The Crafty Quilter - Quilting tips and inspiration
  • Instagram
  • Pinterest
  • RSS
  • BlogLovin
  • Twitter
  • Flickr
  • Email
Menu
Skip to content
  • Home
  • About Me
  • Versatile Face Mask Pattern
  • Tutorials
    • Holiday / Seasonal
    • Quilts
    • Home Accessories & Decor
  • Tips & Techniques
  • My Patterns
  • Disappearing 9-patch QAL
  • Summer Fun Quilt Along
  • Christmas Once a Month
  • Recipes
  • Privacy Policy

Working out the bugs…

2 / 8 / 12

Since I’m so new at blogging, I’m still trying to work out the bugs. If you have subscribed to my blog via email or an RSS feed like Google Reader, my recent posts aren’t formatting like they should be.  I’m still trying to figure out why, but in the meantime, if you go straight to my website, www.thecraftyquilter.com, you will get the correct formatting. Thanks for your patience!


1 Comment
Share
  • Pin it
  • Share
  • Tweet
  • Share
  • Email
  • Print

Quarter-Square Triangle Tutorial

2 / 8 / 128 / 23 / 18

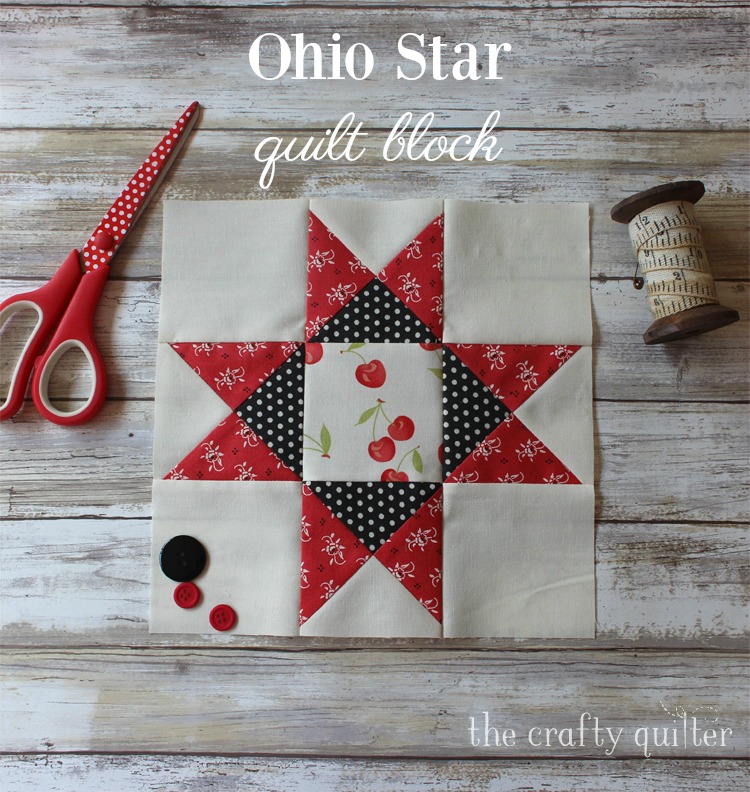
Welcome to my updated and expanded tutorial on how to make perfect quarter square triangle units.  Since I first published it in 2012, this has been my most popular tutorial ever – thank you Pinterest!  Now it’s 2018 and I thought it was time to give it a fresh look with better images and more detailed instructions.  Plus, I’ve included a cutting chart that you can download and print out.  Towards the end, you’ll find instructions on how to make the popular Ohio Star block which includes four quarter square triangle units.  Enjoy!

Quarter square triangle tutorial @ The Crafty Quilter.  Learn how to make perfect QST units every time and it includes an oversized cutting chart that you can download!

Original quarter square triangle photo used for the Ohio Star:

Quarter Square Triangle Math

You start with four squares to make four quarter-square triangle (QST) units.  First, let’s talk numbers (I know, it’s an evil necessity). In order to know the size of the squares to start with, you need to know the finished size of the unit, which is 3″ in this case (that’s because I want a 9″ finished size block).  Add 1 1/4″ to that number and you have the size needed to cut your squares.   So, 3″ + 1 1/4″  will give us 4 1/4″ squares.

Now, if I were a perfect quilter, I would use that number. However, things often get a little wonky on me, so I like to oversize my QST’s so that I can trim them down into the perfect size. So, I add 1 1/2″ to the finished size desired. For this unit, I will need (4) 4 1/2″ squares to start with.

Download my over-sized cutting chart for 11 different sized quarter square triangle units here:  Quarter Square Triangle Cutting Chart

Quarter Square Triangle Construction

First, draw a diagonal line on the two like-colored squares from corner to corner.  Use a pencil or Frixion Pen (my favorite) and a ruler to draw your line.  You’ll be stitching 1/4″ on each side of the line.  If you don’t have a 1/4″ foot, you might want to draw the actual stitching lines.  A special ruler called the Quilter’s Rule Quick Quarter II makes this step easy.  Some people find it easier (and more precise) to stitch on a drawn line instead of 1/4″ away from a line. The following picture shows both ways:

Quarter square triangle tutorial @ The Crafty Quilter.  Learn how to make perfect QST units every time and it includes an oversized cutting chart that you can download!


With right sides together, layer each red square with another square and stitch 1/4″ on either side of the center drawn line (or exactly on the drawn lines if you chose that method). Cut apart between stitching lines and press towards the red square. You should now have four half-square triangles (HST’s).

Quarter square triangle tutorial @ The Crafty Quilter.  Learn how to make perfect QST units every time and it includes an oversized cutting chart that you can download!


Next, layer two of the HST’s together so that the center seams nest together and the red colors are opposite each other.

Quarter square triangle tutorial @ The Crafty Quilter.  Learn how to make perfect QST units every time and it includes an oversized cutting chart that you can download!


Again, you’re going to draw a diagonal line and stitch as you did in the previous step.

UPDATED TIP:  It’s important to draw the line so that it’s perpendicular to the seam.  Instead of only lining up the ruler with the corners, make sure to also place a line of your ruler on the seam when you mark your line.  If the corners don’t line up exactly, that’s o.k.

Quarter square triangle tutorial @ The Crafty Quilter.  Learn how to make perfect QST units every time and it includes an oversized cutting chart that you can download!


I think it’s important to pin the seams that are nesting and to stitch with the top seam allowance facing up (towards the machine needle):

Quarter square triangle tutorial @ The Crafty Quilter.  Learn how to make perfect QST units every time and it includes an oversized cutting chart that you can download!

TIP:  Why does it matter if the top seam allowance is facing the needle?  Because if I were to start stitching at the top and the seam allowance was facing away from my needle, chances are the presser foot would push the top seam allowance down and away from the bottom seam.  But because I have my seam allowance on top facing the needle, the presser foot still pushes the top seam allowance, but it pushes into the bottom seam allowance creating a more snug intersection. That’s a lot of information, but if you’re new to quilting it’s nice to know these little tricks.

Now you’re going to cut these apart between your stitching lines and, voila, you have your QST’s!

Quarter square triangle tutorial @ The Crafty Quilter.  Learn how to make perfect QST units every time and it includes an oversized cutting chart that you can download!


Now remember we still need to trim these units down to 3 1/2″ square. There are several ways of doing that.  For the first two methods, you will need to press your seam before trimming.  You can press to one side or twirl your seam allowances.  I like to “twirl” my seam allowance because it makes the unit flatter and my ruler doesn’t rock when I’m cutting.

To do this, you’ll press half of the seam allowance up and the other half down. The center (where the 4 seams intersect) should pop open in the seam allowance, creating a mini 4-patch in the center of the wrong side.

Quarter square triangle tutorial @ The Crafty Quilter.  Learn how to make perfect QST units every time and it includes an oversized cutting chart that you can download!

Trim method 1

You will need a square ruler that is 3 1/2″ or larger.  Place it so that the diagonal line of the ruler is along one of the diagonal seams of your QST.  You need to make sure that you’re trimming the same amount equally from all four sides so that your center seam stays in the center.  So, put the 1 3/4″ intersection of the ruler (that’s half of 3 1/2″) at the center seam and trim along the top and right hand side (if you’re right handed).

Quarter square triangle tutorial @ The Crafty Quilter.  Learn how to make perfect QST units every time and it includes an oversized cutting chart that you can download!


Now rotate the QST and line up the 3 1/2″ lines of the ruler with the previously cut edges.  Trim the remaining two sides.  You should now have a perfect 3 1/2″ QST.

Quarter square triangle tutorial @ The Crafty Quilter.  Learn how to make perfect QST units every time and it includes an oversized cutting chart that you can download!

Updated: Trim method 2

For the second method of trimming, I love the Tucker Trimmer 1 by Studio 180 Design.  This ruler does a fantastic job of trimming down pieced squares accurately and easily.  It can be used on HST’s and QST’s.  There are two diagonal markings to line up with the seams on the QST which takes the guess work out of the ruler placement.

Quarter square triangle tutorial @ The Crafty Quilter.  Learn how to make perfect QST units every time and it includes an oversized cutting chart that you can download!

Trim method 3

This method uses a ruler that I’ve had for a long time – Quilt In A Day’s Triangle Square-up Ruler.  The advantage of this ruler is you trim two sides at the same time, and it has two diagonal markings for easy placement.

Before pressing your seam, you will place the ruler so that the 3 1/2″ red dashed line is along the bottom stitching line and the perpendicular line is placed along the center seam. Now you just have to trim the two sides and then press!

Quarter square triangle tutorial @ The Crafty Quilter.  Learn how to make perfect QST units every time and it includes an oversized cutting chart that you can download!


Ohio Star Quilt Block

Quarter square triangle tutorial @ The Crafty Quilter.  Learn how to make perfect QST units every time and it includes an oversized cutting chart that you can download!  Plus instructions to make this beautiful Ohio Star Block


If you want to make a 9″ (finished size) Ohio Star Block, you will need (4) 3 1/2″ squares and (1) 4 1/2″ square of background fabric, (1) 3 1/2″ center square, (2) 4 1/2″ squares of medium fabric, and (1) 4 1/2″ square of dark fabric.  (You can also interchange the medium and dark fabrics.)  I’m using fabric from the Farmhouse collection by Fig Tree for Moda.

Quarter square triangle tutorial @ The Crafty Quilter.  Learn how to make perfect QST units every time and it includes an oversized cutting chart that you can download!  Plus instructions to make this beautiful Ohio Star Block

First, make the 4 quarter-square triangle units using the instructions above. Then arrange your squares as shown below and sew them into rows.  Press seams toward the plain squares.

Quarter square triangle tutorial @ The Crafty Quilter.  Learn how to make perfect QST units every time and it includes an oversized cutting chart that you can download!  Plus instructions to make this beautiful Ohio Star Block


Now join the rows together.  When pinning the rows together, make sure to use a setting pin at the intersections so that your diagonal seams will match and there will be a visual straight line as shown below.

Quarter square triangle tutorial @ The Crafty Quilter.  Learn how to make perfect QST units every time and it includes an oversized cutting chart that you can download!  Plus instructions to make this beautiful Ohio Star Block


Here’s how a setting pin works:  Nest your seams together.  Starting on the top seam allowance, there should be an “x” where the stitching lines are.  Place your setting pin straight down through the “x” and then straight down into the bottom seam allowance’s “x”.  Leave that pin straight up and down (perpendicular) to the seam.  You can peak to see if the diagonal seams match up by pinching the intersection with your fingers and opening it up.  Then pin on either side of your setting pin, close to the seam allowance.  Remove the setting pin and sew your seam, making sure your stitching goes through the middle of the “x”.

Quarter square triangle tutorial @ The Crafty Quilter.  Learn how to make perfect QST units every time and it includes an oversized cutting chart that you can download!  Plus instructions to make this beautiful Ohio Star Block

2018 update:  Using washable glue instead of pins has become very popular for matching seams.  I recently purchased Seam Align Glue by Acorn Precision Piecing from The Quilt Show and I used it for this quilt block.  I love it!  It was easy to apply and it didn’t make the fabric stiff.  My seams came out perfectly.  Elmer’s Washable School glue would work also.

Quarter square triangle tutorial @ The Crafty Quilter.  Learn how to make perfect QST units every time and it includes an oversized cutting chart that you can download!  Plus instructions to make this beautiful Ohio Star Block


Your block should measure 9 1/2″ square.

Quarter square triangle tutorial @ The Crafty Quilter.  Learn how to make perfect QST units every time and it includes an oversized cutting chart that you can download!  Plus instructions to make this beautiful Ohio Star Block
Ohio Star Block

I love making quarter square triangles and they’re so versatile!  Maybe I’ll make enough Ohio Stars for a table runner (in my spare time!) or I might just quilt it as is and practice my free motion quilting (more likely).  Thanks so much for stopping by!

34 Comments
Share
  • Pin it
  • Share
  • Tweet
  • Share
  • Email
  • Print

“Paris in the Fall” Block-of-the-Month

2 / 5 / 124 / 29 / 13


"Paris In The Fall", by This & That

I am co-teaching a Block-of-the-Month (BOM) program at The Granary with Paula Ivers, the shop owner.  We are using the pattern “Paris in the Fall”, by This & That. It’s a wonderful way to hone your piecing skills a little at a time and make a beautiful quilt in the process!  Here’s another version of Block 1:

Isn’t it pretty?  I’m using fabric from Moda’s  “Rouenneries Deux” by French General. I love the reds, creams and taupes in this line and I have to admit that I have enough of it to make at least four quilt tops!

I’ll be back in a few days to share some tips for making the quarter-square triangles that are used in this block.


12 Comments
Share
  • Pin it
  • Share
  • Tweet
  • Share
  • Email
  • Print

Heart Sachet Tutorial

2 / 1 / 121 / 30 / 16

It’s February (where did January go?) and I thought it would be a good time to share a fun tutorial on how to make a heart sachet. I originally got this idea from the Moda Bake Shop. I used Moda layer cakes for mine and made it a little bit smaller than the original version. So let’s get started:

Step 1: You will need 6 layer cakes (10 ” squares) of coordinating fabric.  This will be enough to make 4 heart sachets.  You’ll also need some polyester stuffing and lavender oil.

Take two of the layer cakes and from each cut (1) 2″ wide strip, (1) 8″ square and (1) 2″ x 8″ rectangle as shown below.

Layer Cake cutting step 1

 Step 2:  From the remaining layer cakes, cut (1) 2″ x 10″ strip from each. Subcut the remaining piece (which should now be a 8″ x 10″ rectangle) into (4) 2″ x 8″ rectangles.  Arrange those 2″ x 8″ rectangles (including the ones from previous step) into sets of five as shown and sew together with 1/4″ seam. Press seams to one side.  You should have a total of 4 strip sets that measure 8″ x 8″ square.

(5) 2" x 8" strips

Step 3:  Cut the 8″ square strip sets on the diagonal as shown. Do the same thing with the two 8″ plain squares from step 1.8" strip set cut on diagonal

Step 4: With right sides together, sew a pieced triangle to a plain triangle, leaving a 2″ gap along the center of the long side. Clip corners bluntly and turn right side out.

Step 5:  Stuff the triangle with polyester stuffing.  If you want to make it smell pretty, add a few drops of lavender oil to the stuffing first.  You don’t need the stuffing to reach too far into the two points of the triangle since this will get sewn together eventually to form the top of the heart.Stuffing sachet

Step 6:  Sew the opening closed.  I do this by machine (lazy me). Next, you want to take the two long triangle points and overlap them to form the handle for your heart. Stitch across the overlap to secure – again I did this by machine. It should begin to look like a heart shape by now (hurray!)

Sew opening closedForm heart handle


Step 7:  Make the bow for the heart by taking (2) 2″ x 10″ rectangles and draw a 45 ° diagonal line on each end as show in picture. Sew 1/4″ all the way around, leaving a 2″ opening along one long side.  Trim points bluntly and turn right side out. Press. Stitch opening closed.

Step 8:  Assembly your cute heart sachets!  Tie the bow around the heart handle and adjust until it looks just right.

Don’t you love it?  Hearty goodness that smells nice too!


3 Comments
Share
  • Pin it
  • Share
  • Tweet
  • Share
  • Email
  • Print

Welcome!

1 / 28 / 122 / 1 / 12

Welcome to my blog, The Crafty Quilter!  I hope to bring you easy quilting tips, inspiration and general crafty goodness. I’m really new to this high tech blogosphere, so please be patient as I learn the ropes.

I’m hoping to post twice a week and include tutorials, tips, recipes, and things going on in my life. Most of it will be quilt related, but I love to do so many crafty things like make cards, anything home dec related, garden, cook, make something out of nothing… you know where I’m going.

I hope you enjoy your visit and come back often!

3 Comments
Share
  • Pin it
  • Share
  • Tweet
  • Share
  • Email
  • Print

Posts navigation

Previous Page 1 2 … 157 158 159

About me…

Hi there! Welcome to The Crafty Quilter. I'm Julie Cefalu, and this is where I get to express my creativity to a larger audience. I love to share quilting tips and tutorials along with the latest creative happenings in the blogging world. Thanks for visiting, and I hope you come back soon!

If you would like to subscribe via email, enter your email address below:

Join 8,088 other subscribers

Follow on Bloglovin


myBluprint.com
Everything you need to quilt and sew at Shop.MyBluprint.com

My Classroom on The Quilt Show!

Latest on Instagram

thecraftyquilter

Let me introduce you to the Possibilities Quilt! Let me introduce you to the Possibilities Quilt!  I designed this as a skill building quilt that you can customize with three sizes and setting options. This sample is the largest and most complex. It measures 60” x 76”. 
.
I’m still working on the pattern, but I’ll be teaching this via Zoom through @thegranaryquilts starting January 26 at 7:00 pm PT. There will be five classes; each lasting 45 minutes. There’s still room ➡️ More information can be found on my blog or at The Granary Quilts website. Oh, and there will be kits available. The batiks in this group are sold out but more in a similar  color way will be coming soon.
.
#possibilitiesquilt #quiltalong #thecraftyquilter #quilt #quilting #batikquilts #zoomquiltclass
Can’t turn my back on him for one minute! 😭 I Can’t turn my back on him for one minute! 😭 I’m making progress on a new quilt pattern sample while I sew for a few minutes (or hours) a day for the #sew365project with @intrepidthread 
.
#newquiltpattern #thecraftyquilter #quiltforfun #quiltingfeedsmysoul #quiltingwithdogs #quilting
I’m joining Julie at @intrepidthread for the #se I’m joining Julie at @intrepidthread for the #sew365project and starting off the year with a commitment to spend at least 5 minutes each day sewing!
❤️
You know how it goes: 5 minutes leads to 15 minutes which leads to an hour.  And before you know it, projects are completed (or multiplying 😭)!

You can sign up to receive emails that will encourage and motivate you, plus prizes might be involved!
.
#sew365project #thecraftyquilter #seweveryday #quilteveryday #quiltufo #ufochallenge #lovetosew #lovetoquilt
Now that it’s been gifted, I can show you the do Now that it’s been gifted, I can show you the doll tent I made for my granddaughter, Amelia.  It fits a 14” doll (or various stuffed animals). The pattern is from @wonderful_wellies Etsy shop and it came together perfectly. The instructions are very easy to follow.

Amelia’s sister Clara now wants her own. Time to sew!

#wonderfulwellies #dolltent #dollsewing #stuffedanimaltent #tentfordolls #thecraftyquilter #lovemygranddaughters #lovetosew
I’ve been taking an IG break, but it’s time to I’ve been taking an IG break, but it’s time to get busy!  I’ll be co-teaching this lovely block of the month pattern by @boundtobequilting via zoom through @thegranaryquilts starting January 8. Because of the online platform, we can have a larger class size and you can live near or far! If you’re interested in joining us, you can check out all of the details at The Granary Quilt Shop @thegranaryquilts 😍.
.
I’m using this gorgeous collection of #kismetfabric by @sharonhollanddesigns for @artgalleryfabrics ❤️ for my version of the quilt. It has the perfect southwest vibe!
.
Also, Happy New Year everyone!
.
#blockofthemonth #quilting #bomquilt #thecraftyquilter #redatnight2bom #newyearnewquilt
Making spirits bright with these last minute coast Making spirits bright with these last minute coasters!  I used black cork fabric for the appliqué and it was super easy! ♥️
.
I have the full tutorial on my blog today (link in profile). This is a great way to use up scraps. If you don’t have cork fabric you could use Kraftex or pleather instead.
.
#corkfabricproject #corkfabric #corkmat #coastertutorial #fabriccoasters #christmassewing #giftstosew #christmasquilting #sewcute
Load More... Follow on Instagram


I’ve Been Featured!

Sew Can She

Archives

Categories

Tags

Amelia applique baby quilt blog hop blog hops BOM bom's christmas Christmas in July Blog Hop christmas once a month Craftsy fabric family fat quarter shop flowers free motion quilting free patterns garden giveaway giveaway winner holiday tutorials I Love Home BOM national quilting day quilt alongs quilt blocks quilting quilting tips quilts recipes sew thankful sunday splendid sampler spring spring petals qal summer fun qal table runner Table Topper The Quilt Show tips tutorial Tutorials UFO's Valentine's Day WIP wip's WIP Wednesday

Blogs I Follow:

  • A Quilting Life
  • Amy Made That!
  • Blossom Heart Quilts
  • Celebrate Creativity
  • Free Motion by the River
  • http://summercrafter.com/
  • Meadow Mist Designs
  • Moda Bakeshop
  • Quilt Story
  • Sew Fresh Quilts
  • The Inbox Jaunt
  • The Patchsmith


Disclaimer:

Some of the links on this site are affiliate links and I may be compensated a small commission when you make a purchase by clicking on those links. I only promote products and services that I use and love myself. Your support enables me to maintain the content of this blog and I am truly grateful!

Privacy Policy

Privacy Policy
Site made with ♥ by Angie Makes
Angie Makes Feminine WordPress Themes