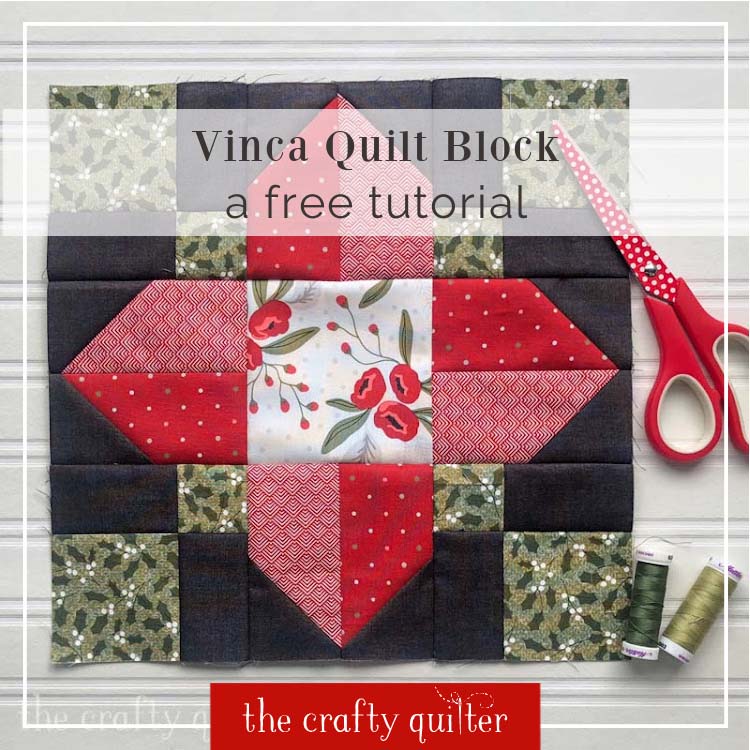
Free tutorial for the Vinca Quilt Block
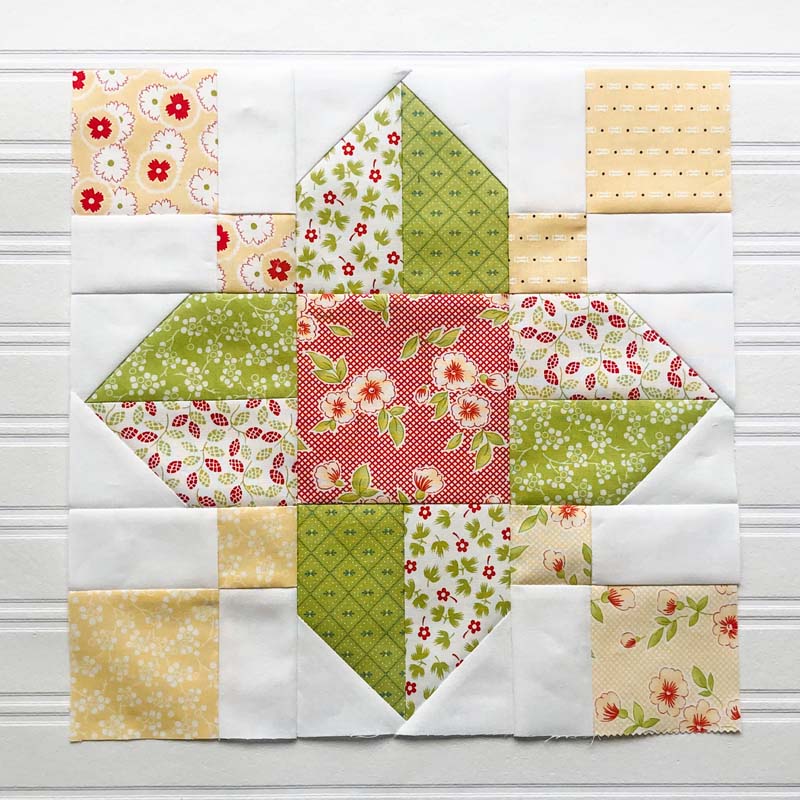
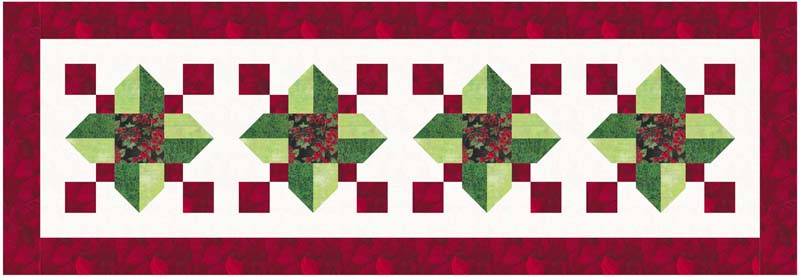
What started off as a Christmas tutorial has morphed into something more general (and has more possibilities). I’m so happy to share a free tutorial for the Vinca Quilt Block! This 12″ quilt block is easy, beautiful and can be made with precuts. The shape reminds me of Vinca flowers, hence the name. The fabric you choose can make it perfect for any holiday. You’ll see my version is Christmas themed, but I’ve also made a neutral, scrappy version that can be used any time of year.
2024 UPDATE: There is a full pattern available for purchase that includes four quilt sizes. You can find the Vinca Blossom Quilt Pattern in my Etsy Shop here.
2025 UPDATE: I’ve made a free pdf (for the quilt block only) that you can download and print. You’ll find it towards the end of this blog post, here.
Vinca Quilt Block Tutorial
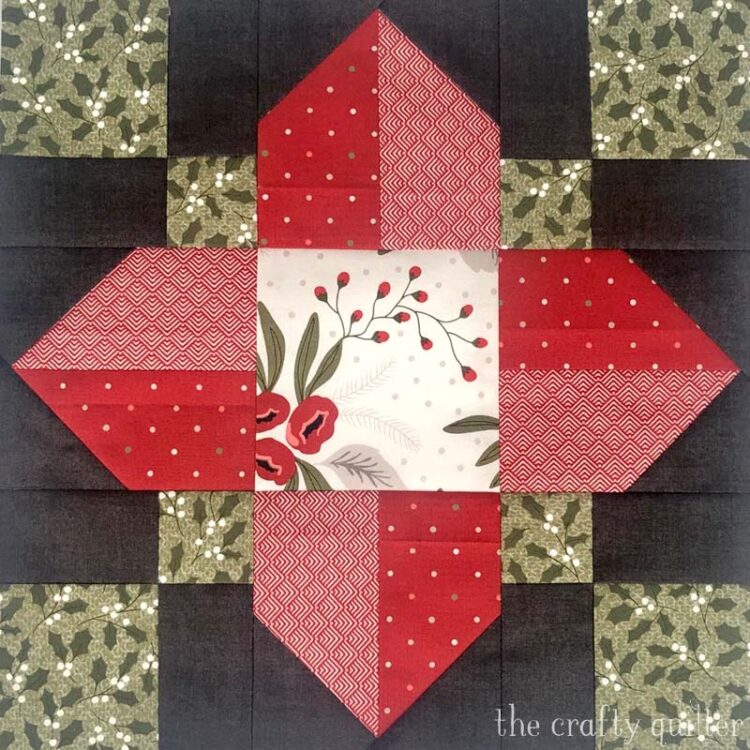
The Vinca Quilt Block measures 12 1/2″ (unfinished). To make this block come together really quickly, I strip-pieced sections and then made the appropriate sub-cuts into units. This is such an efficient way to go and produces more accurate units. I’ve also made it with individual squares and rectangles cut from charm squares (5″ precuts). I’ll give you instructions for both!
- All seams are 1/4″ wide.
- RST = right sides together
- WOF = width of fabric (presumed to be 40″)
Strip Pieced Instructions
Fabric needed for one block – strip pieced
- Background fabric – 1/8 yard
- Green – 1/8 yard or large scrap (6″ x 14″)
- Red – 1/8 yard or large scrap (3″ x 20″)
- Light Red – 1/8 yard or large scrap (3″ x 20″)
- Center print – 4.5″ square

Cutting Instructions
Background Fabric
Cut (1) 3″ x WOF strip, subcut into
- (1) 2″ x 13″ rectangle – A
- (1) 3″ x 9″ rectangle – B
- (8) 2 1/2″ squares – C
Green Fabric
- (1) 2″ x 9″ strip – E
- (1) 3″ x 13″ strip – F
Red Fabric
- (1) 2 1/2″ x 20″ strip – G
Light Red Fabric
- (1) 2 1/2″ x 20″ strip – H
print fabric
- (1) 4 1/2″ square – I
Assembly Instructions
Step 1. Make Corner Units
- With RST, sew a 2″ background (A) strip to a 3″ green (F) strip. Press to the dark side.
- Cut A/F strip-set into (4) 3″ segments.
- With RST, sew a 3″ background (B) strip to a 2″ green (E) strip. Press to the dark side.
- Cut B/E strip-set into (4) 2″ segments.
- Place the 2″ and 3″ segments RST, nest the seams, pin and stitch.
- Press seam to either side or spin the seam.
- Make 4. Corner unit should measure 4 1/2″ square.


Step 2. Make Petal Units
- With RST, sew a 2 1/2″ red (G) strip to a 2 1/2″ light red (H) strip.
- Press seam open.
- Cut G/H strip-set into (4) 4 1/2″ segments.
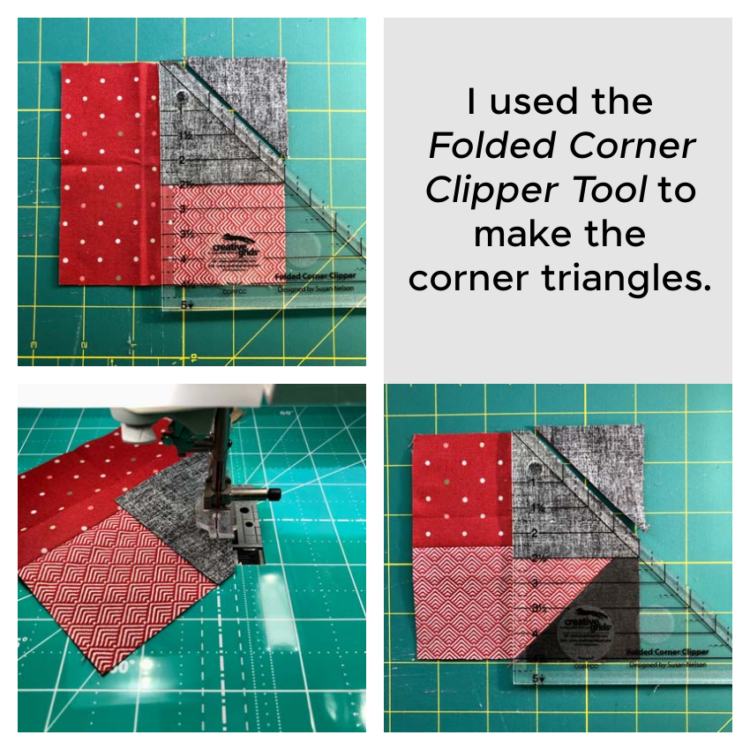
- Draw a diagonal line on the wrong side of each 2 1/2″ background (C) square.
- Place a marked 2 1/2″ (C) square RST onto the light red corner of the 4 1/2″ G/H segment and stitch on the diagonal line.
- Trim seam allowance and press out to the corner.
- Repeat on the adjacent dark red corner.
- Make 4. Petal unit should measure 4 1/2″ square


Step 3. Assemble block
- Arrange 4 1/2″ print (I) square, Corner Units and Petal Units as shown.
- Sew together into rows and press seams, alternating directions of each row.
- Sew rows together, matching seams.
- Press seam in either direction.

Note: As an alternate method for drawing diagonal lines on the (C) squares for the corner triangles, see my blog post on stitch and flip method using specialty rulers. I used the Folded Corner Clipper Tool for this block and it worked great!
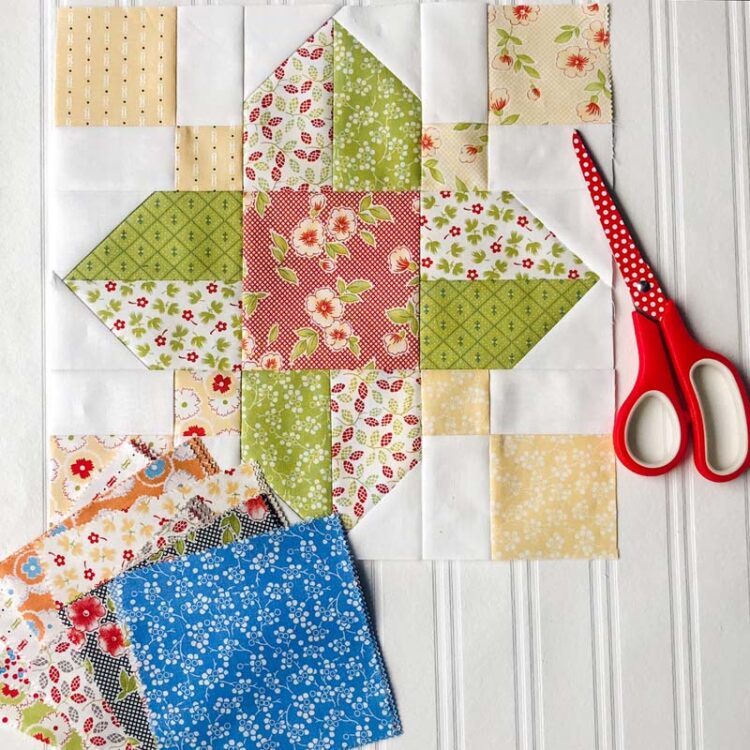
Scrap Fabric Instructions
Fabric needed for one block
Use fabric scraps that are large enough to yield the correct amounts shown in the cutting instructions below, or 5″ charm squares (you will need 9 squares plus background fabric).
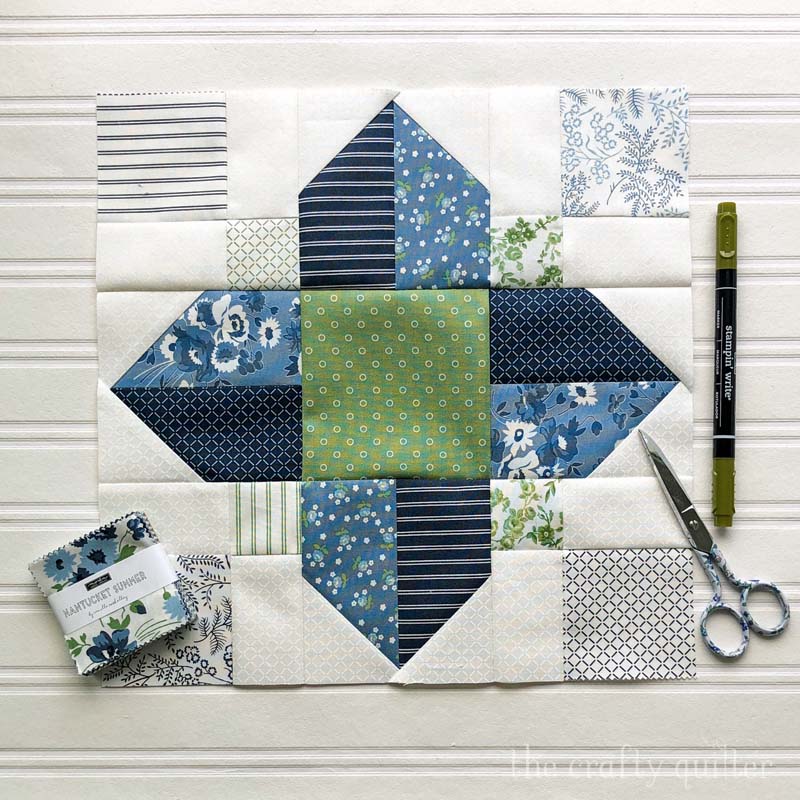
A note on using 5″ charm squares: Choose four squares that are in the same color family for the Green Fabric, two squares in the same color family for the Red Fabric and two squares for the Light Red Fabric. One square will be for the block center. In the example below I’ve used a yellow color family in place of the green (for the corner units) and a print/green color family in place of the red/light red (for the petals).
Scrap Cutting Instructions
Background Fabric
- (8) 2″ x 3″ rectangles – A/B
- (8) 2 1/2″ squares – C
Green Fabric
- (4) 2″ squares – E
- (4) 3″ squares – F
Red Fabric
- (4) 2 1/2″ x 4 1/2″ rectangles – G
Light Red Fabric
- 41) 2 1/2″ x 4 1/2″ rectangles – H
print fabric
- (1) 4 1/2″ square – I
Diagram for cutting 5″ charm squares


Assembly Instructions Using Scraps
Step 1. Make Corner Units.
- These instructions are similar to the strip-pieced version. Layout your pieces as shown below and sew them together into rows and then sew the rows together.

Step 2. Make Petal Units
- With RST, sew together the Red 2 1/2″ x 4 1/2″ (G) rectangle and the Light Red 2 1/2″ x 4 1/2″ (H) rectangle.
- Continue with the Step 2 instructions for the strip-pieced version.


Step 3. Assemble Block
- Follow the same steps for the strip-pieced version.
Free PDF download
After many requests, I’ve created a free pdf that you can download and print. Enjoy!
More versions
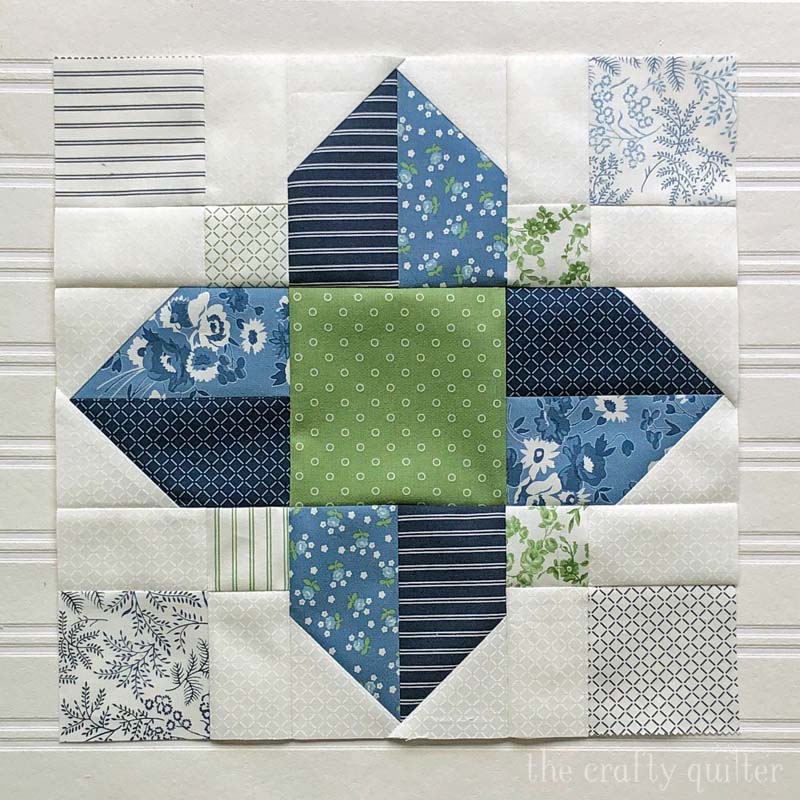
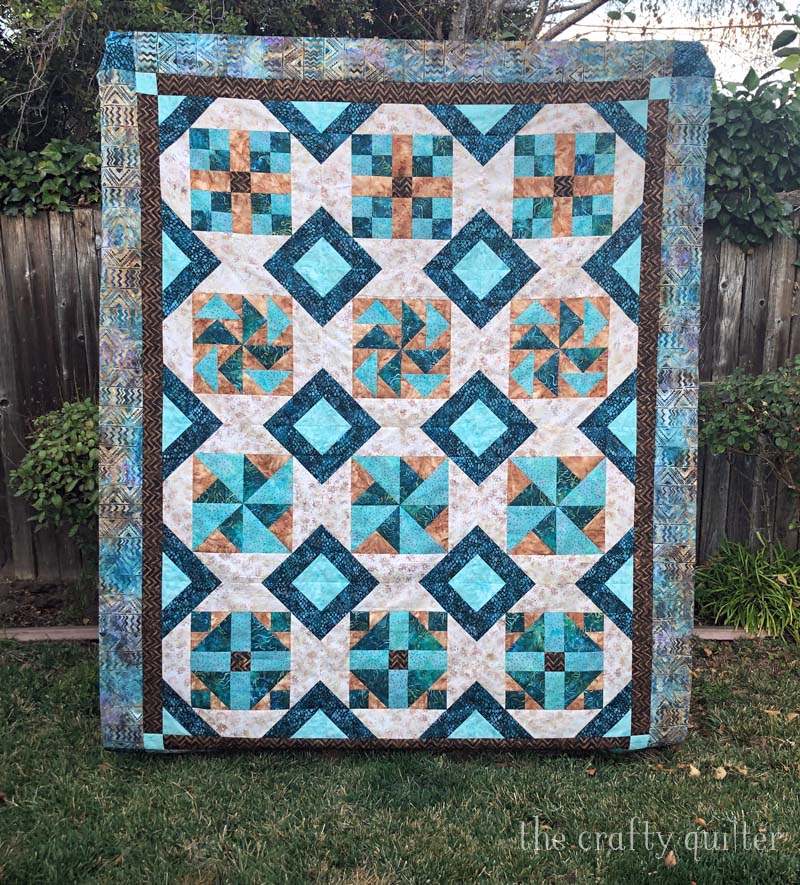
My absolute favorite version of this quilt block was made using a charm pack of Nantucket Summer by Camille Roskelly for Moda Fabrics. One charm pack of 42 squares will make four Vinca Quilt Blocks, so I have three more blocks to go for a possible table runner!
Now that you know how to make one Vinca Quilt Block, you may be wondering what you can do if you make more. I have some ideas for you! You can make a table runner with three or four blocks, a wall hanging with four blocks, a lap quilt with 9 or 12 blocks, and a bed quilt with 25-30 blocks. UPDATE: You can purchase the full pdf pattern with four quilt sizes here.
My Christmas Version
Currently, my Christmas version is going to be a 9-block quilt because I ran out of fabric to make more blocks. I’m using yardage from Christmas Morning by Lella Boutique for Moda Fabrics. This fabric line came out last year, but you can still find yardage online. Below is a photo of four blocks with sashing so you can see what they look like together.
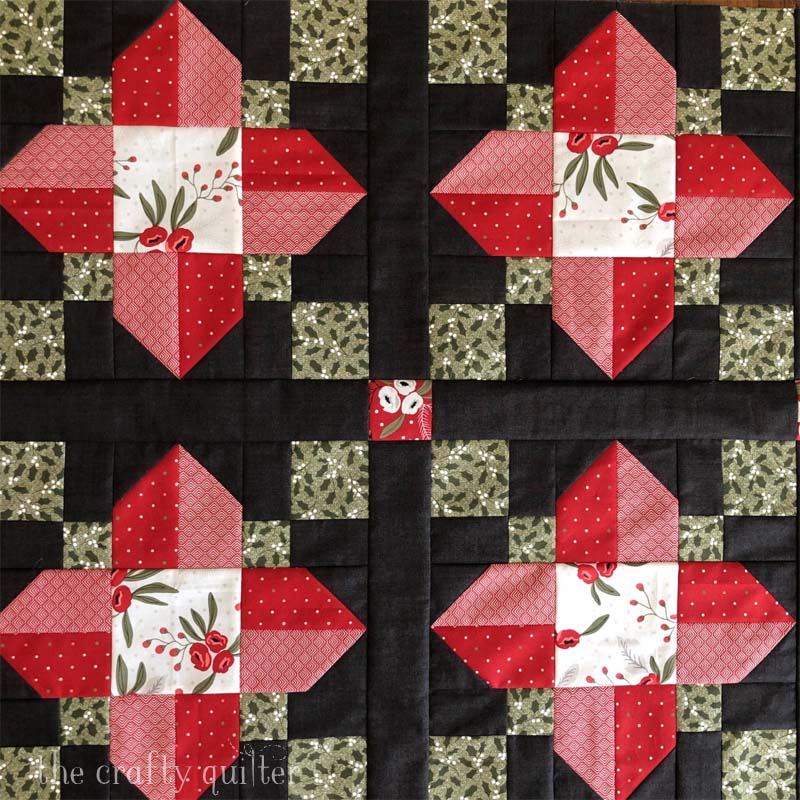
I used 2 1/2″ wide sashing strips with a 2 1/2″ square cornerstone. You can see a secondary pattern (a 9-patch) emerge in the center when a cornerstone is added. I love it!
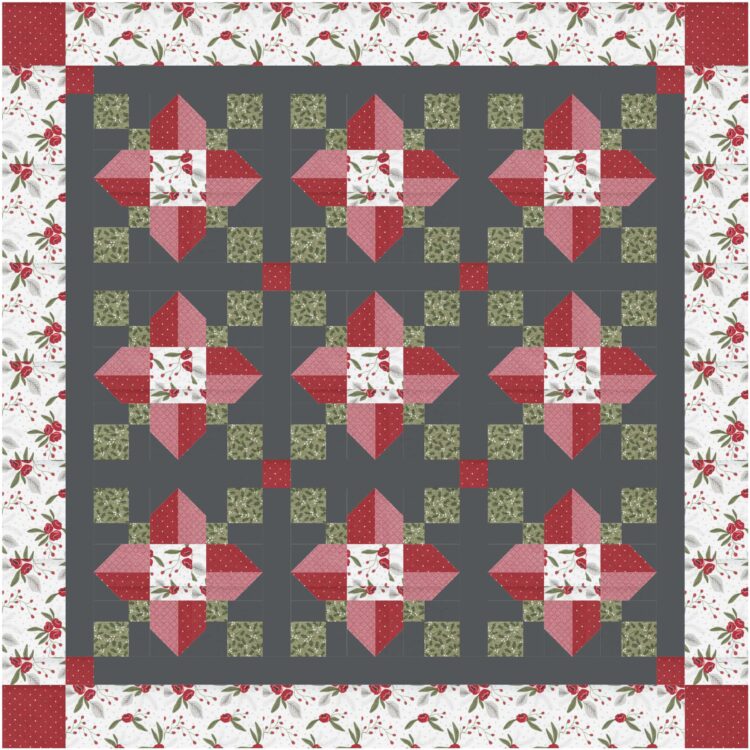
I have a few mock-ups to share of a quilt with sashing and without sashing. It changes the look quite a bit. And you can see what a table runner would look like with sashing (no cornerstones).

I thoroughly enjoyed making these quilt blocks, and I hope you love the Vinca Quilt Block as much as I do! If you make one, let me know how it goes. Happy quilting!

Discover more from The Crafty Quilter
Subscribe to get the latest posts sent to your email.


Could you have a pdf file so I could print this pattern
May I have permission to share this pattern with a group of quilters. We swap quilt blocks and this one would be perfect for our group.
Thank you,
Debra Gaynor
I really appreciate the great instructions! I made a 3 block table runner but am undecided on which pattern to use for quilting. Any suggestions?
Thanks so much!
Jeanne
The Pinterest link doesn’t work!
What a beautiful block! Thanks for tutorial, and the variations, too. You’re so inventive. I love seeing how your mind works. Is there a printable version of this pattern?
Thanks,
Jennifer
Such clever variations … and I love your sense of colour combinations x
Julie, I Just Love this block. I can’t wait to make something out of it. Love the Nantucket blues too. You are so creative.
Chris
Please tell me how you use a tutorial when you do not have a computer in your sewing room? Can I print a pattern? THank you. Sandy
Great tutorial. Thanks for sharing. Do you have a cutting mat under the needle of your machine? How does that work and where do I get one like that?
Hi RoLaur,
The mat that covers my sewing machine “bed” is called a Sew Steady Grid Glider. It’s great because it has a ¼” seam guide plus a 1” grid for measuring and diagonal lines for reference. I also use it when I do free motion quilting, so it’s all purpose!
Love all of your blocks!
Thank you
Wow this is a beautiful block! It is hard for me to pick the pattern I love though your patterns are always my favorite:). Thank you for sharing such a wonderful tutorial. I am excited to try them out!
Love this block and I really love that you give layout ideas! Keep ’em coming! Thanks.
Just gorgeous! I’ll be adding this block/quilt to the top of my bucket list. Thanks for sharing 🙂
Thank you for sharing this beautiful block! Your directions are outstanding!!!!
Thanks so much for the tutorial. It is beautiful.
Love this block! Thank you for posting the clear instructions and tips.
Thank you Julie,
So beautiful. Looks very complicated.
Your explanation hellp me a lot.
Thanks for sharing the beautiful pattern. I can hardly wait to make a block.
Thanks for keeping me inspired with your blog!
Between gardening and sewing, it helps me to deal with grief
Plus your fabric and pattern tastes are identical to mine.
Thanks and continue to enjoy your summer!
We are having a break from the heat this weekend,may get out and weed
While I can
Sorry for your loss.
Julie, this is a wonderful block! It looks a lot harder than it is to make. You have really have very clear and precise directions. Your photos are terrific. Thank you for all the wonderful ideas. This is a gift to all of us quilters.
Thank you, I also love the looks of the block pattern. Thank you for the tutorial.
Hi Julie!
I love them all. Thank you, once again for your inspirational patterns and just showing us how things look in different color patterns, with bindings, just so nice of you.
June
What a sweet block. That Christmas table runner is just perfect. If I didn’t have so many UFOs in progress, I would get right to this one. Thanks for the post.
As ever, such clear instructions … that way, we all benefit. 🙂 Thank-you x
Your Christmas Vinca block is just what I was looking for! Thank you.
I love this! What a stunning look. And those rulers come in very handy:)
What a beautiful block you have created. I love the way you gave directions for using yardage or charm squares. Thank you for showing the different layouts. Your fabric choices are lovely!
C’est un très joli bloc qui permet beaucoup d’interprétations. Merci Julie de nous offrir ce tuto.
This is so pretty! Love the Christmas one. Thank you for sharing the tutorial.
In my opinion, this is one of the most beautiful creations you have ever made. I love the Christmas colors and the blue block. I don’t think the scrappy fabrics do the block justice. Thank you for sharing. I always look forward to your emails!
Thank you for sharing. I really love the Nantucket Summer fabric line. It’s going fast in the quilt shops in my area. But I’m gonna try to find enough charm packs to do a lap size!
Thanks, Julie. Really a cute block and your different renditions.
That’s a great block, I loved seeing it in the different fabrics!
Fun project to do. Easy to follow instructions and technique.
Thank u.
I like this block. Thanks for sharing the tutorial.
Thank you for the tutorial, Julie. I love the block and they way you showed the variations. I really do like the Nantucket Summer fabric as I seem to be partial to blues with green.
Love this block! Thanks Julie and enjoy the rest of the summer.
That’s a good one, Julie! I’m liking the Christmas version!
Thank you!
Jean❤️
Thank you for sharing, Julie! I really like the table runner! 🙂