The Stitch and Flip Quilting Method using specialty rulers
Most quilters have encountered the stitch and flip quilting method for adding corner triangles to pieced units. Did you know there are specialty rulers designed specifically for the stitch and flip method? Of course there are! Join me as I take a deep dive into three different specialty rulers and find out the pros and cons of each.
{This post contains affiliate links. See my affiliate disclosure at the bottom of this blog post.}
What is the stitch and flip method?
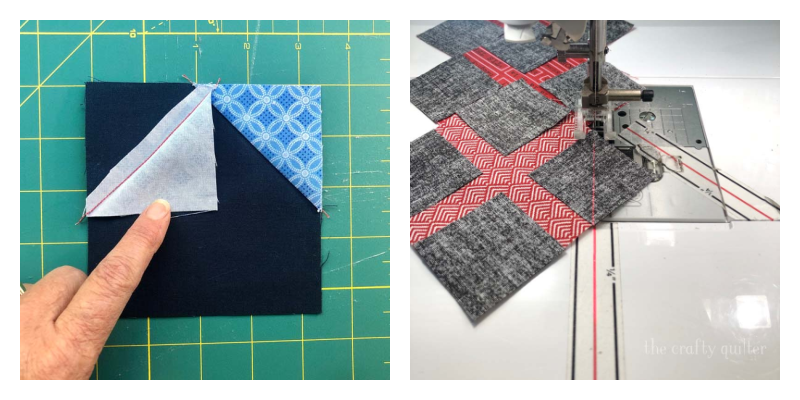
One of the most often-used techniques in quilting is the stitch and flip method. Any time you add a corner square to a larger unit and sew diagonally from corner to corner to create a triangle, you’re using the stitch and flip method. It’s also know as the folder corner technique, snowballing a corner and flip & sew.
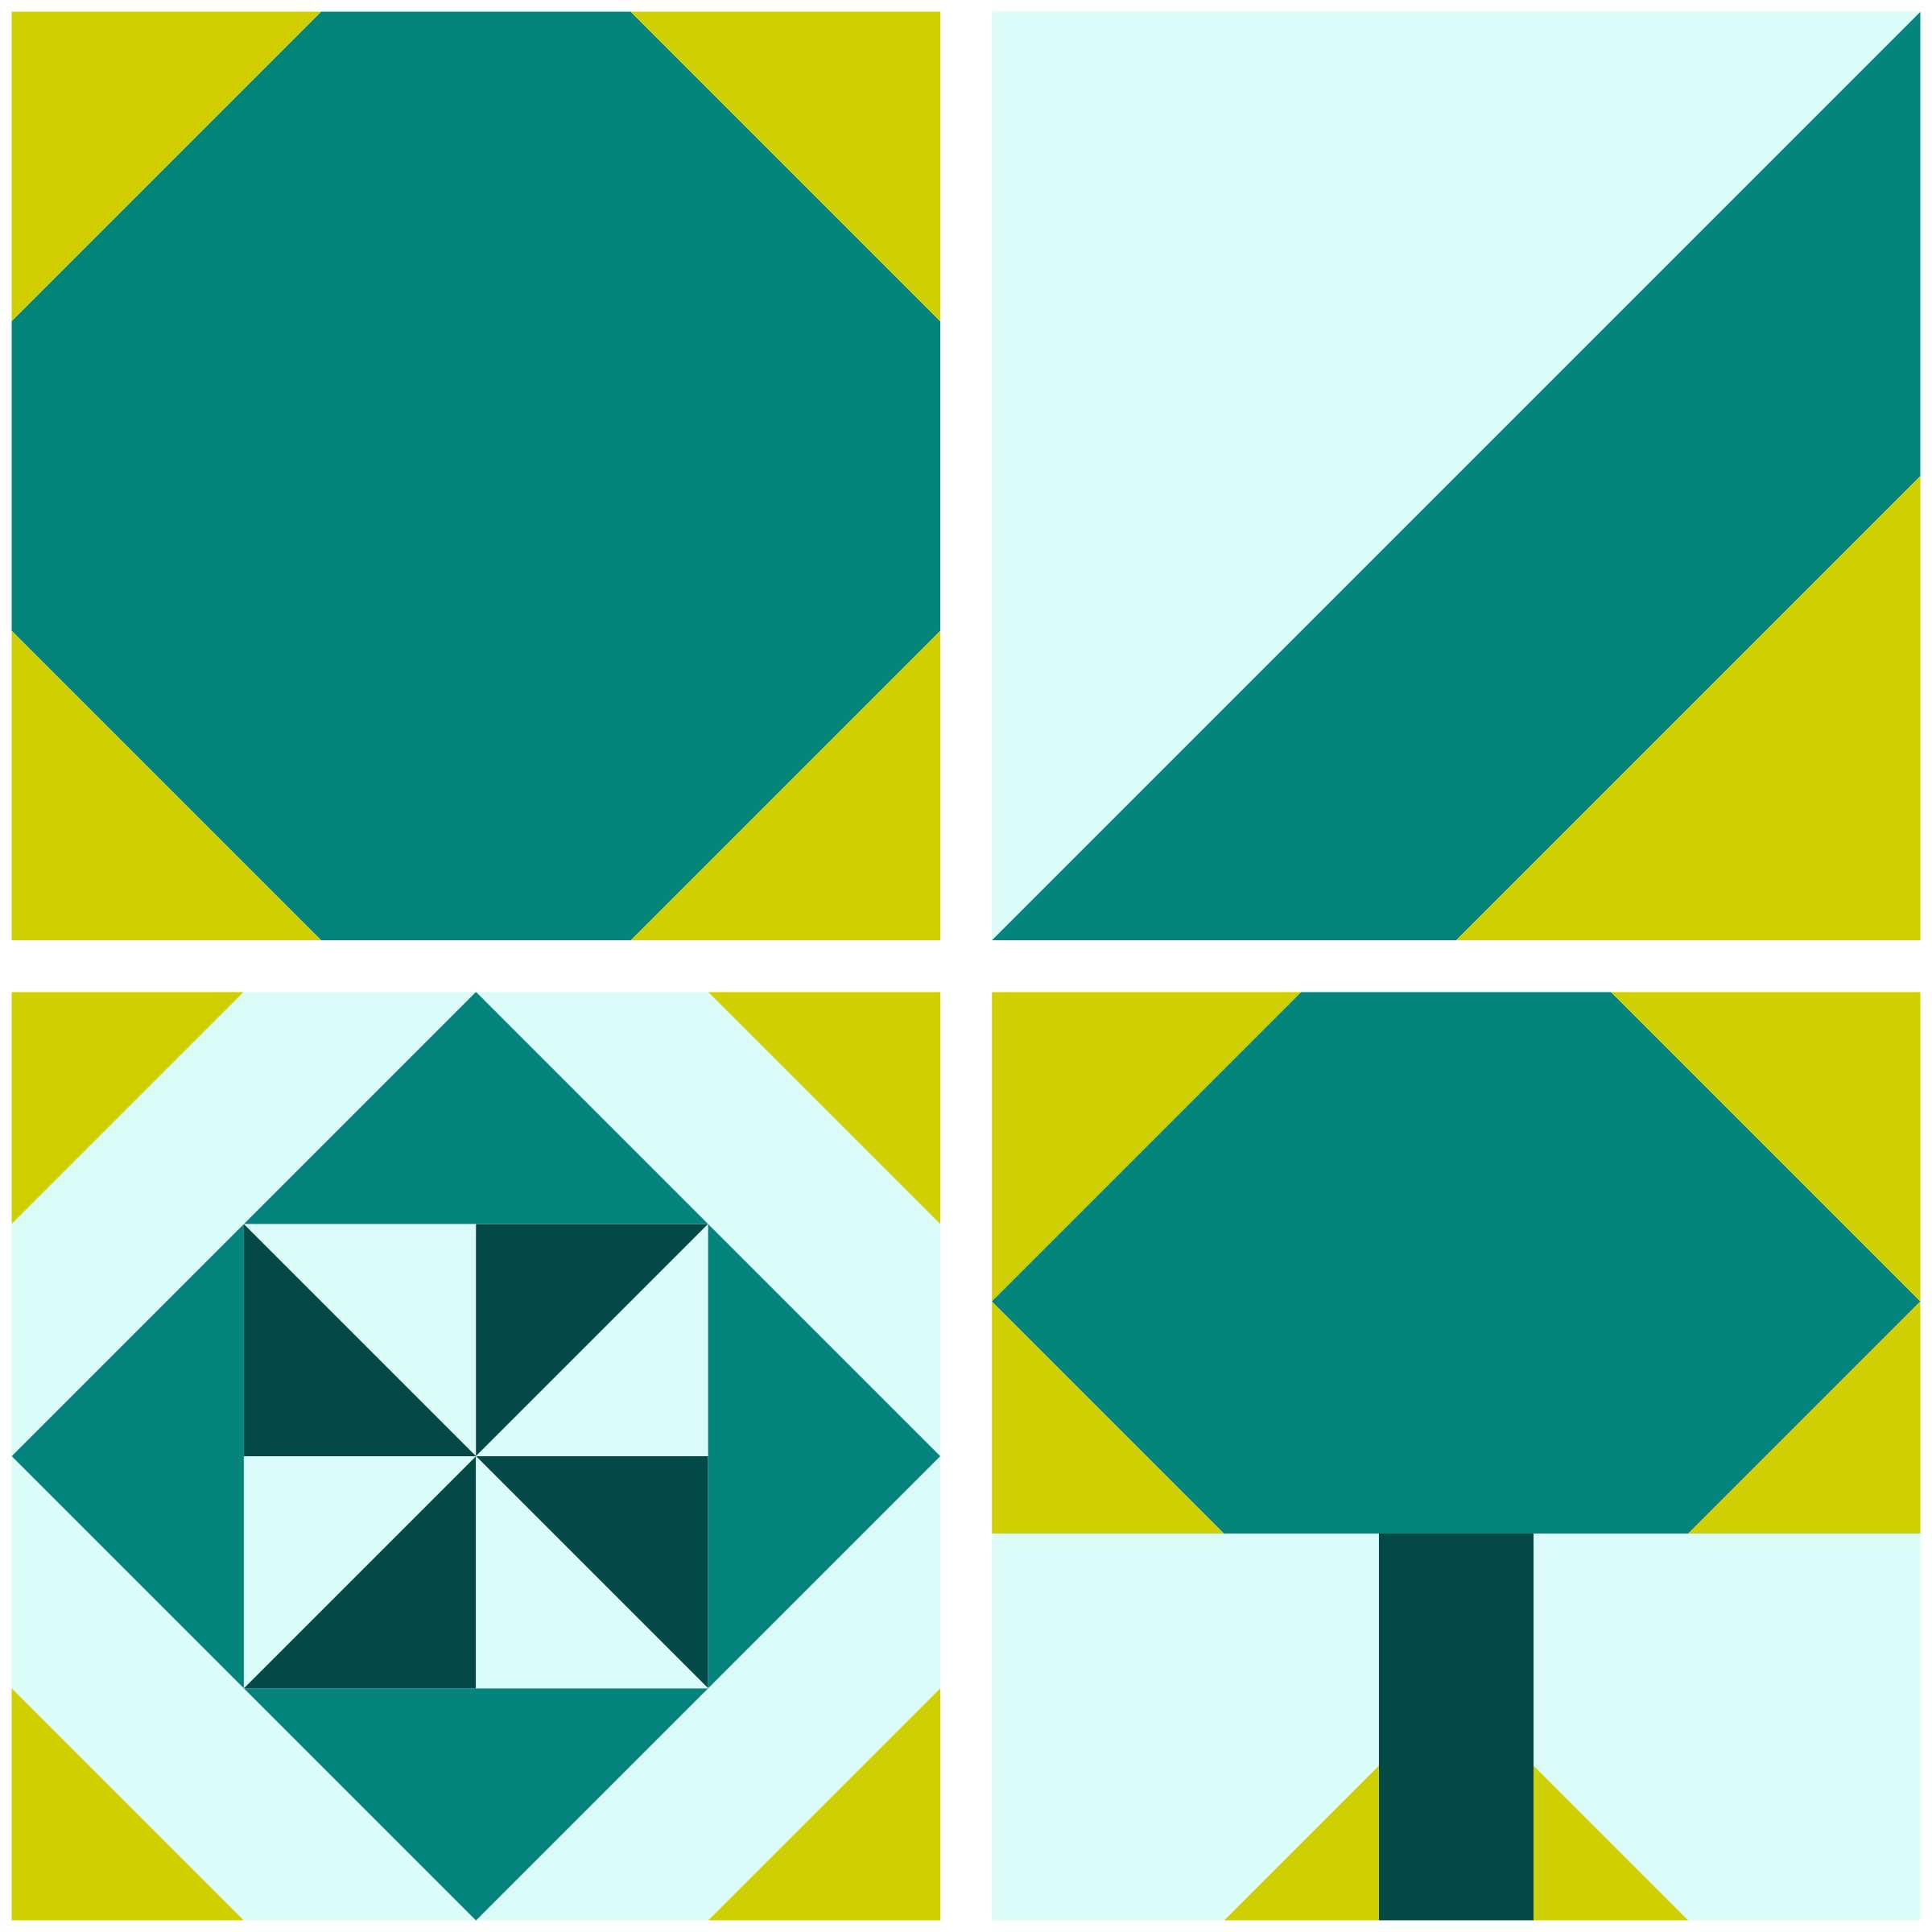
Below are a few examples that use the stitch and flip method. Any lime-green triangle you see below can be made with stitch and flip.
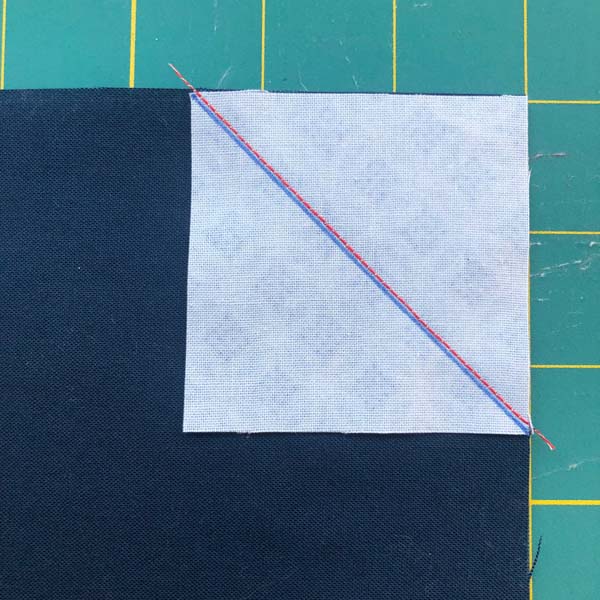
With the traditional stitch and flip method, a diagonal line is drawn on the wrong side of the corner square. It gets placed right sides together with the larger unit and you stitch on the diagonal line, trim the seam allowance, flip the fabric corner out and press. With accuracy and a bit of luck, your pieced unit will turn out just right. However, most of us get corner triangles that are wonky or too big or too small.
This is a simple technique that doesn’t require any special tools or math equations, but there are other things to consider. If you have a lot of corner triangles to make, there are a lot of diagonal lines to draw. Thread weight and fabric type can require adjustments to the stitching line. Usually, I sew two thread-widths to the seam-allowance-side of the marked line to accommodate the fold-over of fabric and thread. This gives me better results most of the time (as long as I’m sewing in a straight line!)
You may have tried other tricks for this stitch and flip method such as not trimming the base unit seam allowance (if the corner triangle doesn’t reach the corner) so the base unit serves as an accurate guide for piecing, and using Diagonal Seam Tape or something similar to avoid marking the diagonal seam lines. The tricks can work well when used carefully.
Stitch and Flip Method using specialty rulers
I’ve heard of quilters who swear by specialty rulers (rulers with a specific task or purpose) for the stitch and flip method. I’ve never given them much attention (the rulers, not the quilters) because they all involve trimming the corner seam allowance first which leaves you stitching on an exposed bias edge. This is something I usually avoid at all costs.
Several weeks ago, I decided to give one such specialty ruler a try. It wasn’t bad; actually, it was quite good! And then I realized that I owned another specialty ruler from a different manufacturer that did the same thing, so I tried it out as well. I decided I might as well take the plunge and investigate a third ruler by one of my favorite companies to see how it compared.
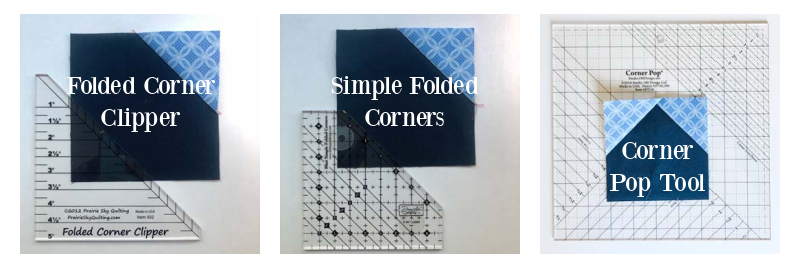
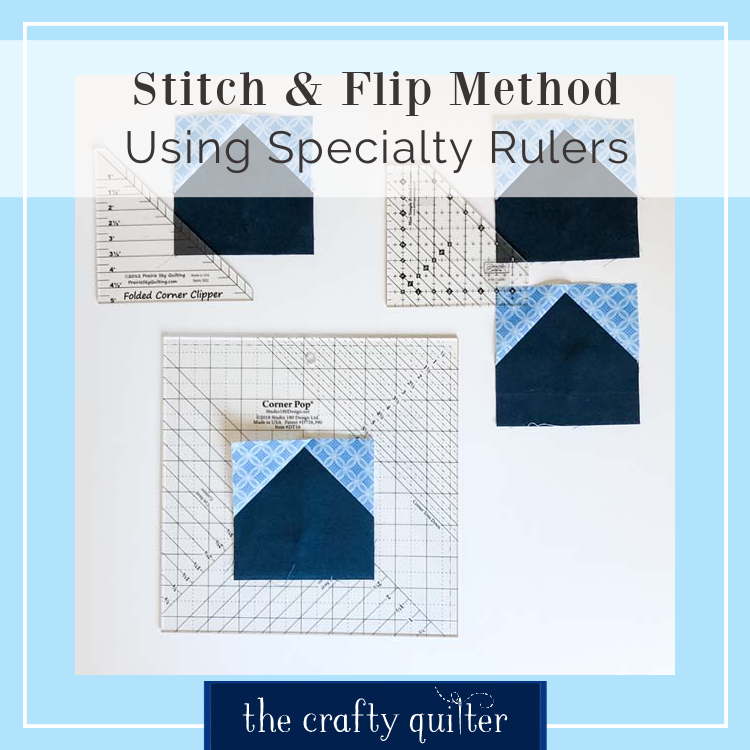
You’ll find my results in the following paragraphs. I tested the Folded Corner Clipper by Creative Grids, the Simple Folded Corners Ruler by Antler Quilt Design, and the Corner Pop Ruler by Studio 180 Designs. I’ll give you my honest feedback along with the pros and cons of each. There are more specialty rulers designed for this technique, but I’m focusing on three only. This is not a sponsored review, just my own curiosity and investigative review.
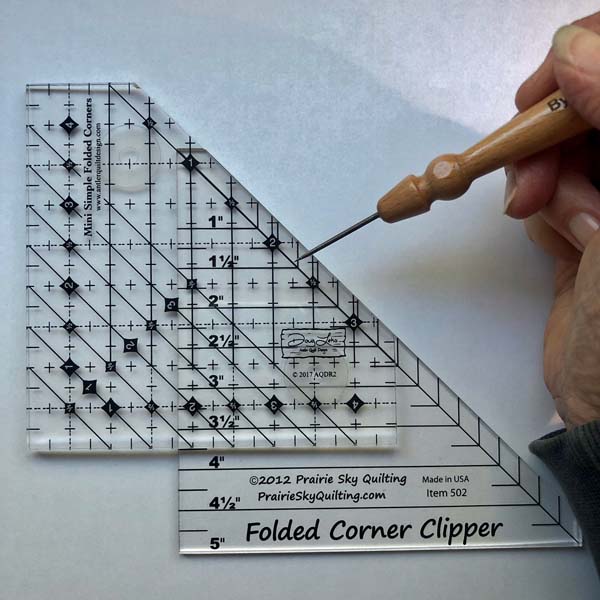
Folded Corner Clipper
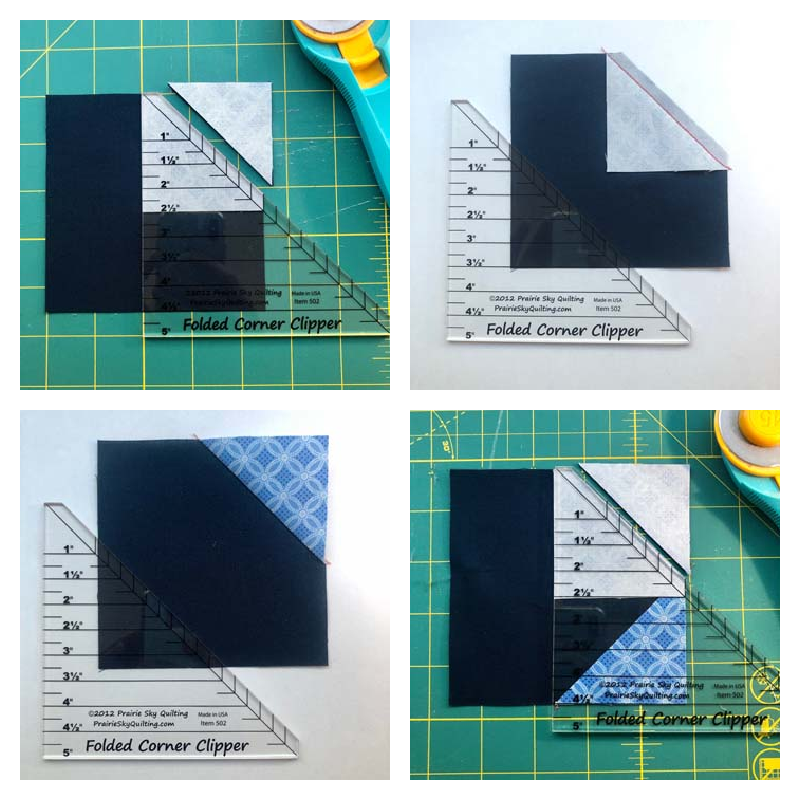
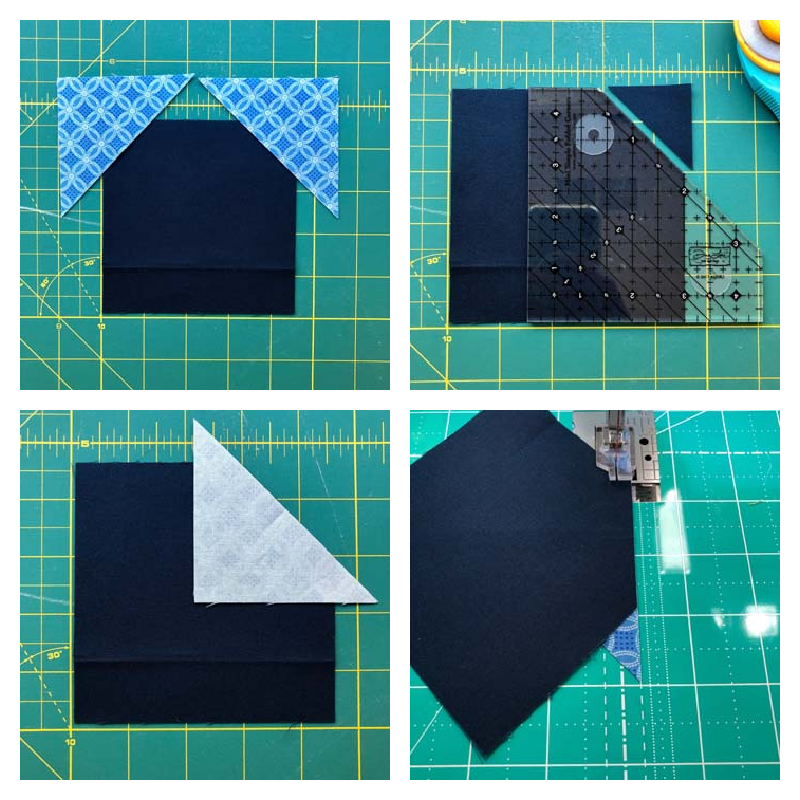
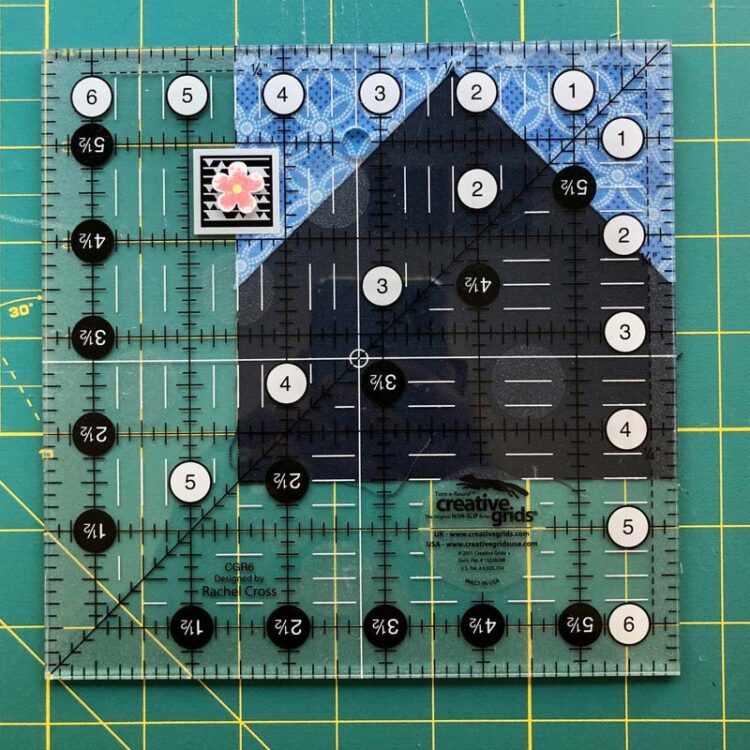
The Folded Corner Clipper by Creative Grids is easy to use and comes in two sizes, regular and extra large. This ruler was originally designed and manufactured by Susan Nelson of Prairie Sky Quilting (this is the ruler I own and you’ll see it in my photos), but it was so popular that Creative Grids now makes it using their exclusive gripper dots so that it’s non-slip.

The premise is that you trim the corner first, leaving you with a raw edge as a seam guide. No drawing lines, no trimming seam allowances and no dog ears to clip!
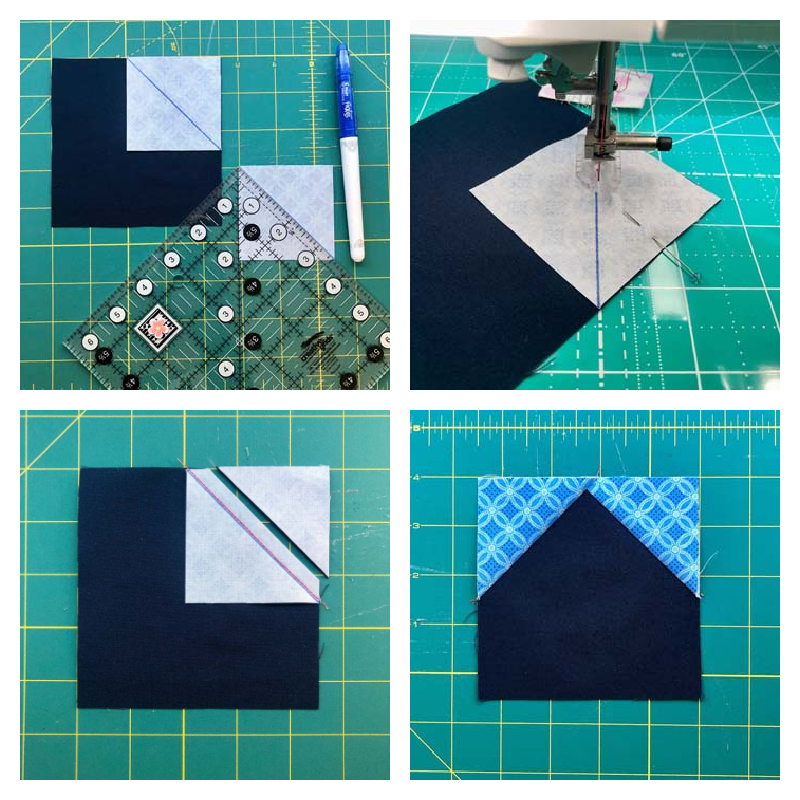
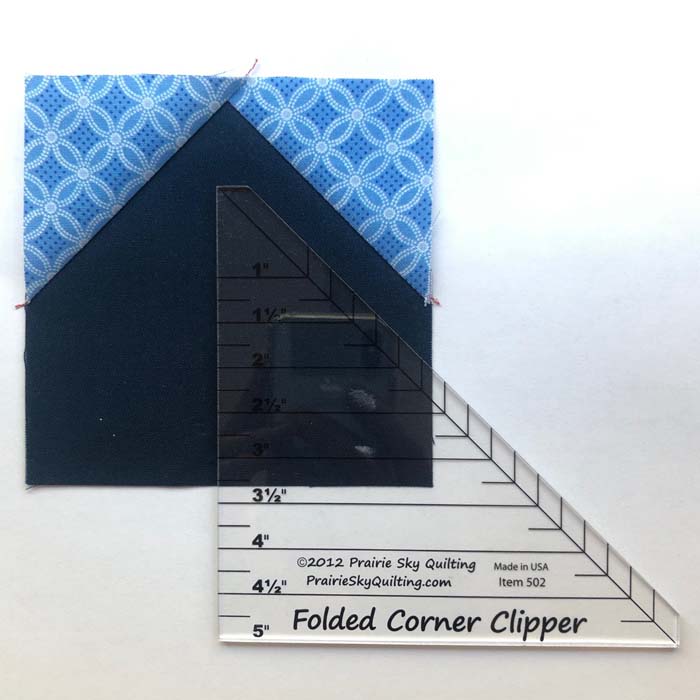
The following example shows a 4 1/2″ base square and a 2 1/2″ corner square. I am right-handed. I’ve also added a corner triangle to the adjacent corner (similar to flying geese).
Basic steps for the Folded Corner Clipper (ruler instructions contain more detail):
- Place the square of corner fabric right sides together with the base fabric, lining up the corner raw edges.
- Place the Folded Corner Clipper on top of the corner square so that the markings on the ruler are aligned with the corner fabric. Trim.
- Stitch with a 1/4″ seam allowance, using the raw edge as a seam guide.
- Fold the corner fabric over and press the seam.
- I repeat those steps for the adjacent corner.
I was happy to see that my unit turned out the right size and not at all wonky! Because I used the same fabric for all of my “testing”, I had to include the ruler in each photo so I could identify which image went with which ruler. That’s the only reason a ruler is always in a photo.
Pros & Cons of the Folder Corner Clipper Ruler
Pros
- It’s simple and easy to use. This is key in my opinion.
- There aren’t too many distracting lines on the ruler (making it simple and easy to use).
- The instructions are good and concise (you don’t need to study anything for hours).
- It saves time (as opposed to drawing lines with the traditional method).
- It can also be used for cutting half-square triangles and for joining binding seams.
Cons
- Your 1/4″ seam needs to be accurate.
- Precision is key with each step (placing the fabric pieces right sides together. placing the ruler just right, and sewing the seam.)
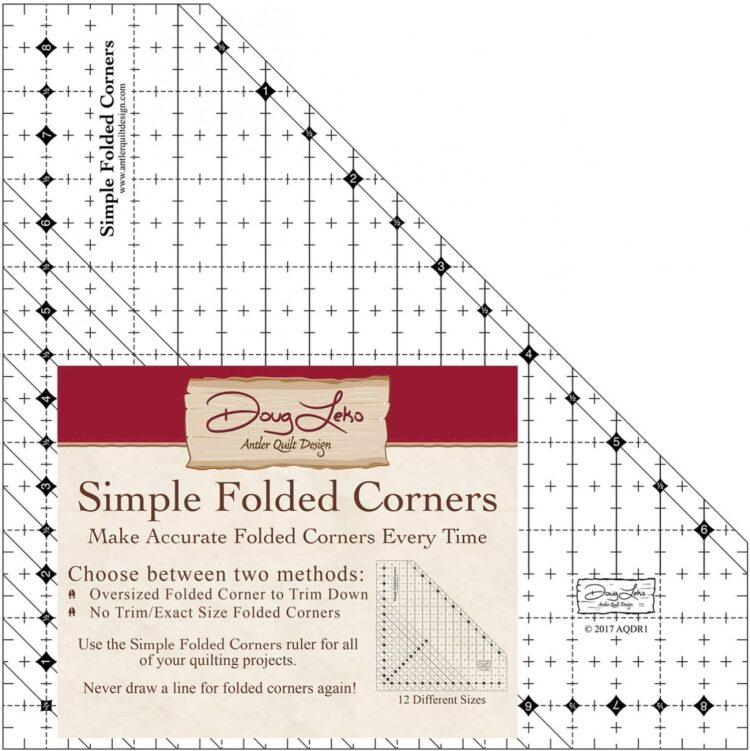
Simple Folded Corners Ruler
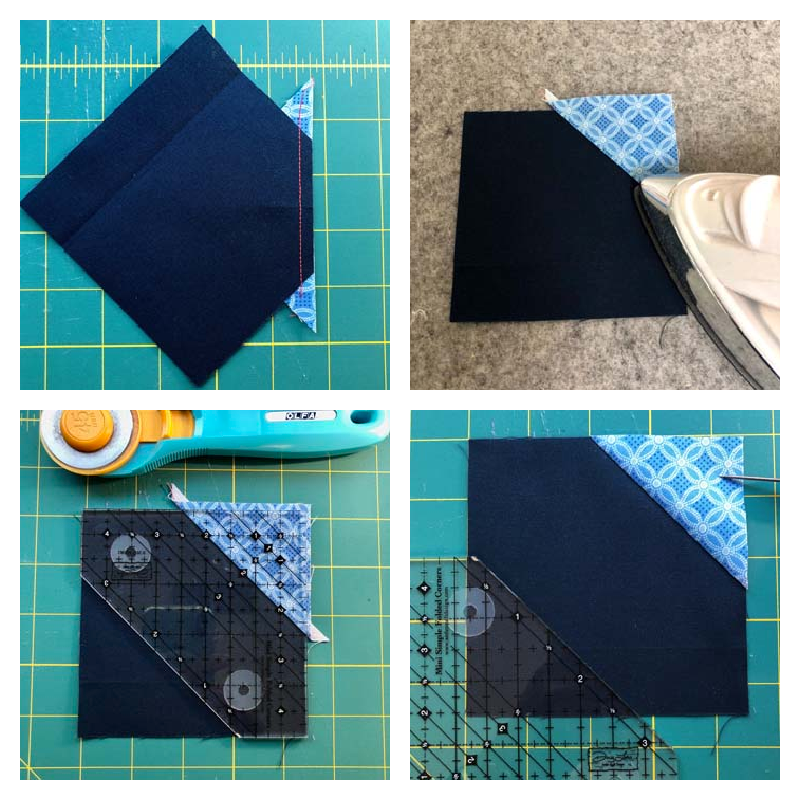
The Simple Folded Corners Ruler by Doug Leko for Antler Quilt Designs works similarly to the Folded Corner Clipper mentioned above, and also comes in two sizes: mini (for base fabrics smaller than 4 1/2″ and up to 3 1/2″ folded corners) and regular (can be used for 1/2″ finished folded corners and up to 6″ folded corners). The big difference with this ruler is it provides two methods: oversized folded corners that you trim down and exact-size folded corners with no trimming.
Exact Method
The following example shows a 4 1/2″ base square and a 2 1/2″ corner square. I am right-handed. I’ve also added a corner triangle to the adjacent corner (similar to flying geese).
Basic steps for exact size method (ruler instructions contain more detail):
- Place the square of corner fabric right sides together with the base fabric, lining up the corner raw edges.
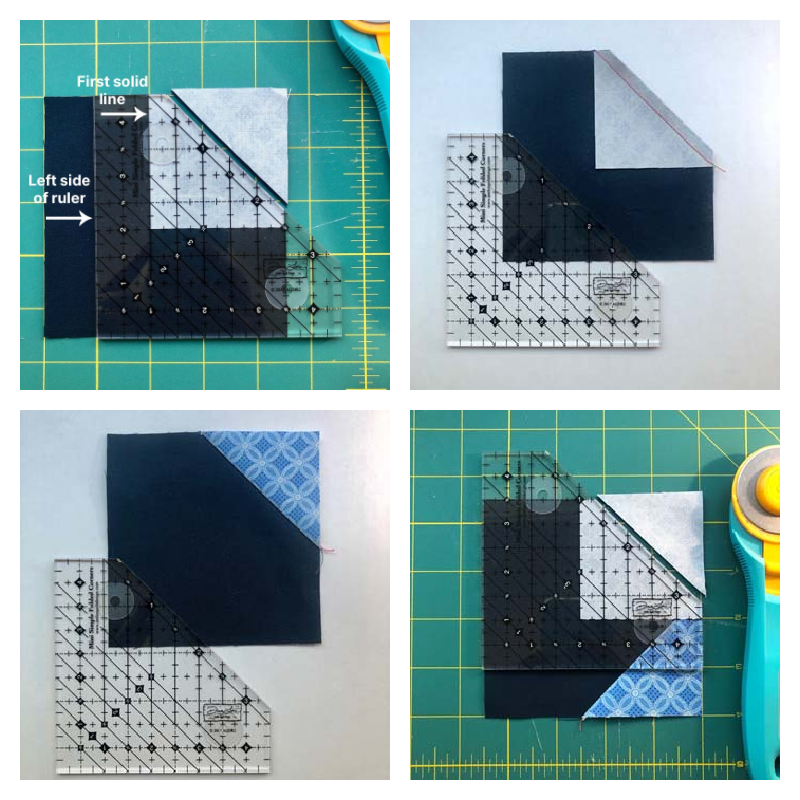
- Place the Simple Folded Corners Ruler so that the first solid line on the left side of the ruler is on the left edge of the top corner square. Trim.
- Stitch with a 1/4″ seam allowance, using the raw edge as a seam guide.
- Fold the corner fabric over and press the seam.
- I repeat those steps for the adjacent corner.
There is a great video at Fat Quarter Shop with Doug Leko demonstrating how to use the ruler. It’s well-done and very helpful.
For my example, the resulting unit turned out good, but slightly smaller along the left folded corner edge. Hmmm. It could be due to user imperfection (most likely) or possibly because the cutaway line is more of a scant 1/4″ than a full 1/4″. I compared the cutaway lines of the Folded Corner Clipper and this one – there is just a slight difference in that line with the Simple Folded Corners Ruler being a hair scanter.
Oversized Method
The following example shows a 4 1/2″ base square and a 3 1/4″ corner square, cut in half diagonally. I am right-handed. I’ve also added a corner triangle to the adjacent corner (similar to flying geese).
Basic steps for oversized method (ruler instructions contain more detail):
- Use the chart in the ruler instructions to determine the size to cut for the oversized corner square (3 1/4″ in this example). Cut that square in half, diagonally to create two corner triangles.
- Trim the base fabric. You’ll need to find the Cut-Away line that corresponds to the finished folded corner size (2″ in my example). The instructions has a chart with this information, too.
- Place one triangle right sides together with the trimmed base piece, matching centers.
- Stitch using 1/4″ seam. I like to stitch with the base unit on top so I can keep an eye on that seam allowance edge.
- Flip the corner triangle out and press.
- Trim the oversized folded corner. Use the chart in the ruler instructions to determine the trim line needed. Place the folded corner seam under the Trim Line and make sure the base unit is properly aligned. Trim the excess fabric from both corner edges.
If you’re a fan of making oversized units and trimming them down, you will love this method. My unit turned out the exact size needed. I was happy with the results.
Pros & Cons of the Simple Folded Corners Ruler
Pros
- You get two methods to choose from which makes it a very versatile ruler. That’s a huge plus.
- The instructions (both right and left-handed) are clear with good diagrams and charts.
- The exact method saves time (as opposed to drawing lines with the traditional method).
- The oversized method is very forgiving and the results are precise.
- Less waste with the oversized method. For example, instead of cutting two 2 1/2″ squares, I only cut one 3 1/4″ square.
- The ruler comes in two sizes. (I will probably use the mini most often.)
Cons
- The ruler has a lot of markings, so it’s a little more complex and may be difficult to read.
- You need the instructions to use the ruler (especially the chart for the oversized method).
- The exact method requires accuracy in cutting and stitching.
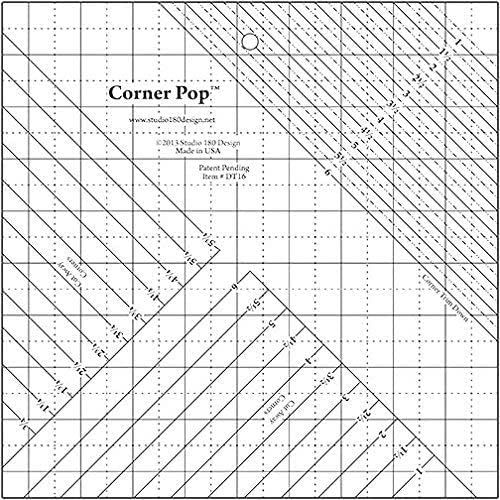
Corner Pop Ruler
The Corner Pop Ruler by Studio 180 Design (one of my favorite companies) comes in one size with options for 3/4″ finished corners to 6″ finished corners. It works similarly to the oversized method used with the Simple Folded Corners Ruler.
The following example shows a 4 1/2″ base square and a 3 1/4″ corner square, cut in half diagonally. I am right-handed. I’ve also added a corner triangle to the adjacent corner (similar to flying geese).
Basic steps for the Corner Pop Ruler (the ruler instructions contain more detail):
- Use the chart in the ruler instructions to determine the size to cut for the replacement triangle (oversized corner square). This is 3 1/4″ in my example). Cut that square in half, diagonally to create two replacement corner triangles.
- Trim the base fabric. You’ll need to find the Cut-Away Corners line that corresponds to the finished folded corner size (2″ in my example). The instructions has a chart with this information, too. Position the base unit so the corner to be trimmed is in the lower left (for right handers). Place the ruler lines over the corner you want to cut away and trim.
- Place one replacement triangle right sides together with the trimmed base piece, matching centers.
- Stitch using 1/4″ seam. I like to stitch with the base unit on top so I can keep an eye on that seam allowance edge.
- Flip the corner triangle out and press.
- Trim the oversized folded corner. Use the chart in the ruler instructions to determine the Corner Trim Down line needed. Place the folded corner seam under the correct diagonal trim line and make sure the base unit is properly aligned. Trim the excess fabric from both corner edges.
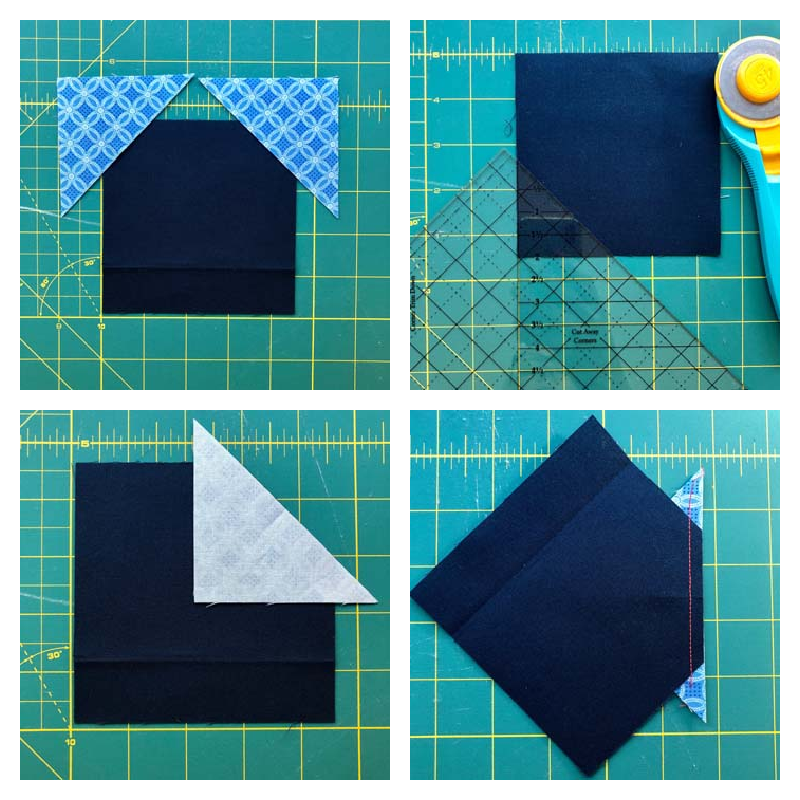

The Corner Pop Ruler produced accurate results! My test block turned out perfectly.
Pros & Cons of the Corner Pop Ruler
Pros
- This tool has markings for whole and half-inch sizes as well as quarter-inch and three-quarter inch sizes. That is a big bonus.
- Given the large number of size options, the ruler is easy to read and includes grid lines for accurate placement.
- The instructions (both right and left handed) contains verbiage that is very descriptive and easy to understand, and has good diagrams and charts.
- Less waste. For example, instead of cutting two 2 1/2″ squares, I only cut one 3 1/4″ square.
- The oversized method used allows you trim everything to the perfect size.
- The resulting precision creates seams that are properly located for accurate piecing.
Cons
- The instructions are necessary to use the ruler (until you get the technique and math down).
- You need to familiarize yourself with the ruler markings and sections before use.
Tips for using any of these rulers
I have some general tips that can be used with any of these specialty rulers.
- Applying starch to your uncut fabric will give more stability to any exposed bias edges while sewing.
- Read all instructions before starting (of course).
- Make a test block to ensure your seam allowance, thread weight and fabric weight are all compatible.
- Stitch the diagonal seam with the base fabric on top to ensure your raw edge can be seen (since this is your seam guide).
- Make sure all edges are lined up accurately with the appropriate guidelines on the ruler before trimming.

Final thoughts on the Stitch and Flip method and specialty rulers
After playing with these specialty rulers for the stitch and flip method, I have come to a few conclusions.
- No more marking diagonal lines is a big time saver.
- No more stress about whether your corner will be too small, too big or too crooked.
- Less waste with the oversize method makes me a big fan!
- Every corner is filled perfectly and the seams are placed correctly. Have you ever pieced together two units with diagonal seams that need to match and they don’t line up?
- Ensures more success with your piecing and better accuracy.

I know someone is going to ask me which specialty ruler is my favorite? At this moment, I don’t have one. I like them all for different reasons, but here are some guidelines:
- If you like simplicity, go with the Folded Corner Clipper.
- If you like precision and flexibility, go with Simple Folded Corners.
- If you want more size options, choose the Corner Pop Ruler.
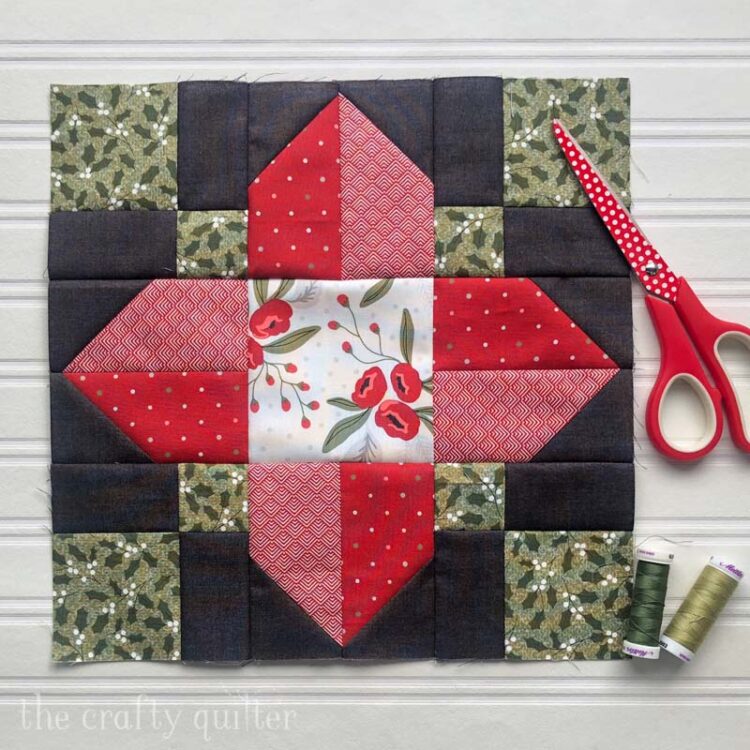
I hope you found this blog post about the Stitch and Flip method using specialty rulers helpful. I’m a convert, for sure! Give it a try the next time you need to add a corner triangle to a unit. I’ll have the perfect project for you to practice on next week – a free tutorial for a Christmas in July/August quilt!

Discover more from The Crafty Quilter
Subscribe to get the latest posts sent to your email.


Thank you for testing the different rulers. This sure helps me decide that I need one. I always look forward to getting your posts!
I have found that the specialty rulers are not needed as long as you know what size to cut your square. I line the quarter inch lines in the corners of the square and cut both layers and then sew. It comes out perfect. Anytime I attempt to sew a hair next to the drawn line, my block comes out wonky.
The timing of this article is perfect. I’m about to sew over 500 stitch and flip corners using the Simple Folded Corners ruler. I debated drawing the lines instead but now I’ll give the ruler a test!
Thanks!
Great job explaining all the ruler options! I have used two of them and am pretty happy with the results. Like you, choices always feel like a good thing…so my favorite right now is the Simple Folded Corners.
Great post! I have the Folded Corner Clipper and it is a game changer! happy to learn of the other two!!!
I have the same conclusions as you had. I use the corner clipper to cut off the base corner and use corner pop tool to determine the size of the replacement square (cut in half) and to trim. I mostly love the accuracy and not having all of the little leftover triangles from the diagonal drawn line method. Thanks for the tutorial.
Thank you for this information. Very clear and helpful.
Your Christmas Block is so nice. Love to make this in hot August.
Hartelijke groet uit België
Marjolein
Thanks Julie.
I always love your posts. I’m a quilt starter but not very good finisher. You always motivate me to get going.
Hi Julie. I’m kinda new to your post and though I’m not a new quilter, I sometimes feel like I am. So I appreciate your explanations of the different rulers for the stitch & flip method. Honestly, I’ve always been a line drawer, only because I didn’t know any other way. Thank you for “broadening my horizons” in this area. A great post with great information. I will definitely be changing my methods to oversizing & trimming I think.
Good morning Julie,
Thanks for the excellent tutorial. I have the Folded Corner Clipper and have not tried the other two. I also use it when I am joining strips for binding.
Julie what is your background on you upcoming free pattern? I have the lella bOutique Christmas fabric.
Thank you Julie for such a fabulous email. Very clear comparisons, perfect details, loved it! I have the Studio 180 Design Corner Pop and have used it for years. I find oversizing and trimming has been the very best thing for All quilting blocks. I own every single Studio 180 Design ruler and use them all. Highly recommend the processes. Keep up the great work, love your emails!
Thank you Julie for being one of the best guides on my quilting journey.
Thank you so much. That was very informative. I have the corner pop ruler,(love studio 180 designs) just haven’t used it yet .
Thank you so much for sharing these methods, Julie! You are clear and concise, and the visuals really help, too! 🙂
Thank you Julie for great information.
Julie, thank you for sharing this, I wish I had known about these rulers sooner. The quilt I am working on I had to draw a line on 176 2 !/2in. squares. Struggled with getting the correct size. Will look into purchasing one of the rulers. The information was most helpful. looking forward to the tutorial next time.
Thanks Julie for fine details! Makes it easy for us to chose which one to use. I have two of the three and honestly have been too intimated to use them. All fear aside….I’m working on a quilt with half square triangles and I love the idea of no more lines!! Blessings, Dawn
Very interesting article. Thank you!
Very helpful …thanks so much!
Great review!
I use Doug Leko’s Simple Folded Corners ruler. Rather than cutting the corners of both the background and the added corner square, I use the ruler to remove only the background triangle. I lay the appropriate sized HST on the background aligning the bias seams and sew. This process is even easier when I trim the triangle corners using a corner trim tool. When using this method, I have only one HST leftover. I trim the background “waste” HST to the next smaller size.
Beautiful post. Great information. Clearly explained, very well documented and greatly appreciated. Great job and thank you Julie…