
How To Make Cat Ears Flying Geese | Fantasy Flying Geese Week 3
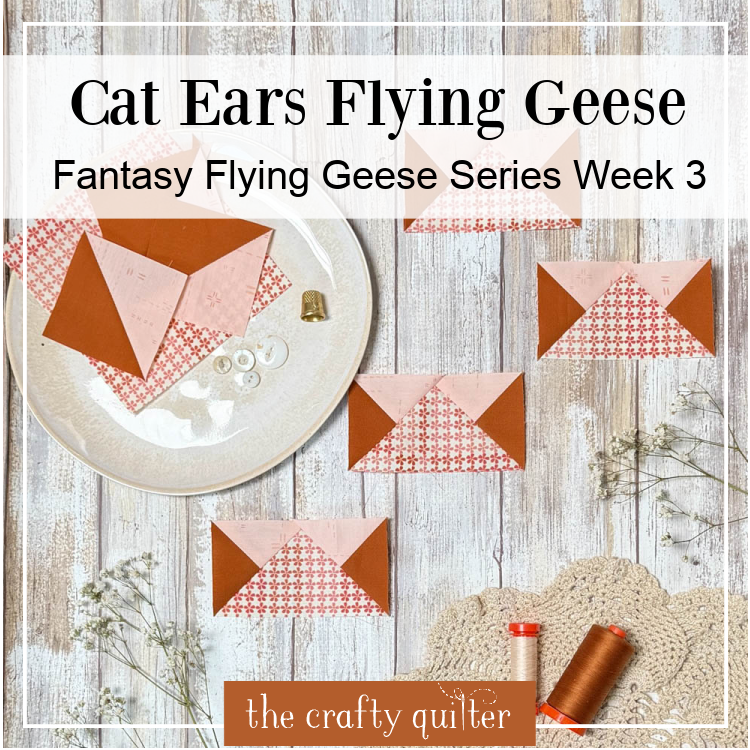
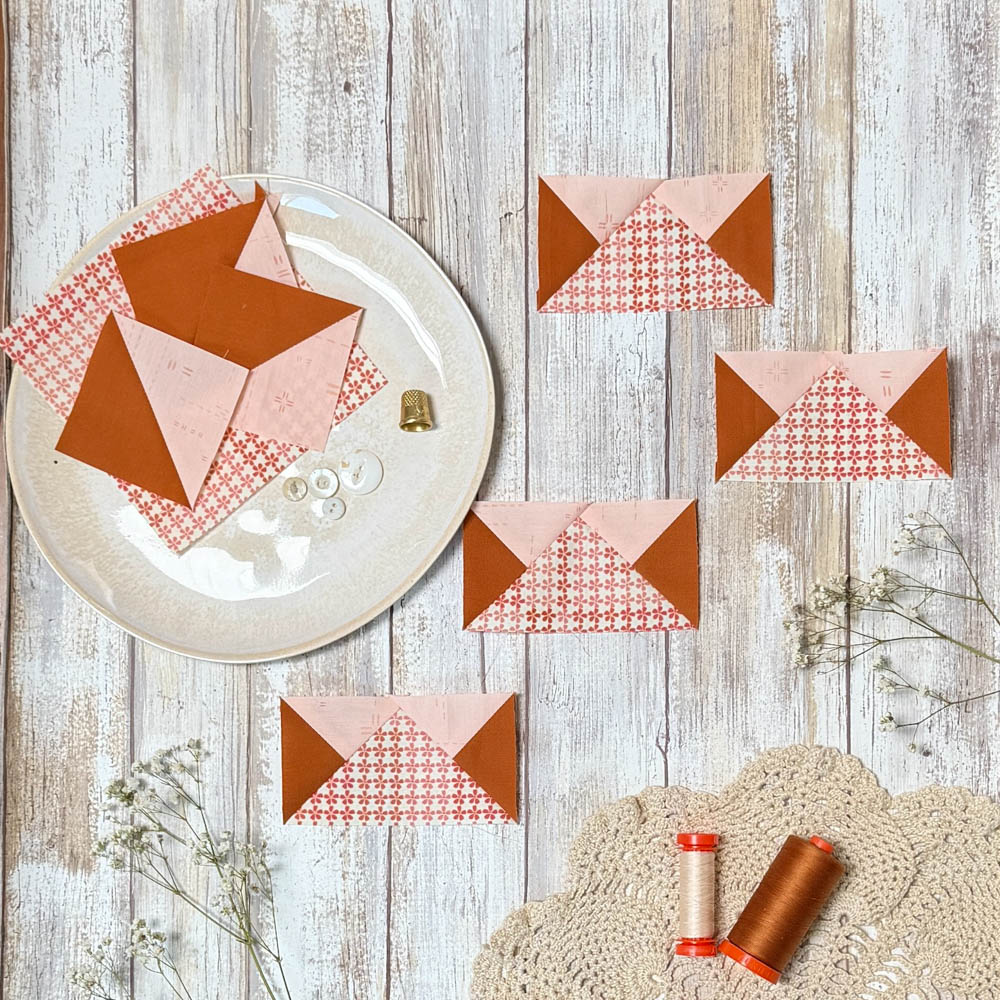
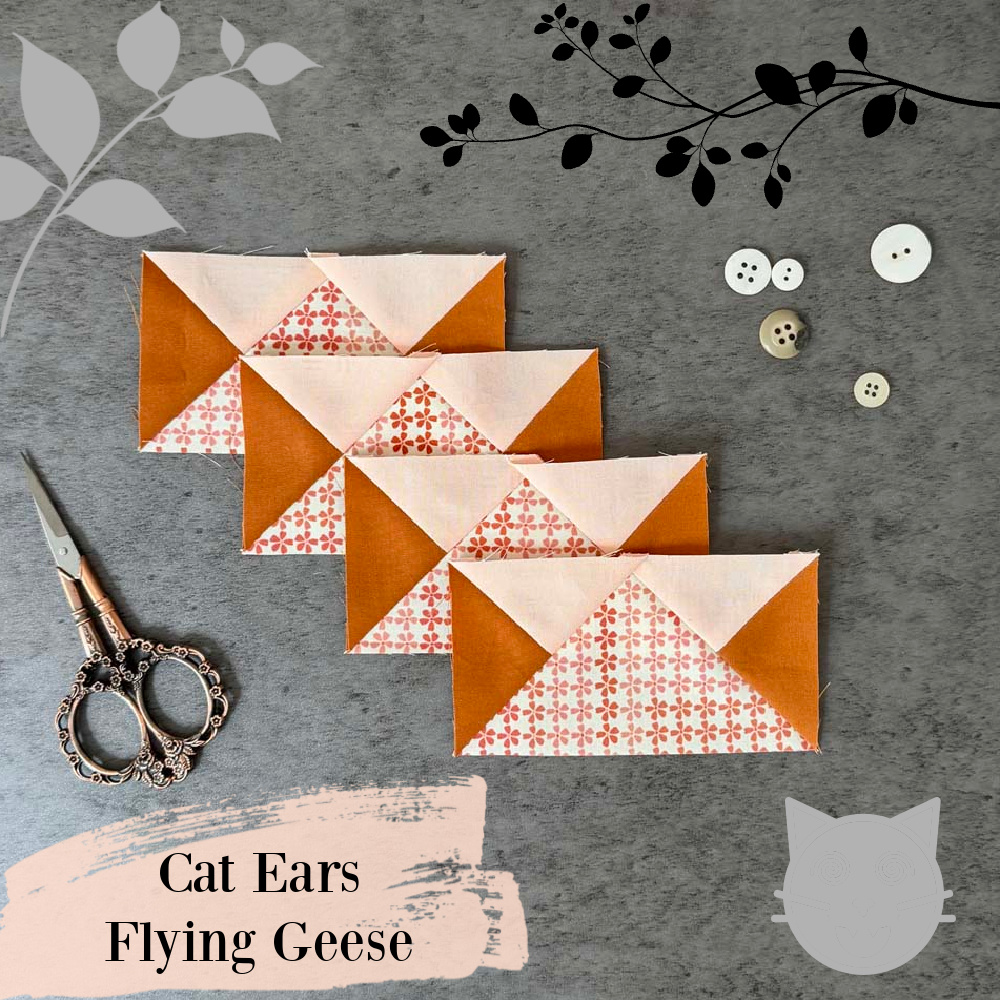
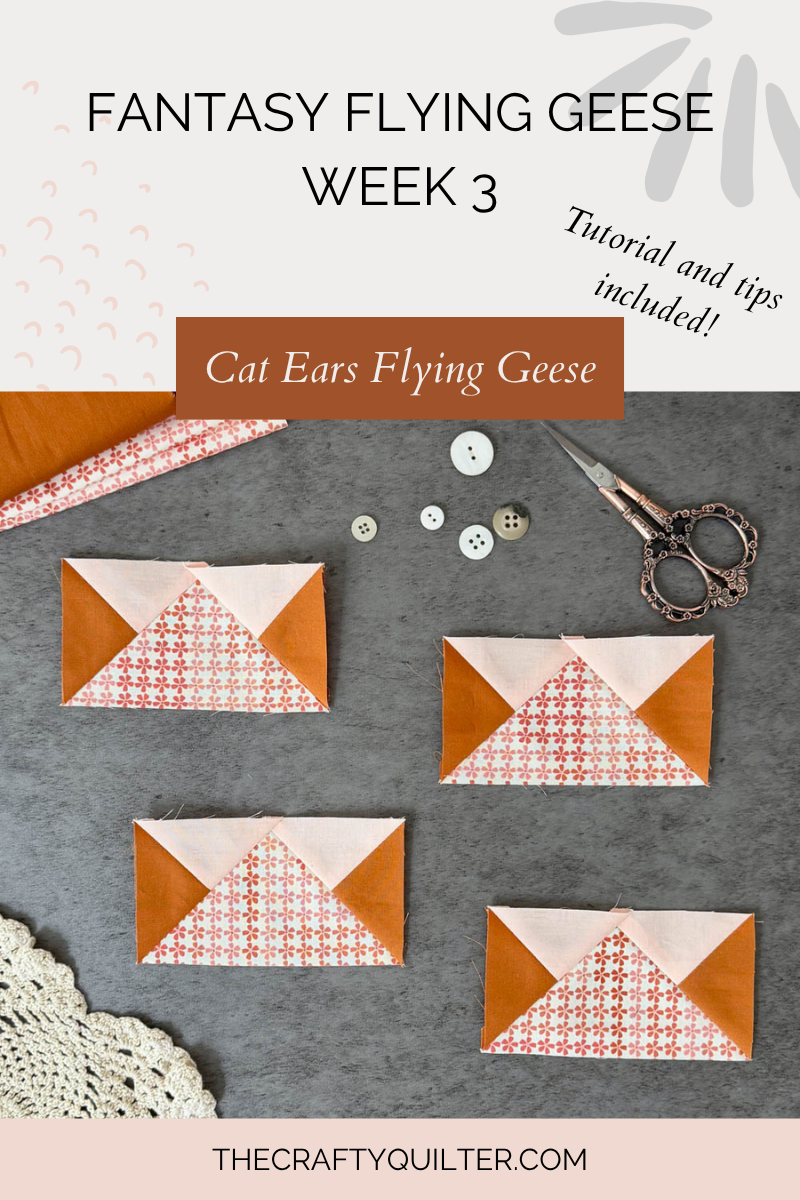
We’re moving on to Week 3 of my Fantasy Flying Geese Series with a flying geese variation that I’ve dubbed Cat Ears Flying Geese! The small wings of the flying geese are each made with two smaller triangles, and as the name suggests, they look a little like cat ears. We’re using a combination of techniques this week and practicing our accuracy skills along the way!
New to this series? Catch up below.
- Introduction Post – Start here to get all of the basic details.
- Week 1 – Capped Flying Geese
- Week 2 – One Seam Flying Geese
About Cat Ears Flying Geese
The Cat Ears variation divides each of the small wings of a traditional flying geese unit into two triangles, adding a third fabric into the mix. We’ll use the familiar four-at-a-time method to make these flying geese, but with one fun twist: the smaller squares are replaced with half-square triangle units.
Oversized vs. Exact
The HSTs will be made slightly oversized and then trimmed down to the exact size needed. From there, however, we’ll use exact cutting measurements rather than oversizing the remaining pieces.
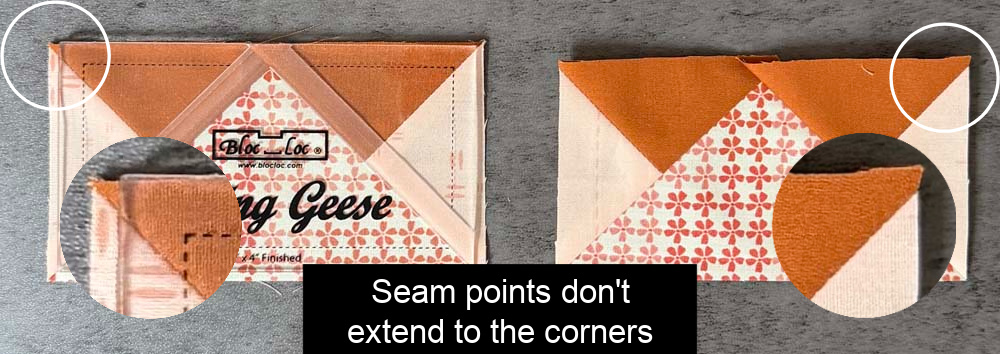
Why not oversize the entire Cat Ears Flying Geese unit? When the pieces are cut oversized, the points of those small triangles become offset from the corners as the unit is trimmed to size. Trust me, I’ve tried this several times, and I haven’t found a way to make those points land exactly where they should!
Below, you can see two Cat Ears Flying Geese units that were both made slightly oversized. The unit on the left is untrimmed; notice how the upper left corner of the Bloc Loc ruler does not line up with the corner seam. The unit on the right has been trimmed, and you can see the same problem on both sides—the small triangle points no longer align with the corners.
With all of that said, this flying geese variation will be an opportunity to practice a scant 1/4″ seam allowance and precision piecing! I have plenty of tips to help you get great – if not perfect – results.
What Is A Scant 1/4″ Seam Allowance?
A scant 1/4″ seam allowance is just a thread or two narrower than a true 1/4″ seam. This tiny adjustment accounts for the space taken up by the thread and the fold of the fabric when the seam is pressed to one side. Using a scant 1/4″ seam can help your pieced units finish at the correct size and improve accuracy, especially when several seams are involved.
General Things To Know
- Makes four Cat Ears Flying Geese that measure 2″ x 4″ FINISHED.
- Fabric: One light, one medium and one dark fabric. Use large scraps or 1/8 yard each.
- All seams are 1/4″, however a scant 1/4″ may give you better results.
- RST = right sides together
- HST = half square triangle
Cat Ears Flying Geese Instructions
Note: Make sure to read the TIPS section before starting.
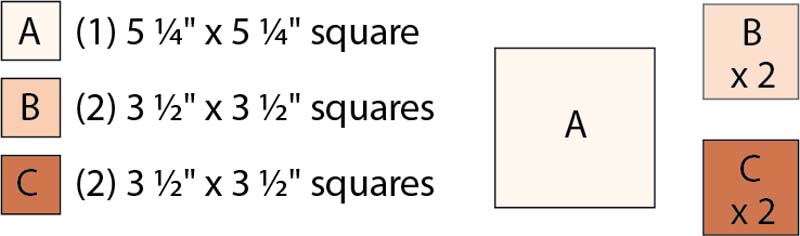
Cutting Instructions
Make HSTs
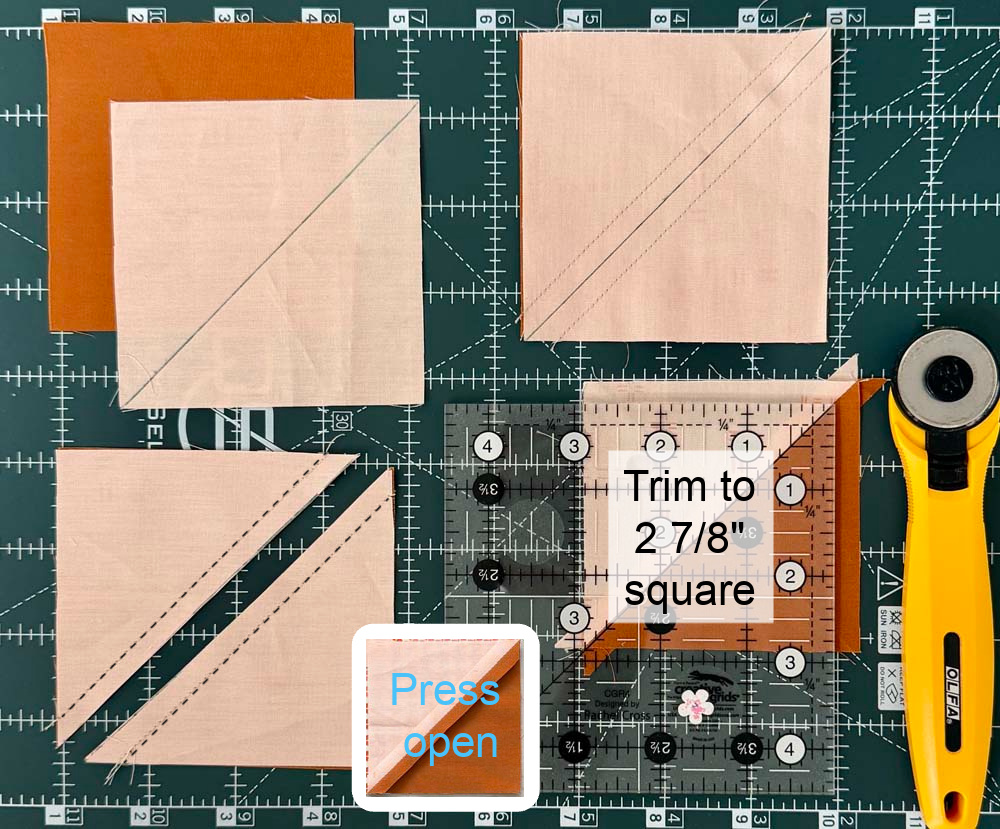
- Draw a diagonal line from corner to corner on the wrong side of each B square.
- Place a B square RST with a C square. Stitch 1/4″ on each side of the diagonal line.
- Cut apart on the diagonal line.
- Press seam open.
- Trim HSTs to 2 7/8″ square. TIP: Trim on all four sides to ensure a perfect square.
- Repeat to make four HST units.
Make 4-at-a-time Flying Geese
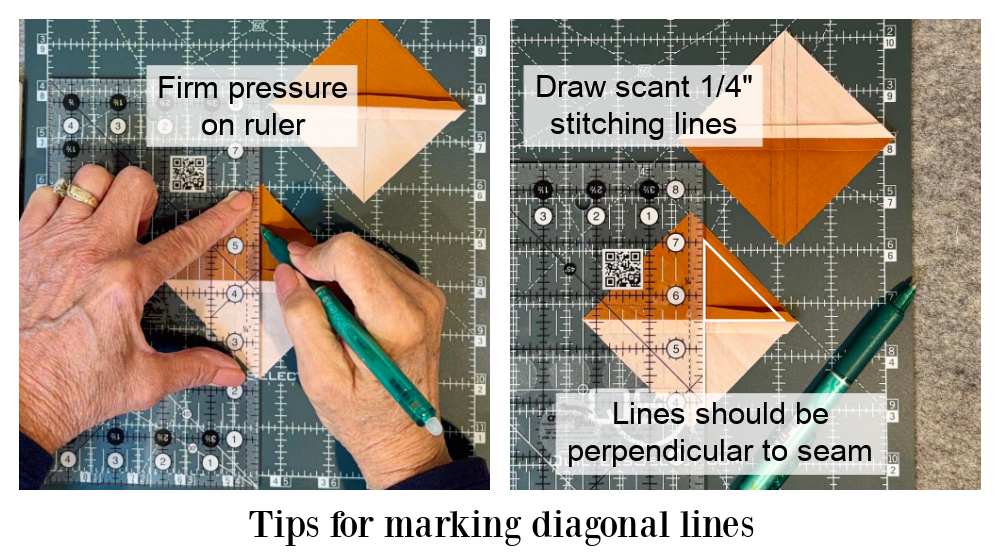
- On the wrong side of each HST, draw a diagonal line from corner to corner that is perpendicular to the seam. TIP: You may find it helpful to draw stitching lines a scant 1/4″ on both sides of the center diagonal line.
- With RST, place an HST on opposite corners of an A square so the the dark half of the HST is facing the corners. Check your orientation with the photos below, and make sure the outer raw edges of each HST and the large A square are aligned perfectly.
- Pin in place.
- Stitch a scant 1/4″ on each side of the diagonal line.
- Cut apart on the center diagonal line and press.
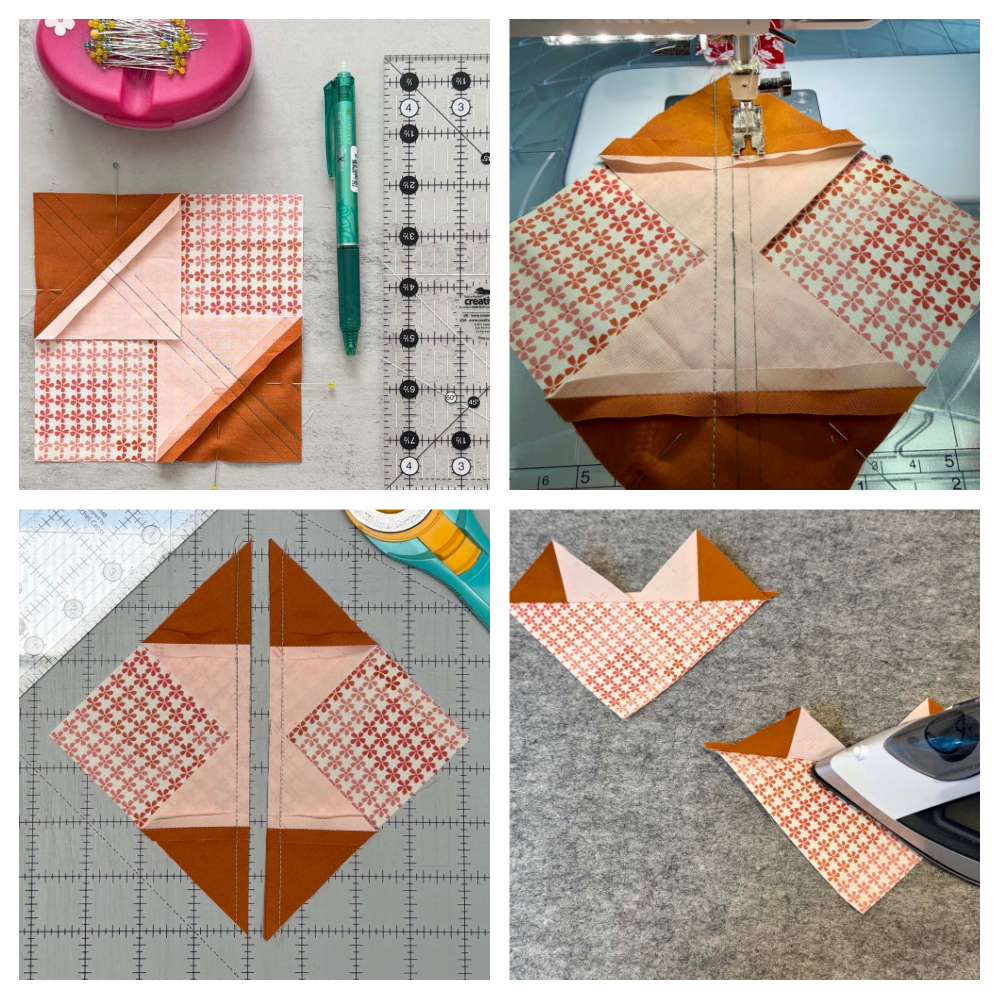
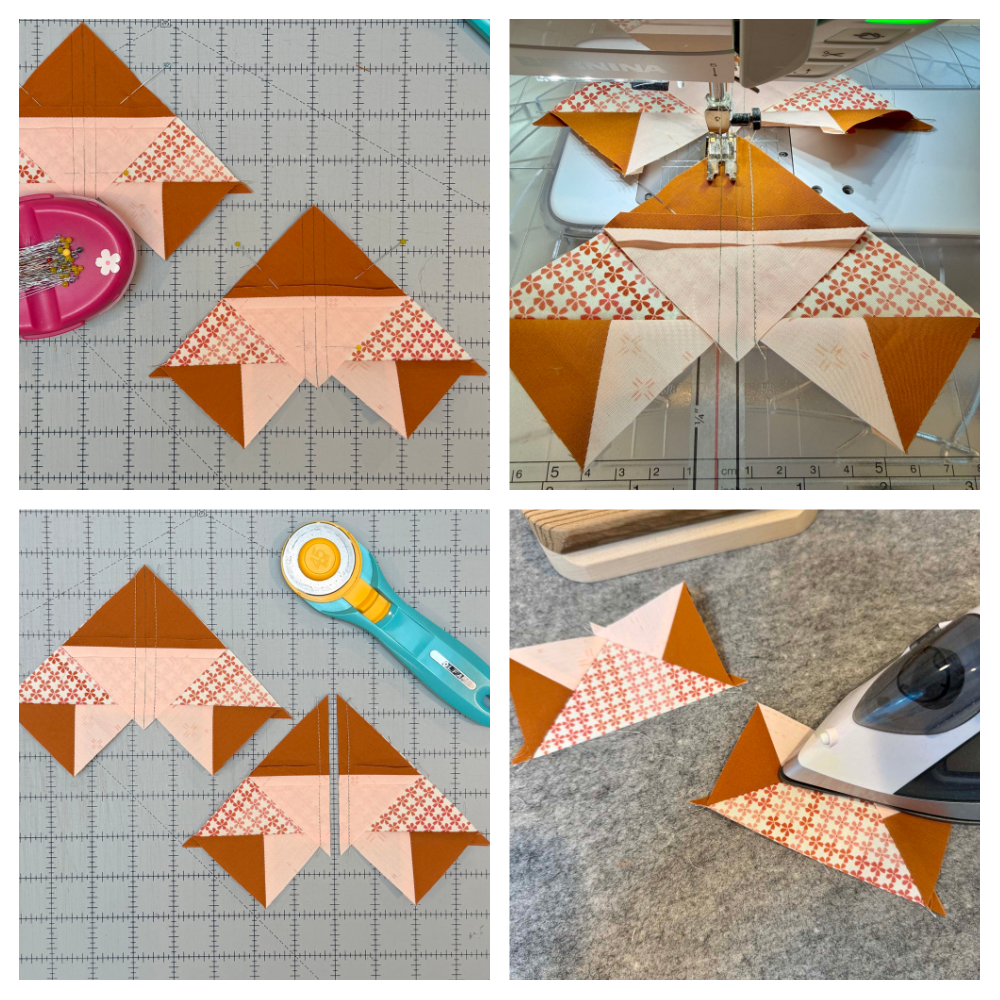
- With RST, place HST on remaining corner of the unit from above so the the dark half of the HST is facing the corner. Check your orientation with the photos below, and make sure the outer raw edges are aligned perfectly. Pin in place.
- Stitch with a scant 1/4″ seam on each side of the diagonal line.
- Cut apart on the center diagonal line and press.
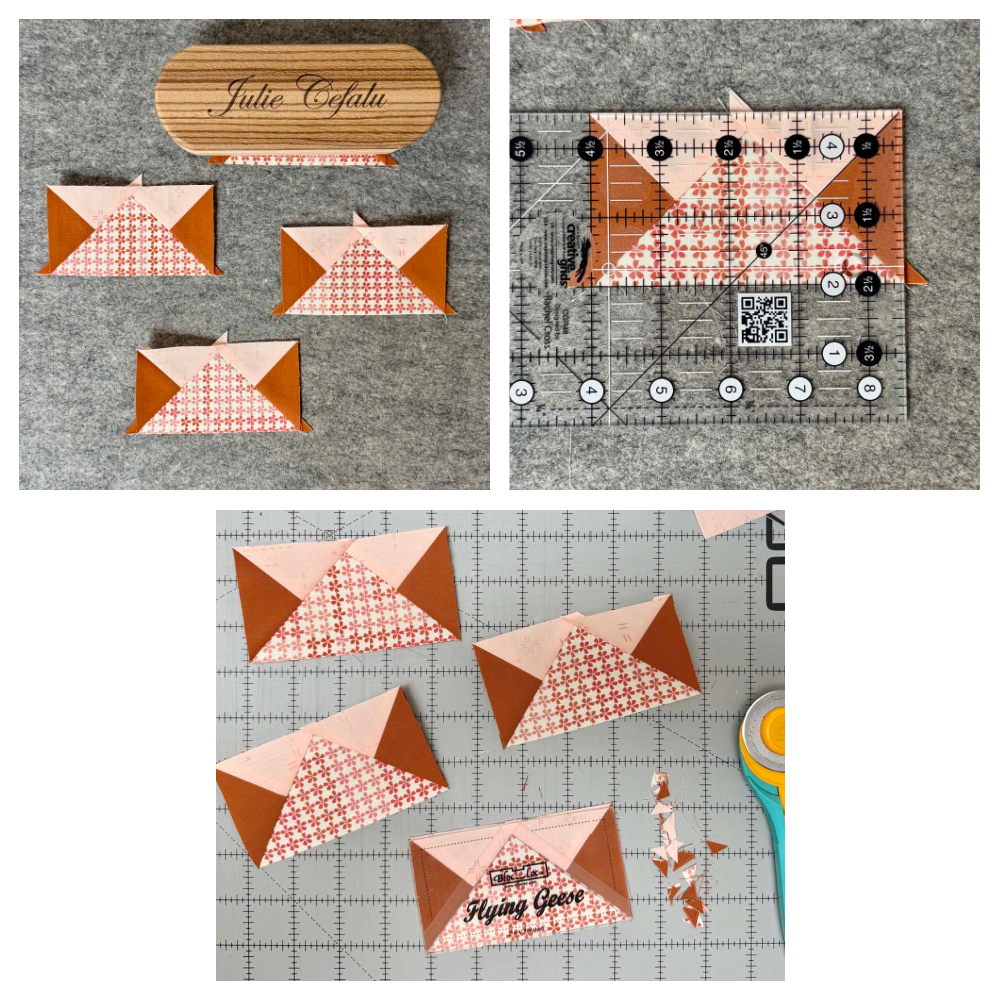
- You should now have four Cat Ears Flying Geese that measure 2 1/2″ x 4 1/2″.
- Trim the small “
dogcat ears” as needed.
TIPS for success
Tips for making HSTs & marking lines
- Press down firmly with the ruler when trimming to avoid slippage OR use Odif Grippy Nonslip Coating on the back of the ruler. This does an excellent job of keeping things from shifting.
- Trim HSTs on all four sides to ensure a perfect square.
- When drawing the center diagonal line, make sure the ruler is lined up in each corner so that the marked line begins and ends precisely at the corners.
- The diagonal line should be perpendicular to the seam.
- While marking, press down on the ruler with firm pressure at the corners to prevent shifting.
- Try marking the stitching lines as well to help keep a straight and consistent seam. These should be a scant 1/4″ on each side of the center diagonal.
Tips for Perfect Flying Geese
- Starch all fabric before cutting and piecing. This adds stability and control to the fabric.
- Make a test block first and make adjustments to seam allowance, etc. (if necessary).
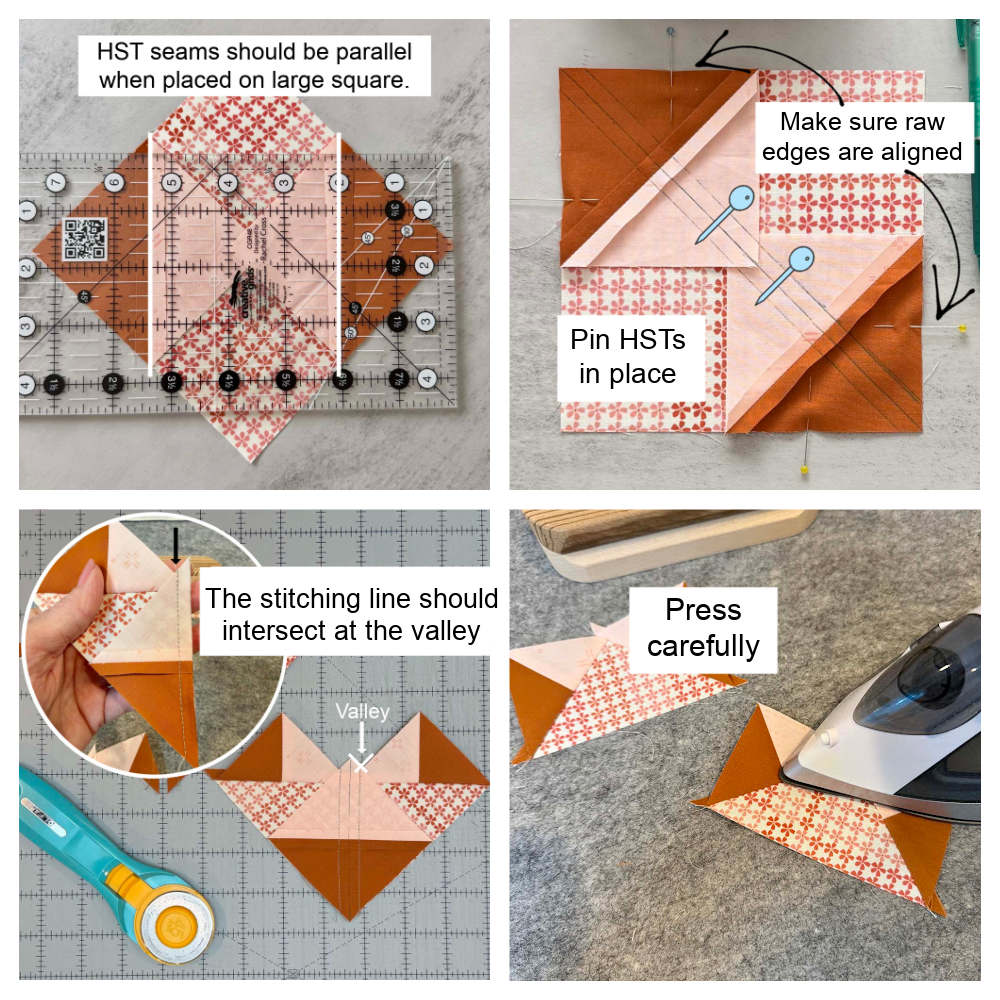
- When the first set of HST squares are placed on the large square, the HST seams should be parallel to each other.
- Use several pins to secure the HST squares before stitching and make sure all raw edges are aligned.
- Take your time and sew as straight as possible. Marking the stitching line helps with this.
- When sewing the second set of diagonal seams, the stitching line should intersect with the “valley” formed by the HST and unit underneath. (See photo bottom left.)
- Carefully press seams. This will keep the seams from bowing or curving.
Common Mistakes And How To Fix Them
My flying geese are too small
- Most likely your 1/4″ seam allowance is too generous. Try making it smaller.
- Verify the size of your cut pieces.
- Make sure you’re pressing the seam flat from both sides.
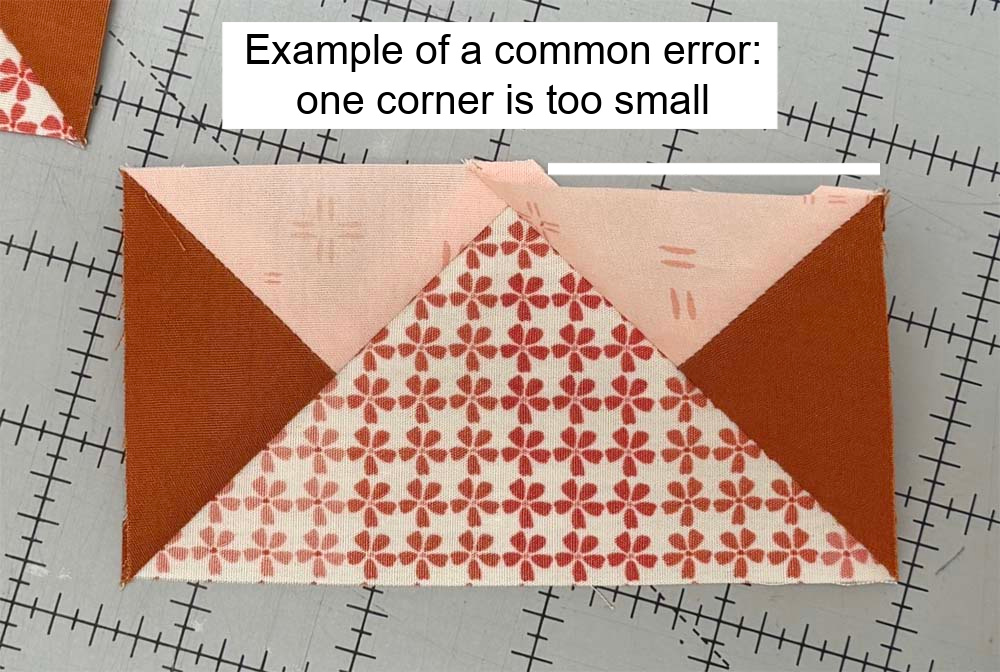
My flying geese are wonky
Wonky means that there is more than one side or corner that is skewed. It could be that the bottom or top diagonal seams don’t line up with the corners or that one corner is too small and the other is too big. Generally, nothing seems quite right! We’ve all been there, so take a deep breath and try the following:
- Go through the TIP Section and apply all of them. 😉
- Make sure to pin the layers before stitching.
- Stitch slowly. The beginning and end of a seam are where the most wobbles occur. Make sure to keep the stitching line straight throughout.
- Check your 1/4″ seam allowance, and practice a scant 1/4″ seam. This is usually a “click” or two to the right of the center needle position.
Even though I like my piecing to be precise, it’s not always worth the stress. I think progress over precision is a much healthier mindset!
Playing With Color & Layout
Color and value can really change the look of a block. The same is true for how blocks are positioned in a quilt. I thought it would be fun to play with both of those aspects for the Cat Ears Flying Geese.
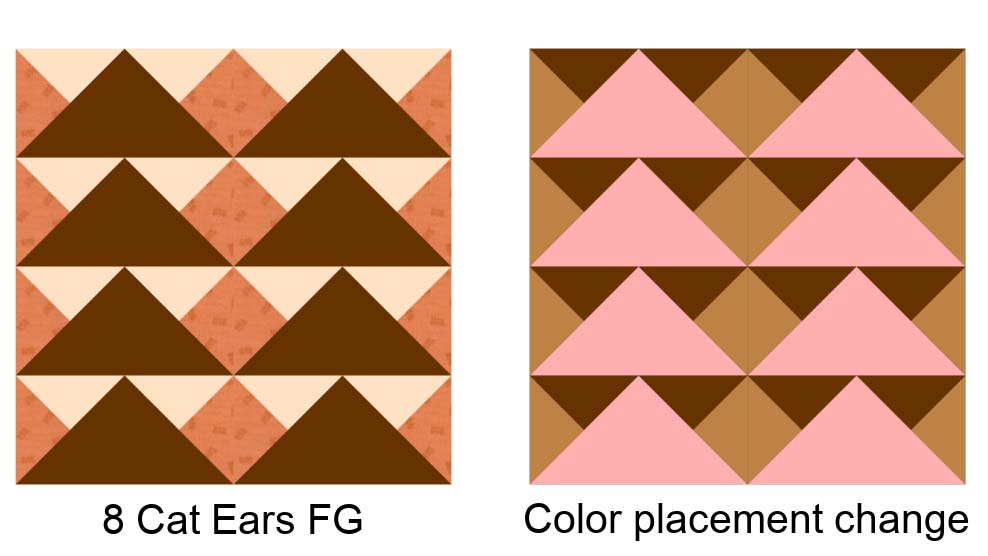
If you arrange the blocks in a row, it could make a really cool border. When you change the rotation and the color placement, that border looks very different!
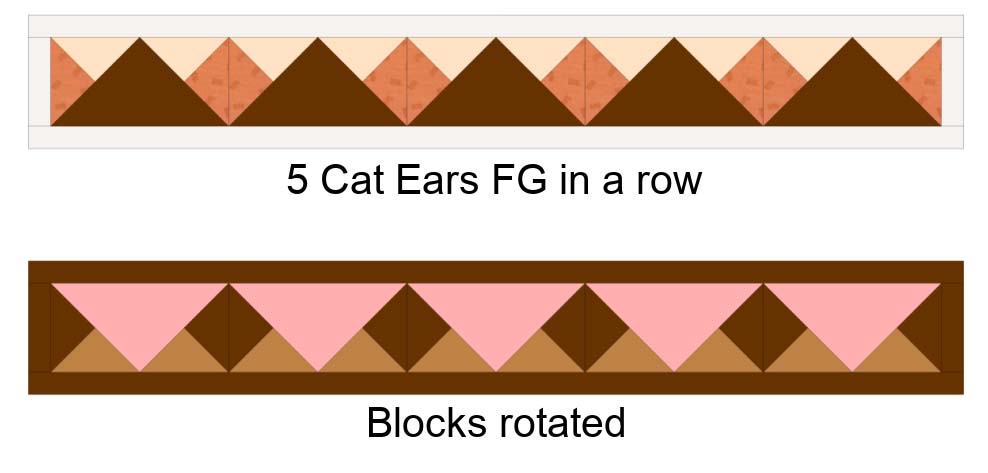
Next, I made a large block of eight Cat Ears Flying Geese – two across and four down. In the first block, (below left) I see a range of large and small mountains. In the second block (below right), I changed the color and value of the large triangle and the two small triangles. The mountains are gone, replaced with a fun pattern of overlapping large and small triangles!
That’s just the tip of the iceberg. There are so many ways to play with flying geese! I hope you do some experimenting of your own.
Printable Instructions
You can download the pdf below.
Conclusion
You might find the Cat Ears Flying Geese to be a bit of a challenge. This variation demands a little more precision, so don’t be surprised if it takes some practice to get everything just right. I think it’s good to stretch beyond your comfort zone once in a while. You may discover a new technique, sharpen your piecing skills, and surprise yourself with what you can do!
I hope you’ll give this variation a try and have some fun with it. Remember, Fantasy Flying Geese is all about experimenting, learning, and seeing where a familiar quilt block can take us!
If you’d like to share your flying geese variations, use the hashtag #fantasyflyinggeese and tag me @thecraftyquilter so I can be sure to see it. You can also send me an email and attach a photo.
I’m really excited about the next Fantasy Flying Geese variation. It’s one of those clever piecing tricks that will make you say, Wow! I’ll see you back here in a week!


Discover more from The Crafty Quilter
Subscribe to get the latest posts sent to your email.

This is a great series, Julie! I really love Flying Geese and can’t wait to see all the variations you’ve come up with. I have made the one-seam or (I call them) 3D version in a quilt a couple of years ago when Island Batik gave us a Flying Geese challenge, and really enjoyed them. Thanks for sharing this.
Thank you for sharing! I love these!
Wow! This cat ear flying geese is so clever and versatile. And all of your instructions are logical and easy to follow. Julie you need to write a book!! Thank you for sharing this series, I’m loving it!