Hollyday Table Runner tutorial
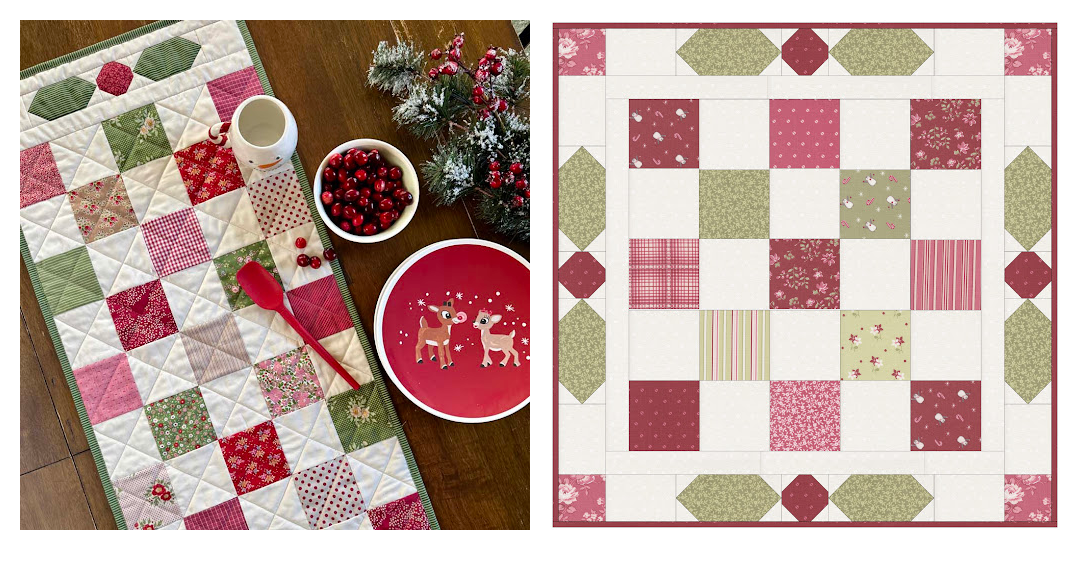
I love decorating for each season with table runners. My new Hollyday Table Runner tutorial is sure to add a festive touch to your December table. This is such a simple and easy design that you can make in a flash. It’s a great way to use up a charm pack of Christmas fabrics or a collection of scraps in your favorite holiday colors. This makes a perfect hostess gift or make several for friends and family!

About the Hollyday Table Runner
What makes the Hollyday Table Runner special is its simplicity and sweet design. It’s gives the feeling of nostalgia with it’s basic patchwork layout, while remaining versatile with fabric choices. And it’s functional, too!
There’s even a bonus square layout, as well, for those of you with round or square tables! You can thank one of my blog followers for that option; she made a special request when she heard I was making a table runner tutorial. This was an easy design to make into a square, so I was happy it worked out.
The long table runner measures 15″ x 41″. It would be easy to make it longer by adding another row or two of squares. The square table topper measures 21″ x 21″. If you set it on-point, it would look great on a rectangular table as well.
For the table runner, I used Tilda fabrics from two collections: Creating Memories (Winter) and Merry Little Christmas. I love the sweet prints in traditional reds, greens and taupes in these collections. For the table topper, I mocked it up using fabric from A Very Sweet Christmas by Bunny Hill Designs for Moda Fabrics. This is another cute collection of fabrics in a softer Christmas palette. I have the fabric, I just need a little more time to make this one come to life.
Hollyday Table Runner Tutorial
- Please read through the instructions before beginning this project.
- All seam allowances are 1/4″
- RST = right sides together
- WOF = width of fabric
- IMPORTANT: Cutting and piecing instructions give the table runner quantity first, followed by the table topper in ( ).
Note: This is a free tutorial that has not been tested or tech-edited. If you feel there are inaccuracies, please leave a comment or contact me by email.
Supplies
- Background – 1/2, (1/2) yard
- Color squares (patchwork) – one charm pack or 28, (12) 3.5″ squares + (4) 2.5″ squares
- Holly – 1 (2) fat eighths
- Berry – scrap larger than 5″ square
- Binding – 1/4, (1/4) yard
- Backing – 1/2, (2/3) yard
- Batting, 18″ x 44″ (24″ square)
- Erasable marker
- Glue pen (optional)
TIP: glue pens (and sticks) are perfect for holding small pieces together instead of pins.
Cutting Instructions
Background
- 27 (12) 3.5″ squares
- 4 (2) 1.5″ x 15.5″ rectangles
- (2) 1.5″ x 17.5″ rectangles (table topper only)
- (4) 2.5″ x 3″ rectangles (table runner only)
- (8) 2.5″ x 4″ rectangles (table topper only)
- 16 (32) 1.5″ squares
- 8 (16) 1.25″ squares
Color Squares
- 28 (13) 3.5″ squares
- (4) 2.5″ squares – table topper only
Holly
- 4 (8) 2.5″ x 4.5″ rectangles
Berry
- 2 (4) 2.5″ squares
Binding
- 3 (3) 2.25″ x WOF
Piecing Instructions
Center patchwork
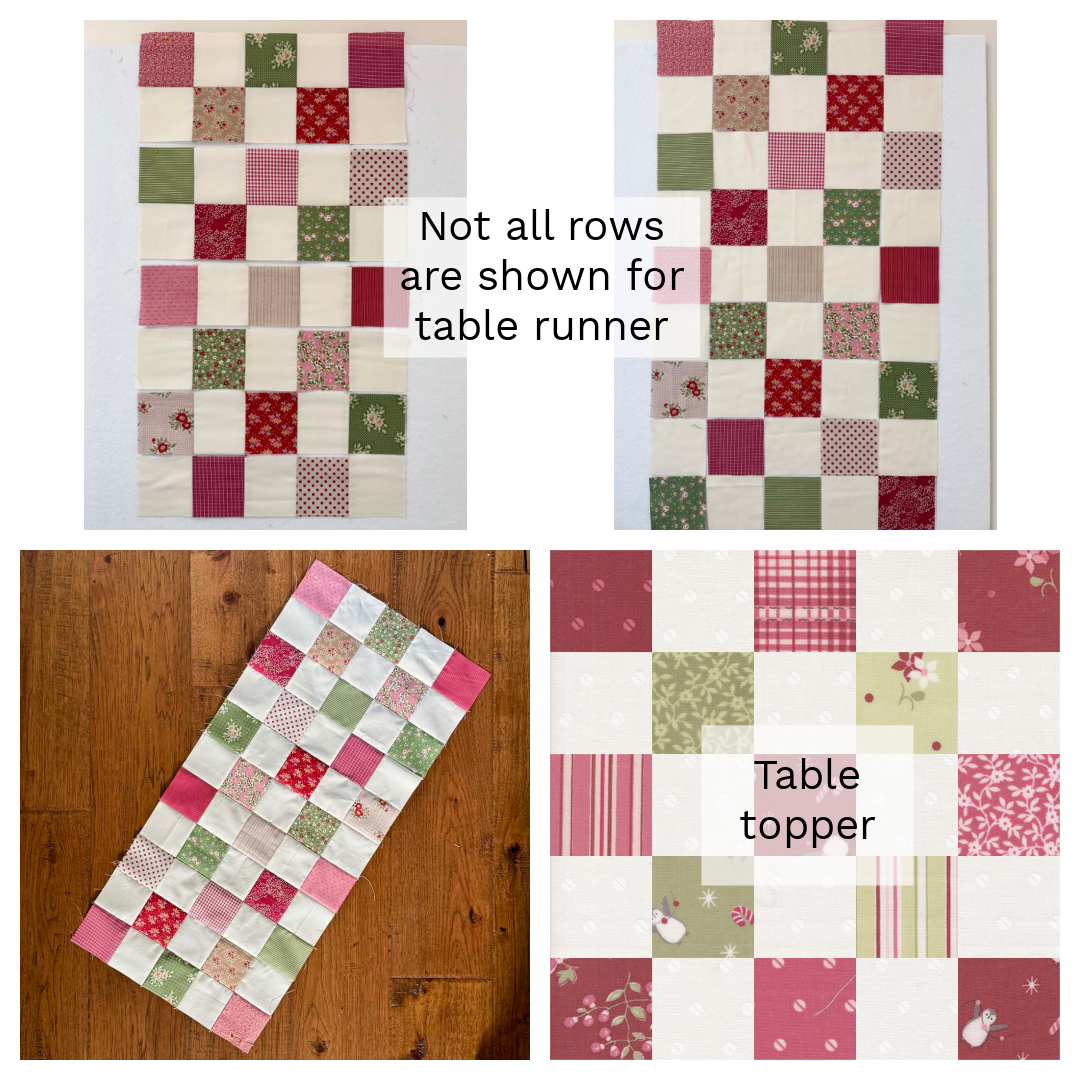
- Arrange the 3.5″ color squares and the 3.5″ background squares into a grid of 5 across and 11 down (5 across and 5 down). Alternate color squares and background squares, beginning with a color in the top corner.
- Sew the squares into rows. Press each row in alternate directions.
- Sew the rows together, nesting seams at intersections.
- Press row seams in either direction.
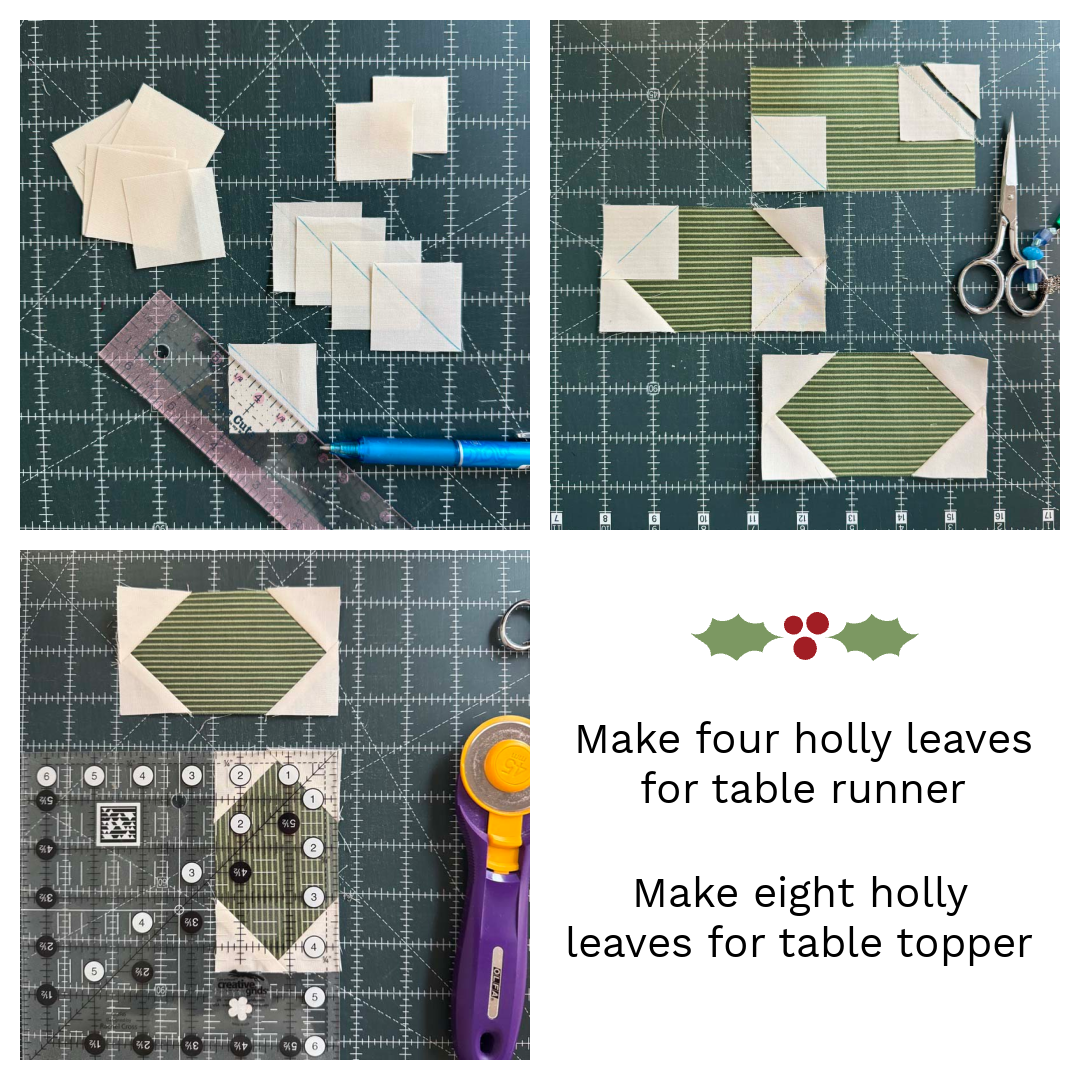
Holly Units
- Draw a diagonal line from corner to corner on the wrong side of each background 1.5″ square.
- Place a marked 1.5″ square RST on opposite corners of the 2.5″ x 4.5″ holly rectangles.
- Stitch on the marked line, trim the seam allowance, and press to the corner.
- Repeat on the remaining corners to make 4 (8) holly leaves that measure 2.5″ x 4.5″. Check size and trim if needed.
Berry
- Draw a diagonal line from corner to corner on the wrong side of each background 1.25″ square.
- Place a marked background square RST on each corner of the 2.5″ berry square.
- Stitch on the marked line, trim the seam allowance, and press to the corner to make 2 (4) berries. Check that it measures 2.5″ square and trim if necessary.

Border assembly (table runner)
- Arrange the holly units, berry, and 2.5″ x 3″ background rectangles as shown in the photo steps below.
- Sew the units together and press as indicated by arrows.
- Repeat to make two border units.
- Arrange border units with a 1.5″ x 15.5″ background rectangle on top and one on the bottom.
- Sew border unit and rectangles together to create a border section. Press towards background rectangles.
- Border section should measure 4.5″ x 15.5″.
- Make two border sections.

Border assembly (table topper)
- Arrange the holly units, berry, and 2.5″ x 4″ background rectangles – similar to the photo steps above, left.
- Sew the units together and press as indicated by arrows.
- Repeat to make four border units. They should measure 2.5″ x 17.5″
Table Runner Assembly
- Sew border sections to the top and bottom of the center patchwork.

Table Topper Assembly
- Sew the 1.5″ x 15.5″ border strips to opposite sides of the table topper patchwork.
- Sew the 1.5″ x 17.5″ border strips to the top and bottom of the table topper patchwork.
- Sew two border units to both sides of topper.
- Sew a 2.5″ color square to each end of the remaining two border units.
- Sew the pieced border units from above to the top and bottom of table topper.

Finishing
- Baste together the table runner (topper), batting and backing.
- Quilt the layers together. I chose a simple diagonal grid design that goes through the center of each square. I stitched in the ditch along the border section seams.
- Trim the layers even with the quilt top.
- Apply binding using your favorite method. You can find my favorite all-machine binding method here.

PDF download
I’ve made an ad-free pdf for this tutorial that you can download for free through the end of the year! It will be available in my Etsy Shop starting January 1, 2026.

Looking for more holiday table runners? You’ll love my free Nordic Star Table Runner pattern and my free Pinwheel Star Table Runner and Placemats tutorial.
I hope this Hollyday Table Runner brings some Christmas cheer to your day! If you make one, make sure to tag me @thecraftyquilter and use the hashtag #hollydaytablerunner so I can see what you made.


Discover more from The Crafty Quilter
Subscribe to get the latest posts sent to your email.


Such a lovely table topper and runner! Enjoy your time off from blogging & enjoy your time with family 🙂
Beautiful,fun project
Thank you so much, I really enjoy this type of a pattern, brings us back to what I grew up with as a quilting style….Love it and appreciate your kindness. Merry Christmas to you and your family.
Julie, many thanks for giving the directions for a square table topper! My round table thanks you, too
Linda