Two methods for oversized flying geese including cutting charts
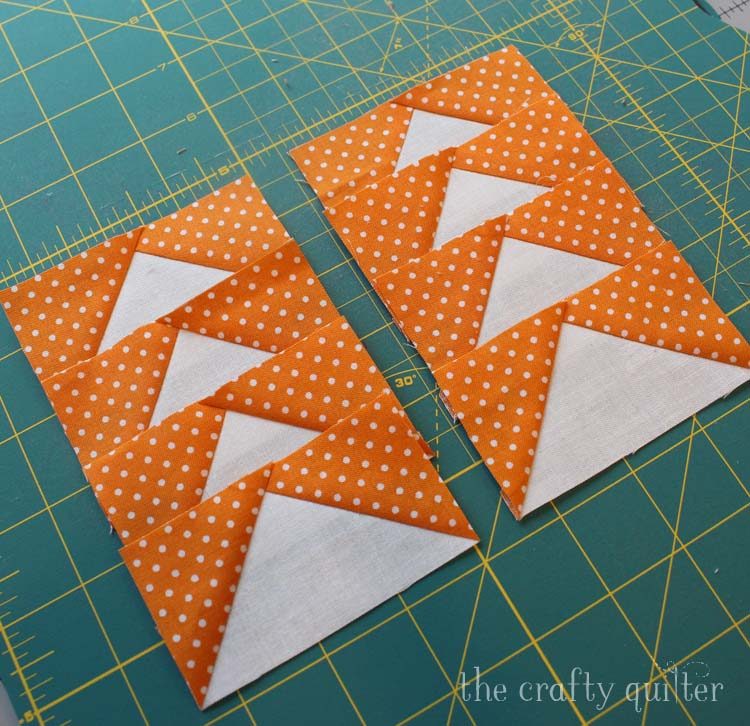
Lately I’ve been making lots of flying geese units for various blocks. There are so many ways to make flying geese, but my favorite way is to make them oversized and them trim them to the correct size. Today I’m going to show you my two favorite methods for making oversized flying geese and several ways of trimming them. I’ve also included a cutting chart for each method that you can download and print for handy reference!
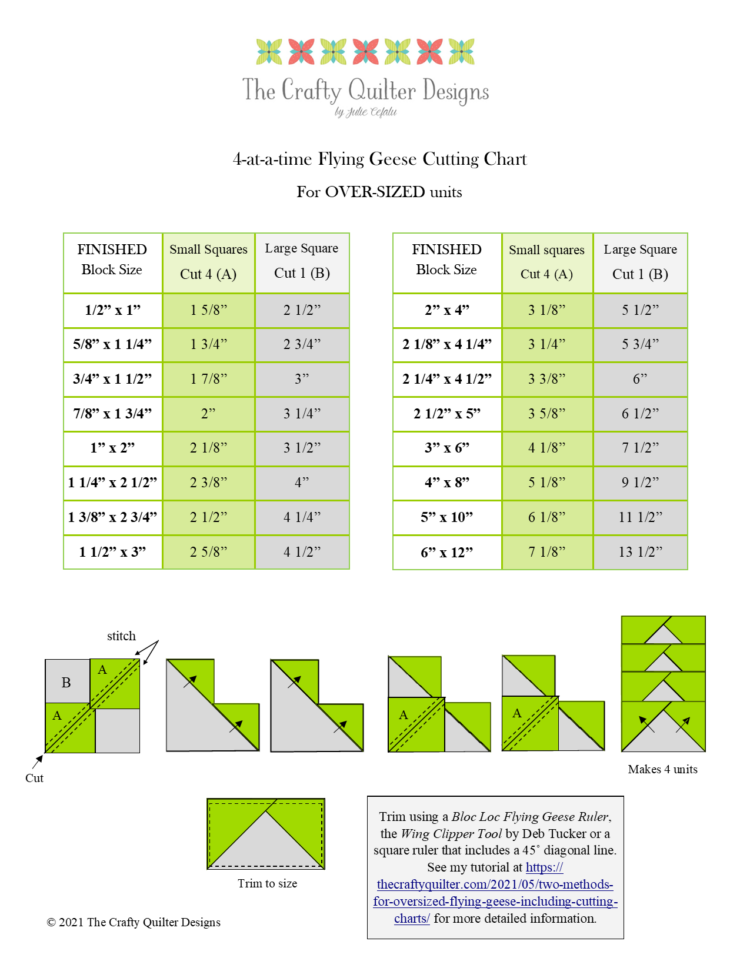
Method 1: 4-at-a-time oversized flying geese
The 4-at-a-time method of making flying geese is my favorite way to make them. This is also called the “no waste method” and uses a formula to come up with exact measurements to cut and then sew the pieces together. If you’re not really careful and you don’t use a scant 1/4″ seam, these flying geese units can turn out a bit small and possibly wonky.
I much prefer making them oversized using the same 4-at-a-time method, but changing the formula to make the cut pieces bigger. This allows me to trim them down perfectly and I don’t worry about being so perfect with my stitching. I will show a few of my favorite trimming methods at the end of this blog post.
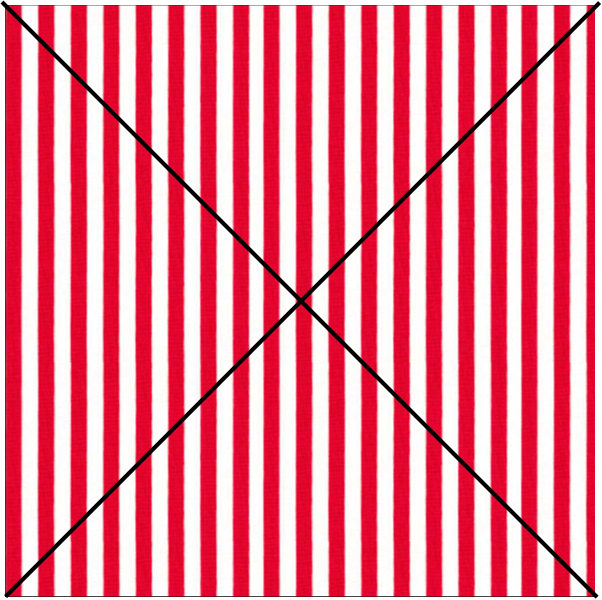
Making flying geese this way is so fast and efficient! The only time I don’t use this method is when I only need to make one or two flying geese or if I have directional fabric. Stripes and one way designs can sometimes work in your favor with this technique, but most often not. It also depends on if the directional fabric will be used for the geese body or for the geese wings. You can see in the example below, a large square of striped fabric. It will eventually get sewn and cut up diagonally. The resulting large triangles (body) will have stripes running horizontally and vertically.

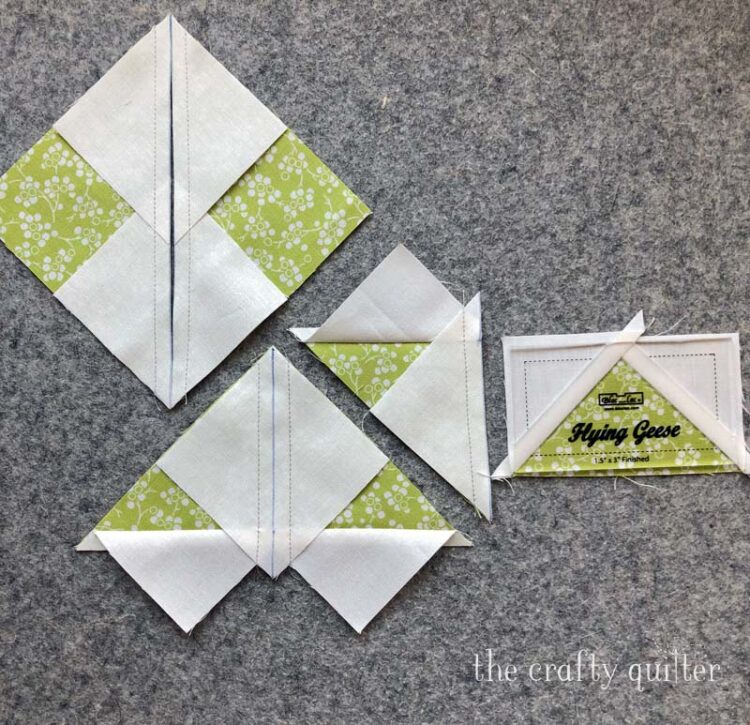
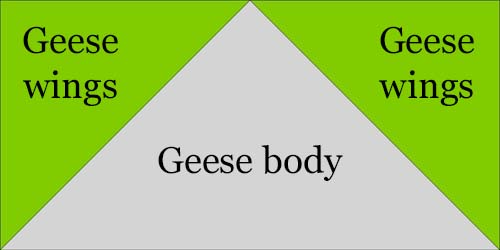
I’ll be referring to the parts of the flying geese as the body and the wings. Some people call it the goose and the sky, but body and wings makes more sense to me. And then there’s the singular goose vs. the plural geese which is a whole other discussion! Here’s a labeled flying geese unit so we’re on the same page.
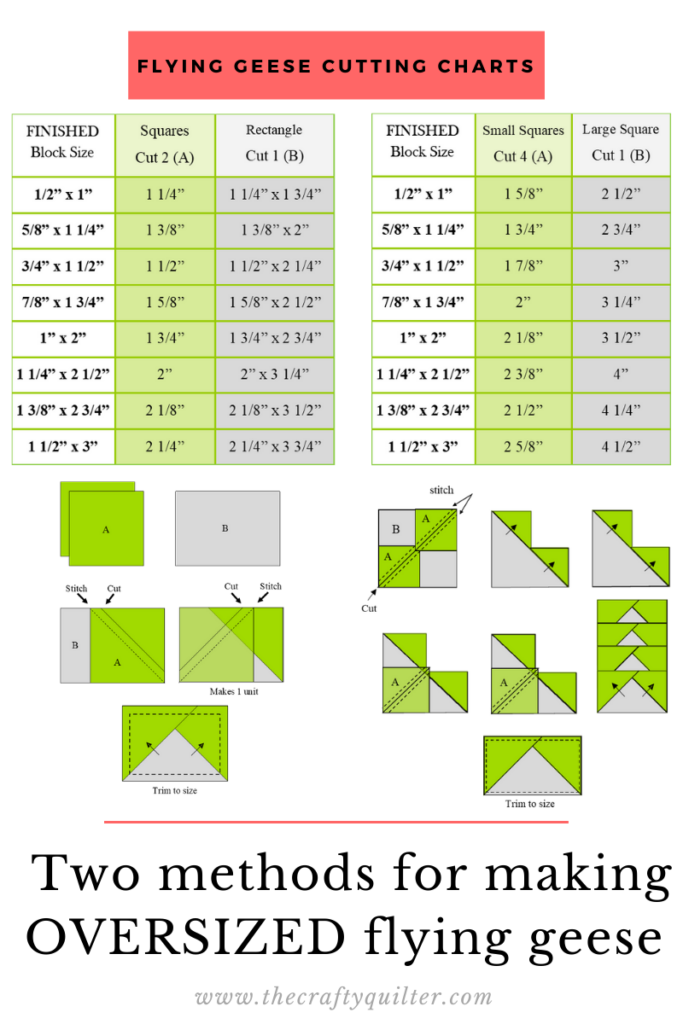
In order to convert any flying geese instructions to the oversized, 4-at-a-time dimensions, you need to know the FINISHED size of the flying geese unit. Then you need to add 1 1/8″ to the short measurement (wings) and 1 1/2″ to the long measurement (geese body). For example, if you need to make a 2″ x 4″ finished-size flying geese unit, the formula will be 2″ + 1 1/8″ = 3 1/8″ for the wing pieces (cut 4) and 4″ + 1 1/2″ = 5 1/2″ (cut 1) for the body piece. But you don’t need to remember that formula because I have a handy cutting chart for you! You can save and download the PDF below or Pin the image for future reference.
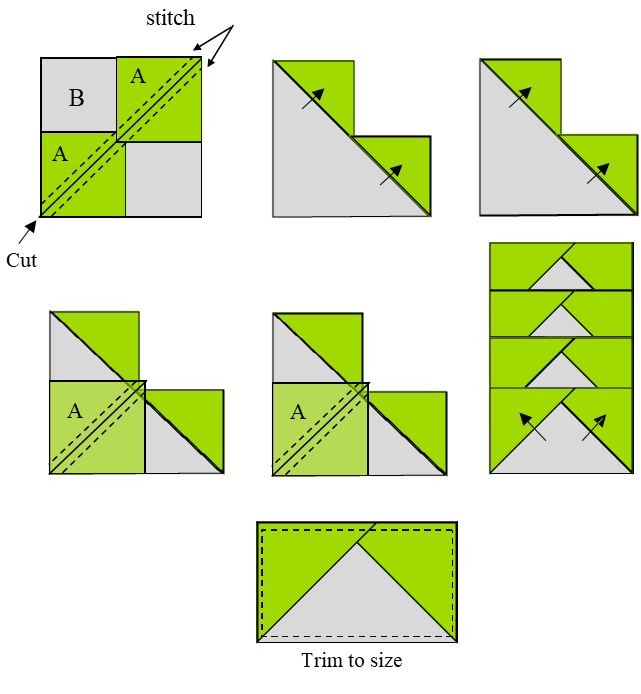
Instructions for oversized flying geese, 4-at-a-time
- Draw a diagonal line on the small squares (A). You can also draw stitching lines 1/4″ on each side of the center diagonal if you choose to.
- With right sides together, place a square on two opposite corners of the large square (B). The squares will overlap in the center.
- Stitch 1/4″ on each side of the drawn line.
- Cut apart on the center diagonal line.
- Press towards the small squares. The resulting shape will look like two hearts.
- Place the remaining small squares, right sides together on the opposite corners of the units from above and stitch 1/4″ on each side of the drawn line.
- Cut apart on the center drawn line. Press towards the corners. You will have four flying geese units that need to be trimmed.
Method 2: Stitch & flip oversized flying geese
The stitch and flip method of making flying geese is most commonly used. I see this technique used in patterns and magazines frequently. The advantage of this method is that you have more control over directional fabrics and it’s simple. The disadvantages are that it’s slightly wasteful and that it requires greater accuracy. You need to stitch right next to the diagonal line to account for the fold-over of fabric and the seam thread. I often forget which side of the line to stitch on! My flying geese almost always turn out wonky.
My solution: oversize the stitch and flip pieces! I just recently tried this on my quilt blocks from the Strawberry Garden Sampler BOM by Fig Tree & Co. I wanted all of the stripes to run in the same direction, and it worked like a charm!
In order to convert stitch & flip flying geese instructions to the oversized dimensions, you need to know the FINISHED size of the flying geese unit. Then you need to add 3/4″” to the square measurement (wings) and 3/4″ to both sides of the rectangle measurement (body). For example, if you need to make a 2″ x 4″ finished-size flying geese unit, the formula will be 2″ + 3/4″ = 2 3/4″ for the wing pieces and (2″ x 4″) + 3/4″ = 2 3/4″ x 4 3/4″ for the body pieces. Again, you don’t need to remember that formula because I have a handy cutting chart for you! You can save and download the PDF below or Pin the image for future reference.
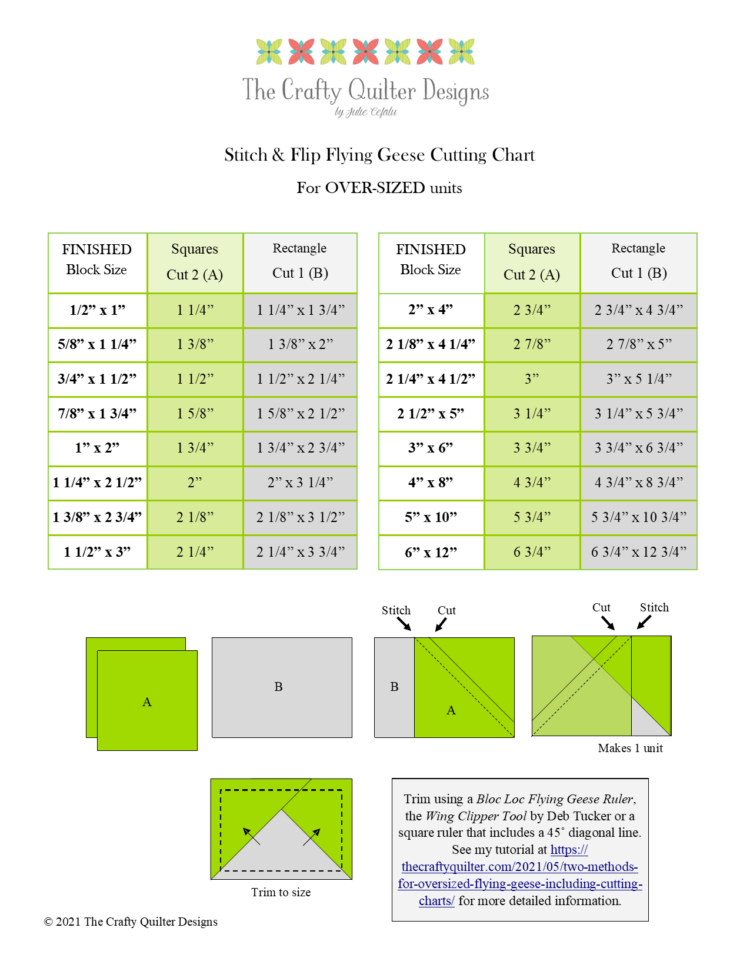
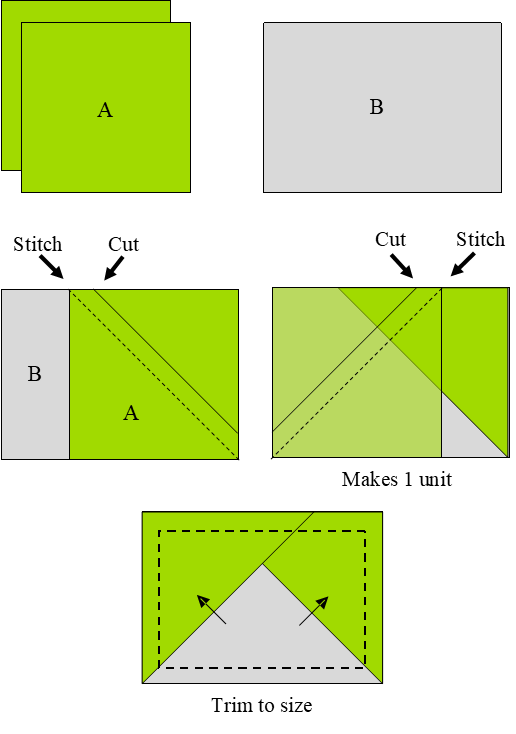
Instructions for oversized flying geese, stitch & flip method:
- Draw a diagonal line from corner to corner on each square (A).
- Place one square, right sides together, onto the base rectangle (B) and stitch directly on the diagonal line.
- Trim seam and press to the corner.
- Repeat with the remaining square on the other end of the rectangle. They will overlap considerably more in the center than when using standard measurements.
- This creates a chunky flying geese unit that needs to be trimmed.
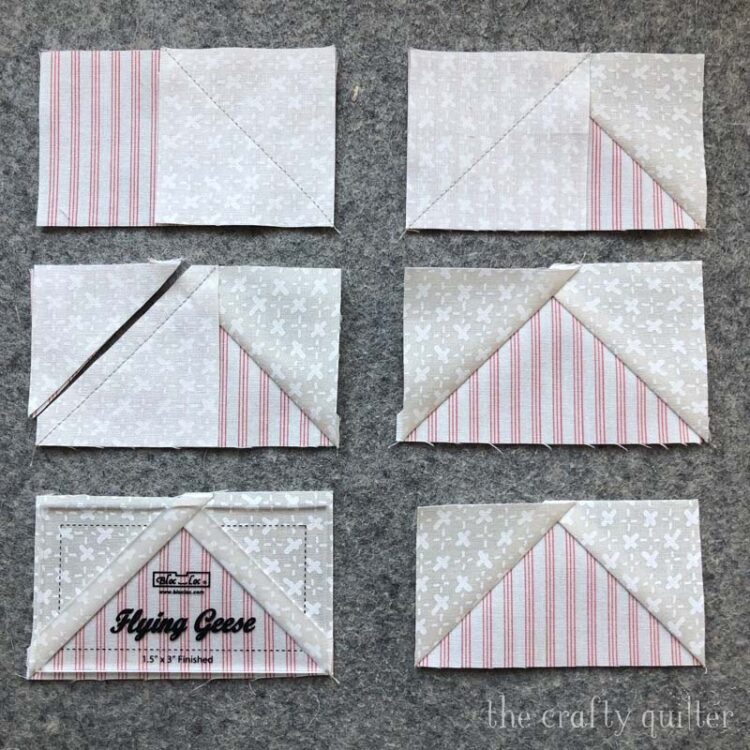
Trimming flying geese with a Bloc Loc ruler
My favorite way to trim flying geese units is to use a Bloc Loc Flying Geese ruler. These are so handy and easy to use! They have a groove underneath that locks into place along the diagonal seam allowance of the block, making it really easy to position. The main drawback is that you need a separate ruler for each size and they are not cheap. With that said, these are my most-used tools for trimming flying geese. I have them in four different sizes from 1″ x 2″ finished up to 3″ x 6″ finished. Once in a while, I need to trim to a different size and I have to use a different ruler.
To use the Bloc Loc Flying Geese ruler, you position it onto your flying geese unit and trim the right side and the top edge. Then you rotate it 180 degrees and trim the remaining two sides. That’s it!

Trimming flying geese using the Wing Clipper Tool
Another great ruler on the market is the Wing Clipper Tool by Studio 180 Designs. The advantage of this tool (ruler) is that it can trim a variety of sizes. There is a Wing Clipper II Tool that trims other sizes that are not as common. The disadvantage is that it’s a little more complicated to use. But still, it does a great job and comes with good instructions.
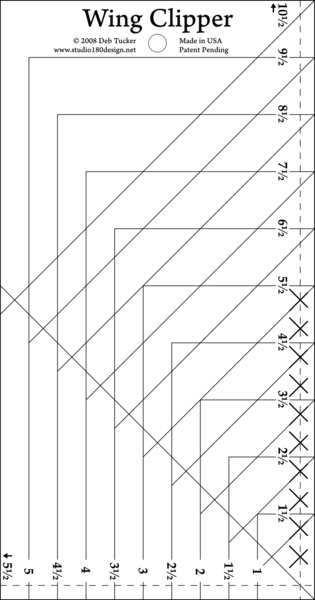
Trimming instructions using the Wing Clipper Tool (I’m right-handed):
- Place the flying geese unit so that the “V” or valley is facing downward.
- Line up the diagonal lines of the ruler on the seams. Make sure you’re using the correct cut sizes (2″ x 3 1/2″) for the example below.
- Trim along the right and upper edges.
- Rotate the flying geese unit 180 degrees (the”V” or valley will be facing upward).
- Reposition the ruler so that the “x” at the top falls on the intersection of the seam and the previously cut edges line up with the correct size marks of the ruler.
- Trim both remaining sides.
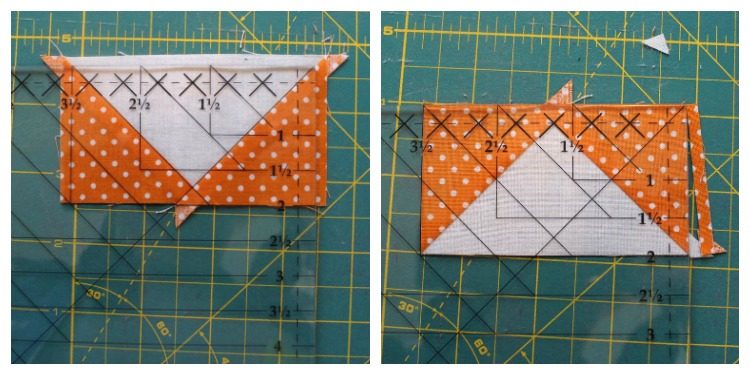
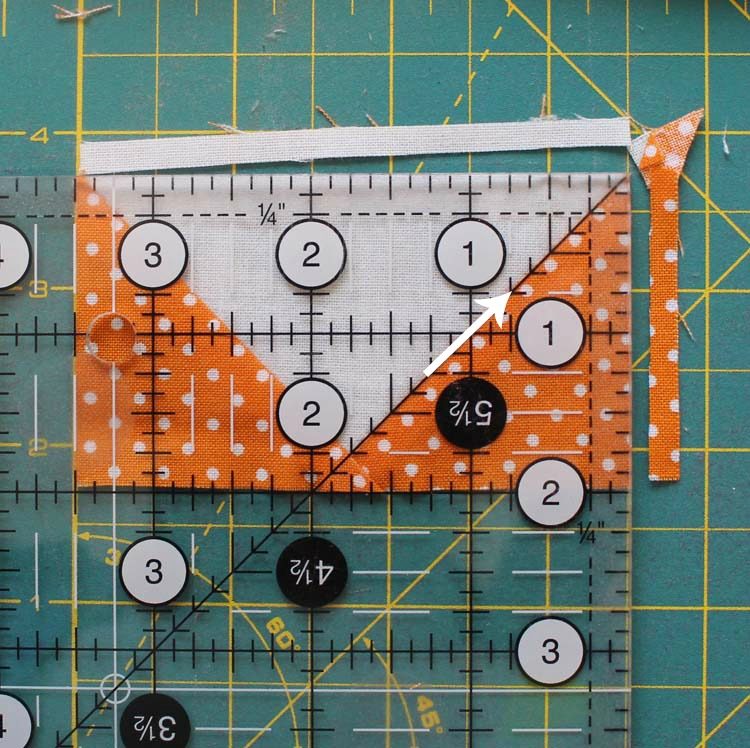
Trimming flying geese using a square ruler
What I like about this method is that it doesn’t cost a penny because you probably have a square ruler already. It’s also versatile and can trim many different sizes for flying geese units (assuming it’s large enough). I use a Creative Grids 6 1/2″ square ruler most often. The drawback is that you have to put your thinking cap on (a little). If you trim this way often enough though, you’ll get used to it.
Trimming instructions using a square ruler. Example shown is being trimmed to 2″ x 3 1/2″.
- Place the flying geese unit so that the “V” or valley is facing up. The 1/4″ line of the ruler and the 1 3/4″ line should be on the center seam. The 2″ and 3 1/2″ lines of the ruler should fall on the bottom diagonal seams.
- Trim the right and top edges.
- Turn the unit and place the diagonal line of the ruler on the seam. The previously cut edges will line up with the 2″ and 3 1/2″ lines of the ruler. Trim the remaining two edges.
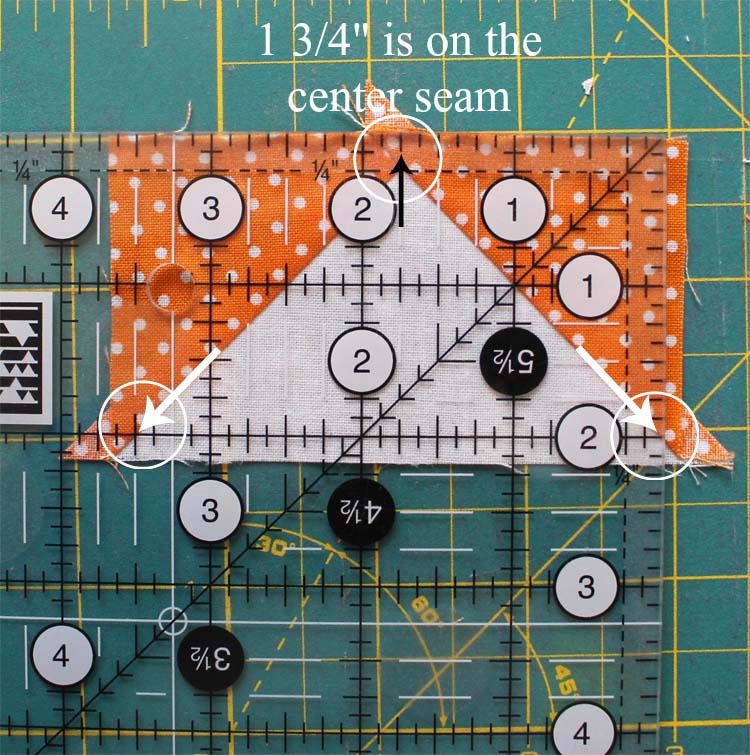
Note: in this example, I’m trimming to 2″ x 3 1/2″. To make this work for any size flying geese unit, you need to know the center measurement of the long side of the unit you’re making. For example, to find the center of a 2 1/2″ x 4 1/2″ unit you would divide 4 1/2″ by 2 which equals 2 1/4″. You would then place the 2 1/4″ line of the ruler on the center seam allowance (point) of the flying geese unit.
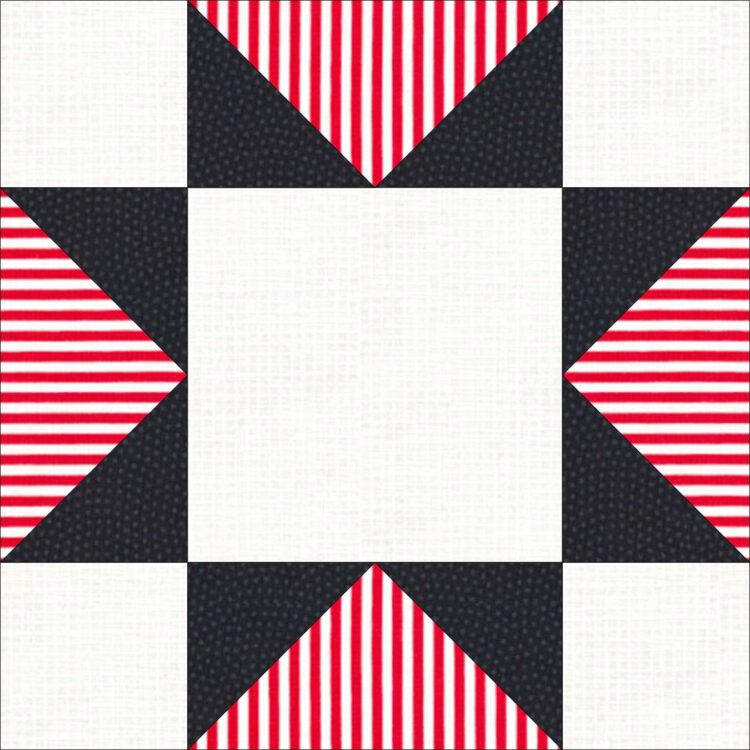
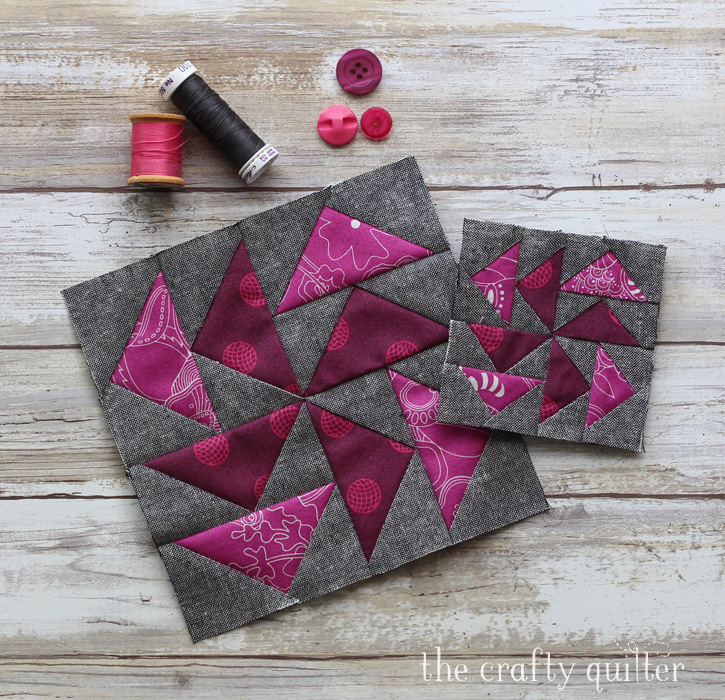
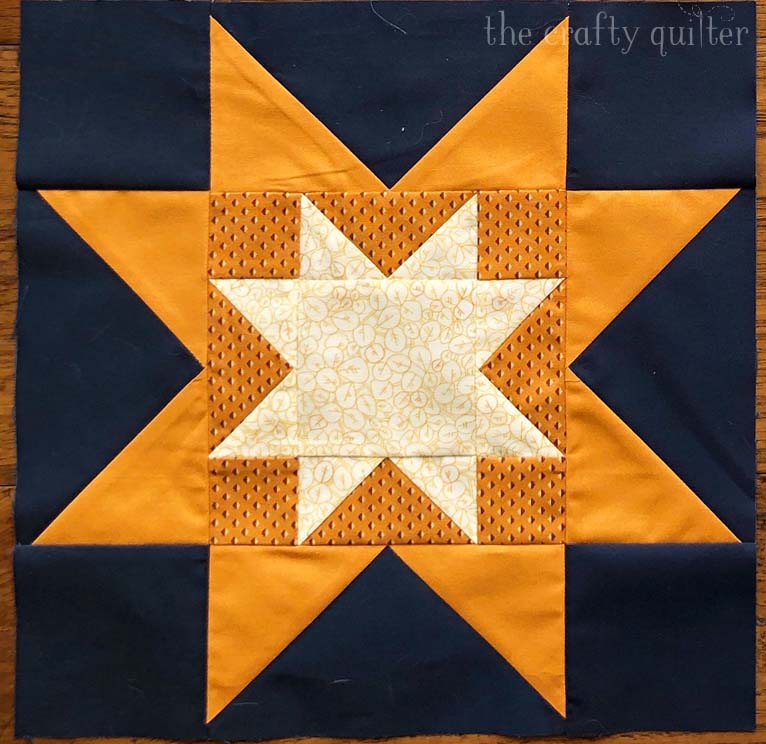
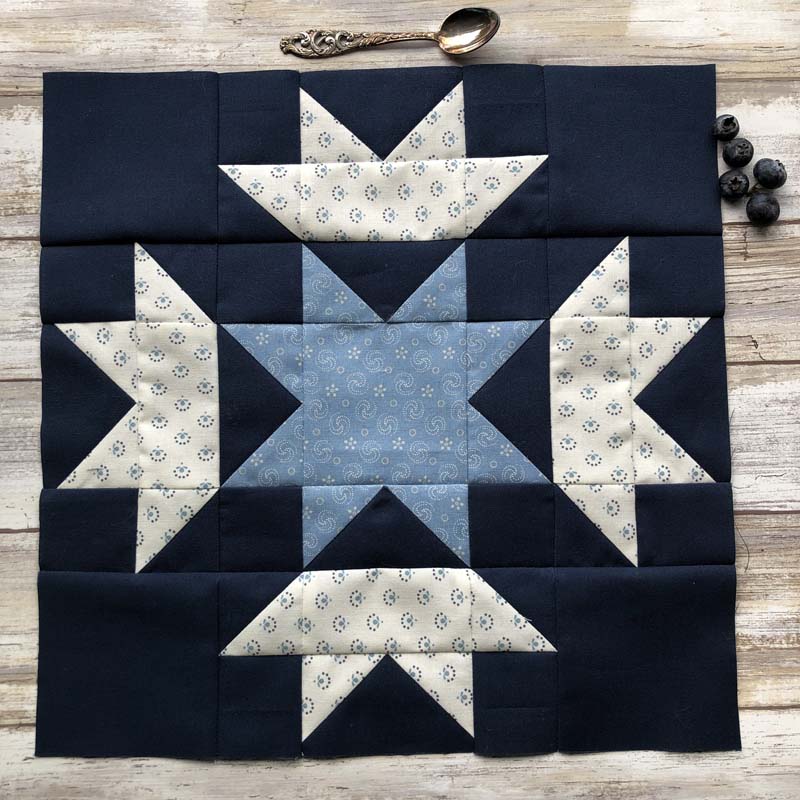
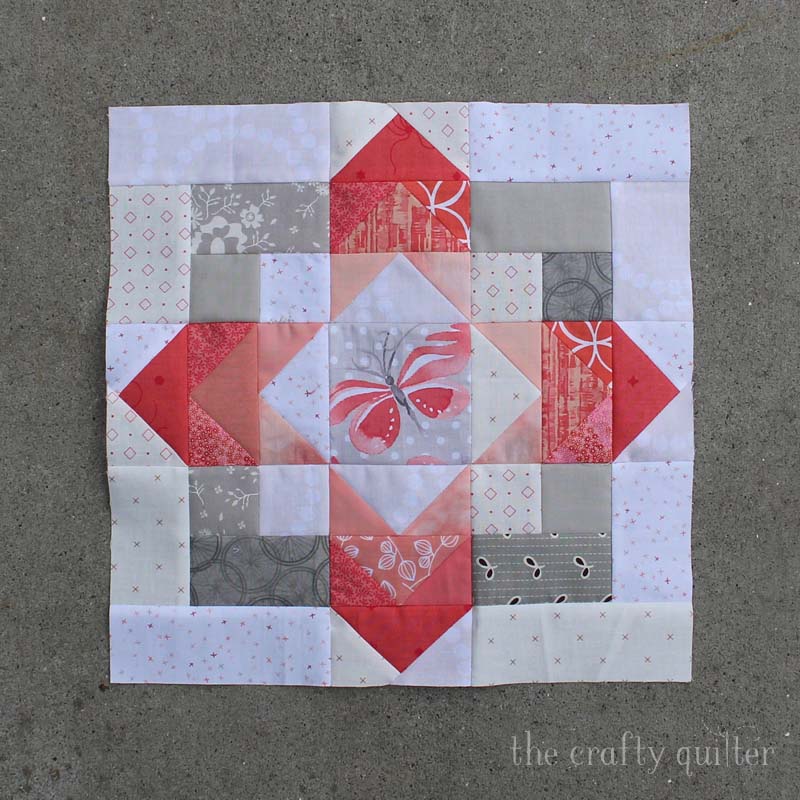
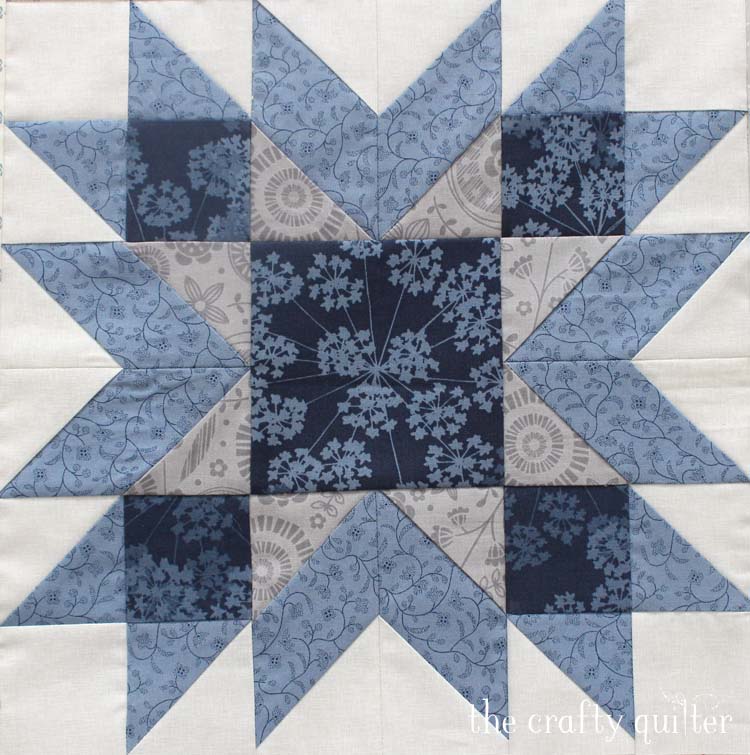
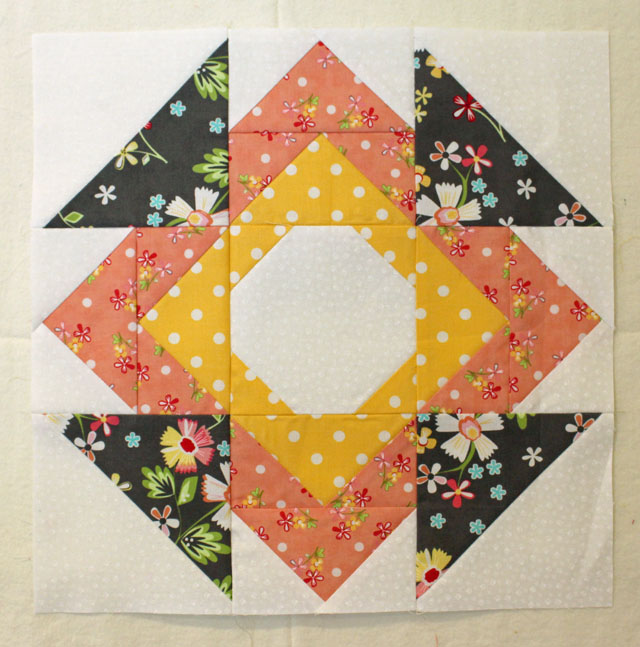
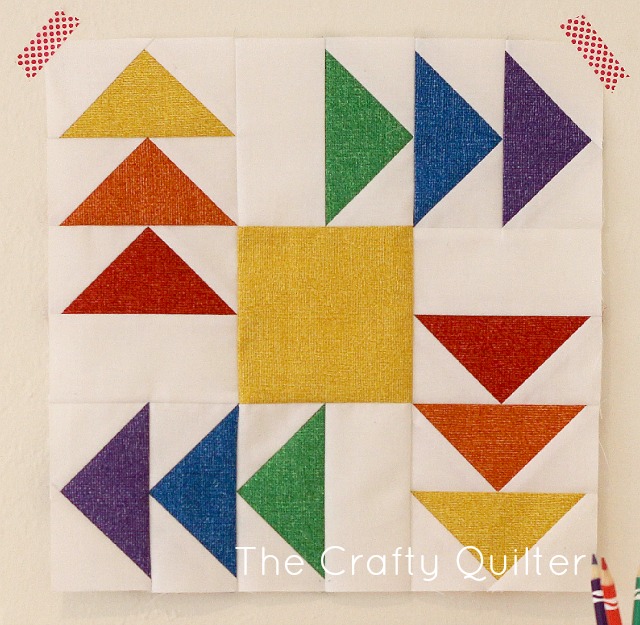
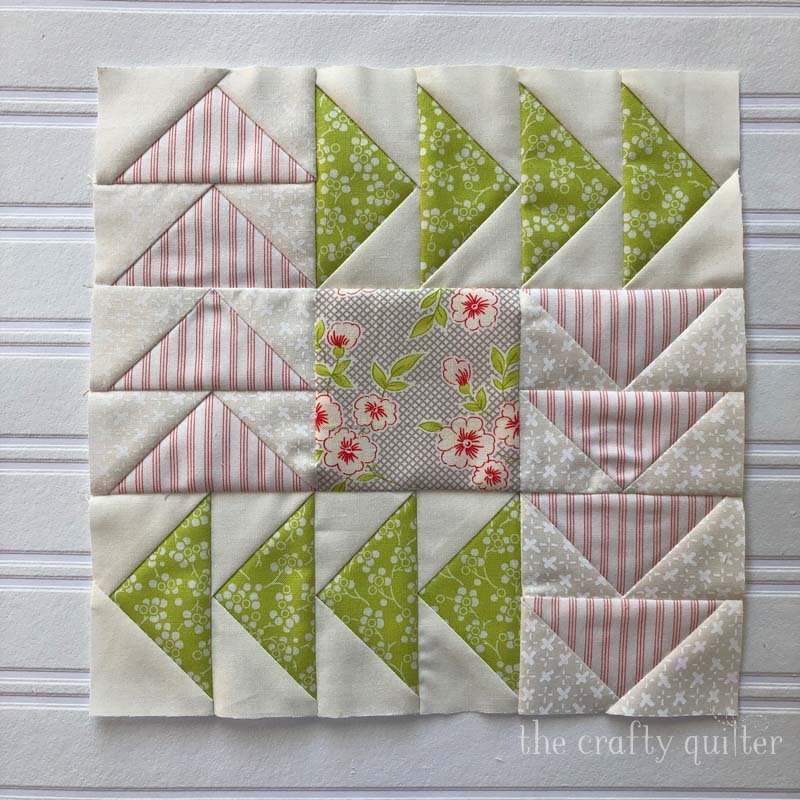
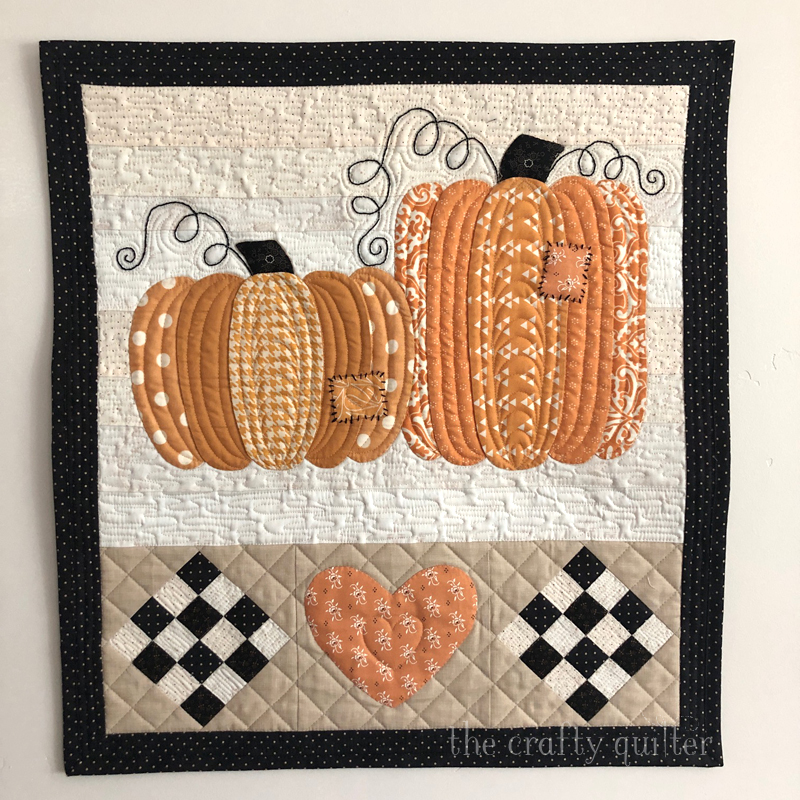
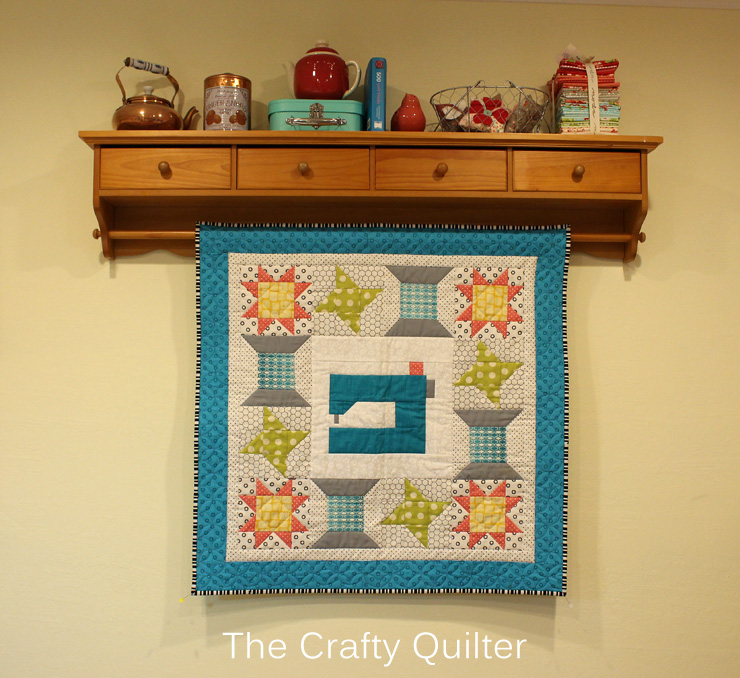
That’s a bunch of information about flying geese and I hope it was helpful. I love making flying geese by oversizing them first and trimming to exact size using any of the methods shown here. I didn’t have to search too far to find some of my past quilt blocks that include flying geese. Here’s a little inspiration for you!
Thanks for visiting and happy quilting!

Discover more from The Crafty Quilter
Subscribe to get the latest posts sent to your email.


Thank you so much for your explanations so clear.
I just have to do it now… for my great pleasure.
Have a good day
Thank you for the tutorial!
Quick question, when you say “finished size” in the chart, is that referring to the size you trim each flying geese down to, or the size once it’s sewn into a block and the seam allowances have been used?
Thanks!
I ve been trying the 4 FG method, 3 of the geese come out the same size one is alway bigger. What am I doing wrong?
You can simulate a Bloc-Loc ruler using Post-It notes and and a square ruler.
1) Remove 3 or 4 Post-It notes from the stack as one unit (so they are all still perfectly aligned).
2) Place the Post-It notes on your table, with the sticky side facing up.
3) Starting from a corner that has the sticky stuff on it, mark points 1.5″ from the corner along the two straight sides coming out of that corner. Using a ruler, draw a straight line between those two points. (You now have a 45/45/90 degree triangle drawn with 90 degree angle in the corner.)
4) Place the Post-Its on the underside of your ruler (sticky side on the ruler) so that the corner is at the right spot and the drawn line on the Post-It’s is parallel to the lines on your ruler. In the square ruler example on this page, the corner goes 1.75″ in from the right edge and 1.4″ in from the top edge; the drawn line would be slightly below and parallel to the 1″ line on the ruler.
5) Place the ruler onto a sewn unit and lock the Post-It corner into the V of the unit. Check that the diagonal seams are hitting on at spots equidistant from the center line. (If they are not, the Post-Its are not at the right angle; peel them off and try again.)
To use this creation, you trim the first two sides the same way as the Bloc-Loc example, and the second two sides the same way as the square ruler example. So, it’s not *quite* as nice as true Bloc-Loc ruler, but it does get you the much easier and faster line up of the crucial first two cuts which are key to having the V corner exactly the right distance from the edge. (And no buying a special tool for just a few units.)
Cindy, I used a Creative Grids Flying Geese ruler and also used your Post-It Notes tip, what a breeze to trim up the flying geese, thank you!
Thank you so much for this very detailed and extremely helpful tutorial. I was so challenged by FG and frustrated that I could not get the correct seam allowances for the tips- to the point that I had resorted to using paper piecing to get accurate FG.
I was trying to adjust my own pattern to a smaller size and was struggling getting the right cutting dimensions for the new size on the flying geese. I have looked at several websites and this is hands-down the best information I have found. I love that you give charts for both methods, give dimensions for making large and cutting down (that’s how I do it), and that your charts include very small sized flying geese, because I make mini quilts. Can’t thank you enough. I will be teaching a class to a guild next month and I will definitely refer them to this post.
Thank you for this tutorial! What is the name of the block in the gallery at the bottom? The pink flower looking one with the butterfly in the middle? Is there a quilt pattern that goes to?
This is a life saver for me. I have been doing 4 at a time geese in my quilts and my blocks have come out too small. Thanks for such an awesome tutorial.
I’ve just spent two hours trying to find *true* calculations for FG blocks and all I could find was charts with numbers but no actual explanations or guidance on how much to add – and more importantly how to align a square ruler – to trim down accurately…thank you so very much for these incredible explanations; this is now going to be a game changer for me instead of an avoidance of making flying geese!
Thanks so much for this amazing tutorial and easy to print document!
I converted to the 4-at-a-time method when I found the Quilt In A Day rulers and Flying Geese quickly became one of my favorite units. I’m now using the Wing Clipper tools because they cover so very many sizes (tho I still use the smallest QIAD template). It’s amazing to me how many blocks or designs use four of any color combination. But I’d never considered oversized individual geese units. Thank you for adding this trick to my tool bag. By the way, I’m a geese/sky proponent primarily because of the goose/geese conundrum. So long as I think about that large triangle as a geese formation (and not an individual bird) it’s a no brainer for me. FWIW.
Wow, thank you so much for your generosity in sharing the charts and knowledge. As a newcomer to patchwork there is so much to fathom and it is overwhelming especially because it seems you have to have so many different rulers that I almost gave up before I started. So grateful that you show how to work with just a square ruler and still make this patch that goes into so many different blocks. I will go sign up for your newsletter. Thank you again for taking time to post on your blog
Hello
Could you please tell me what you use for dark fabric to make lines for appliques?
Thank you
Julie, You get 1st prize for the best tutorial EVER!!! My Very Best Wishes, Patricia Kendel
Such beautiful blocks and great instructions. I will link this up to the Tips and Tutorials on the 22!
Thank you so much for this! I love my Bloc Loc rulers for flying geese and at one point I decided I needed to figure out how to make them oversized so I could trim down, but I hadn’t been able to figure it out. You rock!! 🙂
I avoid FG because they are often wonky. Thank you for these tips and charts. I look forward to getting much better at this unit!
Wow! This is so helpful – everything we need in one place! I’m going to bookmark it so I can return again and again.
Thank you so much. I loved this post. Sometimes I think my head will explode reading different how-tos and trying to decide what will work for a particular quilt. The graphics you’ve put here in addition to the charts are really helpful.
Thank You so much for this tutorial! You are Awesome!!
Hi, Julie! FG 4-at-a-time is my favorite, too. Sometimes, like you, I need only 1 or 2, and I cringe at that. No matter how hard I try, they don’t usually turn out as accurately as I would like. I LOVE YOUR IDEA OF MAKING THEM OVERSIZED AND THEN TRIMMING! Thank you for you work on that! I shall not fear stitch-and-flip FG in the future!! 😉
Thank you sooo much Julie…I always look forward to your post when I open my email on Monday morning. You are like a ray of sunshine and the information, family included are very much appreciated.
Julie – Thank you for the very useful charts and flying geese tutorials. I rarely make flying geese but could have used these charts two weeks ago for an upcoming project. I’ll be bookmarking this page for future reference!
Julie, I recently was introduced to the Wing Clipper tool through a BOM being done locally. Wow- what a huge difference it has made in getting perfect flying geese!! Yes- there is a bit of wasted excess due to the oversized trimming up….but I absolutely love how perfect each geese is! I highly recommend it! Plus- the tool is a bit easier to manipulate as it’s larger than the Bloc Loc…sometimes for smaller geese I have trouble holding the smaller template in one spot. Just my two cents!
Thanks so much!! I tried this right away & these are the best geese I’ve ever made. I’ve always avoided patterns with flying geese because mine were a hit or miss. This makes so much sense and it works!!! Thanks again!!! I’m rethinking my next project. I think it’s time for some geese.
Jut the type of tutorial that I treasure…..perfectly detailed, with photos and thanks so very much!
Wow — what a fabulous tutorial, Julie! I especially appreciate your good explanation and illustrations of how stripes and directional fabrics can look depending on the method chosen to make Flying Geese units.
Thank you SO MUCH for those very valuable instructions and the handy dandy printables! They will be going in my binder!
Thank you, Julie, for the quick reference charts!!! I love flying geese, but hate the calculations for the 4 at a time, It’s my favorite method also. Thanks for a GREAT post. :o)
Great tips and charts, Julie! Thanks! 🙂
Thanks Julie! I was just looking at a pattern today that I really liked but then ….. it had my enemy flying geese! Now I think I will go ahead with the pattern.
Thank you for this great information!