How to make flanged quilt binding
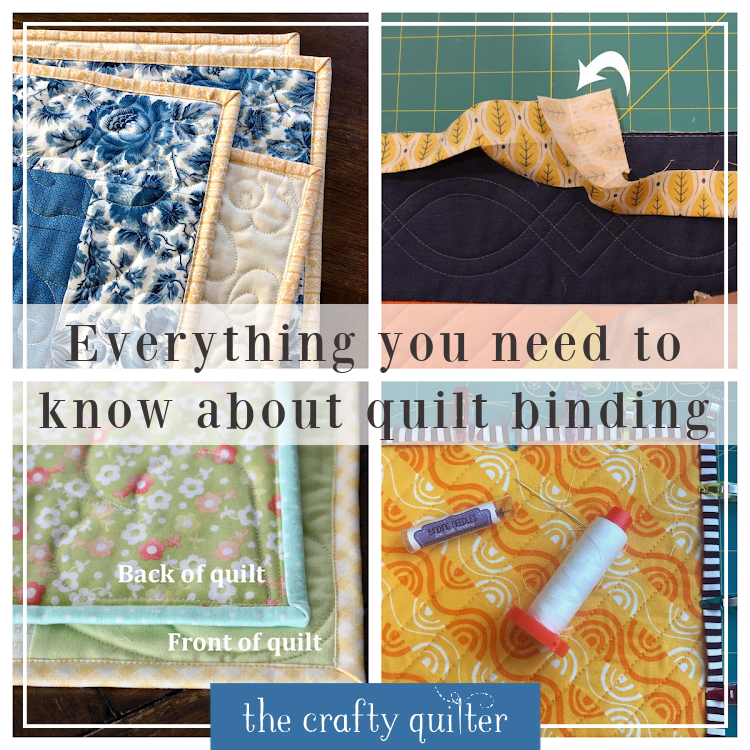
Sometimes it’s the little things that can make a big impact and that’s often true with quilt binding. Today, I’m going to show you how to make flanged quilt binding. It’s so easy and gives your quilt that little extra flair in the finish!
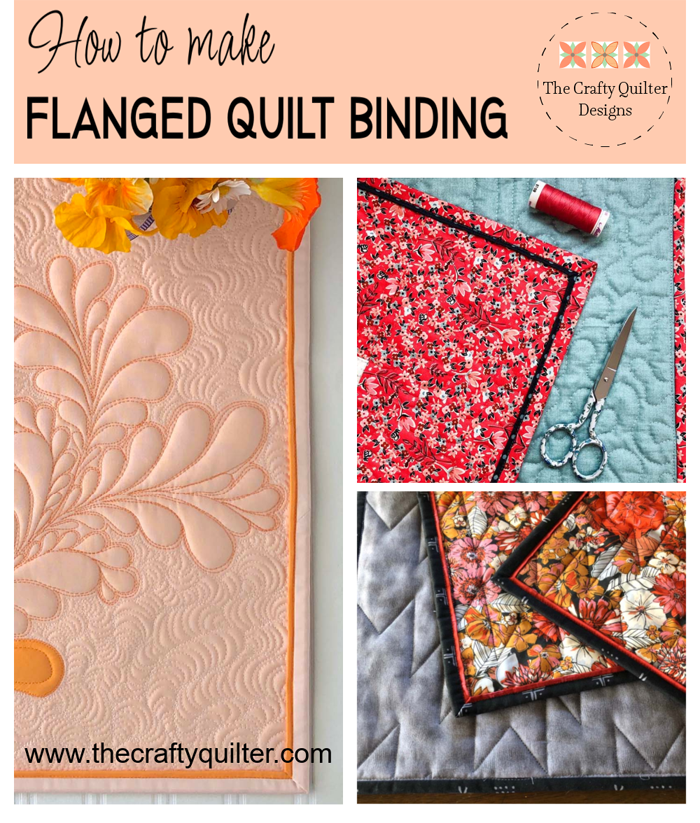
Flanged quilt binding is meant to look like you added piping to the edge of the binding (without all the work). Yes, there’s an easier way to get this same effect and it looks amazing! One of the things I love most about flanged binding is that it’s completed all by machine. No hand stitching involved!
Things to consider
Before choosing this method of quilt binding, there are a few things to consider. The most important one is the quilt border. If your quilt doesn’t have a border or if it’s a pieced border that contain points, you may lose them in the binding. Because the flanged binding is sewn to the back and wrapped around to the front, it needs to cover the binding seam. There’s also the flange itself that extends another 1/8″ (or 3/16″) beyond where you’ll be stitching the binding. The points in the border will get covered if this is the case. But don’t despair, you can still make this work! I’ll share that in the Tips section.
Choosing fabric
When choosing fabric for the binding and flange, keep in mind that the flange is positioned between the outer edge of the quilt top and the binding fabric. You’ll want it to pop; in other words, have good contrast between both neighbors.
If my quilt has a plain border, I often use the same fabric for the binding as the border. This gives the flange a thin outline around the entire quilt and you almost lose sight of the actual binding. You can see that in the samples below.
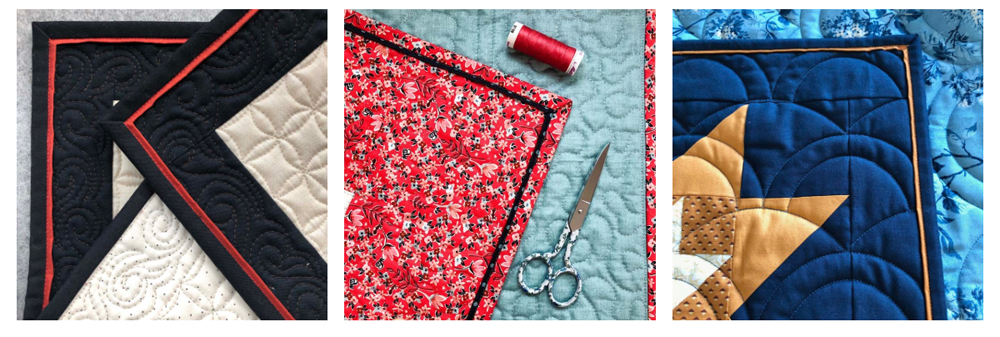
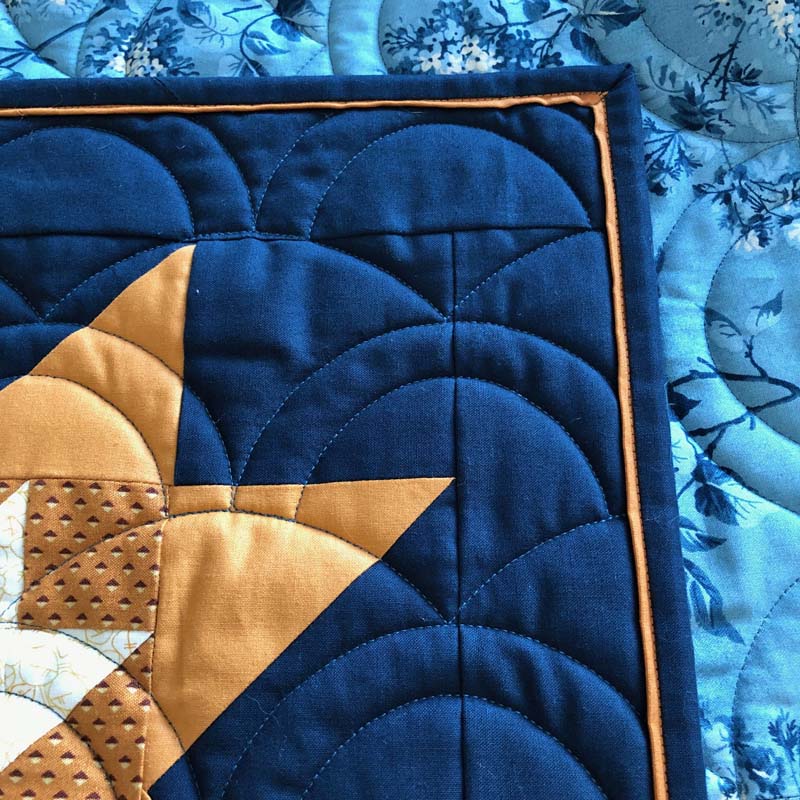
It’s also nice to add a separate binding color that coordinates with the flange and the quilt top as in the photo below. This is something I’d like to do more of.

Supplies needed
- Fabric: choose two coordinating fabrics that have good contrast; we’ll call them flange fabric and binding fabric.
- Thread that coordinates with the flange fabric for the top thread and a thread color that coordinates with the backing fabric for the bobbin.
How much binding fabric will you need? If you’re working from a pattern, purchase a little more than half the amount of flange fabric and half the amount of binding fabric. For example, if the pattern calls for 1/2 yard of binding, you’ll need 3/8 yard for the flange fabric and 1/4 yard for the binding fabric.
If you don’t have a pattern, you need to determine the number of binding and flange strips to cut. For that, you need to measure the length of all four sides of the quilt, add those measurements together and add 12″ on top of that. Then divide this number by 41″ (the useable width of fabric). Round that number up to the next whole number. This gives you the number of strips for EACH.
Example: 60″ + 60″ + 45″ + 45″ = 210″ divided by 41″ = 5.122. Rounded up = 6. This is the number of strips needed.
Multiply the number of strips you need by the width of strips to cut and you’ll get the exact amount of fabric needed. I usually round that up to the next 1/8 yard increment.
Size options
Let’s talk about binding size and flange width for a moment. The finished width of the flange is typically 1/8″, but you can make it a little thicker if you prefer. Similarly, the total binding width can be adjusted to 2 1/4″, 2 1/2″ or 2 3/4″. Both of these adjustments are made by changing the width of the binding strips and the flange strips. Below, I’ve shown three different size options and two different flange widths.
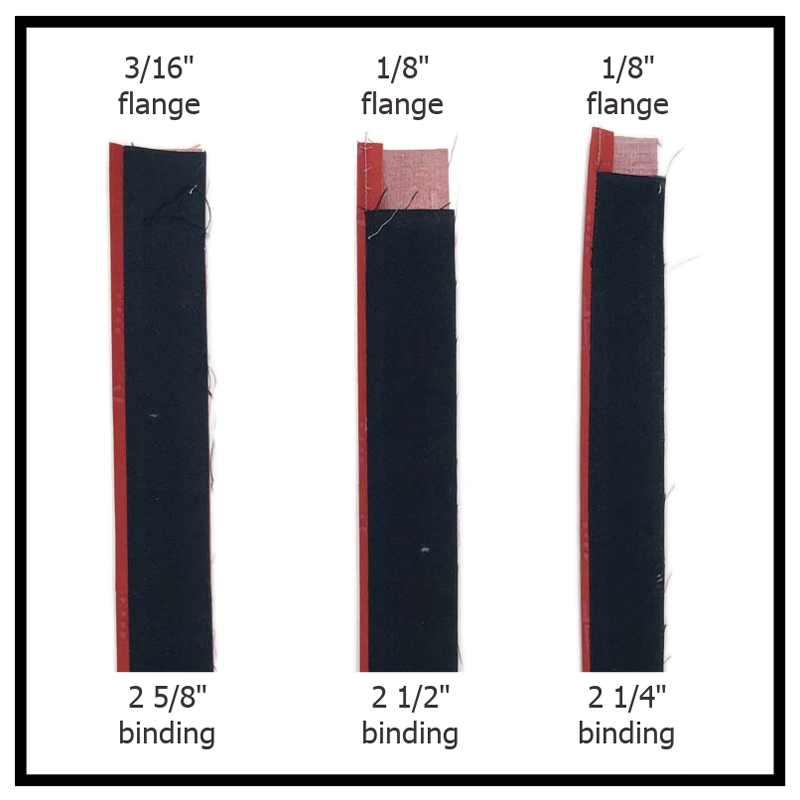
Another thing to note is that the flange strips are cut wider than the binding strips. Even though you see more of the binding fabric from the outside, the flange fabric needs to extend beyond the seam to create the flange.

In general, the flange fabric is 1/4″ wider than the binding fabric to create a 1/8″ visible flange. If you want more flange to be visible (3/16″), cut it 3/8″ wider than the binding fabric. It’s all a matter of personal preference. The chart below shows the sizes needed to create binding with 1/8″ visible flange.

The size of the flange in the following tutorial is 3/8″ wide. This is what I had already prepared when I decided to create this tutorial as an afterthought. So, if it appears “fat” that’s because it is!
Steps to create flanged binding
- Cut strips of binding and flange fabric according to your desired total binding width. For example, 2 1/2″ binding would require 1 3/8″ binding strips and 1 5/8″ flange strips.
- Sew the binding strips together with a diagonal seam and press open. Repeat for the flange strips.
- With right sides together, sew the binding and flange strips together with 1/4″ seam.
- Press toward the binding fabric.

- Press the strip in half, wrong sides together. Your flanged binding is ready to attach!

Steps to attach flanged binding
Note: I ALWAYS test the position of the start point of the binding to make sure there are no binding seams that land in a corner. I usually pick the center of a quilt side to start, and then I lay the binding around all four sides (and fold/miter each corner). If a seam is too close or directly in the mitered corner, I move the starting point up or down. Then I test it again.
Once you’ve tested the starting position, follow the steps below.
- Starting on the BACK of the quilt, place the flanged binding along the quilt edge so that the BINDING fabric is facing down towards the back of the quilt and the raw edges are even.
- Leaving a 10″ tail, begin stitching with a 1/4″ seam allowance. After a few inches, check to make sure the binding will cover the stitches once it’s wrapped to the front side. You may need to adjust your seam allowance.
- Continue stitching until you get to a corner. Stop 1/4″ (or the width of your seam allowance) from the corner and pivot towards the corner. Stitch off the corner and cut the thread.
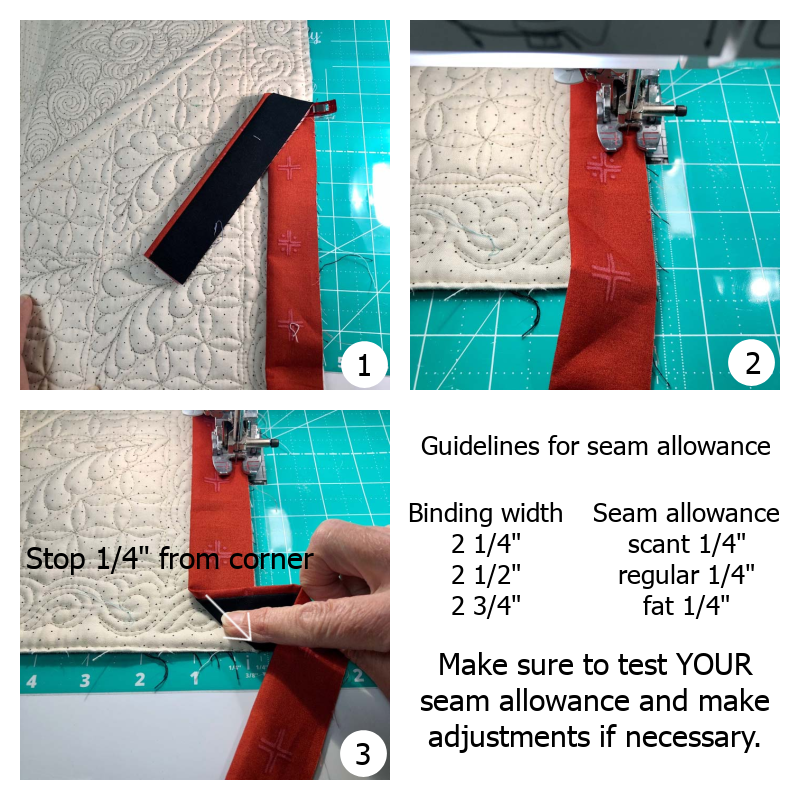
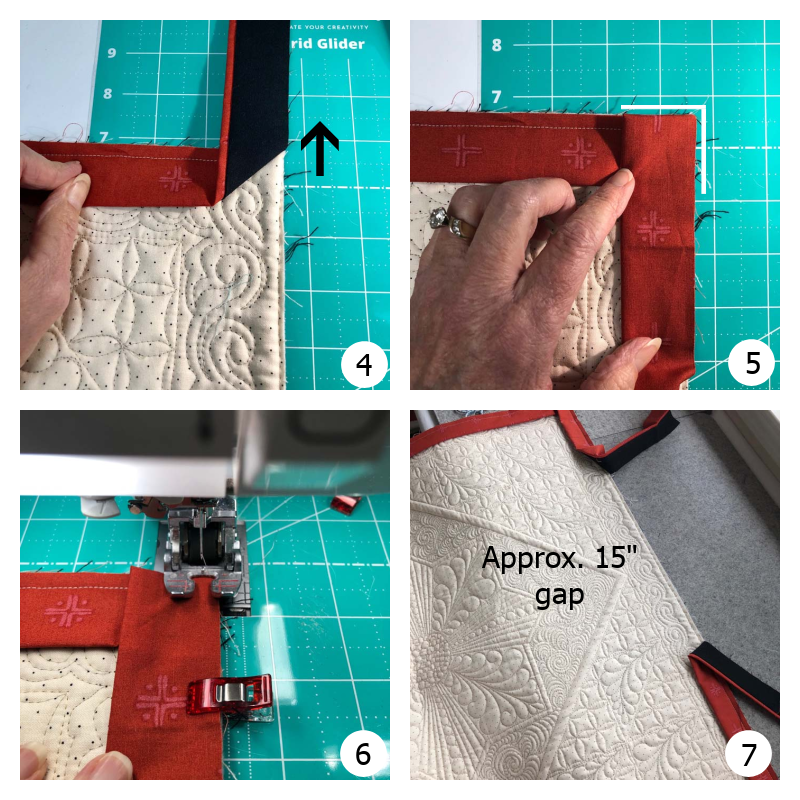
- Turn the quilt and fold the binding fabric at a 45 degree angle (up and away from the quilt).
- Fold the binding down on itself so that the fold is even with the top edge of the quilt and the raw edges are even.
- Begin stitching at the folded corner until you get to the next corner. Repeat for each corner.
- Stop stitching when there is about a 15″ gap from the starting stitches.
Steps to join the binding tails & finishing
There are a gazillion ways to join the ends (tails) of binding. Use whatever method works for you. I’ve been using the same technique for a very long time and I’m really comfortable with it. I’ll give you the basic steps and if you want a video demonstration, you can find it here (about 3 minutes in).
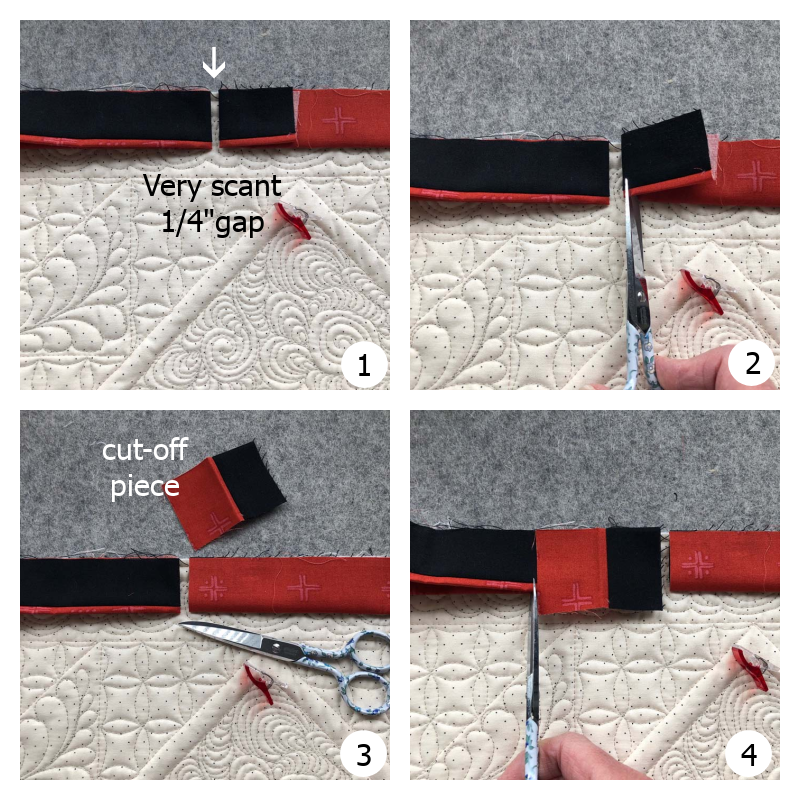
- Fold both binding tails back so there is a very scant 1/4″ gap between them.
- Cut one of the tails on the fold.
- Save the cut-off tail to measure where to cut the other tail.
- Place the cut-off piece on top of the other tail and trim the binding tail even with the edge (that is away from the fold).
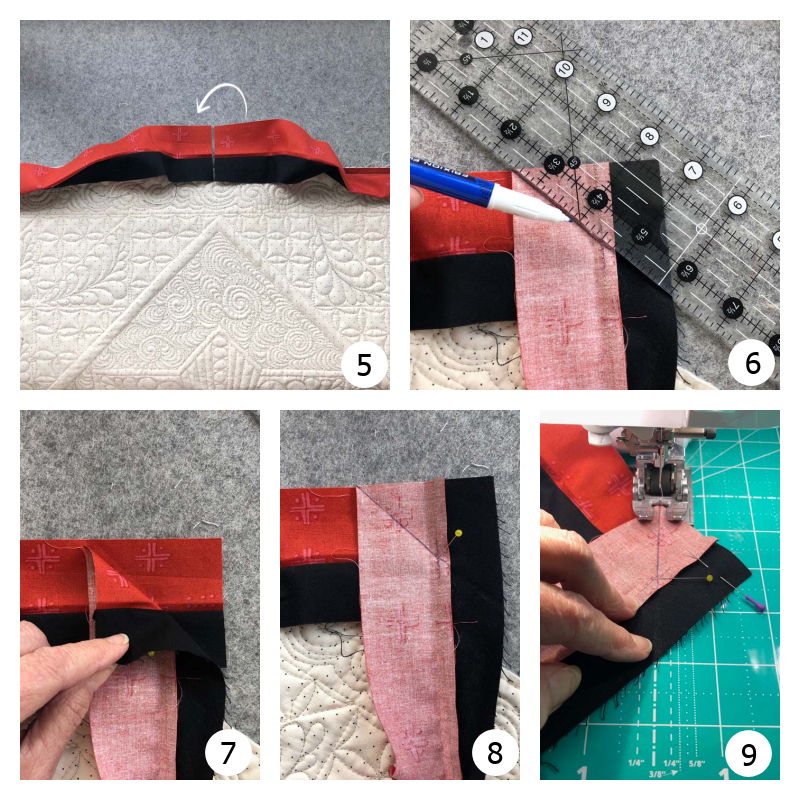
- Open up both tail ends so that they are facing each other. Flip the right side tail onto the left tail (right sides together) and rotate the top tail 90 degrees. They should be perpendicular to each other.
- Draw a diagonal line from corner to corner on the top tail.
- Check to make sure the flange seams are aligned.
- Place a pin straight down where the diagonal line and the flange seams intersect. Pin on each side.
- Stitch diagonal seam.
- Check to make sure the binding fits properly, and then trim the seam and press open (not pictured).
- Stitch the remainder of the binding in place.
- Press the binding over the seam. This makes it easier to wrap to the front.
- From the front, miter each corner and pin in place.
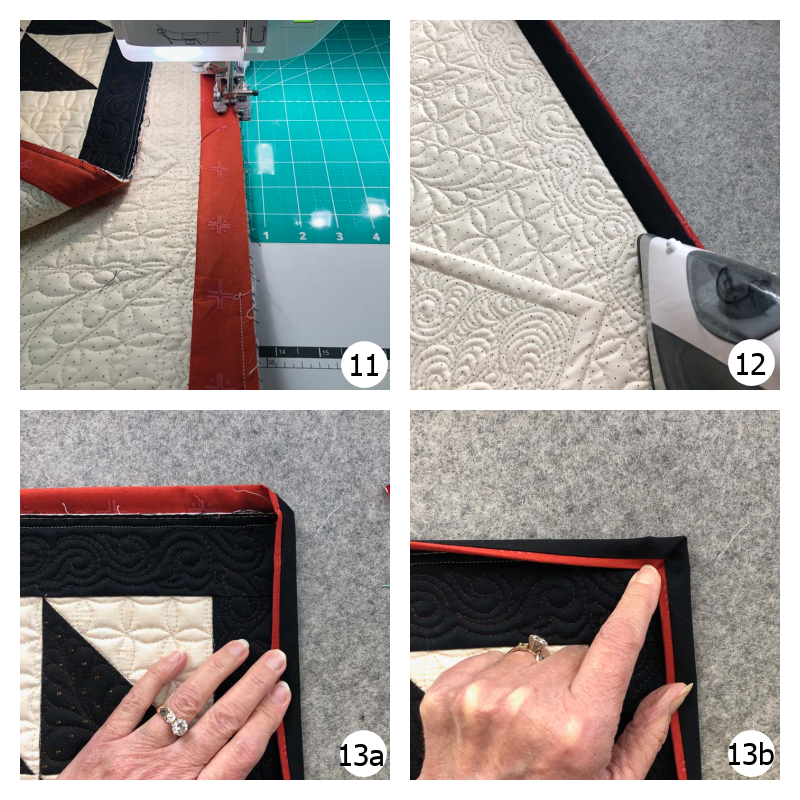
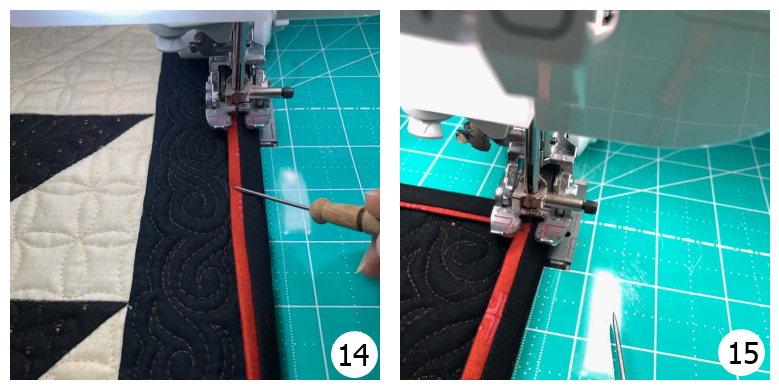
- From the front, stitch very close to the seam between the flange and binding fabric. Make sure to thread your machine with matching thread color for the top (flange color) and bobbin (backing color).
- Pivot when you get to each corner and continue stitching all the way around.
Tips for flange quilt binding
- If your quilt doesn’t have a border or If you’re concerned about cutting off points in a pieced border, trim the batting and backing 1/8″ beyond the quilt top all the way around. This will give you extra space for the 1/4″ seam allowance and the flanged binding will land correctly on the front. You might want to experiment with this on a sample to make sure you have the right proportions.
- Use a walking foot when attaching binding to the quilt. I also use a walking foot when stitching the flange in place on the front. This keeps everything feeding through evenly.
- Use a thicker weight thread to topstitch the flange (instead of stitching near the ditch) to give it a more decorative edge. A 30 wt. or 12 wt. thread would look really nice here.
- You can use bias strips for the binding and flange if you prefer. I’m lazy and I cut my strips on the straight of grain unless I have a curved edge to go around.
Downloadable instructions
I’ve made a condensed version of the instructions that you can download and print! Keep it handy in your sewing room (or supply area) so you don’t have to go fishing for this tutorial every time. Just click on the button below!
About the sample quilt
I began making this quilt several years ago. I was inspired by a free motion quilting design that I saw on Instagram. I wanted to make something similar, so I pieced together four birds in the air blocks which gave me a good amount of space for the FMQ medallion. I drew the medallion out on paper first and then enlarged it for the quilt. I think it took me a week to quilt it.
The quilt has been waiting patiently for me to bind it. A few weeks ago, I decided to finally get it done. This also seemed like a great opportunity to add a flanged binding to add a small splash of color without taking away from the rest of the design. I’m happy with the result!


If you want more information about quilting binding, make sure to visit THIS blog post which has all my binding videos and links to other methods of binding that I’ve shared.
Make sure to subscribe to my newsletter to get the latest quilt-y news, free patterns and tutorials delivered straight to your inbox. My next newsletter is coming this Friday, so don’t miss out!
Pin the image below so you can find it later. As always, thanks for reading and happy quilting!

Discover more from The Crafty Quilter
Subscribe to get the latest posts sent to your email.


I absolutely loved your tutorial on flanged quilt binding! The step-by-step instructions were so clear, and the pictures really helped me visualize the process. I can’t wait to try this technique on my next project. Thank you for sharing such great tips!
Wonderful! I too love this technique – it’s probably my favorite way to finish my quilts. Not only does it add that little splash of color to dress up the quilt, but it can all be done by machine! Thanks for all of the extra tips and tricks you shared.
I love all of your tutorials and explanations about different ways of doing our quilting. I would love to print out the instructions on the flange explanation. It says on your blog to just click the button below to print it out, but, I can’t find where to click to print it out.
Thank you for your help,
Carol Elliott
gw*****@***il.com
P.S. I already get your blog, but, I put it down to be sure to not miss any
Yep, I received my pdf via email…..Thank you sooo much Julie
Love this Post ! For sure, I’m saving this for future reference!
I love using this method. It’s that one final little splash of color to finish off my quilts. I probably use the flange more than I do plain binding. Thanks so much for sharing this:)
Where is the “little button” to print the pdf file?
Great tutorial! Thanks for sharing your technique. And, the quilting is magnificent!
Where is the “little button” to print the pdf file?
Your quilt is beautiful, Julie! And the tutorial is very well written. Thank you so much for sharing! 🙂
First off, thank you for the tutorial on making a flanged binding. With your detailed instructions, even I can do this. I think…at least I’m going to try!
The wall hanging is stunning and I absolutely love the FMQing you did on it. Holy cow! No wonder it took a while to do! I’m in awe.