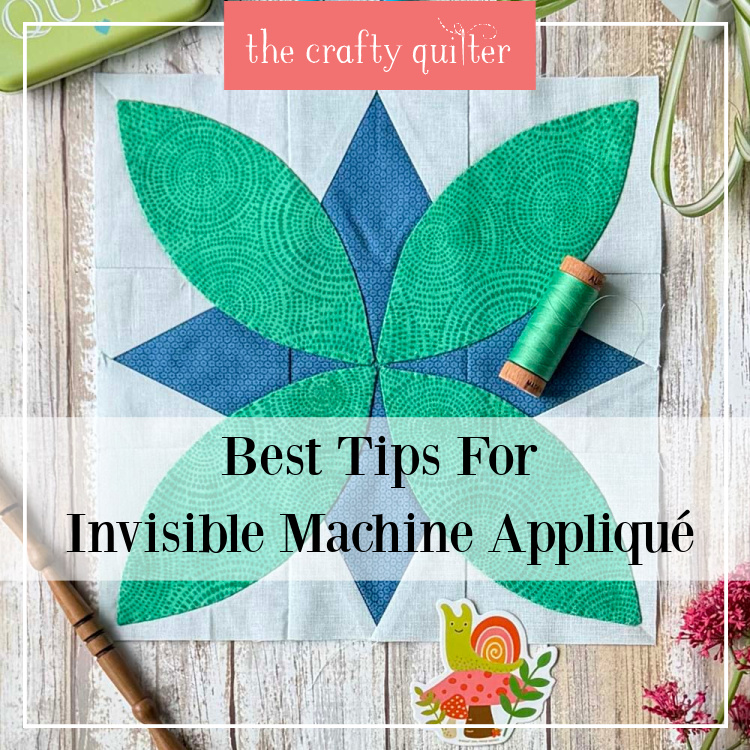
How To Master Invisible Machine Appliqué (tips for perfect results every time)
Invisible machine appliqué can feel a little mysterious at first. You’re aiming for stitches that practically disappear, but sometimes they seem to do the exact opposite. If you’ve ever found yourself squinting at your work and wondering why those stitches are showing, you’re definitely not alone. The good news is that invisible machine appliqué gets so much easier with the right tools and a few small tweaks. Today I’m sharing my favorite tips to help you get those clean edges and nearly invisible stitches we all love.
Appliqué Preparation
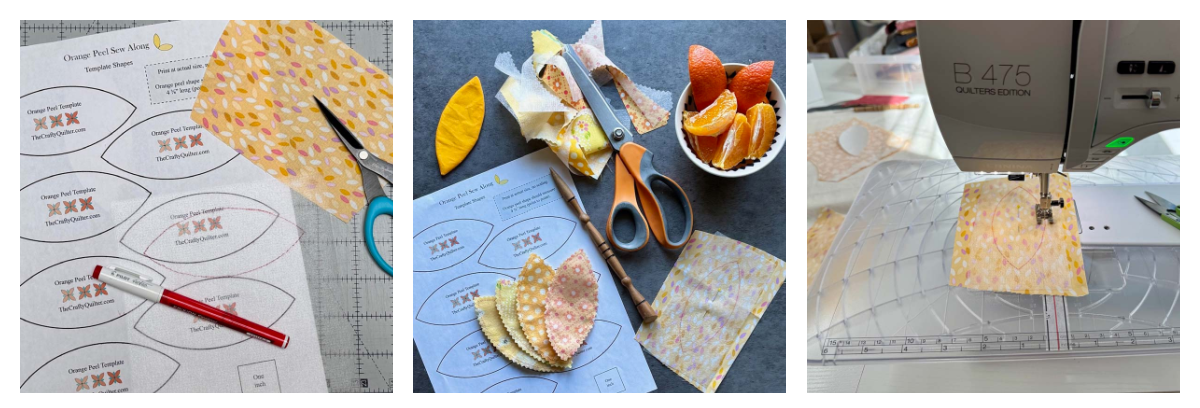
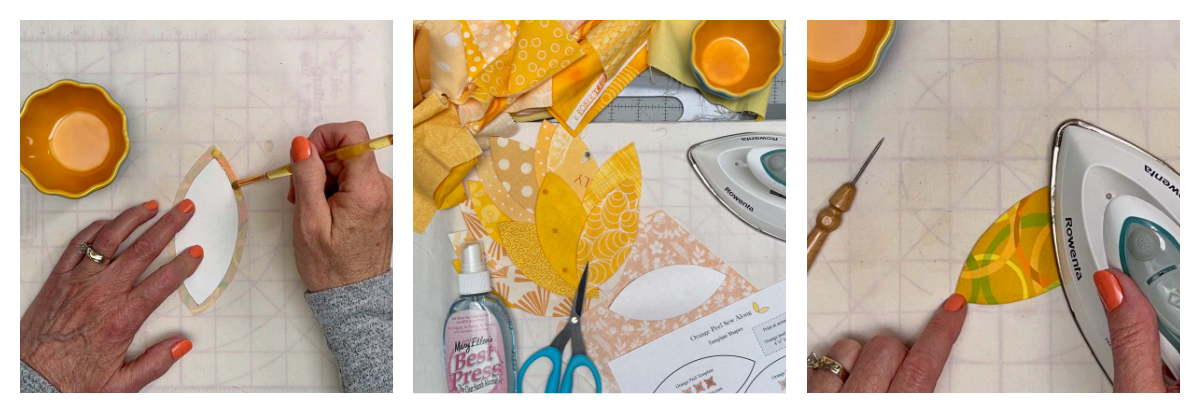
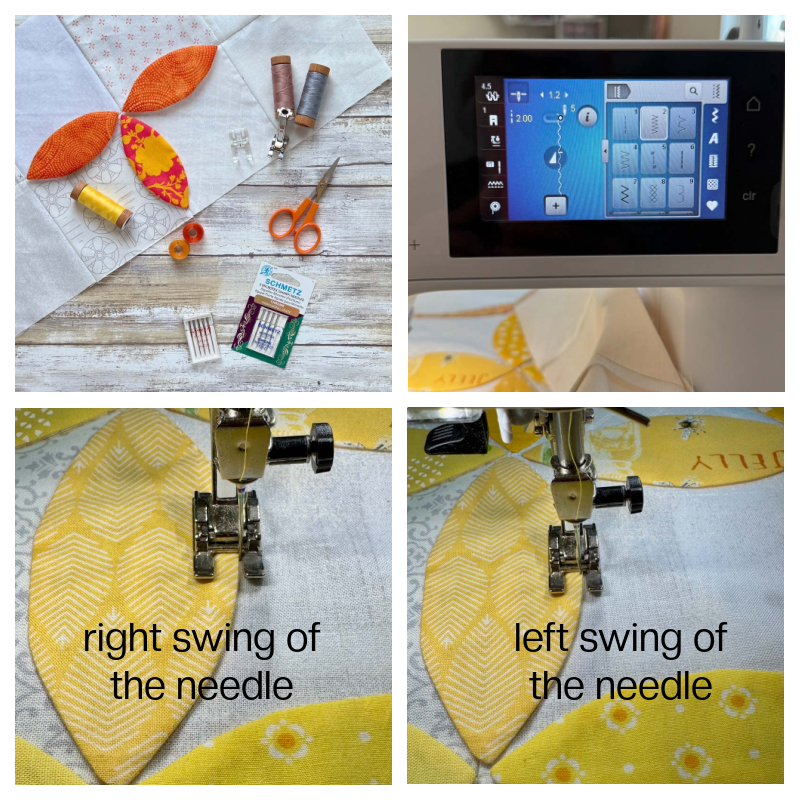
Let’s start with prepping your appliqué so we’re all on the same page. For invisible machine appliqué, you’ll want a turned edge – not a raw edge. That clean, finished edge is what helps your stitches blend in so beautifully.
There are a couple of popular ways to get that turned edge. The two I use most often are the faced method and the freezer paper & starch method. For the sample in this post, I used the faced method, but both work wonderfully depending on your preference.
If you’d like a step-by-step walkthrough, I’ve shared detailed tutorials for both techniques in this Orange Peel Sew Along post.
Tools For Invisible Machine Appliqué
The right tools can make all the difference when it comes to invisible machine appliqué. With just a few simple choices, your stitches will be easier to control and blend beautifully into the fabric. Here are my go-to favorites.
Choosing The Right Thread
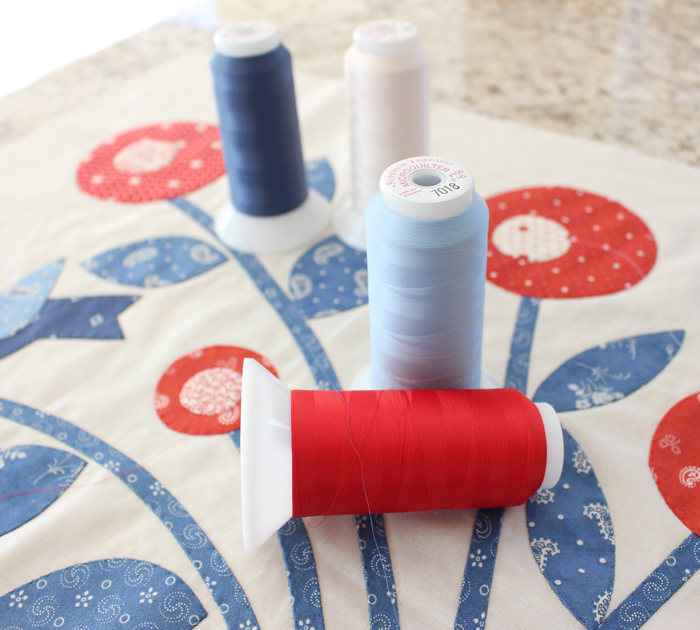
First up is thread, which plays a huge role in how visible – or invisible – your stitches will be. For the best results, I recommend using a fine thread, typically in the 60 wt. to 100 wt. range. Finer threads sink into the fabric more easily, helping your stitches blend in instead of sitting on top. Here are a few options that will give you that nearly-invisible look.
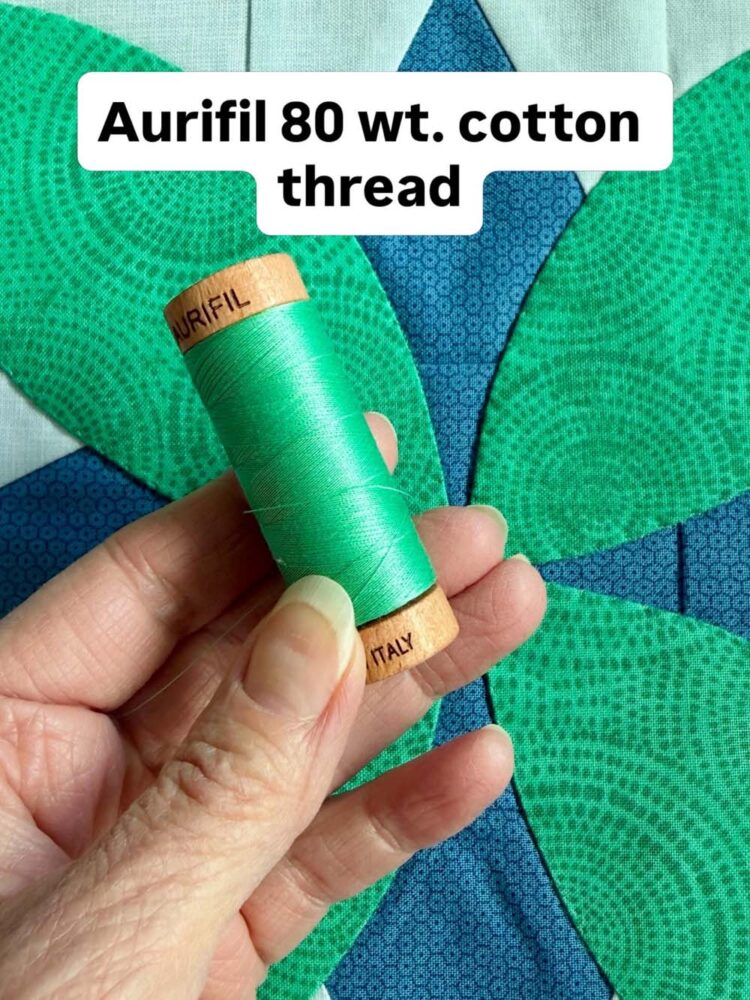
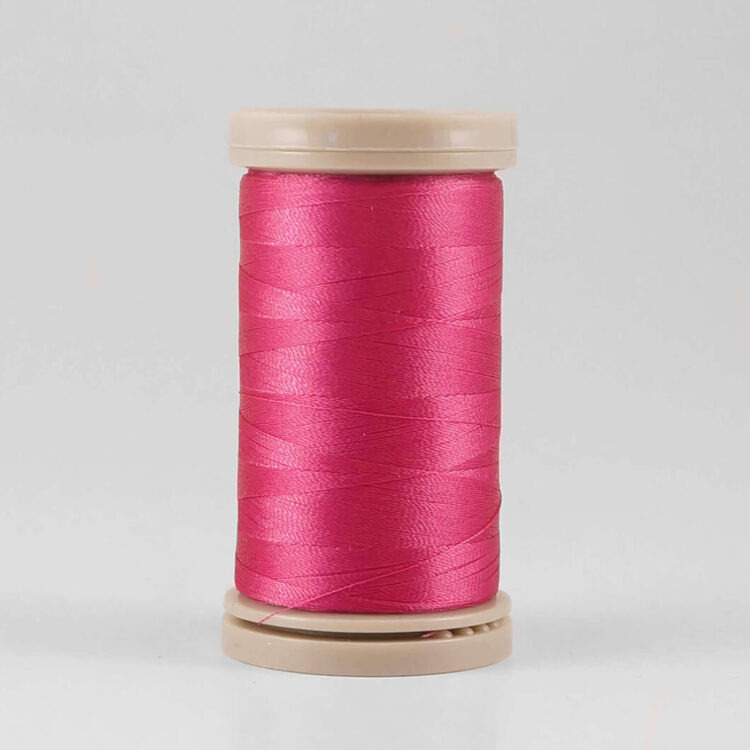
- My favorite thread to use for invisible machine appliqué is Aurifil 80 wt. cotton thread. This is a very fine 2-ply thread – making the stitches blend into the fabric. It is offered in 88 colors and widely available online. It’s great for hand appliqué, too!
- Another comparable thread is Quilter’s Select Para Cotton Poly. This polyester 80 wt. 2-ply thread is thermally treated to remove stretchiness and shrinkage. This process makes the thread feel, stitch and look like mercerized cotton. Currently, there are 40 colors to choose from – which may lead to difficulties finding the perfect color match to an appliqué project.
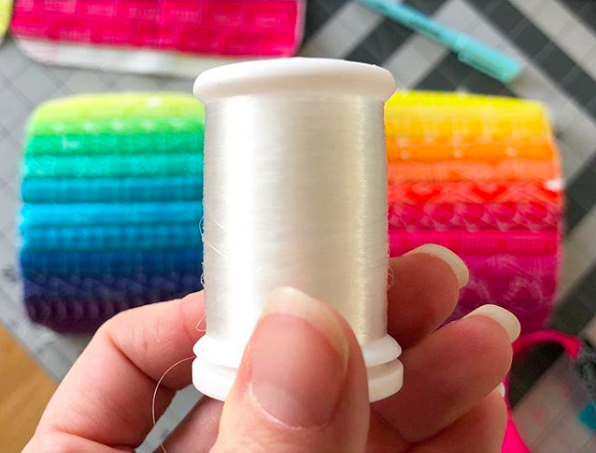
- Invisible monofilament thread can also be used for the top thread. The brand I like most is Superior Threads MonoPoly. It is a clear 100 wt. polyester with reduced shine. Because it is clear, some people find it hard to see when threading the machine and when stitching. It’s a catch 22!
- I’ve have good success using Superior Threads MicroQuilter for invisible machine appliqué. This is a 100 wt. 2-ply polyester that is really strong, yet very fine. It’s also great for stitching in the ditch – the stitches just disappear. You can read my full product review for this thread here.
Color choice matters just as much. Try to match your thread as closely as possible to your appliqué fabric. If you’re unsure, choosing a slightly darker shade often blends better along the edge than a lighter one.
Quick troubleshooting tip: If your stitches are showing more than you’d like, check your tension first. If the top thread is pulling too tight, it can sit on the surface instead of blending in. Try slightly lowering your top tension and test on a scrap until the stitches settle nicely into the fabric.
Bobbin Thread
Don’t overlook the right bobbin thread. When using finer threads in the top of the machine, I prefer to have a 60 wt. thread in the bobbin. I’ve had success with Aurifil 60 wt. cotton thread and Bottom Line (Superior Threads) 60 wt. polyester. Since the bobbin stitches won’t be visible on the front, the goal here is smooth, balanced tension rather than perfect color matching. Using a neutral color in the bobbin will reduce the need to change bobbins when changing top colors.
Quick troubleshooting tip: If you notice little dots of bobbin thread showing on the top side, your top tension may be too tight. A small adjustment can help bring everything back into balance. If you’re still having tension issues, try using the same thread in the bobbin as the top thread. One caveat is if you’re using monofilament thread – stick with a 60 wt. polyester thread in the bobbin.
Choosing The Right Machine Needle
When working with finer threads like 60 wt., I recommend using a size 70/10 machine needle. If you’re using even finer thread – like 80 wt. or 100 wt. – you can go down to a size 60/8 needle. My personal preference is Schmetz Microtex (Sharp) needles, which are designed to create clean, precise stitches.
In general, the finer the needle, the smaller the hole it leaves behind – another little detail that helps your stitches stay nearly invisible. If you notice your thread breaking, try moving up one needle size. That small adjustment is often all it takes to solve the problem.
Quick tip: A fresh needle can make a surprising difference. If your stitches aren’t looking as clean as you’d like or your thread is starting to fray, it may be time to swap in a new needle. Even a slightly dull needle can affect stitch quality more than you might expect.
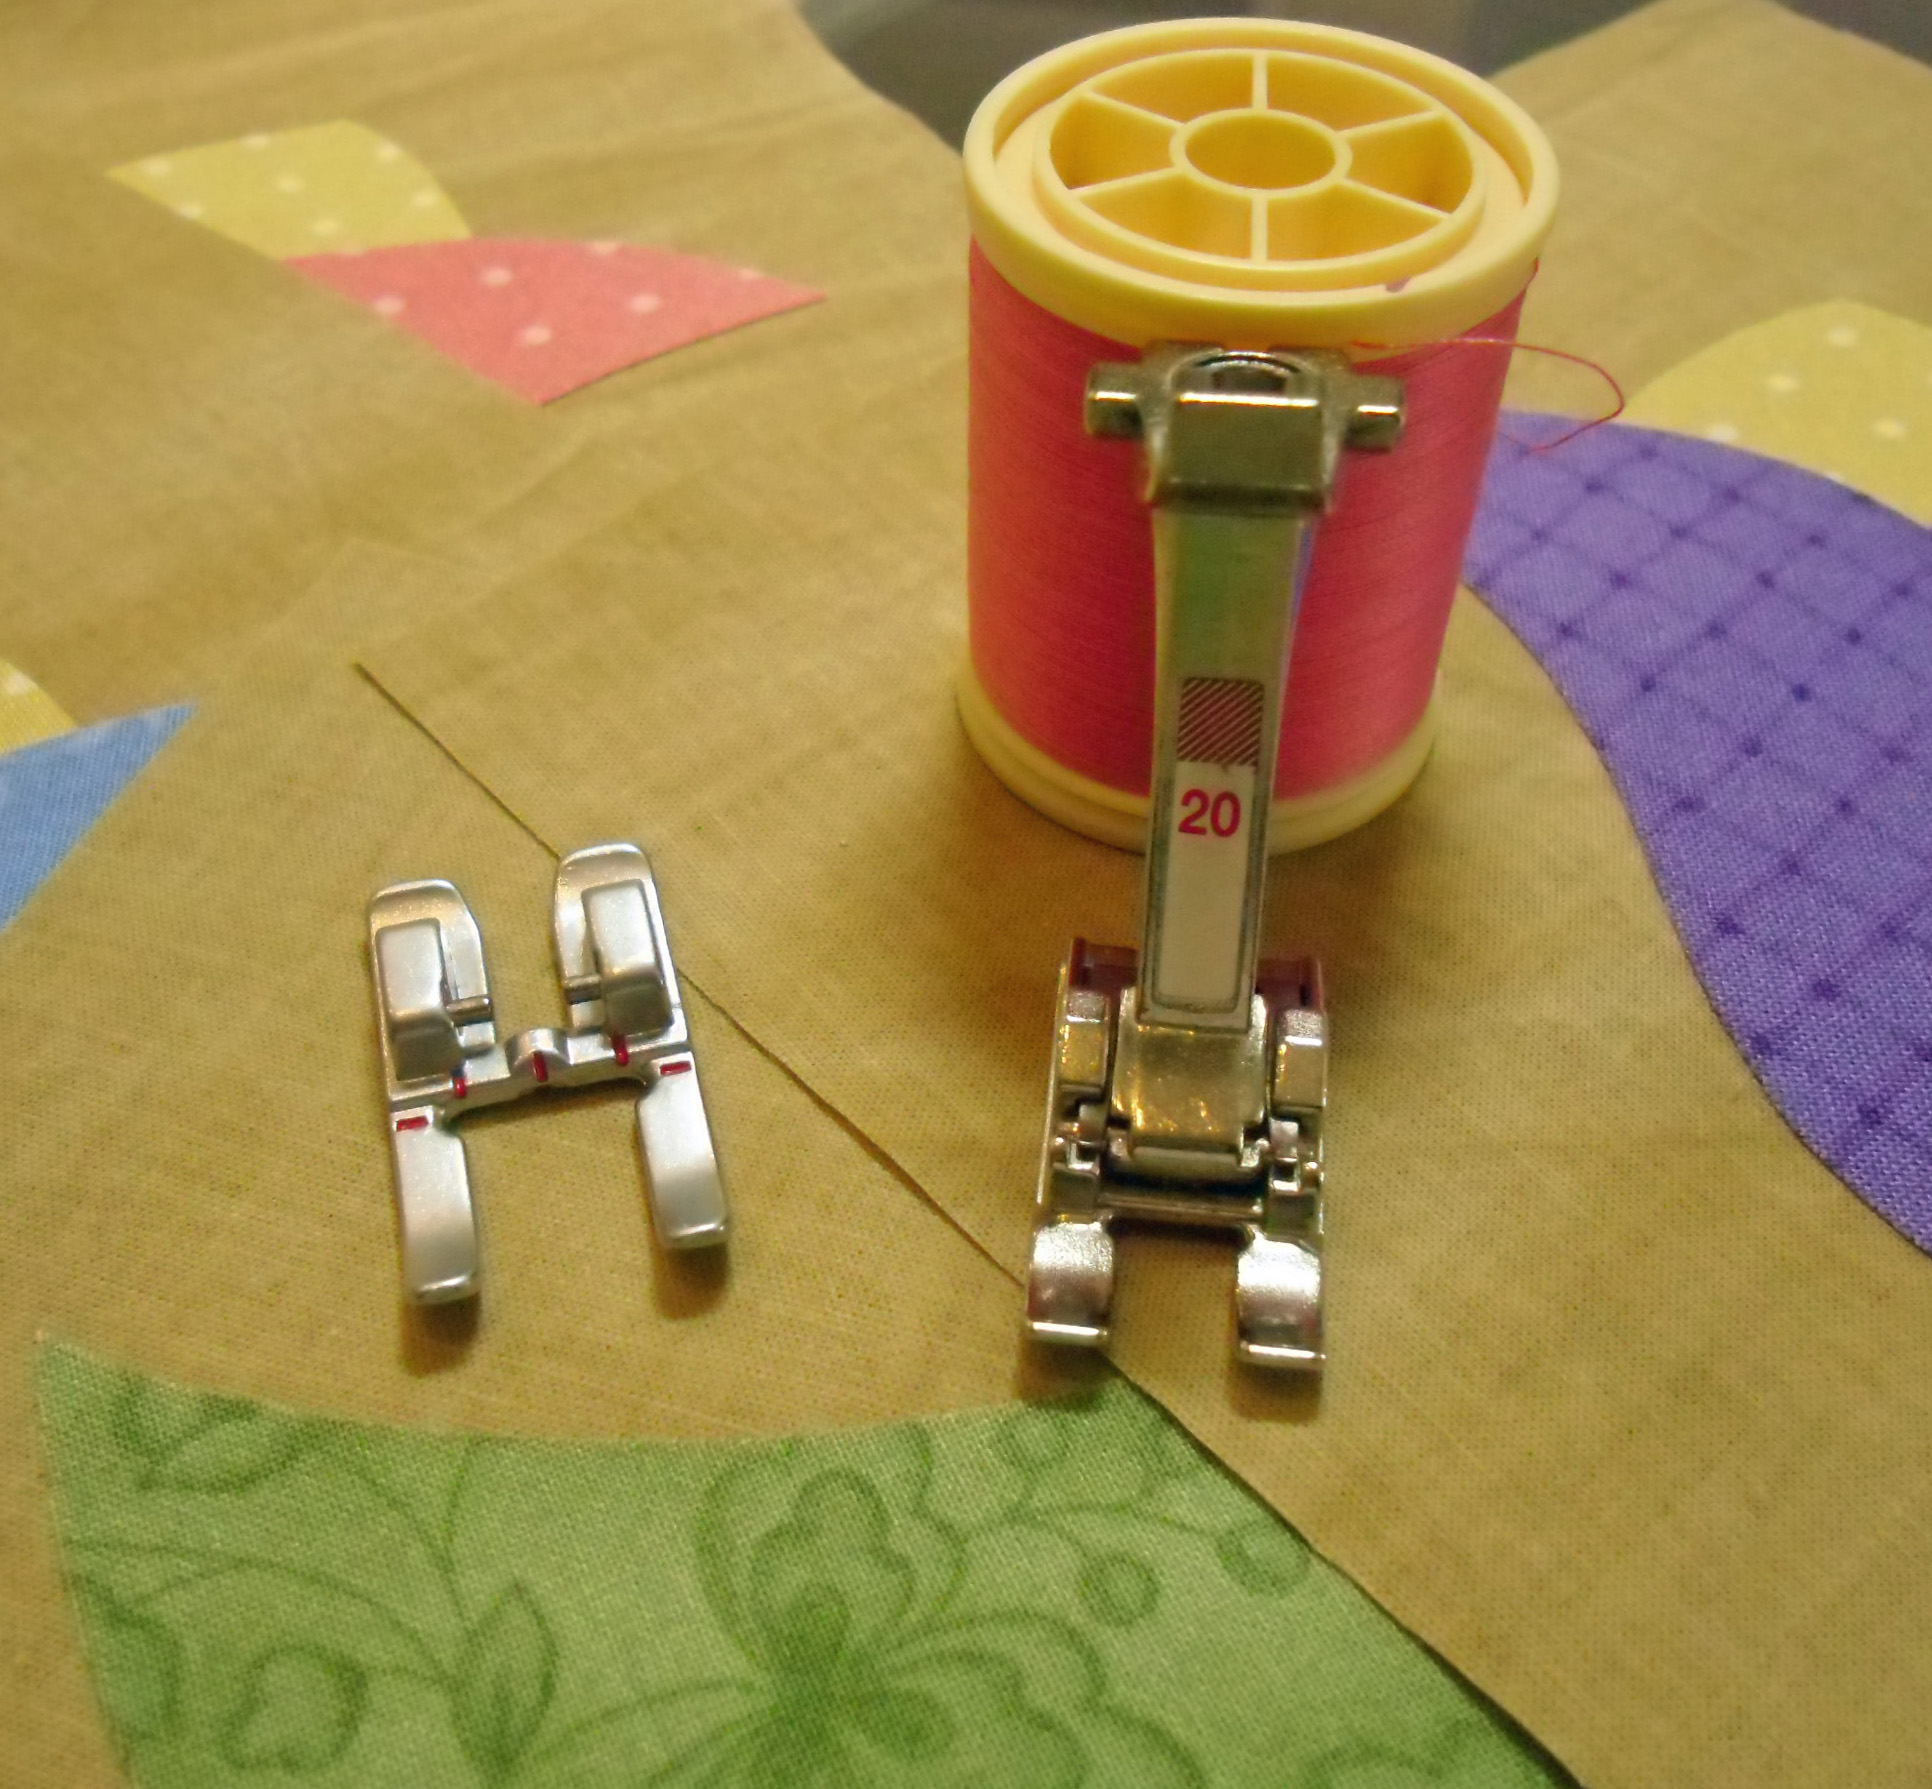
Choosing The Right Presser Foot
Having the correct presser foot on hand for machine appliqué will make the process so much easier. An open toe appliqué foot is the only presser foot that gives you unobstructed visibility in front of the needle. This is so important to keep the stitch placement right where you want it.
Best Stitches For Invisible Machine Appliqué
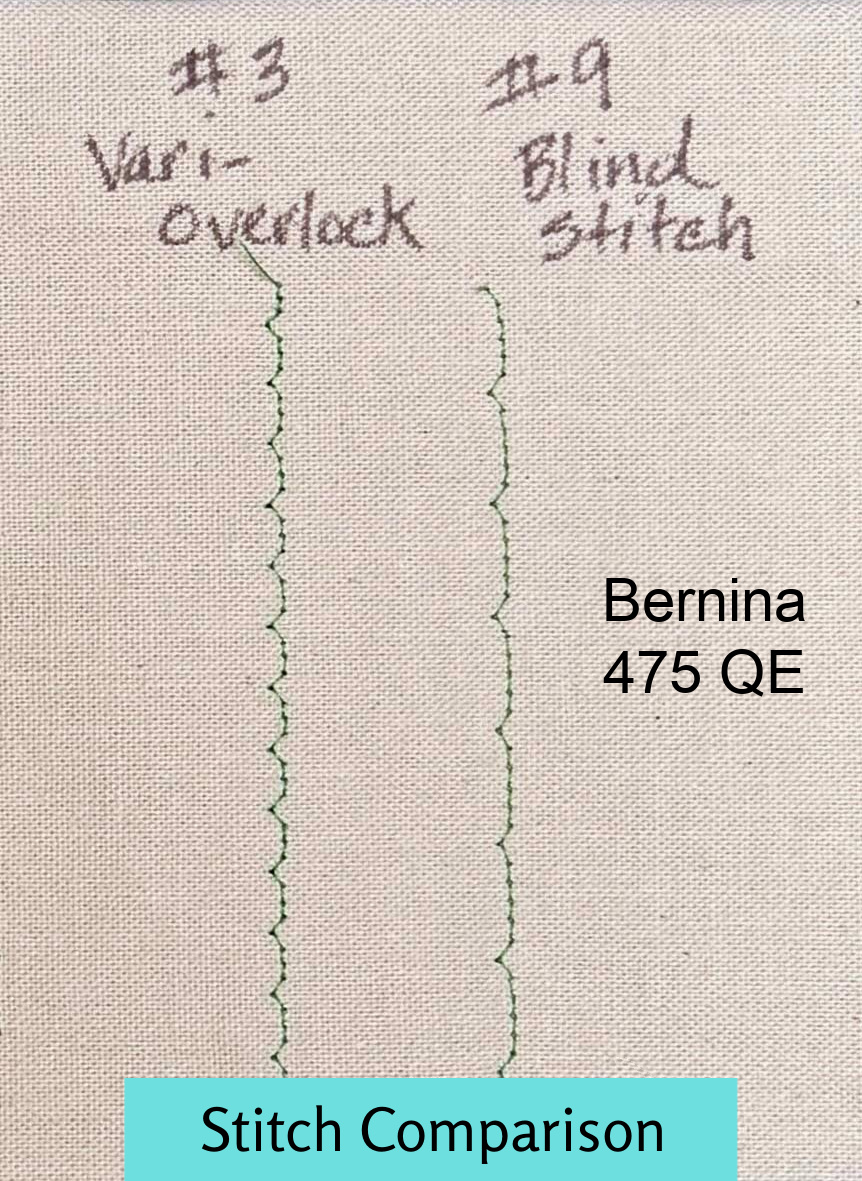
There are several stitches that can be used for invisible machine appliqué, and each one offers a slightly different look. I’ll walk you through three of the most effective choices: blind hem, vari-overlock, and zigzag.
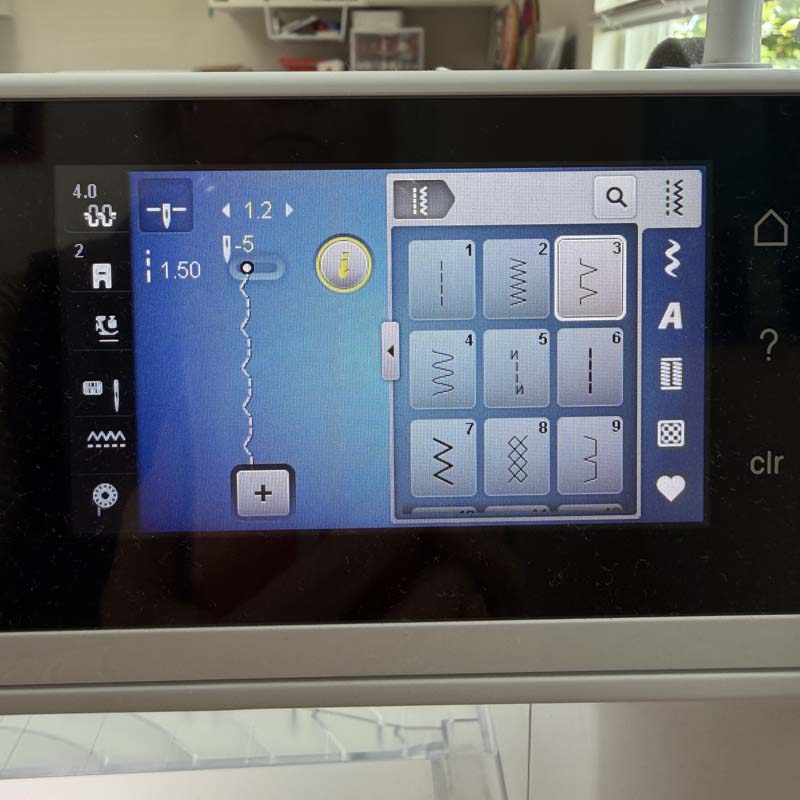
Blind hem stitch
The blind hem stitch can work beautifully for invisible machine appliqué – if your sewing machine allows you to adjust the stitch width. This stitch is made up of a series of straight stitches (usually four or five) followed by a small “bite” or “V” that catches the edge of the appliqué.
The key is to make that “bite” as narrow as possible so it blends into the fabric rather than standing out. On my Bernina 475 QE, I set the stitch width to 1.2 and the stitch length to 1.5. This creates a very subtle bite, spaced about 1/4″ apart, that nearly disappears into the edge.
That said, not all machines offer this level of adjustment. If you can’t narrow the stitch enough, the “bite” can become too visible—making this stitch less effective for truly invisible appliqué.
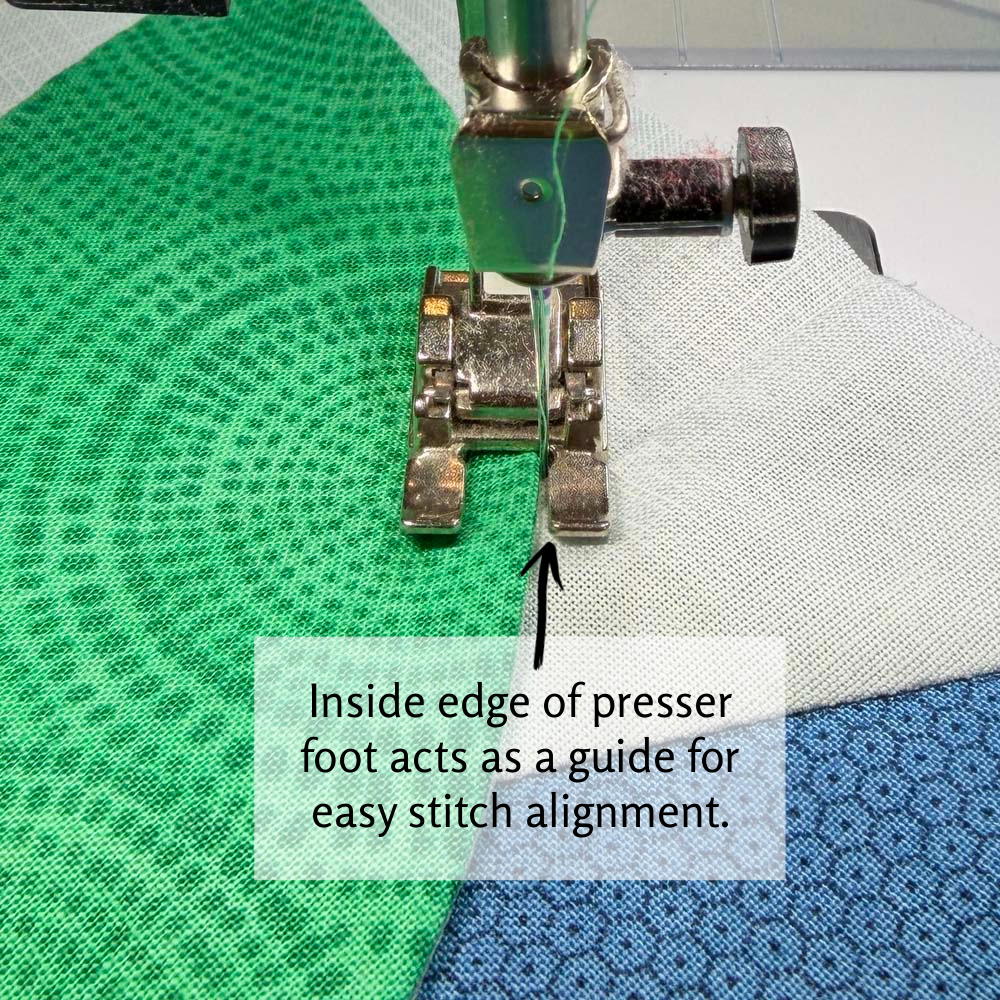
Positioning tip: As you stitch, keep the straight stitches running in the background fabric, just along the edge of the appliqué – with the “bite” barely catching the fold. It can help to align the edge of your appliqué with a guide on your presser foot so the needle swings just enough to grab the edge without going too far onto the background fabric. I find that adjusting the needle position to the far right allows the inside right edge of the presser foot to act as a guide.
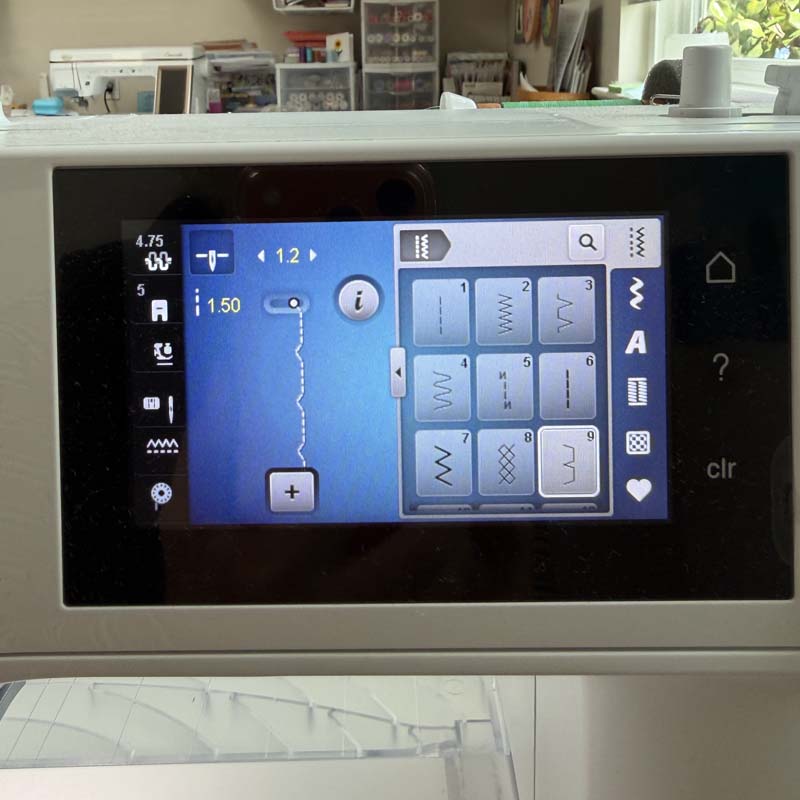
Vari-overlock stitch
The vari-overlock stitch is very similar to the blind hem stitch, with one key difference – there are fewer straight stitches between each “bite,” which creates a slightly tighter progression along the edge.
One thing to watch for is stitch direction. On many machines, the “bites” swing to the right, so you’ll need to mirror-image the stitch before using it for appliqué. This allows the stitch to catch the edge of your appliqué rather than stitching away from it.
On my Bernina 475 QE, this is stitch #3. I adjust the stitch width to 1.2 and the stitch length to 1.5, which creates a subtle bite spaced just under 1/4″ apart.
The vari-overlock stitch is actually my first choice for invisible machine appliqué – it gives such a nice, balanced look along the edge. That said, it may be specific to Bernina sewing machines. I’m not sure if other brands offer a similar stitch, but it’s definitely worth checking your machine’s stitch menu to see what’s available. For example, I don’t have an equivalent stitch on my Baby Lock Crescendo, which is something to keep in mind if you’re working with a different machine.
Positioning tip: Just like with the blind hem stitch, keep the straight stitches running in the background fabric just along the appliqué edge, with the “bite” barely catching the fold. Because this stitch takes fewer straight stitches between bites, you may find it a bit easier to control around gentle curves.
Zig Zag Stitch
A simple zigzag stitch can also create a beautifully subtle, nearly invisible appliqué, just with a few minor adjustments. Start by using a fine thread (60 wt. to 80 wt.) that closely matches your appliqué fabric. This alone goes a long way in helping the stitches blend in.
Next, adjust your stitch width so it’s as narrow as you feel comfortable using. A narrower zigzag means the needle travels less from side to side, so less thread shows on the surface of your appliqué. It does take a little practice to consistently land that stitch right along the edge, but once you get the feel for it, the results are well worth it.
Positioning tip: Aim to have one swing of the needle just barely catch the edge of the appliqué, while the other swing lands on the background fabric. Keeping that motion tight and controlled is what helps the stitch disappear.
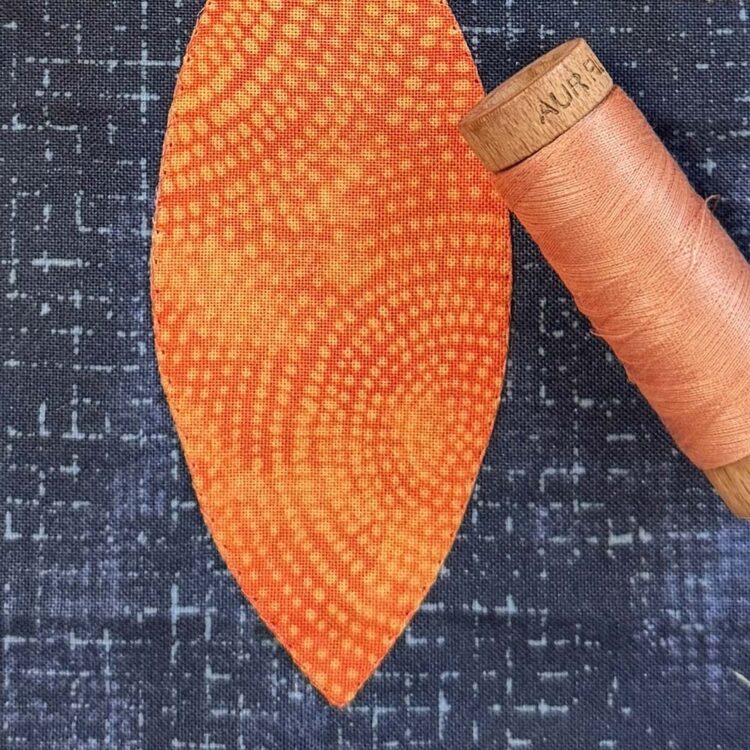
Below is an example of a finished orange peel shape stitched with a narrow zig zag stitch and 80 wt. Aurifil thread. Even though the color isn’t a perfect match, the thread blends easily into the fabric. Once the project is basted and quilted, the small needle holes will fill in and barely be visible.
See These Stitches in Action
Watch how each stitch catches the edge slightly differently—this is the key to achieving an invisible finish.
Tips for Truly Invisible Machine Appliqué
You can see that a few small adjustments can make all the difference when it comes to truly invisible machine appliqué. These are the tips I rely on and recommend:
Match your thread as closely as possible
This might seem obvious, but it’s worth repeating – thread color matters. When in doubt, try slightly darker or lighter, and see which one blends better along the edge.
Use a fine thread
A lighter weight thread (like 60wt or finer) helps your stitches disappear into the fabric instead of sitting on top of it.
Slow down your stitching
Invisible appliqué isn’t a race. Slowing down gives you better control and helps you place each stitch right along the edge where it belongs.
Keep your stitches right on the edge
Aim to have the swing of your stitch just barely catch the appliqué edge. Too far in, and the stitches will show. Too far out, and you risk not securing the edge.
Adjust your stitch width and length
Don’t be afraid to test and tweak the settings. A narrower width and slightly shorter stitch length often create a more subtle, blended look.
Practice on scraps first
Every fabric behaves a little differently. Taking a few minutes to test your settings on scrap fabric can save a lot of frustration later.
If you’re working on an appliqué project, be sure to save this post so you can come back to these stitch settings and tips later!
Final Thoughts
Invisible machine appliqué is one of those techniques that really rewards a little patience and practice. Once you get the feel for it, those nearly invisible stitches start to come naturally, and it’s so satisfying to see your appliqué take center stage without the stitching competing for attention.
The best part is that these tips aren’t just for this project. As you practice, you’ll start to develop your own preferences for thread, stitches, and settings that you can carry into all of your future quilts.
If you give invisible machine appliqué a try, I’d love to hear how it goes for you! Do you have a favorite stitch or tip that works especially well for you? I’d love to hear—leave a comment and share so we can all learn from each other.


Discover more from The Crafty Quilter
Subscribe to get the latest posts sent to your email.


Thanks for the great tips! I’m new to appliqué and will be trying some of these. I especially like the tip to move the needle to the right to use your foot as a guide. My eyes have been crossing trying to follow the edge in the middle of my foot. Fortunately, I just bought the same machine for retreats. I love it!
Thanks for sharing all this great information! I have not explored the vari-overlock on my machine and will look for it (and this excellent source), the next time I am doing some appliqué.
Thank you Julie! These tips sound really good.
Lots of great information Julie, I am going to have to try using the 80wt Aurifil thread. Years ago I used the invisible monofilament (still have some) but it was never my favorite. I am bookmarking this!
thank you. Have not machine appliqued in a long time, Thanks for the reminders!
Wouldn’t it be that the top tension is too high, not too loose, if you’re seeing bobbin thread dots on the top?
Thanks for catching that, Michelle. You’re absolutely right, and I’ve corrected the blog post.