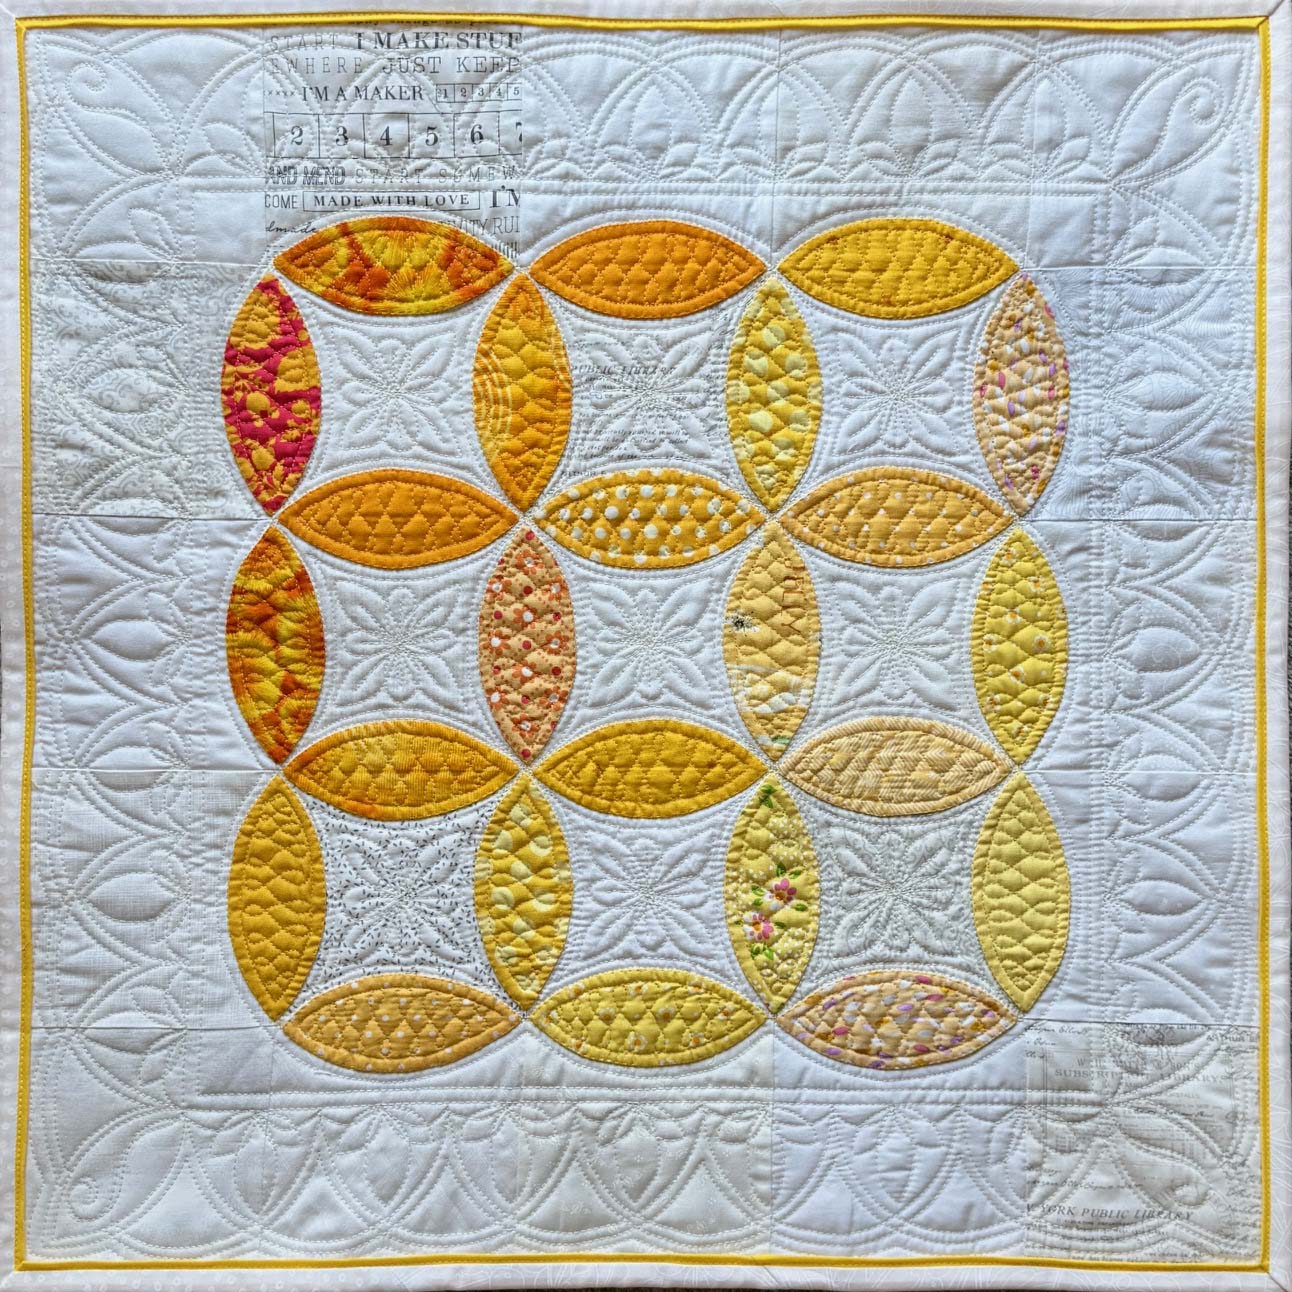
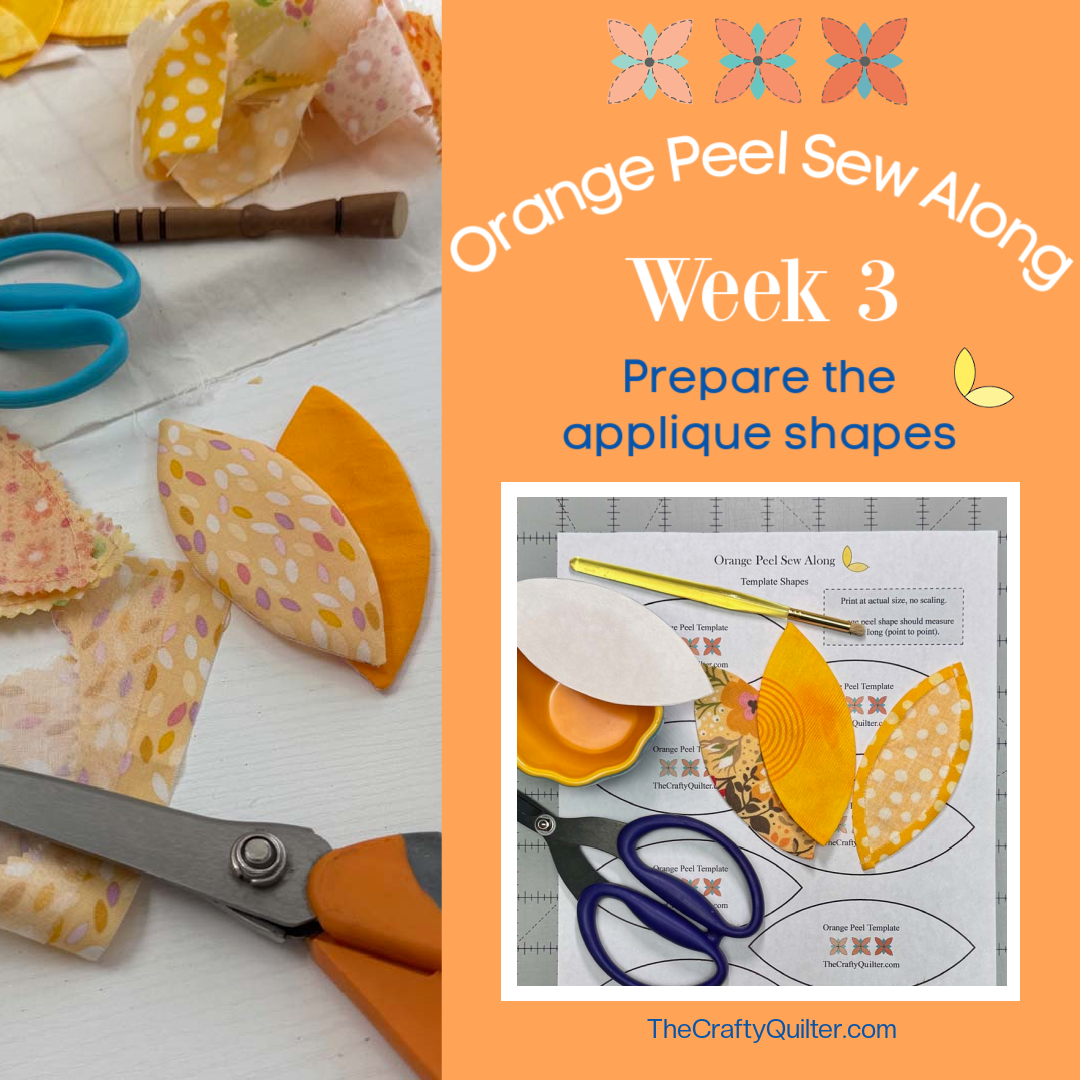
Orange Peel Sew Along Week 3
It’s Week 3 of the Orange Peel Sew Along and we’re ready to prepare some applique shapes! I’ll guide you through the process of preparing applique shapes with a turned edge. There are two main techniques we’ll use for this: freezer paper & starch (with two options) and faced. There are SIX video lessons this week, so you can really see what I’m doing! Plus I added an FAQ section (towards the end of this blog post).
If you’re new to this sew along, I’d love to have you join me. It’s free! You can sign up (below) to receive the weekly emails. It’s the best way to receive the lessons, pdf’s and videos without the distraction of display ads. You can read more about the Orange Peel Sew Along here.
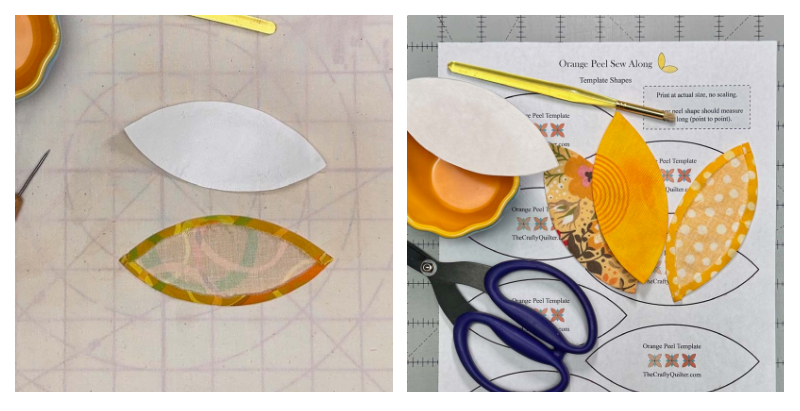
Orange Peel Template
Applique size test
I’m saying this now, so it doesn’t get lost in the content below. I suggest you make ONE orange peel shape using your chosen method and test the size. It should cover one seam of a background square and the points should reach the seam intersections.
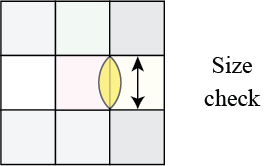
This means it should measure 4 1/2″ from point to point. If it’s a little bit smaller, such as 4 3/8″, that’s okay. The faced method tends to shrink the final size just a bit. Having a little space where the points meet will not make a big difference in the overall look.
The freezer paper and starch method may make a slightly larger shape. This happens because we’re wrapping fabric around a template and there are four layers of fabric at each tip. This might become an issue because we’re working within a defined seam allowance space. If the orange peels overlap at the intersections, it will become crowded and bulky. I’ve had that happen a few times and managed to “massage” things into place.
If your size test shows that your applique shape is really too long (or too short), then you can do one of four things:
- Verify that the printed template page is accurate by measuring the 1″ test square.
- Adjust and remake the freezer paper template (if you’re using that method).
- Trim the freezer paper templates that you’ve already made (if your shape is too large).
- Make another test shape and make sure you’re being accurate with (1) tracing and stitching exactly on the line for the Faced method, OR (2) make sure you’re turning the seam tightly over the freezer paper template.
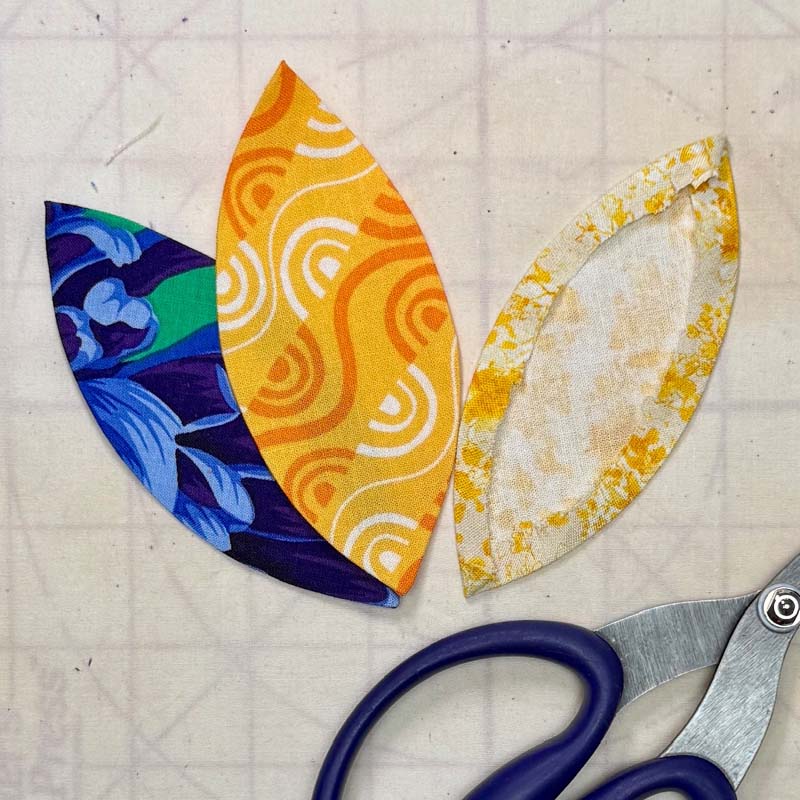
Faced technique
The faced technique for applique uses lightweight fusible interfacing as a facing to turn the raw edges under. I like to use this method for simple shapes such as the orange peel.
Pro’s & con’s
There are some advantages to using the faced technique as well as some disadvantages. Let’s take a look at both.
PRO’s
- It’s great for anyone who doesn’t have great finger dexterity or who prefers using a sewing machine for applique.
- It may be faster than alternative methods for a turned edge.
- It creates a slightly raised applique because of the layer of interfacing.
- It might reduce any shadowing resulting from a light applique fabric on top of a darker background fabric.
- You don’t need to make a template.
CON’s
- It’s not practical to use with tiny and/or complex shapes.
- It requires a sewing machine.
- It requires smooth and steady stitching to get smooth shapes.
- It’s not as easy to get sharp points or perfect circles.
Faced supplies
- Orange peel template PDF
- Lightweight fusible interfacing. I recommend Pellon 944F or Pellon 906F or Quilters Select Cutaway.
- Frixion pen. This is ideal for tracing the template shape onto the interfacing. A regular pencil or chalk pencil will also work.
- Pinking sheers are helpful, but not necessary.
- Point turner tool or wooden chopstick. This tool by Dritz works well.
- Sewing machine
- Open toe applique foot (optional)
Faced applique steps
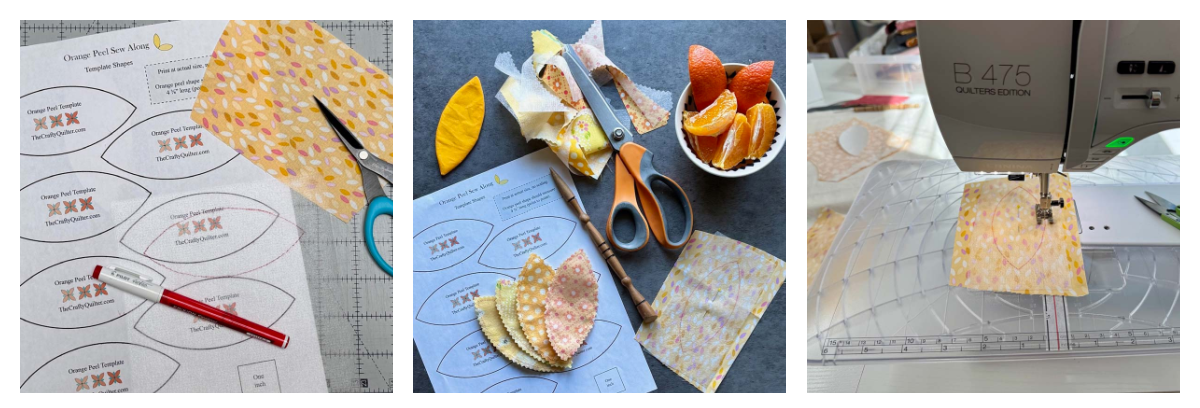
- Using the printed Orange Peel Template page, trace the orange peel shape onto the smooth side of the fusible interfacing.
- Place the dotted side of the interfacing onto the right side of the fabric. Pin the center.
- With your sewing machine, stitch on the drawn line all the way around. Use a short stitch length (1.5). The smoother your stitching, the smoother the final shape will be.
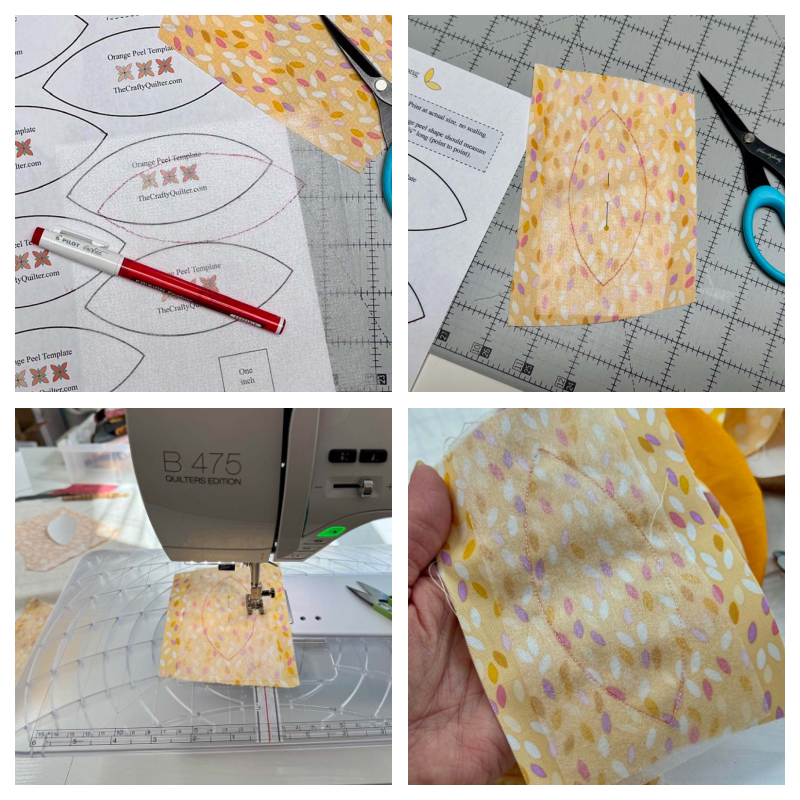
- Using pinking shears or sharp scissors, trim 1/8″ away from the stitching line.
- Carefully trim the points to reduce the bulk.
- Cut a slit in the interfacing.
- Turn right side out.

- Use a point turner or a smooth chopstick to push out the edges and points (carefully).
- Smooth the edges with a seam roller, point turner or your fingers. Do NOT use an iron because of the fusible interfacing.
Faced method video
Freezer paper & starch
I learned the freezer paper & starch technique a long time ago, and it’s one of my favorite ways to prepare shapes for hand applique. There are several ways to do this method, so I’ll be showing you two of them.
Pro’s & Con’s
If you’ve never tried freezer paper & starch (FP&S), you might be wondering why you should (or shouldn’t). Let’s take a look at some of the pro’s and con’s.
PRO’s
- This method is great for almost any size or shape of applique – even small pieces.
- All of the prep work is done at the front end. When you’re ready to applique, you just grab and go!
- You get an exact representation of the final shape before adding it to the project.
CON’s
- It takes some practice to get comfortable with this technique. Your non-dominant hand needs to do some of the work.
- It requires making a template from freezer paper.
- It’s an additional step to the applique process.
Creating the template
It’s necessary to make a template from freezer paper first. You can find freezer paper in most grocery stores in the United State; Reynolds freezer paper is most common. Because this has become so useful for quilters, several manufacturers have come out with 8.5 x 11 printable freezer paper and extra thick freezer paper. I really like the extra thick products because you don’t have to use multiple sheets to make a sturdy template. Below are a few that I have tried.
- CutRite Heavy Duty Freezer Paper by Quilter’s Paradise (my current favorite)
- Heavy weight applique freezer paper by The Gypsy Quilter (another good option)
- Quilter’s freezer paper sheets byC&T Publishing
- Kim Diehl’s Best freezer paper by Martingale Publishing
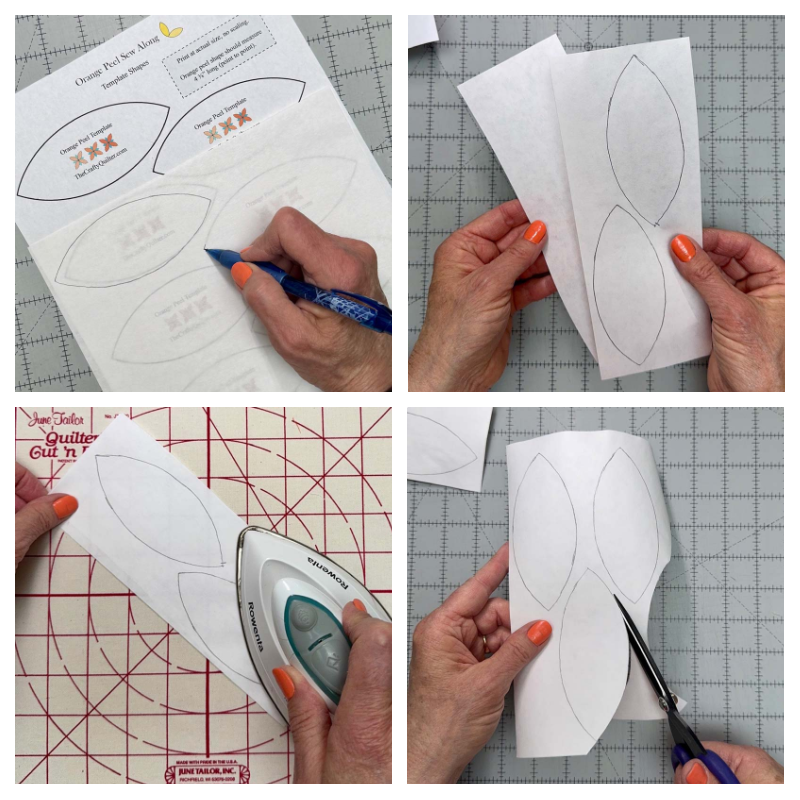
Steps to create the template
- Using the printed template page, trace the orange peel shape onto the paper side of the freezer paper. I use a pencil for this step. Trace at least four shapes – you can space them tightly together if needed.
- If you’re using regular (thin) freezer paper, place the traced freezer paper on top of another piece of freezer paper and iron them together. The shiny sides should both be facing DOWN when you stack them. Skip this step if you’re using an extra thick product.
- Cut out the shapes carefully on the drawn lines.
Create template video
FP&S, method 1
This first method for freezer paper and starch is the way I learned how to do it. It requires the use of a paintbrush and good finger/hand dexterity.
Supplies
- Freezer paper template – see steps to create a template above.
- Iron, any size.
- Fabric
- Sharp scissors – micro serrated (such as Perfect Scissors) are wonderful for this.
- Spray starch, any kind. My favorite is Magic Quilting & Crafting Spray.
- Small paint brush. If you don’t have one, a Q-tip will work in a pinch.
- Small cup for holding the liquid starch.
Method 1 steps
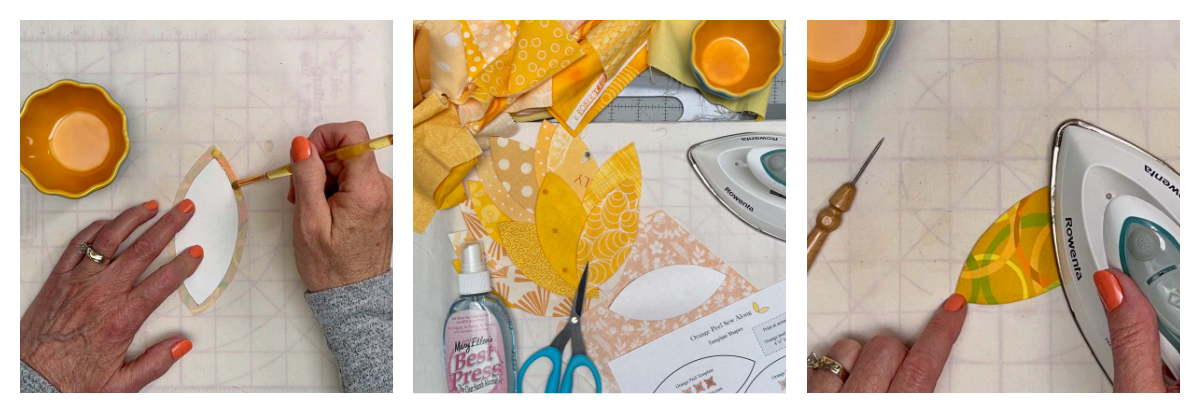
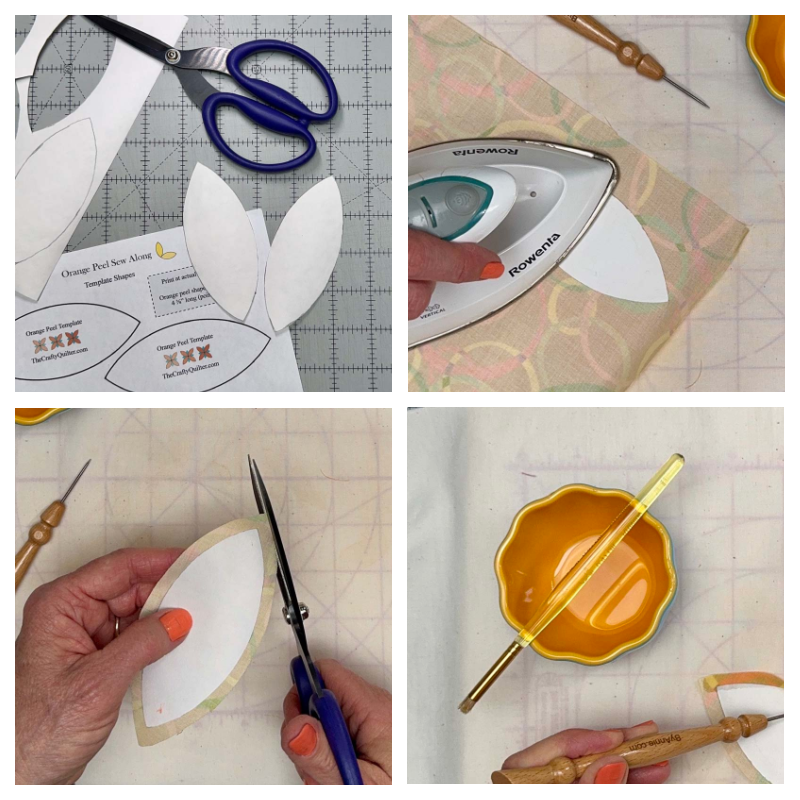
- Create the freezer paper template as outlined above.
- Press the template onto the wrong side of the fabric. Because the orange peel shape has such a gentle curve, it doesn’t matter too much if it’s placed on the fabric grain or on the bias.
- Cut out the shape leaving a 1/4″ seam allowance.
- Place liquid starch in a small cup. If using spray starch from a can, spray it into the lid or a cup – it will liquify in a few seconds.
- “Paint” the seam allowance using a small paint brush or Q-tip. Try to stay away from the edge of the template so it will last longer.
- Using a stiletto (or your fingers) turn the seam allowance onto the template.
- Press with a hot, dry iron until the fabric is dry.
- Repeat for the other side.
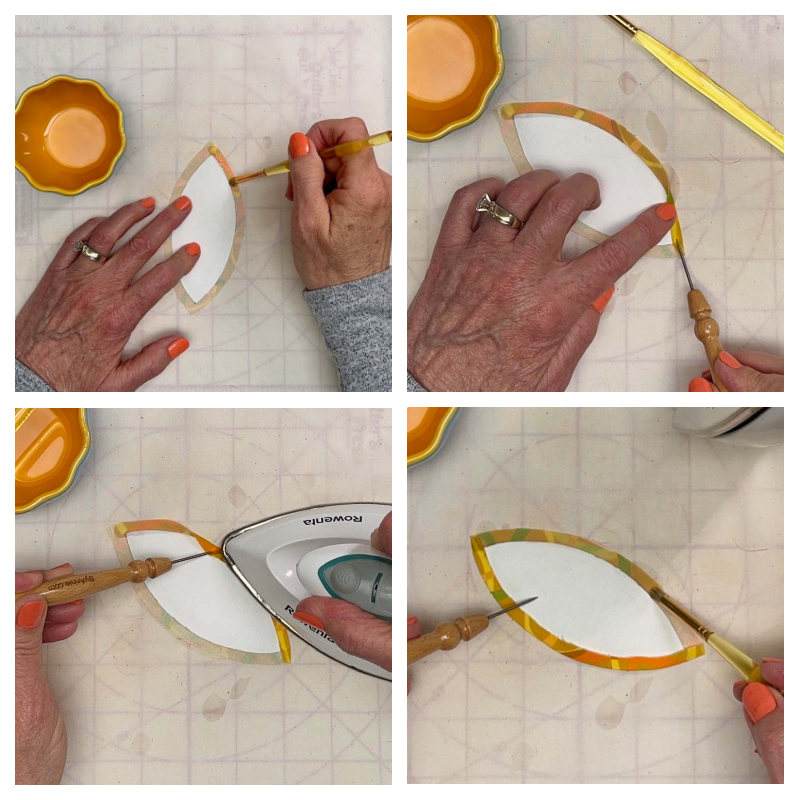
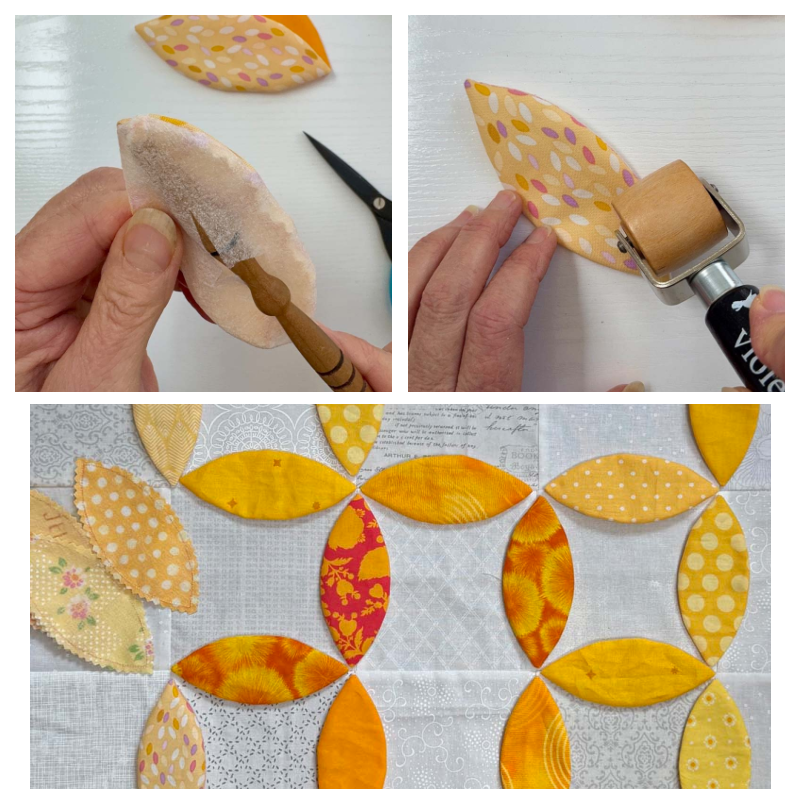
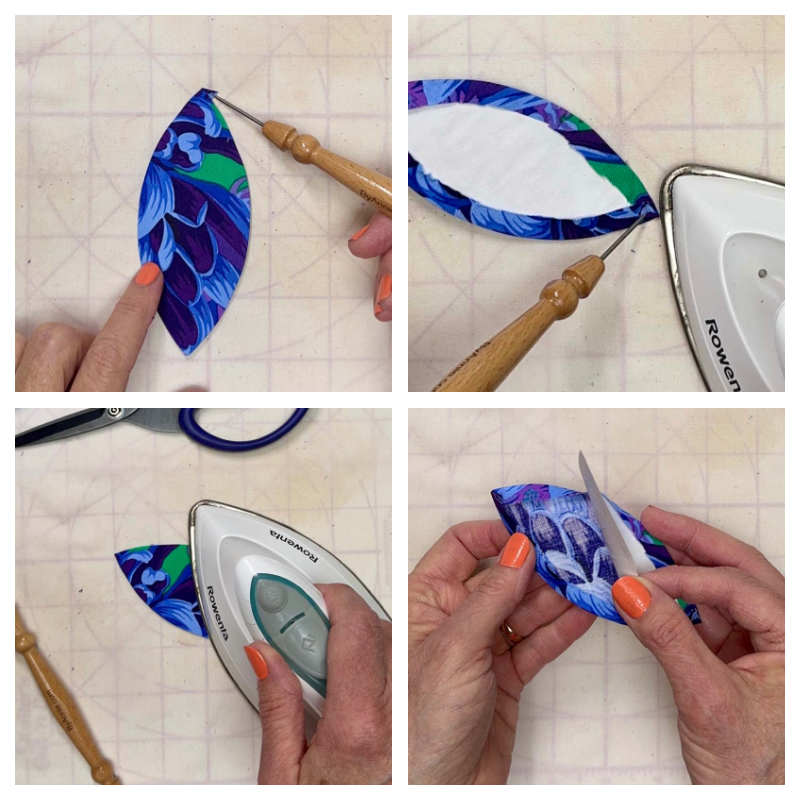
- You will be left with a little dog-ear at each point. Use a stiletto or a seam ripper to fold back the extra fabric. It will form a little triangle on the back.
- Place a small dot of starch at the tip (while the stiletto is holding it in place) and press.
- Press the entire shape flat.
- Let cool just a bit and remove the freezer paper template. This can be used up to six times.
- Press again if necessary.

FP&S, method 1 video
FP&S, method 2
I came up with this second method recently, when I didn’t want to bother dipping a paintbrush in a small cup of starch. Necessity is the mother of invention, as they say!
This method works well for someone who isn’t ambidextrous or doesn’t have good finger dexterity. It requires using a larger chunk of fabric, so it’s a little more wasteful than Method 1.
Supplies
- Freezer paper template – see steps to create a template above.
- Iron, any size.
- Sharp scissors – micro serrated (such as Perfect Scissors) are wonderful for this.
- Spray starch, any kind. My favorite is Magic Quilting & Crafting Spray.
- Fabric, 5″ square at least
Method 2 Steps
- Create the freezer paper template as outlined above.
- Press the template onto the wrong side of the fabric. Because the orange peel shape has such a gentle curve, it doesn’t matter too much if it’s placed on the fabric grain or on the bias.
- Spray one side of the fabric with starch, covering the template with your hand so it doesn’t get wet. (A little wet is okay).
- Use your hand to pull the fabric tightly over the edge of template.

- Press along the edge only, leaving the fabric in the center to gather naturally.
- Trim excess fabric 1/4″ away from the folded edge. This does not need to be perfect.
- Repeat this process on the other side of the shape.
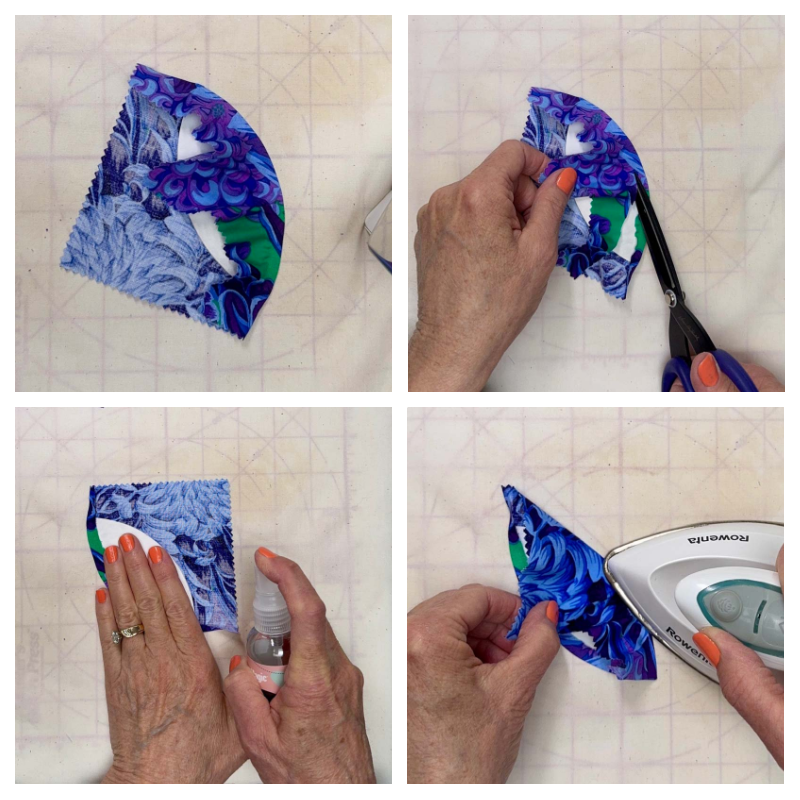
- You will be left with a little dog-ear at each point. Use a stiletto (or a seam ripper will work) to fold back the extra fabric. It will form a little triangle on the back.
- Place a small dot of starch at the tip (while the stiletto is holding it in place) and press.
- Press the entire shape flat.
- Let cool just a bit and remove the freezer paper template. This can be used up to six times.
- Press again if necessary.
FP&S method 2 video
Applique placement
Once the orange peel shapes are prepared, it’s time to baste them onto the background that we made last week. There are two ways to do this depending on the applique preparation method you choose.
General placement guidelines
Place each orange peel shape along a seam line. The points should line up with each seam intersection. If you’re working with sections of background squares, you can baste all of the shapes in a section at a time. When the sections are sewn together (after they’re appliqued in place), you will add the remaining orange peel shapes along the joining seams.
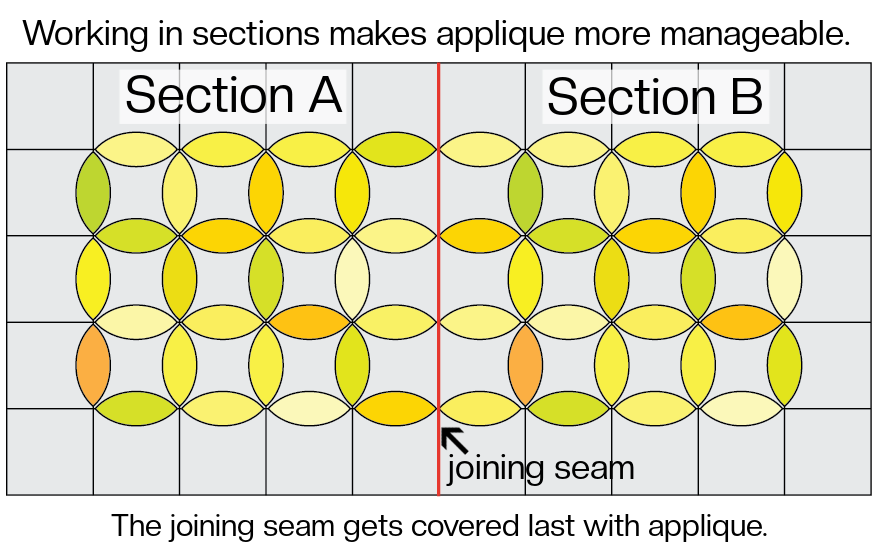
Notice, above, the seams that reach the edge of the quilt do not have an orange peel shape on them. This is assuming these are the final edges of your quilt top. If you were adding more sections around Section A and B, you could add orange peel shapes to those edge seams. The size quilt you make is totally up to you!
Basting the faced shapes
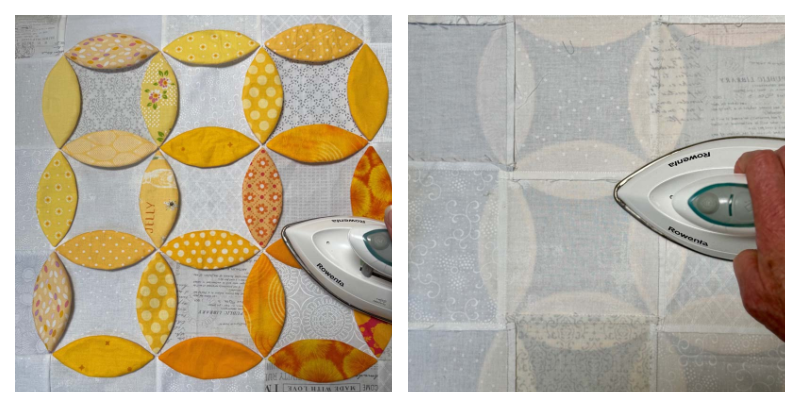
Since we used fusible interfacing for this technique, we’ll temporarily fuse the shapes in place with an iron. It’s best to work with the background placed directly on an ironing board and then arrange the applique shapes on top. Otherwise, things are likely to shift out of place when you’re ready to move it to the ironing board.
Using the placement guidelines above, arrange the orange peel shapes onto the background. Once everything is where you want it, press with a hot, dry iron. Make sure you’re pressing straight down and not moving the iron across. It’s easy to accidentally move the applique out of position as you iron. Press from the back as well.
Faced basting video
Basting FP&S shapes
I like to use water soluble glue to baste the applique shapes made with the freezer paper & starch method. Roxanne’s Glue Baste-It is my go-to product, but any water soluble glue (or glue stick) will work. It’s best to work with the background placed directly on an ironing board and then place the applique shapes down. Otherwise, things are likely to shift out of place when you move it to a different location.
Using the placement guidelines above, arrange the orange peel shapes onto the background. Peel back half of the shape and dot the seam allowance with glue. Pat in place and repeat for the other half. Try to stay away from the folded edge because you’ll be stitching there.
Continue gluing all of the shapes in place. Use a hot, dry iron to set the glue.
FP&S basting video
FAQ’s
Q: Are the orange peel shapes cut on the straight of grain or the bias? A: Either way is fine. Since the curve is so gentle, it doesn’t make a big difference.
Q: Can I use an acrylic template to make my orange peels? A: It depends. First, it needs to be the right size. Second, it should NOT include the 1/4″ seam allowance. With the applique methods we’re using, you would just be tracing around the acrylic template. The only acrylic template I know of that fits the criteria is the KT Melon Template by Kansas Troubles Quilters.
Q: Can I place my orange peel shapes diagonally in the center of each square? A: Yes, you are certainly welcome to do that. You should check the size or your applique shapes; you’ll most likely need to increase the size to fit the diagonal.
Q: If I plan on machine stitching the orange peels, can I used double-side fusible web? A: Yes, you can use a fusible web product such as Heat ‘n Bond Lite; however, that’s a different technique used with fusible raw edge applique. Follower the manufacturer’s instructions.
Q: When using leaders & ender (or chain stitching) how do you *lock* your stitches so the seams don’t fall apart (backstitch)? A: It’s very prohibitive to backstitch at the beginning or end of a seam when you’re chain piecing. Since most seams are bisected by another seam, that’s enough to lock them in place. It’s also helpful to use a shorter stitch length such as 2.0.
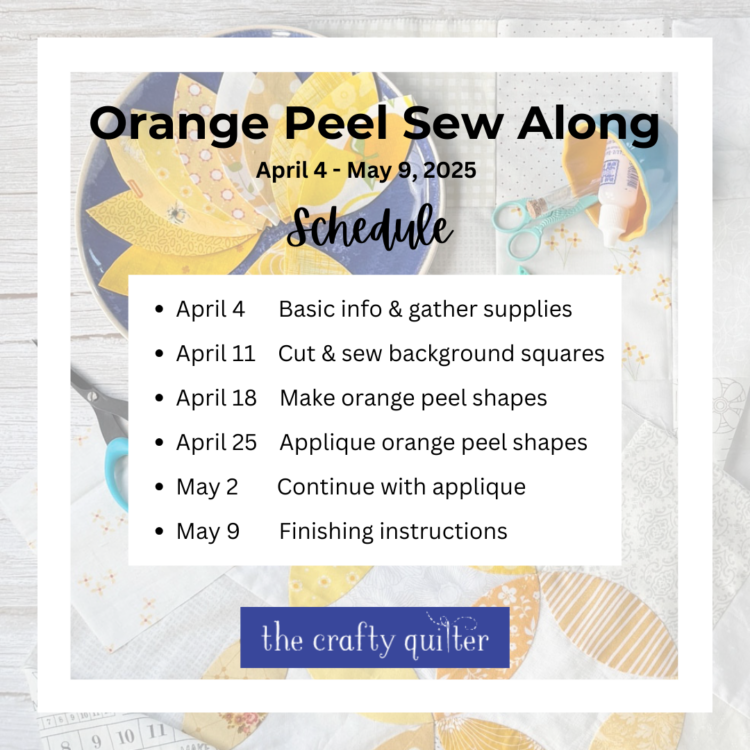
Orange Peel Sew Along Schedule
Orange peel pattern
The orange peel pattern is a pdf that you can download and print. It includes basic instructions along with the template page. Please note this is a free pattern and has not been tech edited.
This week’s assignment
- Choose your favorite method to prepare your orange peel shapes.
- Create enough orange peel shapes for one section (or more if you’d like).
- Baste the orange peel shapes onto the background section(s).
Previous week’s lessons
Sharing
If you use Instagram, remember to take pictures of your progress and post them. It’s a great way to see what others are doing!
Make sure to use the hashtag #orangepeelsewalong and tag me @thecraftyquilter. Remember that only public accounts are visible to everyone (even with the hashtag).
This is a big week for the Orange Peel Sew Along – there’s a lot of information to digest! Take your time and please let me know if you have any questions.

Discover more from The Crafty Quilter
Subscribe to get the latest posts sent to your email.

I’m making the wall sized version. I think it needs a border. Do you have thoughts/inspiration you could share? Looking for ideas.
Thank you for this wonderful SAL
I lOVE this project……thank you!!
Julie, thank you so much for all this work with the videos. I was really wondering who to do the orange peels. Freezer paper “double” – this makes sense. I am new with appliqué and was wondering if we need a glue. I saw some technics with a “thin fleece” and glue. But I like to spend not to much money to all the extra tools. So freezer paper and ironing the wet piece of fabric, that makes so much sense! Money could be spend for fabric or pattern!
many thanks – happy easter holiday with your family