
How To Make Stroked Flying Geese | Fantasy Flying Geese Week 4
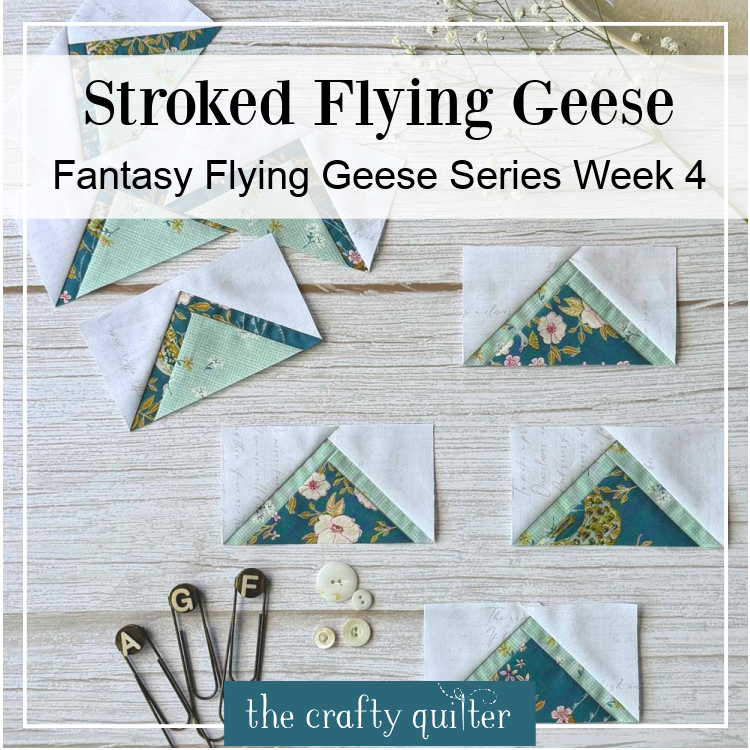
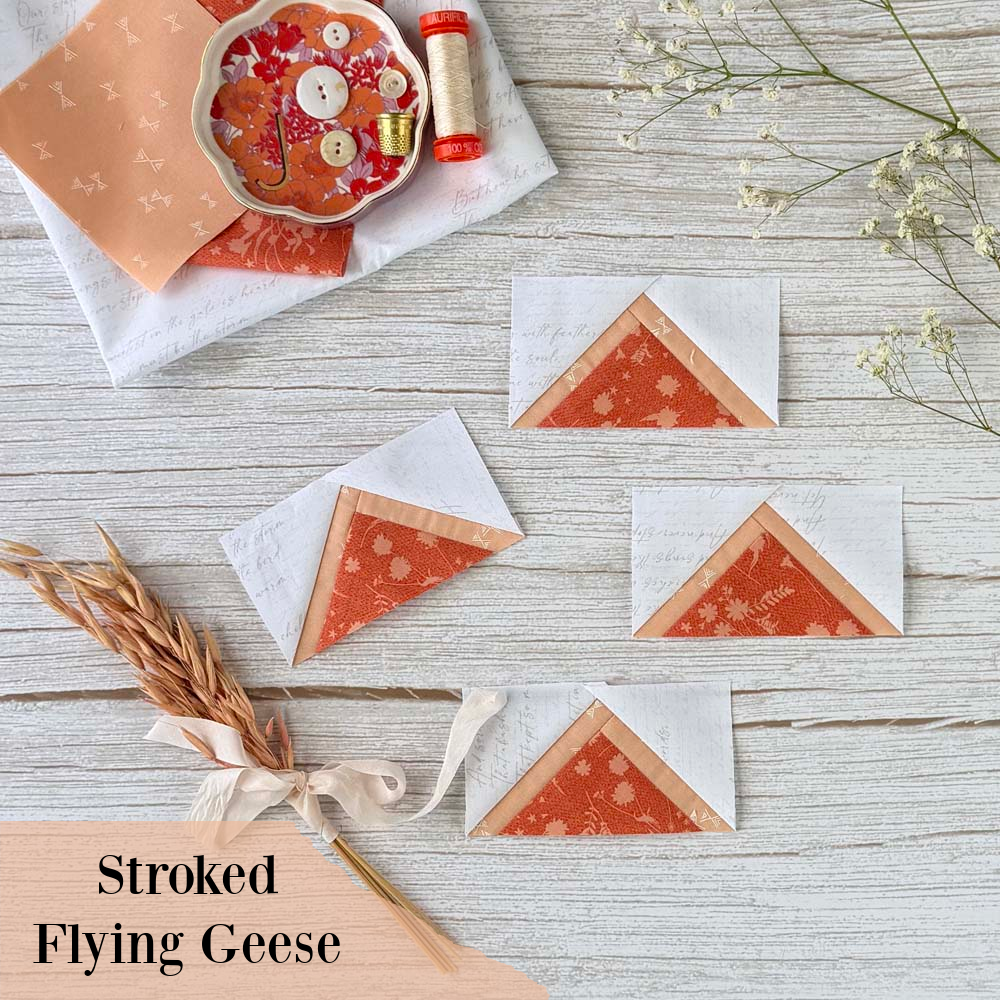
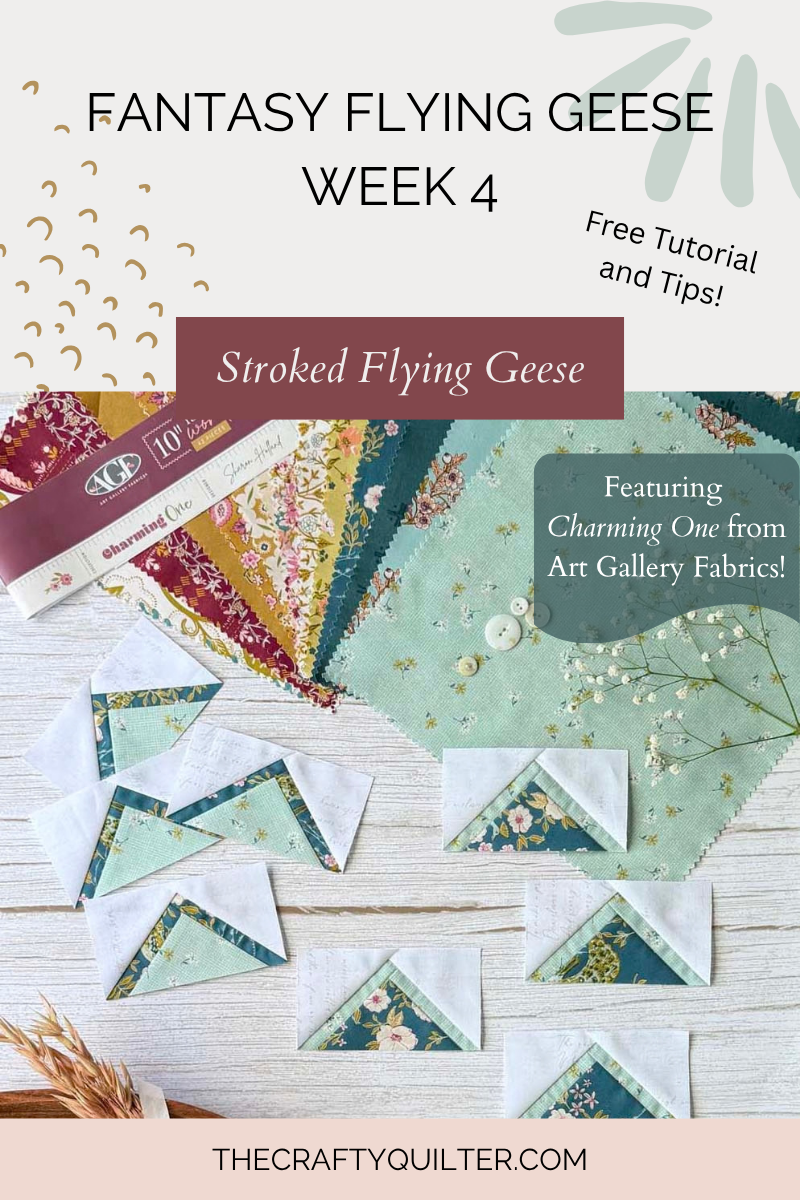
Welcome to Week 4 of the Fantasy Flying Geese Series! This week, we’re learning how to make Stroked Flying Geese – a unique variation I first spotted in a Reel from Art Gallery Fabrics. They kindly gave me permission to recreate the technique here and provided fabric of my choice from one of their current collections for me to use in the tutorial. I chose Charming One by Sharon Holland, and I think you’re going to love seeing this beautiful fabric transformed into flying geese!
What makes this variation so unique is the additional “stroke” of fabric running through the body of the goose. The way it’s constructed is surprisingly clever, and I know you’ll be amazed by the technique!
Note: Art Gallery Fabrics provided the fabric used in this tutorial at no cost. All opinions and tutorial content are my own.
New to this series? Catch up below.
- Introduction Post – Start here to get all of the basic details.
- Week 1 – Capped Flying Geese
- Week 2 – One Seam Flying Geese
- Week 3 – Cat Ears Flying Geese
About Stoked Flying Geese
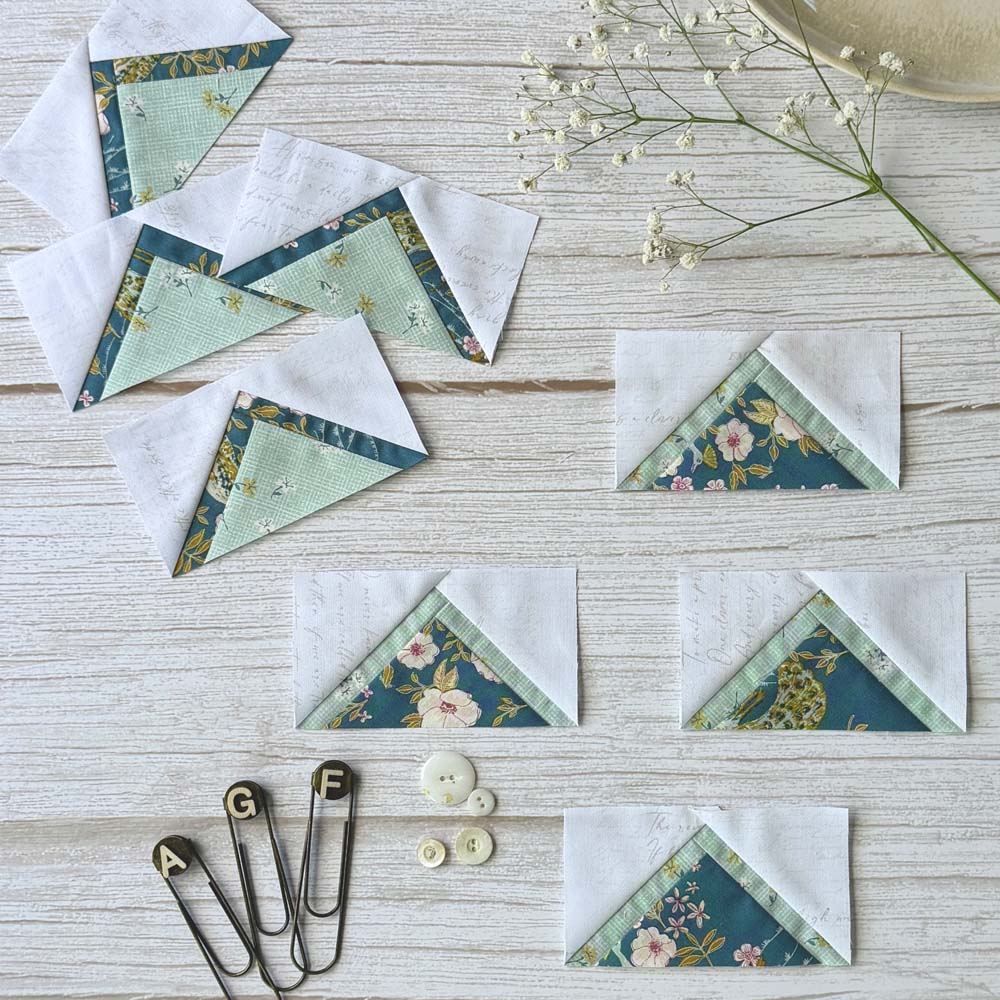
What makes the Stroked Flying Geese variation unique is twofold. First, a narrow strip of fabric is added along the two upper sides of the flying geese body, creating a fun accent—or “stroke.” Second, the technique used to create that accent is quite clever!
We’ll use my favorite oversized four-at-a-time method to make the flying geese, but with an interesting twist: the large square is pieced first to create those accent strips. From there, the flying geese come together in a surprisingly familiar way.
About The Fabric Used
I’ve always loved using Art Gallery Fabrics in my quilts. Their fabrics have a lovely drape and a light, smooth hand that makes them easy to work with, and the results are always beautiful.
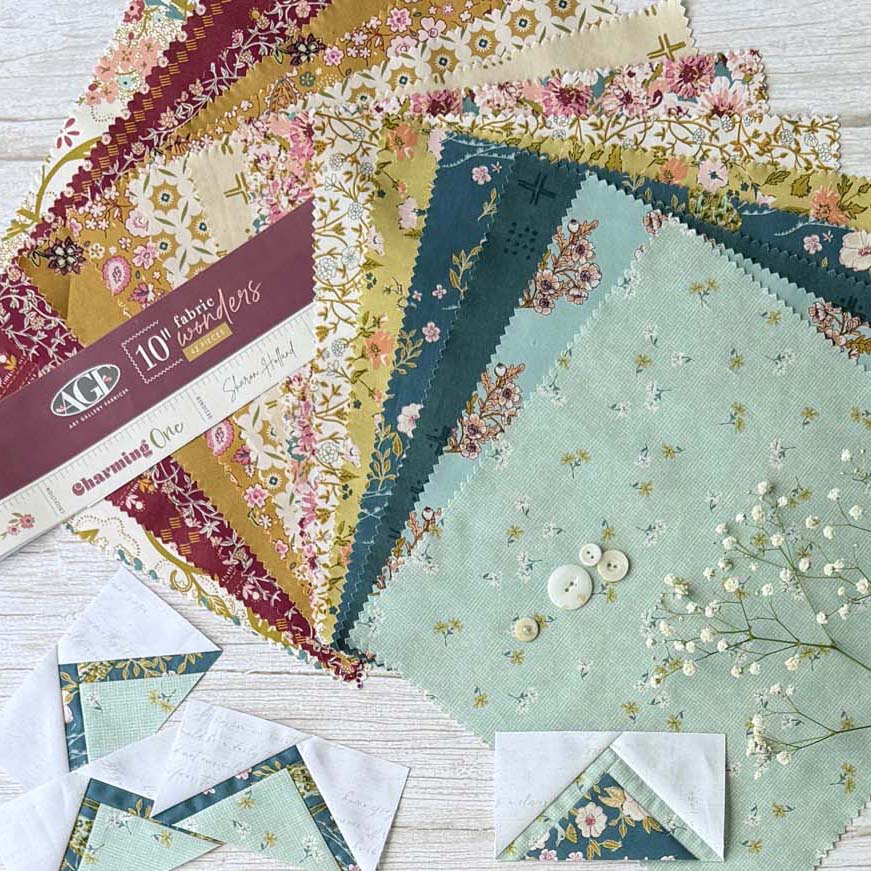
For this tutorial, I’m using a few pieces from a 10″ pack of Sharon Holland’s latest collection, Charming One. It’s filled with warm plums, harvest golds, dried-grass neutrals and watery blues, creating a beautiful palette that transitions perfectly from summer into fall.
General Things To Know
- Makes four Stroked Flying Geese that measure 2″ x 4″ FINISHED.
- Fabric: One light, one medium and one dark fabric. Use large scraps or 1/8 yard each.
- All seams are 1/4″
- RST = right sides together
- FG = flying geese
Stroked Flying Geese Instructions
There are a lot of steps in this variation, but many of them are tips for alignment and marking registration lines. The process itself is not difficult, so just follow the instructions step-by-step!
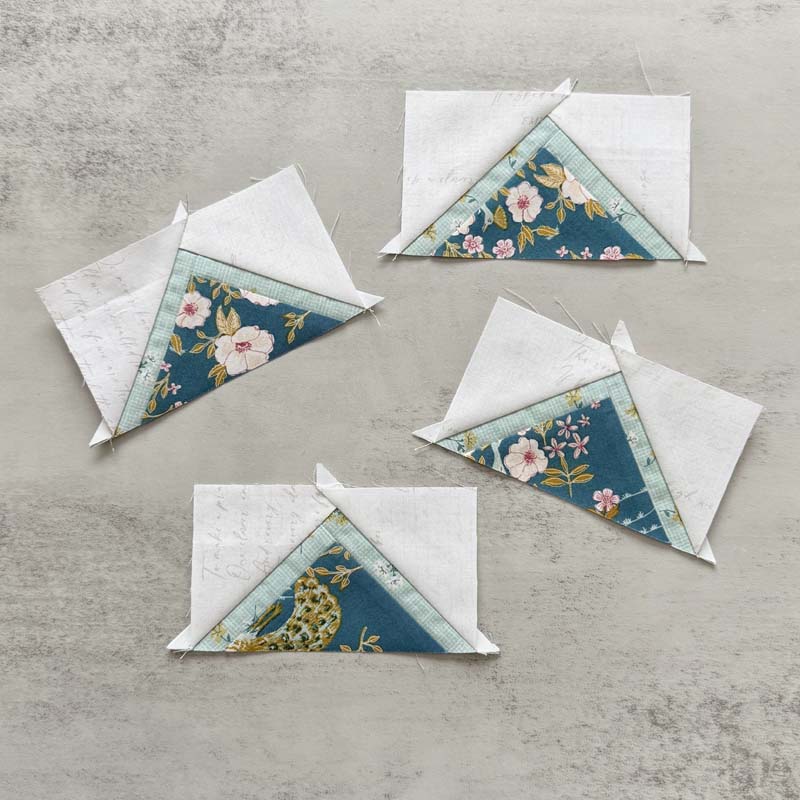
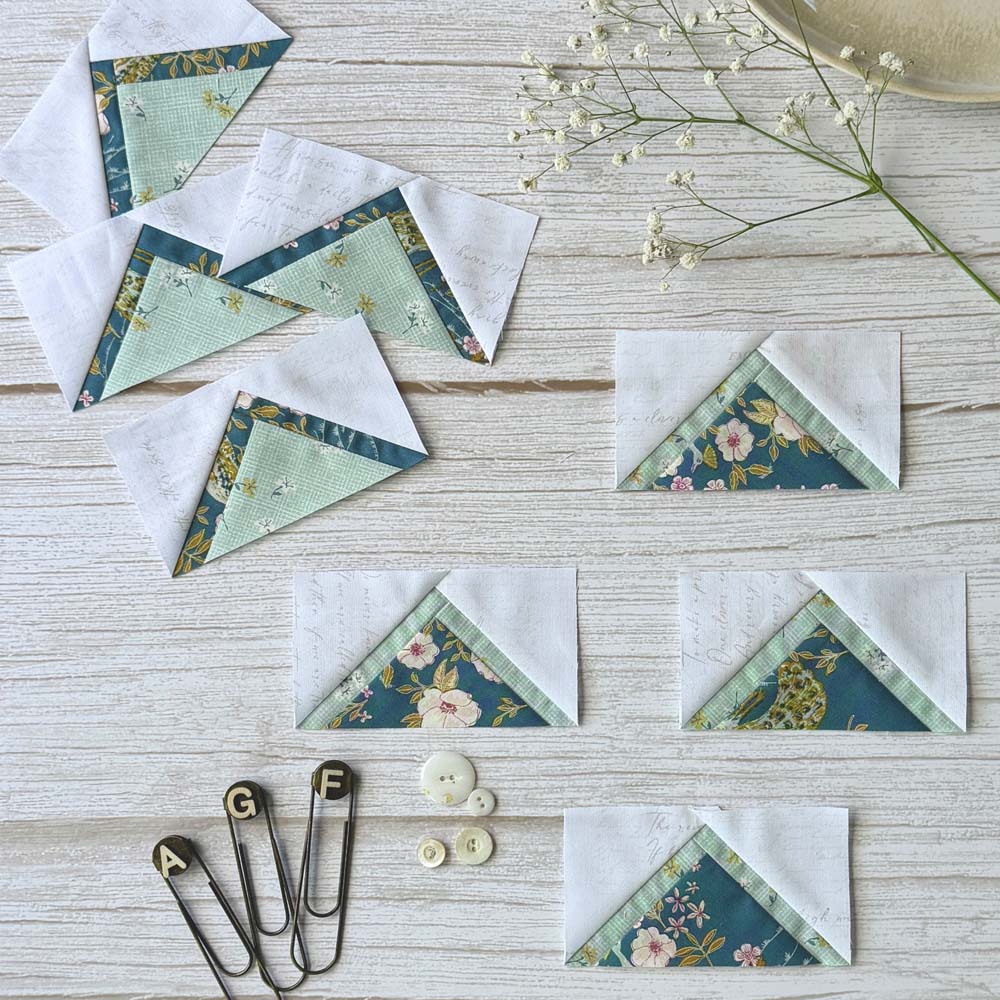
Note: You’ll often see eight stroked flying geese in the finished photos. You only need to make four.
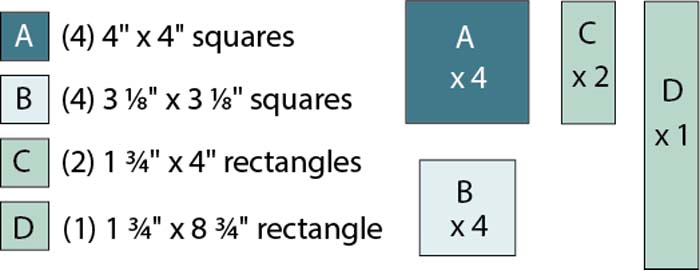
Cutting Instructions
Assemble The Large FG Body
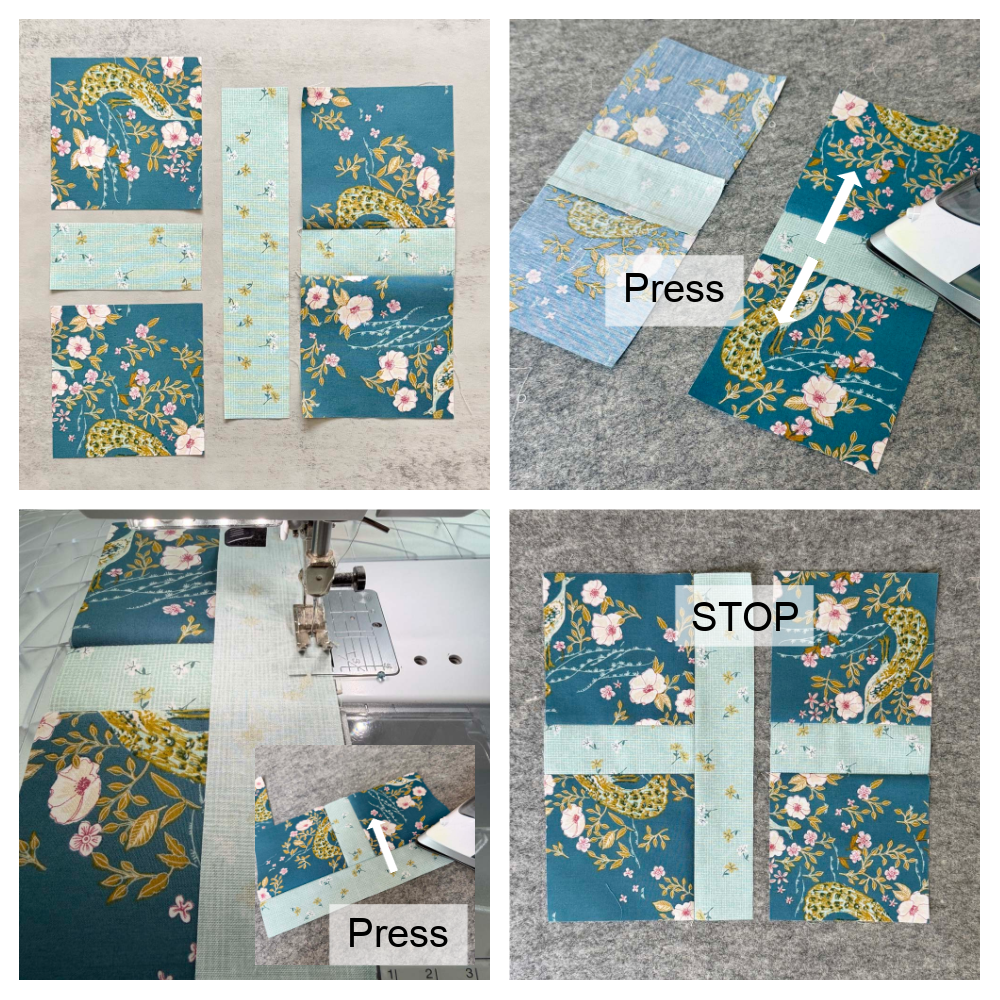
- Arrange the four A squares, two C rectangles and one D rectangle as shown below.
- With RST, sew an A square to each side of a C rectangle.
- Press toward the A squares.
- Repeat to make two A/C units.
- With RST, sew one A/C unit to the long side of the D rectangle.
- Press toward the A/C unit.
- STOP before sewing the other A/C unit onto the D rectangle.
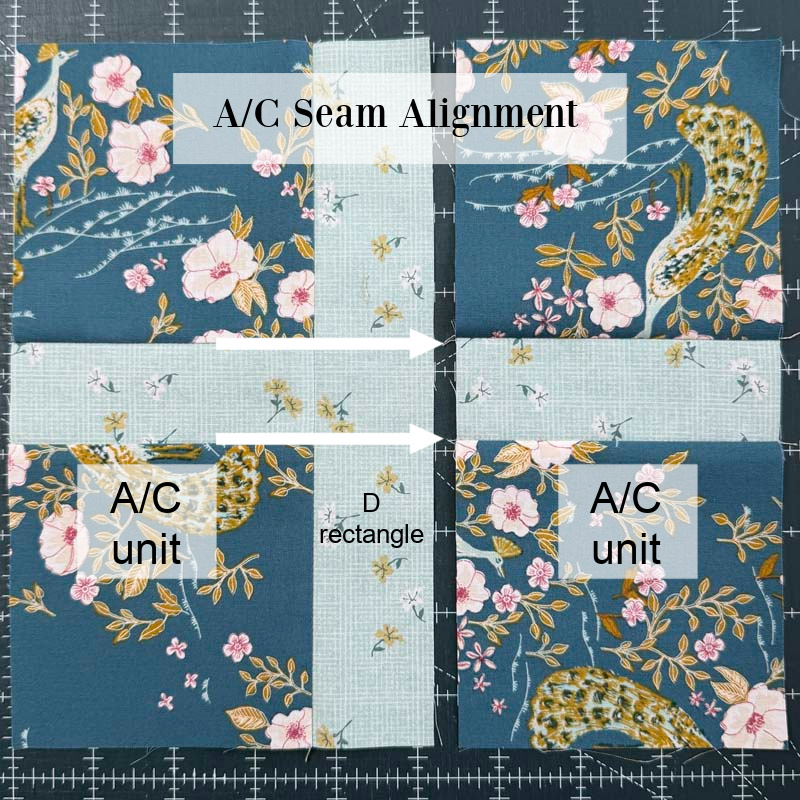
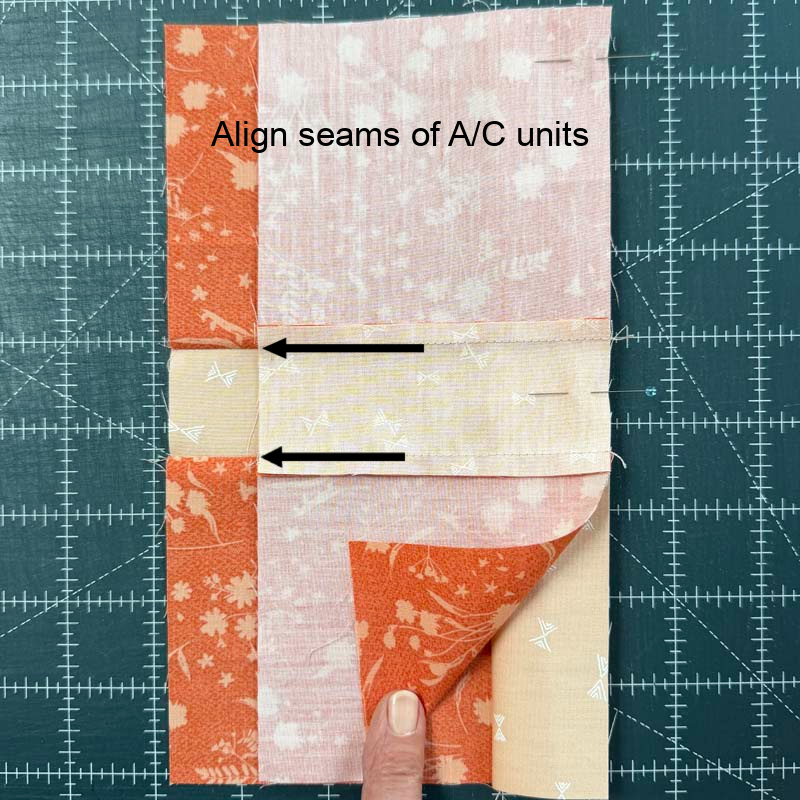
Before sewing the other A/C unit onto the D rectangle, it’s important to make sure the seams of both A/C units are aligned with each other.
- To ensure the seams of the A/C units are aligned, you can either mark the edge of the D rectangle at the seam line, or make a crease at the center of the D rectangle and the second A/C unit.
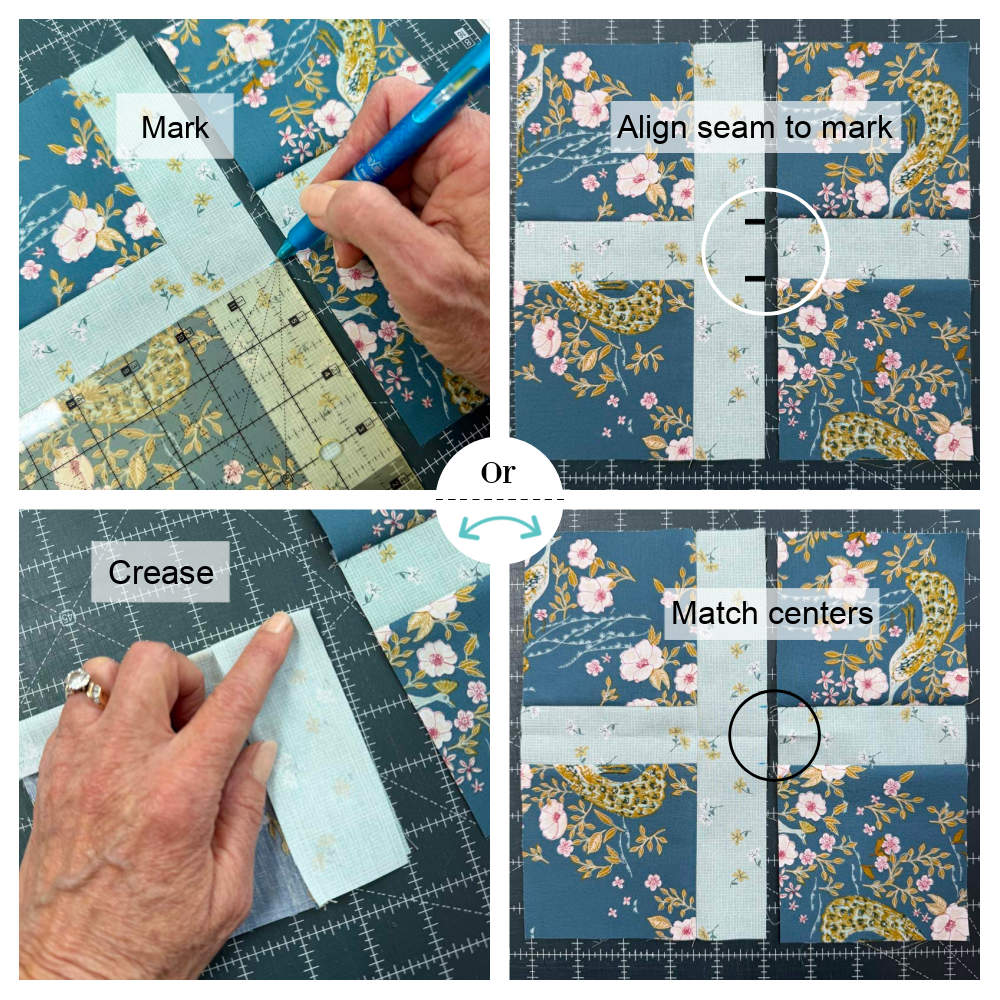
- Match seam marks or center creases and pin the A/C unit to the D rectangle section.
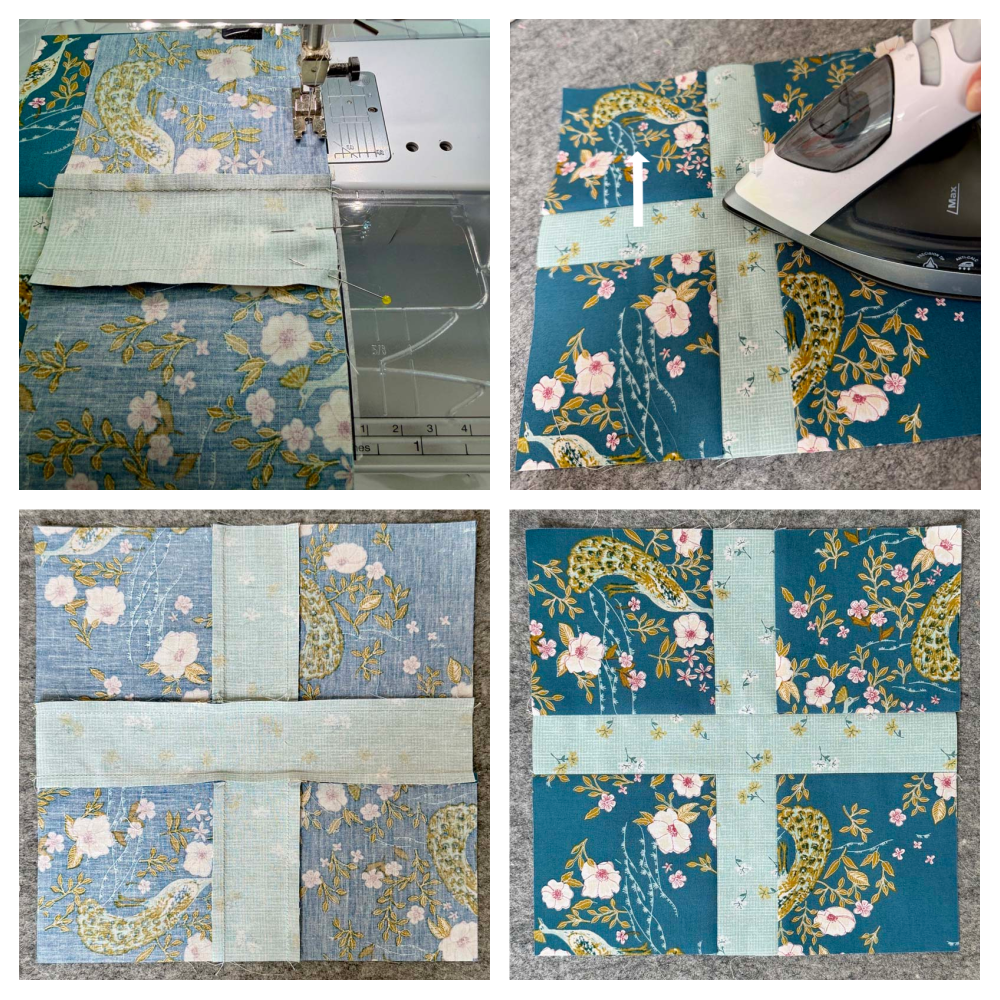
- Stitch and press away from the D rectangle.
- The large FG body should measure 8 3/4″ x 8 3/4″. TIP: It’s not crucial, at this point, that the measurements are exact. We will trim in the next step.
Trim the FG Body to Size
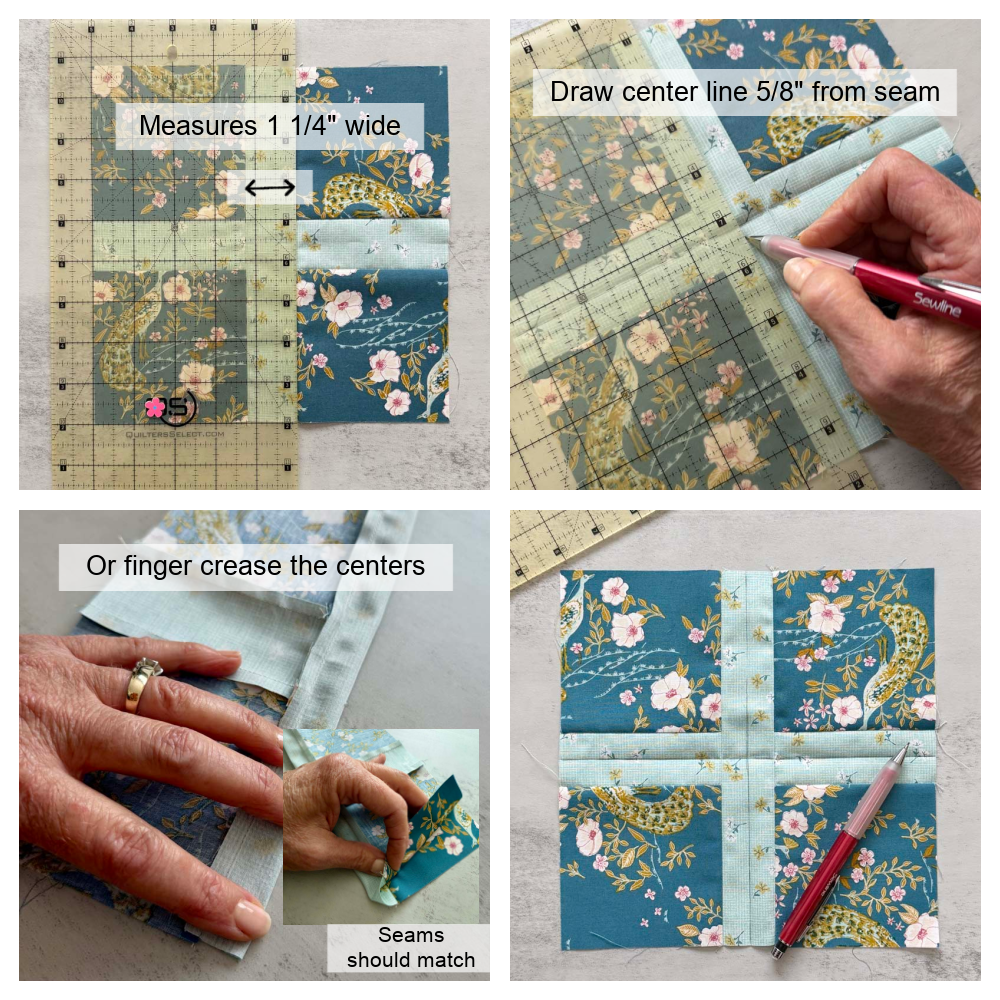
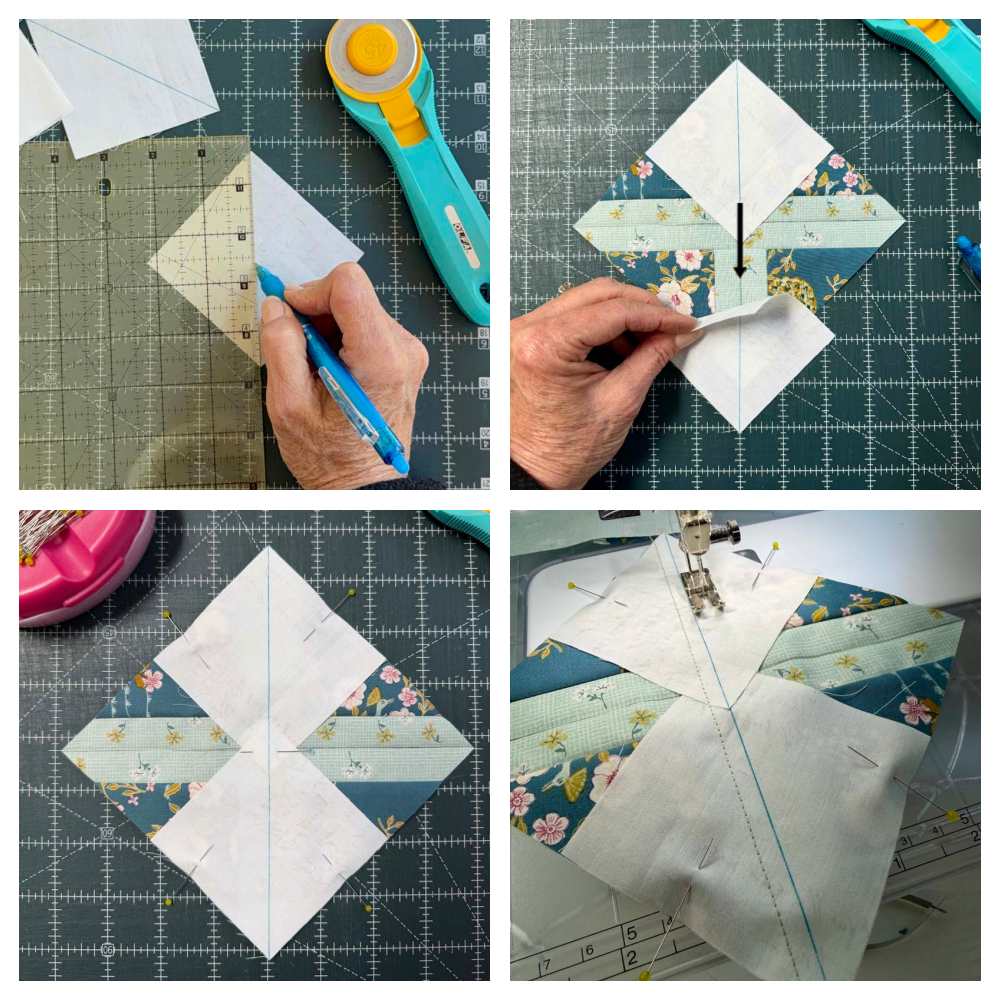
Before trimming, you need to mark the center of the pieced square vertically and horizontally. It’s more important that this line is in the center of the C and D rectangles and not just the overall square. You can either use a fabric pencil, pen or chalk pencil. Do NOT use a heat erasable pen as we want these registration marks to remain after pressing. You can also finger crease the centers, although these may disappear after ironing. I like to do both.
- The center C and D pieces should measure 1 1/4″ wide finished.
- On the right side of the fabric, draw a center line 5/8″ from the seam.
- Alternatively, you can make a crease with your fingers by folding the square in half. If you do this, make sure the seams line up first.
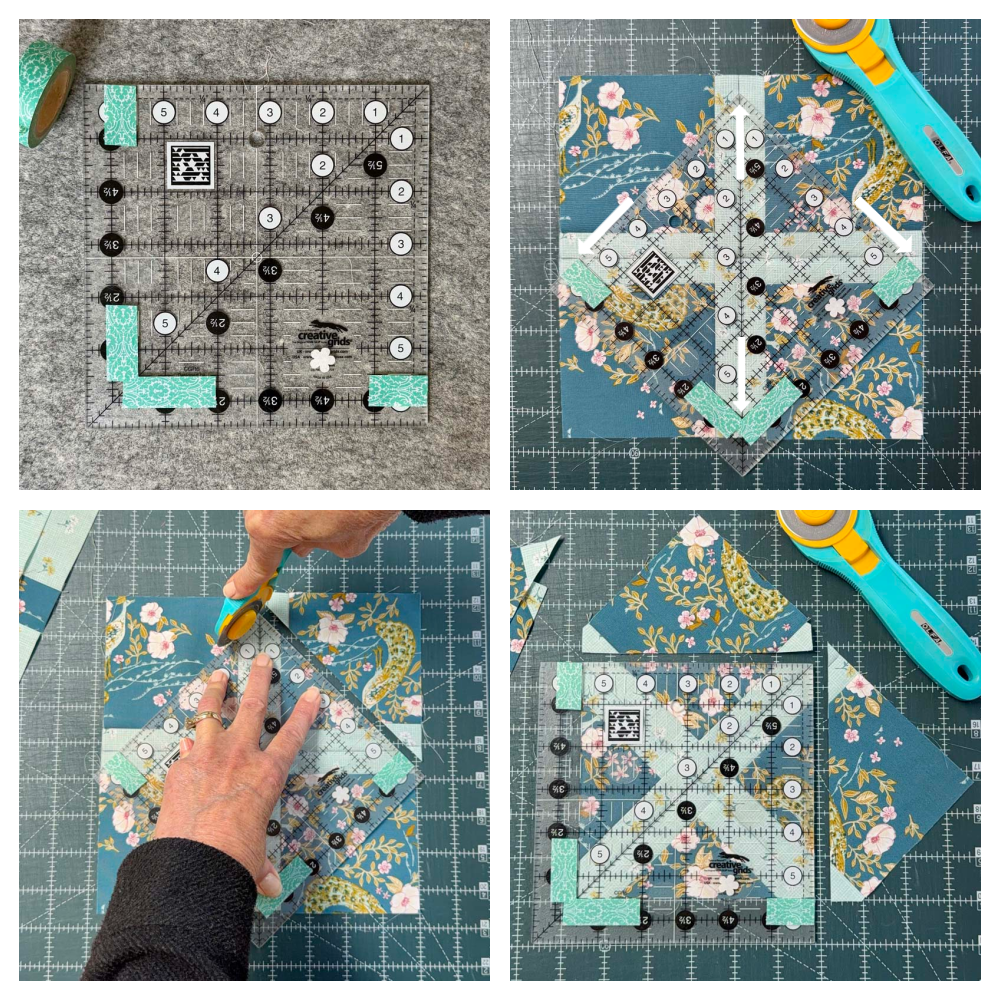
- Using a square ruler and tape, mark off the 5 1/2″ lines on the ruler as shown (below left).
- Place the diagonal line of the ruler on the vertical marked center line. Align both 5 1/2″ tape lines of the ruler with the horizontal center line of the pieced square.
- Trim the top two sides of the pieced square.
- Rotate the square and line up the 5 1/2″ lines of the ruler with the previously cut edges.
- Trim the remaining two sides.
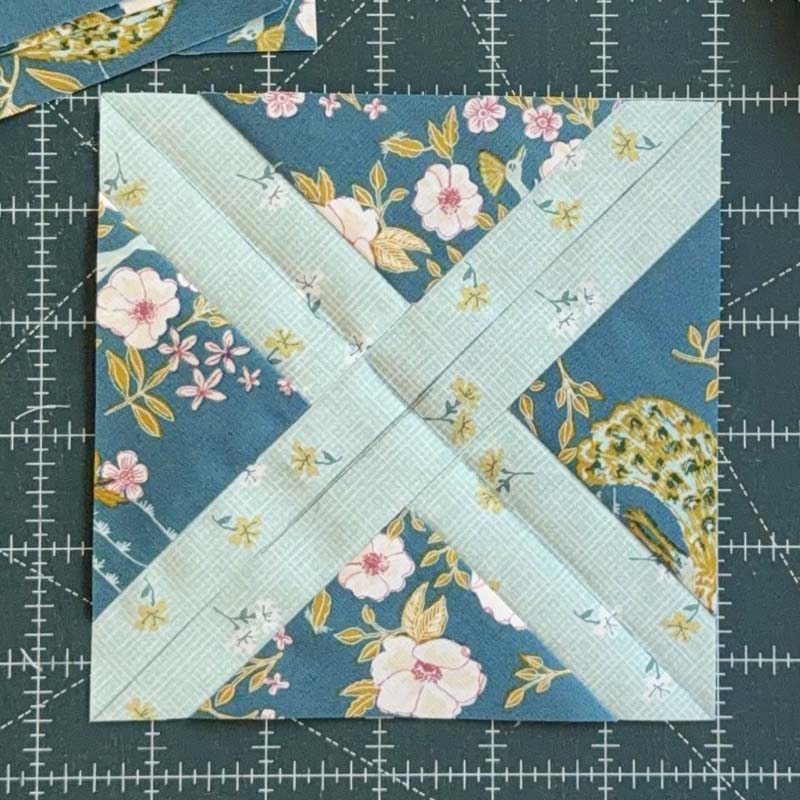
What About the Fabric Waste?
I know some of you will notice that this technique creates a fair amount of fabric waste when the large pieced square is trimmed. That’s definitely something to consider when deciding if this method is right for you. For me, a little fabric waste is a natural part of quilting, and I’m okay with it—especially when I can put those leftovers to good use!
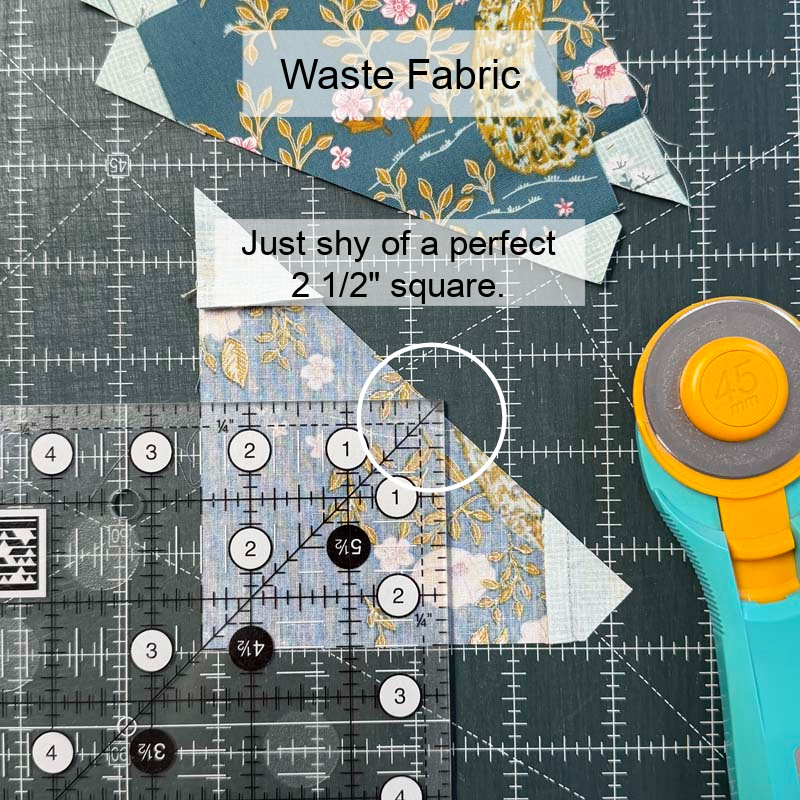
I save larger scraps for scrap quilts and appliqué projects, while tiny bits can be used as stuffing for pet beds, pillow poufs and other projects. For this particular project, I’ve been cutting the leftover fabric into 2 1/2″ squares. One corner comes up just a little shy of 2 1/2″, but the difference is small enough that it will disappear into the seam allowance.
Make 4-at-a-time Flying Geese
- On the wrong side of each B square, draw a diagonal line from corner to corner.
- With RST, place a B square on opposite corners of the pieced square from above. Make sure the diagonal line aligns with the center marked line of the pieced square.
- Pin in place.
- Stitch 1/4″ on each side of the diagonal line.
- Cut apart on the center diagonal line and press.
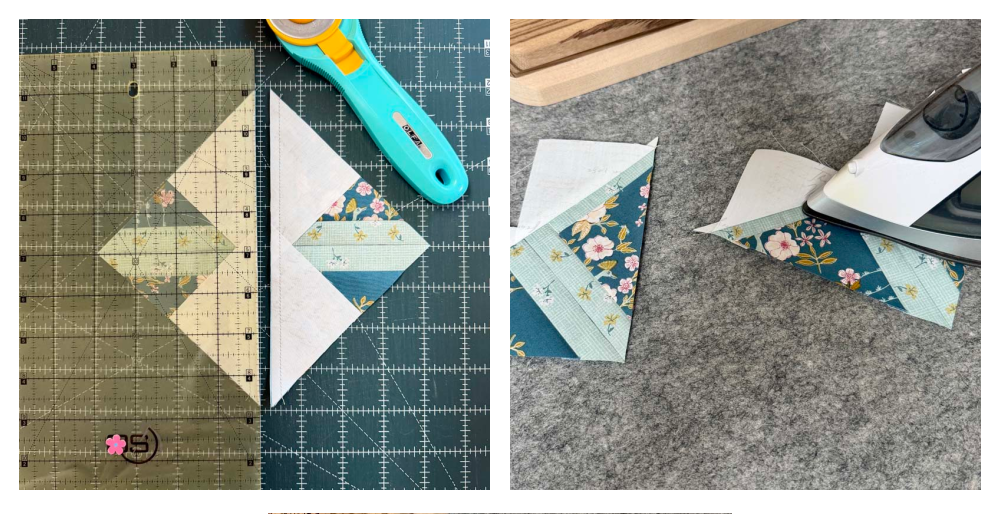
- With RST, place B square on remaining corner of the unit from above, again making sure the diagonal line matches the marked center line. Pin in place.
- Stitch 1/4″ seam on each side of the diagonal line.
- Cut apart on the center diagonal line and press.
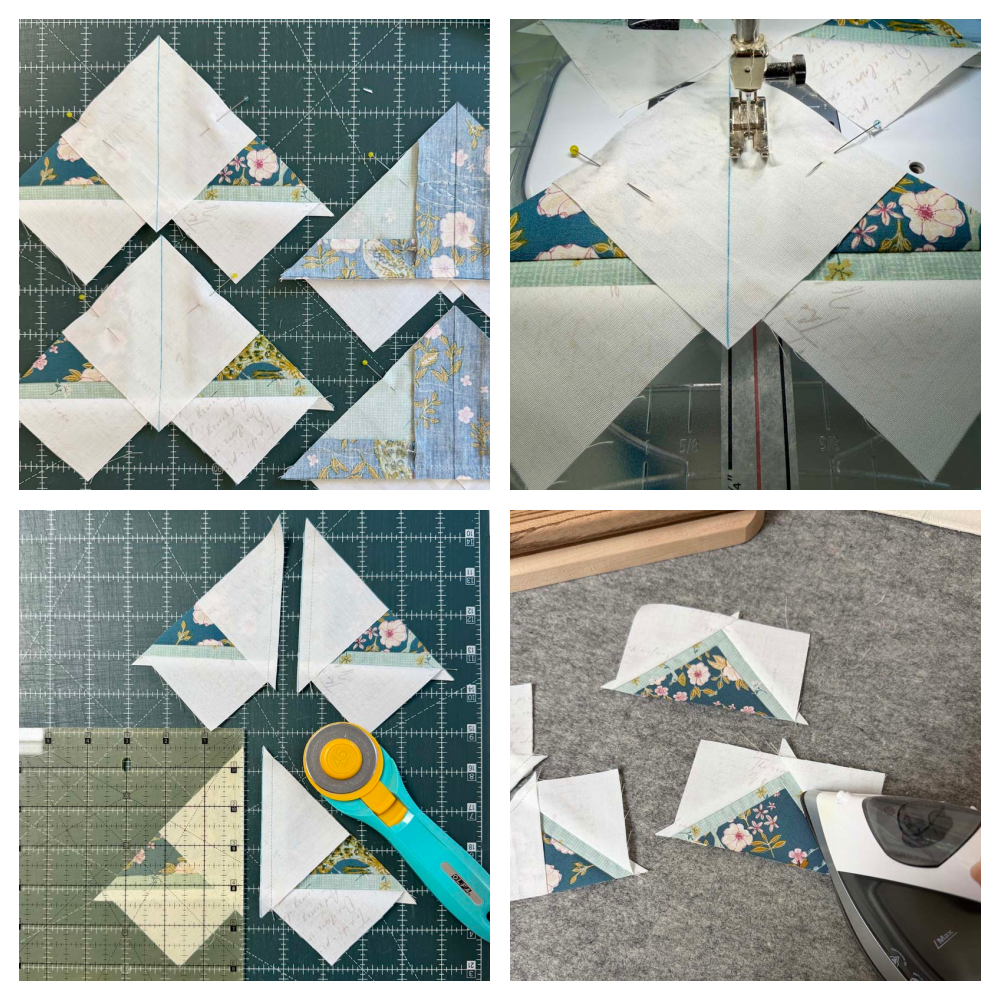
Trimming
Trim each Stroked FG unit so it measures 2 1/2″ x 4 1/2″ using your favorite ruler/method. Below are two of my favorites – a square ruler and a Bloc Loc Flying Geese ruler. I find a rotating mat is really handy for trimming units.
Note: The trimming instructions are written for right-hand orientation.
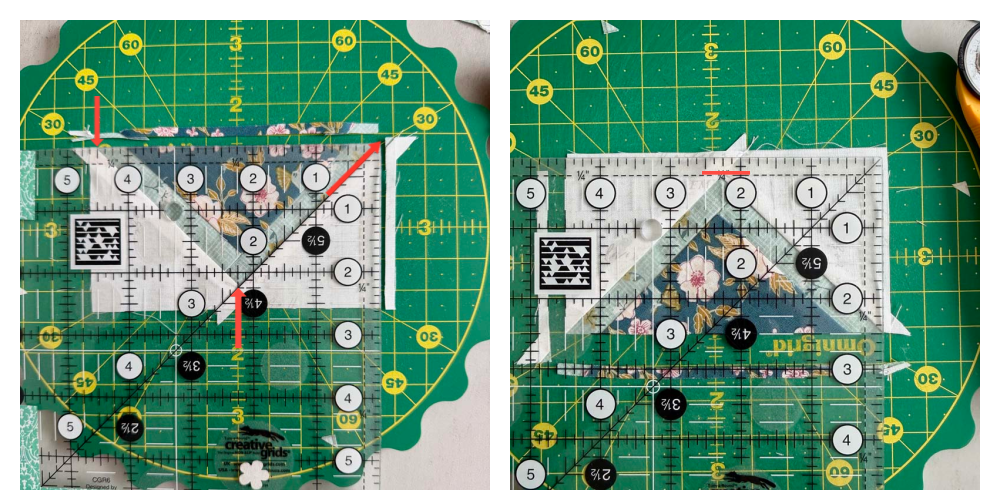
Trimming with a square ruler
- Place the FG unit with the point facing down.
- Place the diagonal line of a square ruler on the large diagonal seam (right side) and adjust the position so that the 2 1/4″ lines of the ruler intersect at the bottom point, and the 4 1/2″ line of the ruler lands on the larger diagonal seam on the left side.
- Trim the right and top edges.
- Rotate the unit 180 degrees. Line up the 2 1/2″ and 4 1/2″ lines of the ruler with the previously cut edges. You should see the 1/4″ seam allowance beyond the center point.
- Trim the remaining two sides.
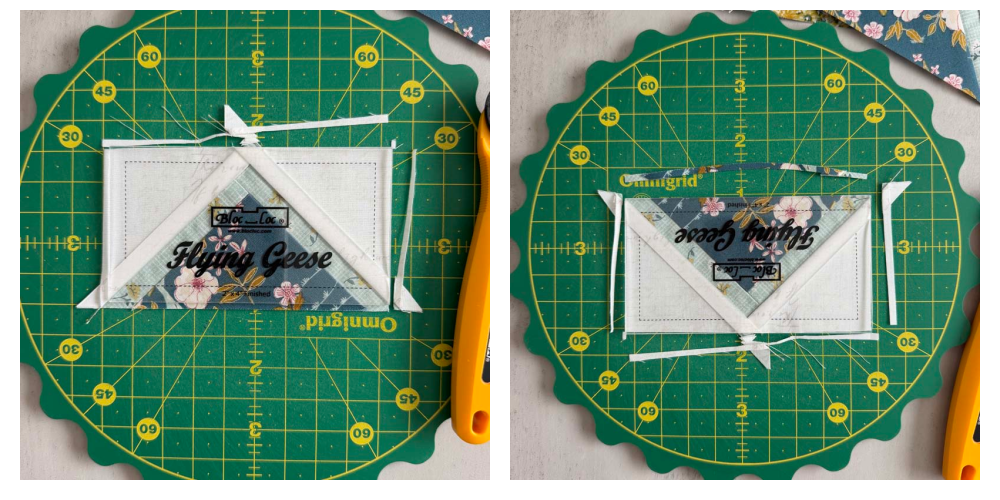
Flying Geese Bloc Loc Ruler, 2″ x 4″ finished size
- Place the flying geese unit on the mat. It doesn’t matter if the center point is facing up or down. My example shows it facing up.
- Place the Bloc Loc ruler on the flying geese unit so that it locks onto the larger diagonal seams. It may not be as tight a fit as usual due to the additional stroked seam.
- Trim the edges on the right and top side.
- Rotate the unit 180 degrees and trim the remaining two sides.
TIPS for success
- Start by making a test block. This is really important since this is a new technique and there are variables throughout the process.
- Follow the pressing directions exactly. If, instead, you press seams toward the C and D rectangles, there may not be enough room for the presser foot when sewing the diagonal seams of the small B squares.
- When drawing the center diagonal lines on the large pieced square, make sure the ruler is lined up in the middle of the C and D rectangles. This will ensure accurate trimming of the large pieced square and an even seam for the stroked section.
- Make sure the diagonal lines of the small B squares line up with the marked center lines of the large pieced square. Since this is your seam guide, it will also help ensure the stroked seam is even.
- Try marking the stitching lines as well to help keep a straight and consistent seam.
Common Mistakes And How To Fix Them
The stroked (accent) seam isn’t consistent
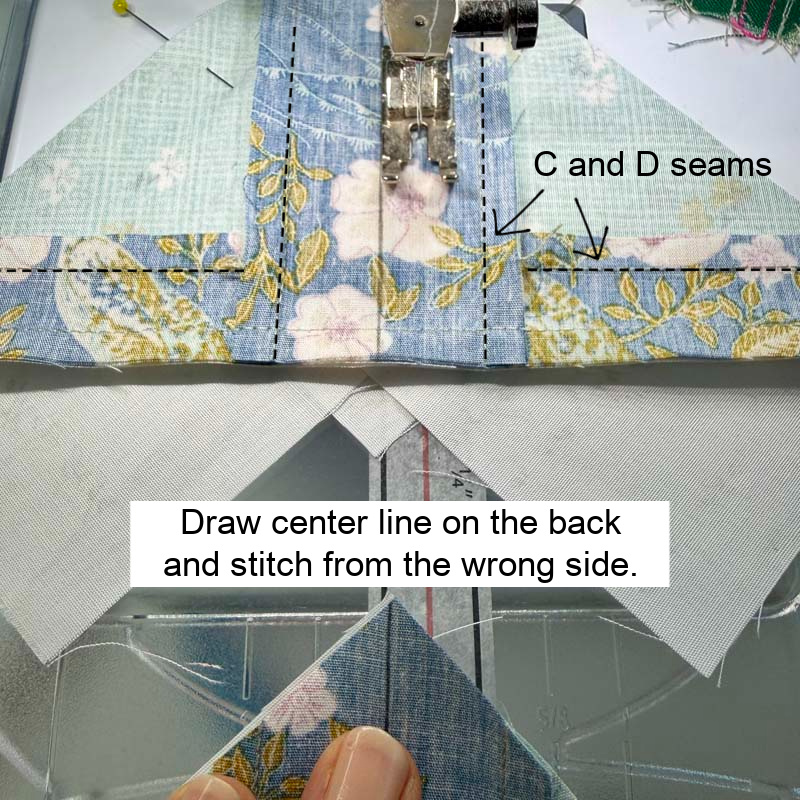
This happens when the 1/4″ seams on each side of the small diagonal squares don’t run parallel to the larger seams of the C and D rectangles.
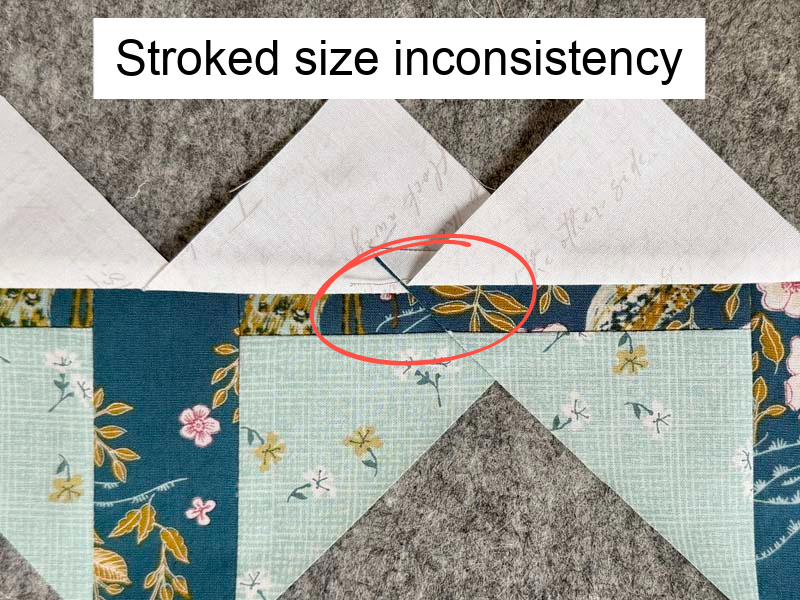
- Try drawing center lines on the large pieced square on the wrong side, making sure they are in the middle of the C and D seams.
- Stitch from the wrong side, 1/4″ from the center lines. These should more closely follow the stroked seam line.
- Make sure the seams of the A/C units match up perfectly when sewn to the D rectangle.
The points are cut off
Since the Stroked Flying Geese are made four-at-a-time and they are oversized, there should be enough extra seam allowance at the point for trimming. If not, try the following:
- Check your 1/4″ seam allowance. You may need to use a scant 1/4″ seam. This is usually a “click” or two to the right of the center needle position.
- Take your time and stitch slowly.
The diagonal seams don’t end in the corners
- Go through the TIPS Section and apply all of them. 😉
- This may be due to inaccurate or inconsistent seam allowances. Try marking the stitching lines and stitch slowly.
- Ideally, the diagonal seams of the first set and second set of small squares are perpendicular to each other. Check that you’re marking and stitching the diagonal lines accurately.
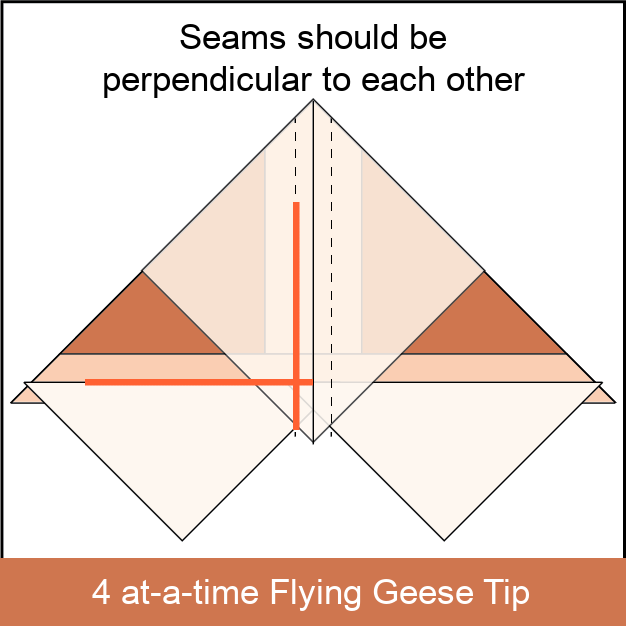
Have fun and breathe! Don’t stress if your first attempt isn’t perfect. These tips are meant to be learning tools, not a measure of perfection.
Printable Instructions
You can download the pdf below.
Art Gallery Fabrics Video
Below is the video by Art Gallery Fabrics that first caught my attention. Notice that it uses different cut sizes and makes Stroked Flying Geese that measure 3″ x 5 1/2″ unfinished.
Conclusion
I think we’ve really put the fantasy in our Fantasy Flying Geese Series this week! The Stroked Flying Geese variation is full of imagination and creativity, and I hope you have fun playing with the possibilities. I’m grateful to the Art Gallery Fabrics team for allowing me to recreate this clever technique for you. It’s also been a pleasure working with Charming One and seeing these beautiful fabrics come to life in my samples.
I hope you’ll give Stroked Flying Geese a try and experiment with your own fabric and color combinations. That extra little “stroke” opens up so many possibilities! And with four variations behind us, we’re getting closer to putting them all together in our Fantasy Flying Geese mini sampler. I’ll see you next week for another fun variation!


Discover more from The Crafty Quilter
Subscribe to get the latest posts sent to your email.
DISCLAIMER:
Some of the links on this site are affiliate links and I may be compensated a small commission when you make a purchase by clicking on those links. I only promote products and services that I use and love myself. Your support enables me to maintain the content of this blog and I am truly grateful!