How to use machine embroidery stitches with applique
If you’re like me, you use the straight stitch on your sewing machine most of the time, and the zig zag stitch once in a while. But what about all those cute decorative stitches on your machine? Today, I’m going to show you how to use machine embroidery stitches in your applique. You’ll love the added dimension it gives to your projects!
Make a stitch sampler
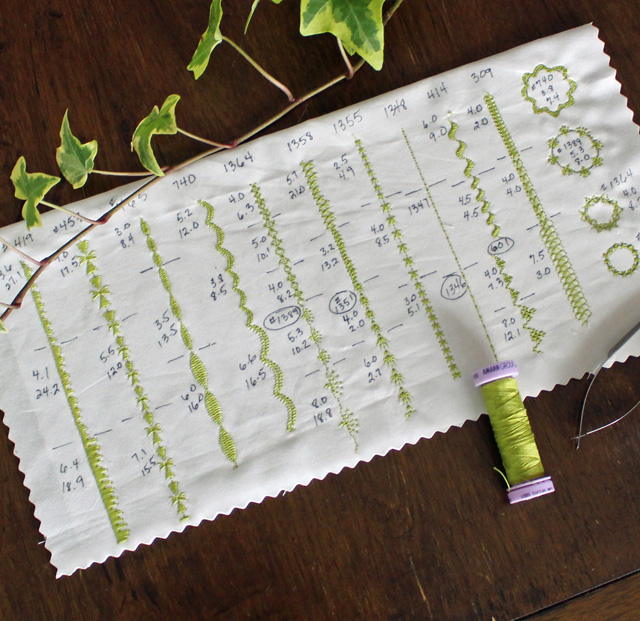
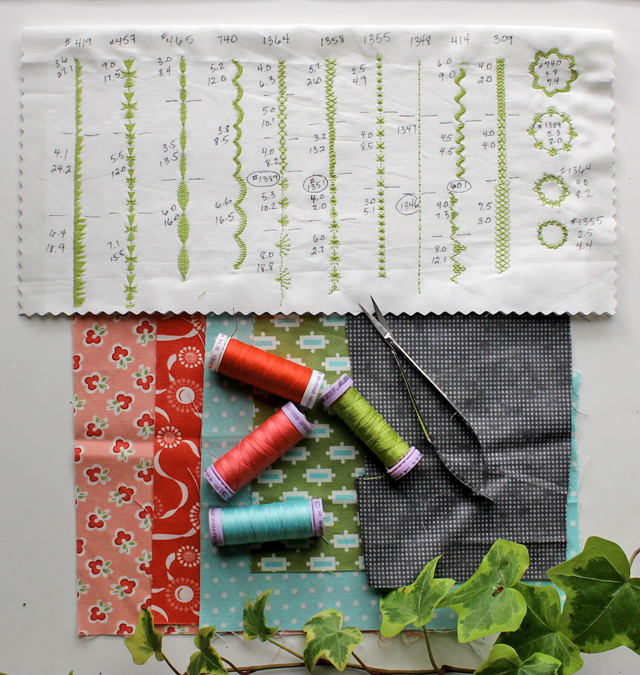
The first thing you’ll do is play with the decorative stitches on your sewing machine. At the same time you’ll be making a Stitch Sampler that you can refer back to when you’re ready to work on a project. This will give you a better visual guide of what your stitches will look like at various stitch width and stitch length settings.
- Cut (1) 12″ square of solid fabric
- Cut (1) 6″ x 12″ rectangle of stabilizer (any kind).
- Fold the solid fabric in half to form a 6″ x 12″ rectangle.
- Sandwich the stabilizer between the layers of the fabric rectangle.
- Load your machine with a bright or contrasting thread to your fabric and attach the correct foot (I like to use an open toe applique foot).
- Pick an embroidery stitch to try.
You’ll be working in columns. Using a pen or permanent marker, write down the name or number of the stitch at the top of the column. To the side, write down the stitch length and width settings. I tested out three different length and width settings of each stitch and added little “tick” marks where the change occurred. It was easiest for me to note the settings on a separate piece of paper and then add them onto the sampler after I completed each column.

Prepare an applique sample
You might want to make a simple applique sample to practice on first, before committing to a big project. Stitching around a shape is less predictable than stitching a straight line. You could also draw shapes onto fabric and stitch around those. I drew some circles at the end of my stitch sampler and tried out some different stitches there first. Always note what settings you used for each stitch.

You can use raw edge applique or turned edge applique for the sample. I have a raw edge machine applique tutorial that you can refer to for more information. For my sample, I’m working with turned edge applique. There are several different methods to prepare a turned edge. I used the Appliquick Tools for mine which involves a fusible stabilizer, a glue stick, and some turning tools. I recently completed a video for The Quilt Show on using the Appliquick Tools that you can watch for an in-depth look at the technique.
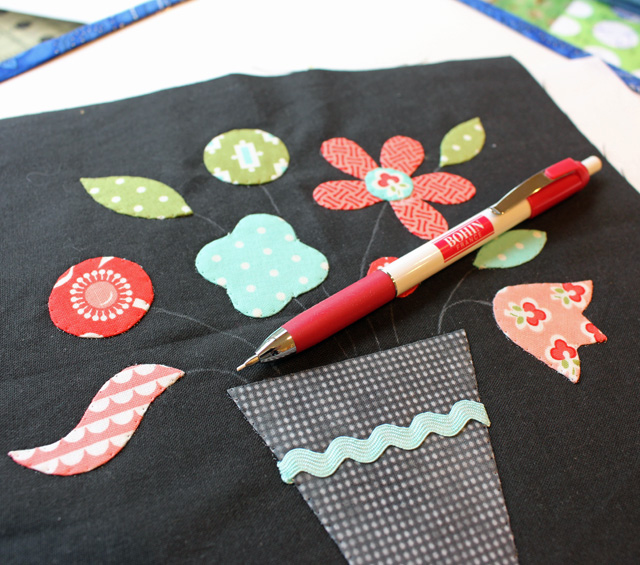
Here is my sample applique which has been glue basted into place using Roxanne Glue – Baste-It. I wanted everything to be really secure before adding embroidery stitches, so I added a blind hem stitch (by machine) with invisible, monofilament thread. You can see details of that technique here (look towards the end of that post).
Stitch & Play!
For most of my machine applique, I use a stabilizer on the back of my project. It’s going to be really important here because of the decorative stitching. I used a Schmetz embroidery needle in my machine, size 75/11. The size depends on the type of thread I use. For 50 weight, 3-ply (50/3) cotton thread, that size works great. For heavier, more decorative threads, you should bump up your needle to the next size which is 90/14. I keep the bobbin thread a neutral color and it should be no thicker than 50/3.
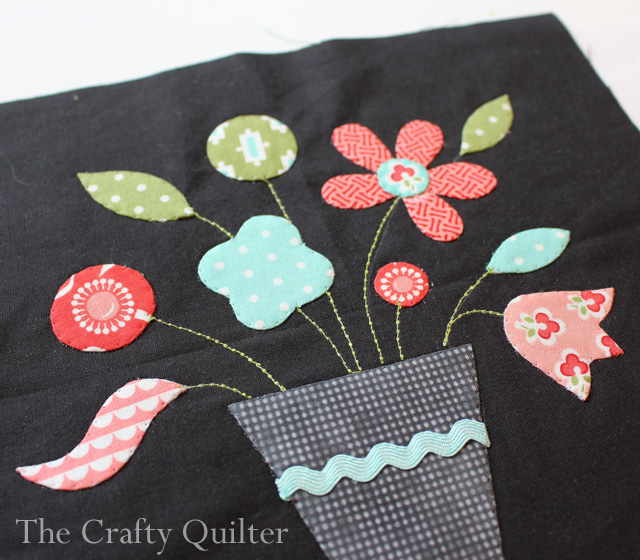
The first thing I did was to create stems using a stitch that looked like a stem stitch or chain stitch. The stitch number on my Bernina 770 is 1347. Your machine may not have a stitch like that. You could try a stretch stitch, a fine zig zag stitch or just make several passes with a straight stitch to get the same effect. I drew the lines first using a Bohin Extra-Fine Chalk Pencil. Next, I stitched each stem using green thread.
.
Once the stems are done, you can start on the flowers. When deciding on a particular stitch, think about the shape and the amount of curves and points you’ll be going around. Make sure to go slow and stop with the needle down. When you pivot around a shape, think about when the best time would be to pivot. There will be some trial and error, but try to remember that this is playtime!
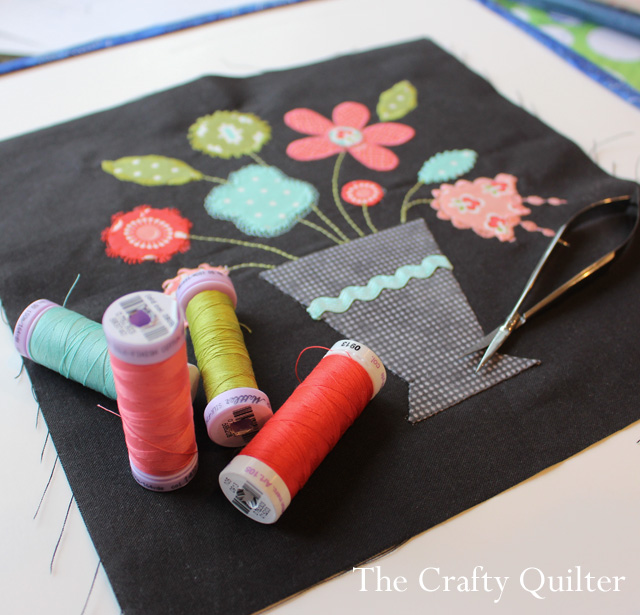
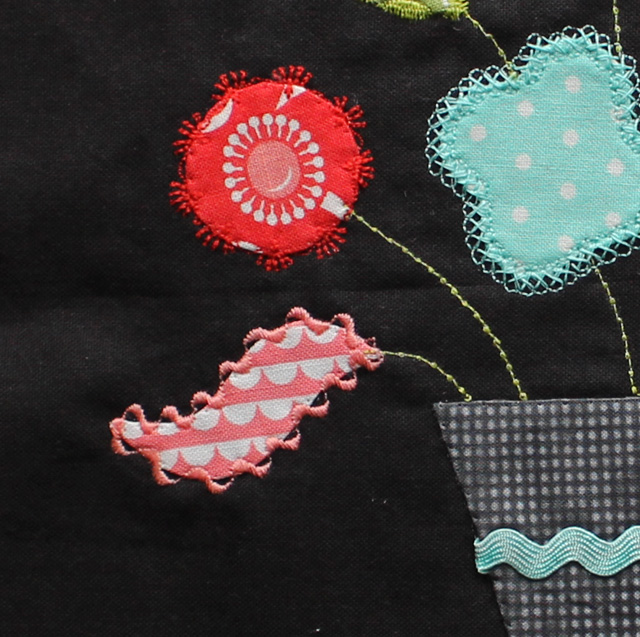
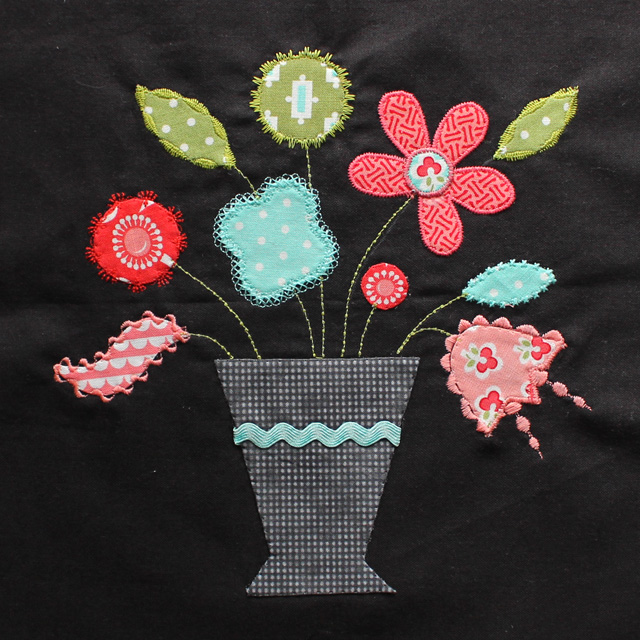
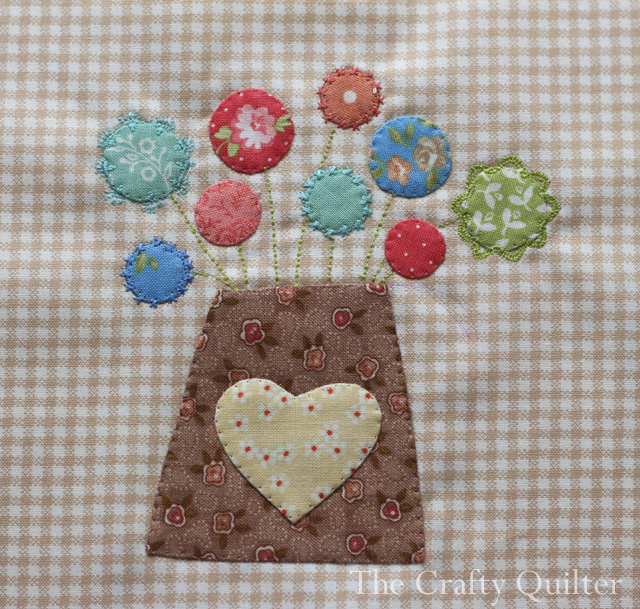
The circle shapes were fun and you can really do some creative stitching there. I like the way the green circle looks like a dandelion or prickly flower. That was stitch #419 on the Bernina 770. You could get the same effect by varying the width of a zig zag stitch or other decorative stitch.
I like the “S” or serpentine stitch (#414) on the pink flower on the left. It really adds a nice flourish!
You can see all of the different stitches I used in the following picture. I had the most difficult time with the pink flower on the right. It started out as a tulip and by the time I was done, it looks more like a fuschia. I was nervous about adding the “stamens”, but now I think they look really cool.
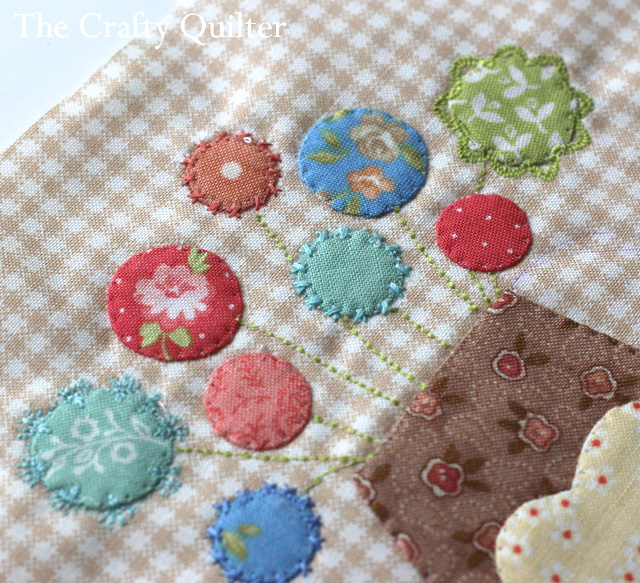
Some flowers don’t need any embellishment, but others can really take on a new character with decorative stitching. You can turn a smooth leaf into a jagged one; a common circle into a lacey flower. I used these same techniques with block 4 of the Splendid Sampler. Some of those circles are dime-sized, so I had to pick a pattern that was small and consistent. Others I left alone. Sometimes a smooth circle says it best!
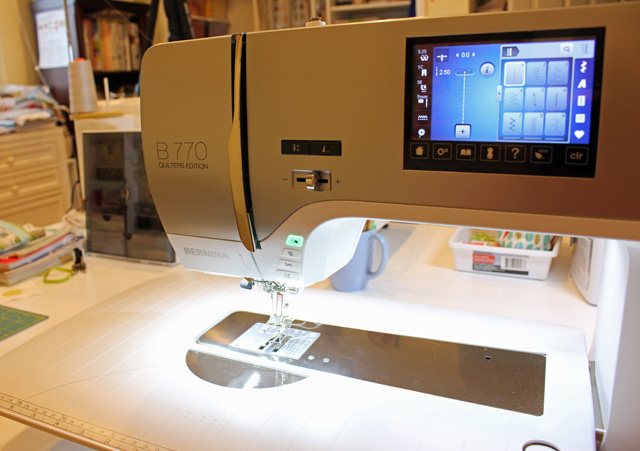
Let me tell you a little about my sewing machine so you know what I’m working with. I recently upgraded from a Bernina 440QE to a Bernina 770 (thanks to Mr. Crafty Quilter). I’m still getting used to my new machine, so all of this playtime with the embroidery stitches has been really helpful for me. Many of the stitches I tested aren’t found on the 440, but a few of them are.
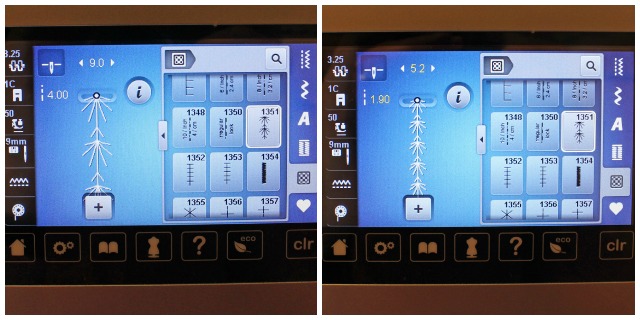
What I like about both of my machines is that you can adjust the stitch width and length of any stitch to anything you want. There are no presets or auto configurations to deal with (although there is a default setting when you select a stitch). I can turn a zig zag stitch into a straight stitch if I select “0” for the stitch width. The Bernina 770 has a screen that shows you what the stitch will look like based on the settings you’ve selected. This is really helpful when you’re trying to determine the affect of different settings for a stitch. The image below left shows stitch #1351 at the default setting. The image on the right is what it looks like after I’ve adjusted the stitch width to 5.2 and the stitch length to 1.9.
I’m only giving you this information to be helpful, and I know someone is going to ask. I’m not trying to brag or to sell you a new machine. If you are in the market for a new machine, test out as many as you can. You can also read my blog post, Sewing Machine Advice, and get some helpful tips on what to look for.
So, I hope you’ll play with the decorative stitches on your sewing machine. Making a stitch sampler is really key in my opinion. Adding embroidery stitches to your applique can add a whole new dimension to your project!
Linking up with Lessons Learned Linky @ Quilting Mod.
Have a great weekend and take time to play!





Applique is not my forte but I would love to give it a try. Thanks for the helpful insights.
Excellent article! As always, the articles you publish give me inspiration and help me to
Embroidery
I want a workhorse machine that will do thick clothing fabrics (denim, wool) pieced with finer fabrics (knit, cotton) AND quilting/free motion, smaller quilts, AND Applique (love the decorative embroidery stitches you used) I am not sure which machine will meet my needs. I read your thread on machines, but nothing seems current. Any help in brands/models will be appreciate. I am mostly a beginner..never worked with embroidery feature…had the Singer touch and sew 628 and hated it…tension/bobbin problems so I quit sewing. (I would like to buy pre-owned but need to know which machines to look for on Craig’s List or EBay)
Oh, my goodness, you are just so clever! I look forward to returning to my Janome so I can do this! Thanks, Julie, for taking the time to prepare this post and to share so freely! XO
Julie,
Thanks ever so much for this tutorial. Most helpful tips that I will be doing. Again Thanks
Very interesting tutorials Julie.
Hi Julie,
I really enjoyed your pictorial. I am switching to my new machine next week so I will take your advise and try out all the stitches on a white piece of cloth. Great idea! I really enjoyed seeing your appliquéd flower block as well. Thanks for sharing.
Chris
Hi Julie! Love your blog. I tried my first applique project last year with great success after going through your tutorials. Thank you for sharing with us. I’m planning to upgrade my machine (Janome MC6600) to the Bernina 770 QE soon and was curious if you also purchased the embroidery module? Any must have accessories I should be aware of? Thank you again for all your help!
hi Julie!
Great step-by-step instructions, as usual.
One suggestion would be, as you are showing the tools and supplies at the beginning, to include the packaging they come in. Seeing the name of the product and the package is helpful (especially for “visual learners” like me) to know what to look for in a store or online.
Thanks for the great post. I never thought about using decorative stitches on my applique. but I will now sew a stitch sampler to see what I can do. I will try the stitching on my block 4. Thanks for sharing.
Hi Julie, thanks for a great tutorial, and congratulations on your new machine. I’m sure you’ll love it, and there’s so much space……..but how often do you reach round for the presser foot lever?
Love this idea.! Have always thought of doing it. Maybe I’ll add it to my UFO project list.
This is a wonderful post that is inspiring me to try out my wide array of stitches on my machine. Thanks so much for providing such great details!
Julie, what a great post! Other than a straight or a zigzag stitch, I’ve not used ANY of the decorative stitches on my machine. I’ve been “afraid” to do so (silly, I know!) As I read your post, the light bulb went off in my head — I can do this!!! With your terrific and thorough explanation, information and photos, it was if you were right here talking me through what you did in setting up your appliqué sample including the thread weight and different stitch lengths and widths. Thank you for your cheerful encouragement, Julie; you have a real knack for producing wonderful tutorials. I’m excited to “play” this weekend — Yippee!!!
Best tutorial I’ve seen on decorative stitching. I have tried some embellishing while working on my Quilters’ Garden quilt. Thanks Julie for a wonderful lesson.
so informative I own up to not using my stitches but the bernina 1230 does not have a vast selection, would love a machine with a wide neck/throat but they are rather out of my price bracket would help greatly on learning to quilt successfully
This is fabulous Julie. Thank you so much for taking us through these steps. I only have a few decorative stitches on my Janome but if will be worth exploring.
thanks for sharing great tips. I have already done a stitch sample with my machine, but have never thought of using the decorative stitches over applique. I’m up to block 4 of the Splendid Sampler too so this might be making an appearance on my sampler too….
Julie, I can hardly believe my luck! I’m getting ready to stitch down lots of appliqués but didn’t know what kind of stitch to use. Those is my first appliqué project in about forty-four years. I decided to go to the Internet for suggestions about stitches but first I checked my email. There was your email with your lastest post, it is just what I needed. I have a 440QE and I’m going to do some playing. I’m glad you recommended making a sampler of the stitches. When I did that last year, I found that several of the decorative stitches don’t work, my machine is eight years old and those stitches probably never worked. New owners, be sure to test each stitch, while you can get it repaired for free. By the way, I found that using a good quality felt made great stitch pages in my stitch book. Thank you!
Really nice, Julie! And very good ideas.
I have used some of the fancy stitches on my Janome for applique, and as you say it really enhances the project.
Thanks for your Blog and now I will go look again at my fancy stitches as Im sure that there is a lot more that I can use.
I do so enjoy all the little bits and pieces that you put up for all of us to read enjoy and make good use of
Happy days
Gayle Z
Very useful information! I definitely will try the idea in my next appliqué project.
Interesting post! Thakns for sharing!
Thank you Julie for the ‘Machine Stitches Embroidery, I will do my best to use this new knowledge with wild abandon.
Funny, I just stitched out my programmed stitches last night, although with somewhat less detail. I don’t do that much machine appliqué, but do use some of the stitches for free motion quilting.
Susan
Oh such a great way to use decorative stitches! Thank you for these instructions.
I don’t have a fancy machine but have trie some embroidery stitches on a couple of projects. It really is fun and thanks for your great tips.
Great article and really good information. I have a Bernina B560 and can’t wait to see if some of the stitches you used are on my machine. I am going to make a sampler like yours I can see it will be very helpful when selecting decorative stitches. Thanks for such great information.
This tutorial is even better than I expected, and I expected it to be great. 😎
I am definitely saving it to use on my Splendid Sampler blocks..
Thanks so much for doing this for us.
xo Linda
What a terrific and well thought out tutorial.
Great way to get to know what your machine is
Capable of doing, and by making a decorative
Stitch sampler, you have a reference guide.
Thank you!
Thank you, Julie, for sharing the ideas and the detail. I have a Bernina 820 which I love. However, I use mainly straight stitching and zigzag and occasionally buttonholes. I do look at the many different stitches and wonder. The idea of doing a sampler is brilliant. Thank you. I do enjoy you site and have gained much valuable information.
Very helpful, thank you Julie. It’s sees just like you’re sitting beside me and my machine. I sew with a Pfaff but have shied away from the many stitches it offers. This will give me the courage to give it a try.
Thank you for sharing these great tips! I’m excited to try this technique out soon.