Three ways to make your sewing space more efficient
When we remodeled our house in 2019, we turned one of the bedrooms into a new sewing room for me. I wanted to make it as efficient a space as possible. Today, I want to share a few features that I love and some ways you can incorporate those ideas inexpensively to your own sewing space.
Extension Tables
One of my favorite things was to add a pull-out (extension) table that is hidden inside a fake drawer. It’s located to the left of my sewing area and it’s incredibly handy to have that additional workspace so close to my sewing machine. I can place a small cutting mat along with a pressing area on the extension table which makes for a super efficient set up!

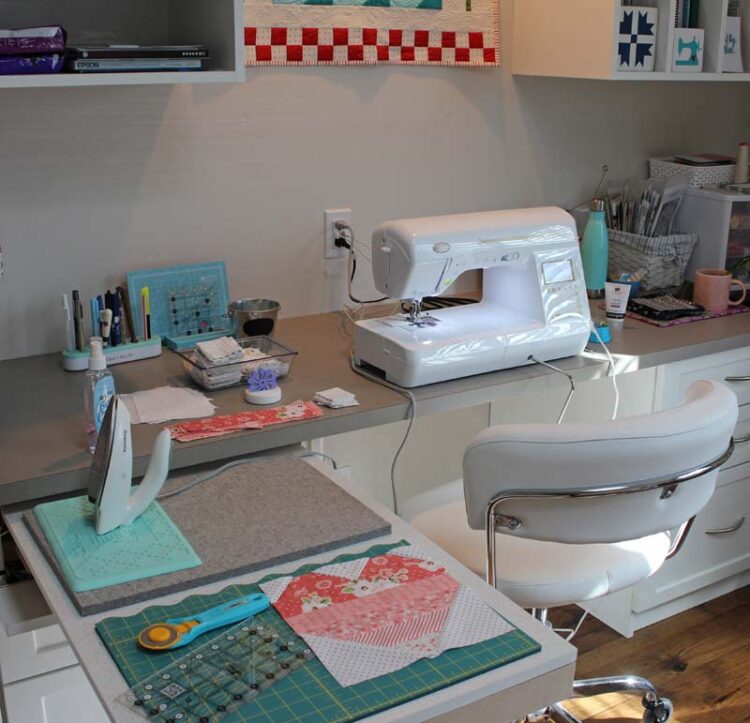
I can go straight from the sewing machine to the pressing station and then to the trimming station with the swivel of a chair! This is great when I want to get down to business and crank out a project, but maybe not so great for my posterior (one of the reasons I exercise and walk frequently).
Below is a photo I took after the cabinets were installed. I used Closet Factory in San Carlos, California for my cabinets. The top drawer on the lower left side is where the pullout table is located. All of my books are located in the upper cabinets to the right. I keep my paper crafting supplies in the upper cabinets to the left.

Before this sewing room, I had a small corner in my daughter’s bedroom that I used for quilting. She was the first one to go off to college, so I took over her desk. I created a portable side table out of a night stand. Mr. Crafty Quilter added rubber caster wheels to the legs and then I filled the drawers with notions, fabric, etc. I placed a June Tailor Quilter’s Cut’n Press on the top so I could cut and trim on one side and press on the other. I wish I had a picture of my little corner. It was a great set up for such a small space. Here is the nightstand (before I sold it on Craig’s List) and you can just see the wheels on it.

Sewing Cabinet
Sewing cabinets can add functionality and organization to your sewing space. I have a second sewing station set up under the window using a Horn of America sewing cabinet that I purchased in 2012. I don’t think this exact model is sold anymore, but a similar one can be found here. I don’t remember how much I paid for mine, but I think it was around $1,200. It was worth every penny! It came pre-assembled and I love all of the table extensions it has. You can see the drawer extension on the left. It also has a table on the backside that opens up along the width of the table which makes it a really large surface area. It also has a cutout area and lift for my sewing machine to sit flush, but I still need to get an acrylic extension to fit around my latest sewing machine.

Here it is with the small extension table being used to support a quilt while I’m free motion quilting. You can also achieve a similar effect by placing an ironing board or card table next to your sewing table.

I can also use this extension table for cutting, pressing and prep work. I purchased the add-on drawer caddie which is under the extension drawer. This is on wheels so it can be moved around and it holds my sewing machine accessories, bobbins, notions, and projects.


Ironing Station
You can make a multi-functional ironing station very easily. I borrowed this idea from a friend and it has really come in handy. I purchased an Ikea Kallax shelf unit ($149) and had Mr. Crafty Quilter install caster wheels along the bottom. We purchased 1/2″ thick x 20″ wide plywood and had Home Depot cut it to fit the length of the shelf unit. I don’t have pictures of that in raw form, but it’s just sitting on top of the shelf unit and covered with an extra large ironing board cover.

You could easily make your own ironing board cover out of batting and muslin fabric, which I did at first. Then I purchased a large ironing board cover and it’s just a little easier to take off and wash if I need to. I love the storage cubbies underneath. You can add baskets, shelf dividers or closed doors to these cubbies to suit your needs.

Other resources
I was recently asked to contribute a design tip for an article at Redfin on How to Create the Ultimate Quilting Room. You’ll find lots of tips and ideas on storage, layout, organization, furniture, lighting, tools, and more from quilting experts across the country. You’ll find my tip under “storage and organization”. It’s a great article, although a little short on visual stimulation. We creatives love our visuals!
You don’t need a large room, however, to create an efficient sewing space. You’ll find great ideas in this article, Anatomy of a Small Sewing Room by Robin at Seamwork. that will get you motivated to create a happy space to sew. Heather at Closet Core Patterns shared Tips for Sewing in a Small Space that has some clever storage solutions and tips for making the most of what you have.
We would all love to have a beautiful and efficient sewing space. I know that I’m very lucky to have my own sewing room and then to be able to have semi-custom closet cabinets installed is icing on the cake. It’s been a long journey for me, but quilting and blogging is what I do to supplement our income. I appreciate having a dedicated space that is efficient and provides the tools and storage I need.
Because I know we all love pictures of sewing rooms, I’ll include a few more of mine. These are not super current because well, you know. It doesn’t always look this pretty! You can visit this post for more photos, information and details.


Thank you for visiting today. I hope you found some ideas that you can use!

Discover more from The Crafty Quilter
Subscribe to get the latest posts sent to your email.


I have a very small space but have it arranged to suit the way I need it —- my major problem is the sewing machine foot peddle. I have to keep pulling it back. My flooring is vinyl. I’ve tried several rubber surfaces under the peddle but it still slides off and then I have to get the rubber pad back too. Any suggestions ?
Love your tips & ideas! It’s always great to get new ones.
What a wonderful space, Julie! It is bright…efficient and omg soooo tidy!! Thanks for showing us!
I love your room. Where did you purchase the brackets and wheels for your ironing station?
Hi Julie,
Thank you for sharing your beautiful Sewing room! I am in the process of remodeling my sewing & crafting room. I can not wait for it to finally be finished. You have given me a lot of inspiration and motivation, thanks for that. Have a wonderful evening.
Love your sewing room! I recently moved and am creating a sewing/quilt room as well. Your ideas are helpful but I had a couple of questions. Do you have a design wall and what did you use? Do you have a closet and how did you organize this for storage? The closet in my room has some custom rods and shelving that I didn’t want remove but I’m trying to figure out how to work storage around it.
Amei a organização do seu Atelie. Assim da gosto trabalhar…parabéns!,,
I love art and craft card making sewing machine
I love your sewing space! That’s a lot like I wanted when we moved into this house. My husband was going to get someone to do some build-ins, but we couldn’t fine anyone. I bought desks from the Christopher Lowell collection, and I do love them, but they are bulky. Thanks for sharing.
Love what you’ve done with your sewing room! I would like to know more about your chair. It looks so comfortable & I would like to have something similar. Is it on wheels? Thanks
Great organization tips and ideas.
There are some great ideas here. My hubby will be building cabinets for my space, so I am jotting some of your ideas down so I don’t forget. In the meantime, I manage with what I have!
Thanks for some good ideas! I was literally at Ikea today picking up a Kallax that exact size for the same idea. I’m tall so I’ll add 7″ legs to it. Instead of doors, I got 4 seagrass baskets and I’ll see if I want the other 4 open.
Cheers!
Beautiful and inspiring sewing studio! Thanks for sharing.
I love your sewing room! It’s so nice and bright. So organized. So personalized. You’ve done a great job, Julie! Thanks for sharing.
Your sewing is very cute and efficient for your crafting and sewing. Still working on mine, seems to be an on going thing. Have a great day.
I love seeing these photos of your bright, clean, cheerful sewing space and especially that you include your doggie!
Please tell more about what you use for pressing, that thick gray square pad?
Not the author but that is a wool pressing mat. Available on Amazon in different weights and sizes. That and a wooden clapper have made my quilting much better.
Hi Robin,
I often use a wool pressing mat to press my quilt blocks and units. It holds the pieces in place and because it absorbs heat, it presses from both sides. They’re also very portable!
Hi Julie….thanks for the great sewing room tips! Can you tell me about your chair and where you purchased it?
Thanks
Hi Debbie,
I purchased that chair at Home Goods. It was the only one they had. I wish I could tell you more!