Summer Fun Quilt Along, week 1
Hey everyone! I’m so excited to start the Summer Fun Quilt Along with you. This is the first week, and I’m going to walk you through the steps of making the checkerboard rows and the wave blocks.
This quilt along assumes that you have a basic knowledge of quilting. I also want it to be a skill-building series, so I will go into detail about many different aspects of quilting or refer you to prior tutorials that I’ve done. If you’re an “old pro” then please just skip to the good stuff.
I have created a pdf with a simplified version of the steps for this section. You can save it and/or print it out for your convenience: Summer Fun Part 1
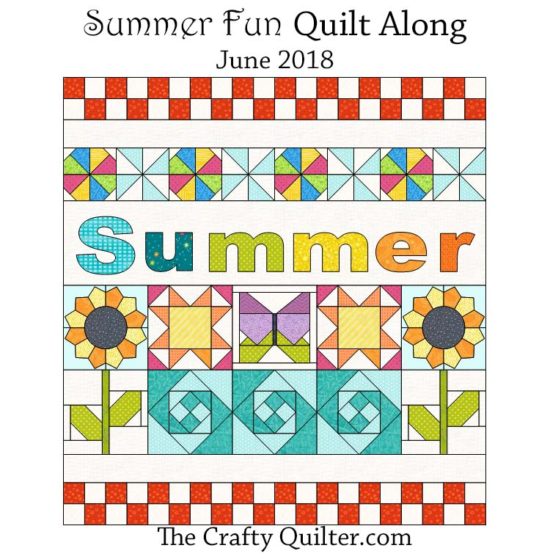
The quilt measures 30″ x 32″ and is divided into five sections. The entire schedule and links will be updated as we go along and you can always find the Summer Fun QAL on the menu tab.
- May 23: Getting ready and supply list
- June 1: Checkerboard rows and wave blocks
- June 8: Beach balls and pinwheels
- June 15: Sunflowers and stems
- June 22: Butterfly and sunny stars
- June 29: SUMMER applique and finishing
- July 6: Linky open
- July 20: Prizes announced
The skills we will be working on in this section are:
- accurate 1/4″ seam allowance
- piecing and pressing tips
- trimming and checking unit size as you go
- cutting 1/8″ increments
All seam allowances are 1/4″. I use a scant 1/4″ seam allowance to achieve perfect sized blocks. You can check out my perfect 1/4″ seam allowance tutorial to get more detailed information.
I also like to press seams to the side instead of open. I’m able to nest seams and get a better match at the seams this way. For more information, visit my article about pressing seams open vs. to the side.
Checkerboard Rows
Cutting Instructions
- Red: (2) 2″ x WOF (width of fabric) strips
- White: (2) 2″ x WOF (width of fabric) strips
Assembly Instructions
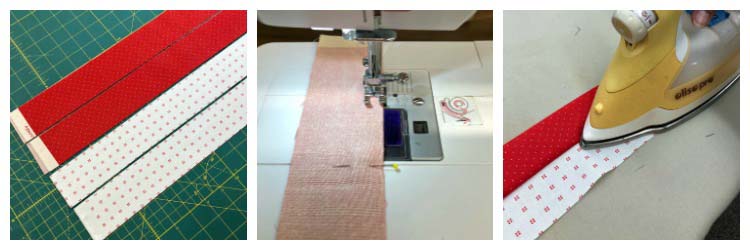
- With right sides together (RST), sew a 2″ red strip to a 2″ white strip to create a strip set. Repeat to make two strip sets. Press towards the red.
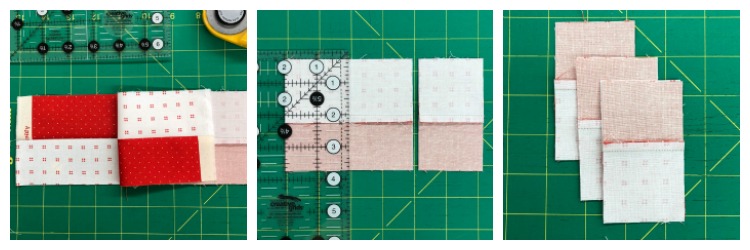
2. Place the two strip sets right sides together, opposite colors facing each other. The center seams should nest together. Cut into 2″ segments. You’ll need 20 pairs.
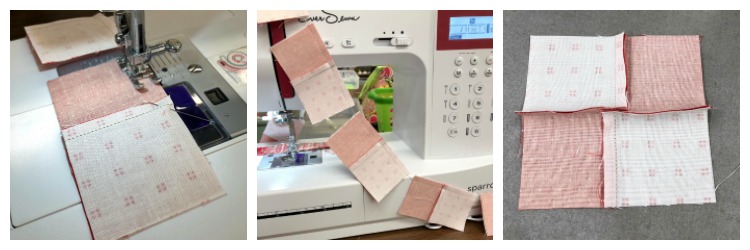
3. Sew the pairs together to create a 4-patch. Chain piece for better efficiency. TIP: make sure the seam allowance on top is facing the sewing machine needle. This will create a more snug intersection. I always do this when possible.
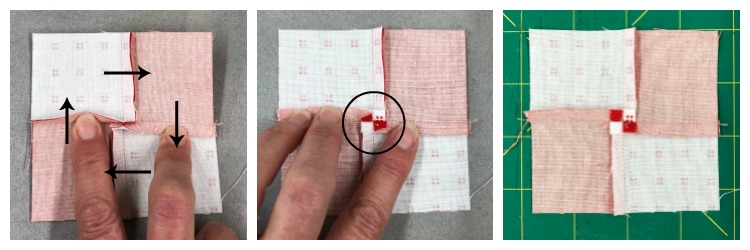
4. Press the 4-patch units. TIP: I love to “twirl” the center seam. To do this, you’ll press half of the seam allowance up and the other half down. The center (where the 4 seams intersect) should pop open in the seam allowance, creating a mini 4-patch in the center of the wrong side. If your stitch length is really short, you might have to un-sew these few stitches. The seams should be rotating in a clockwise direction. This makes the 4-patch lay flatter. You could also press the seam to one side or the other.
5. Make sure the 4-patch measures 3 1/2″ square. Trim if necessary. I always check the size of my units as I go along. I’ll trim even if it’s just a few threads. If your block isn’t big enough, you should double check your 1/4″ seam allowance and/or your pressing.
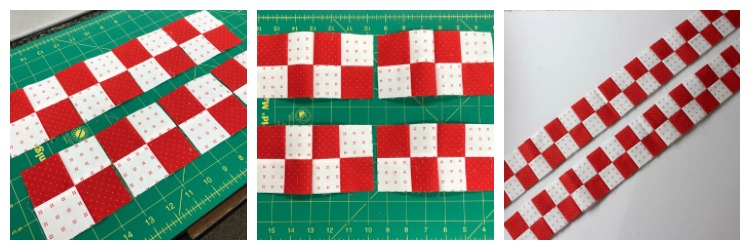
6. Sew the 4-patch units into pairs and then sew the pairs together, eventually forming a row of ten 4-patches. Make two rows. They should measure 30 1/2″ long.
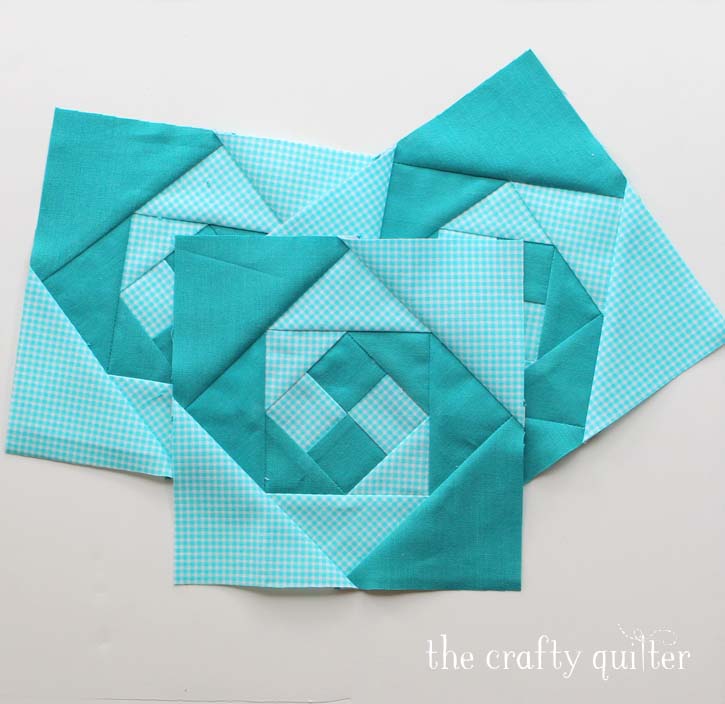
Wave blocks
Cutting instructions (over-sized so you can trim down to the perfect size)
From both dark teal and light teal, cut
- (1) 1 5/8″ x 10 1/2″ strip
- (3) 2 1/2″ squares, cut in half diagonally once to create 6 (a) triangles
- (3) 3 1/4″ squares, cut in half diagonally once to create 6 (b) triangles
- (3) 4 1/4″ squares, cut in half diagonally once to create 6 (c) triangles
Assembly Instructions
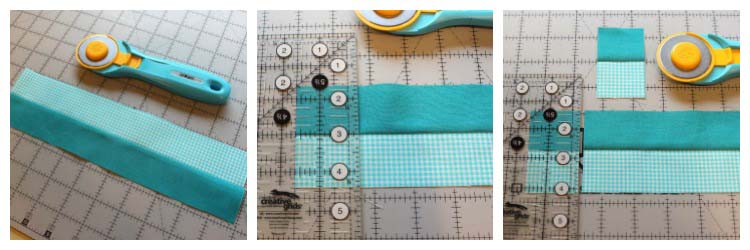
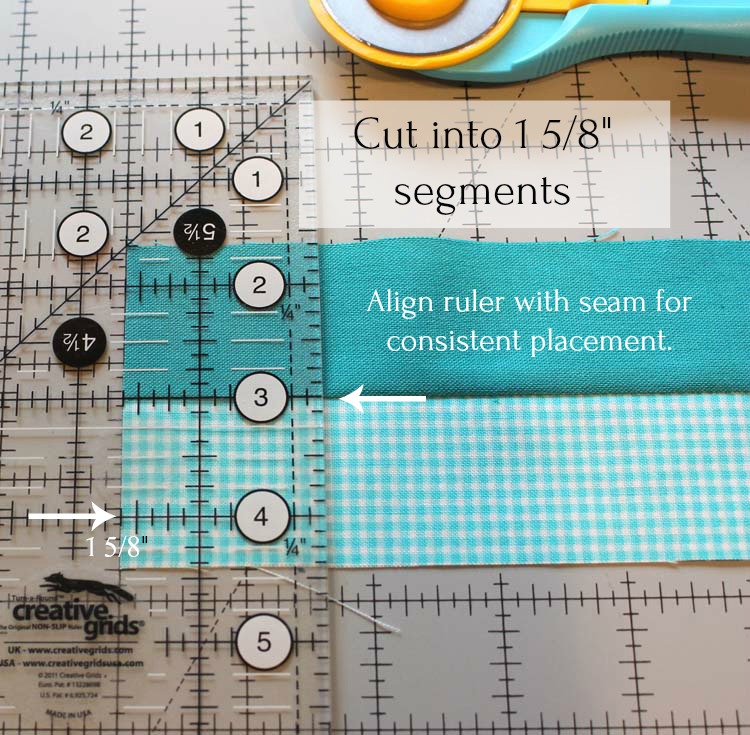
- 4-patch: Sew the 1 5/8″ x 10 1/2″ strips together. Press towards the darker fabric. Subcut into (6) 1 5/8″ segments. TIP: Line up one of the horizontal lines of the ruler with the center seam for more consistent and accurate measurements, and then line up the 1 5/8″ line to cut.
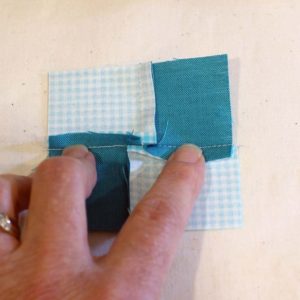
2. Sew two segments together to make a 4-patch unit. Make (3) 4-patch units. Press seam to one side or “twirl” the center seam as in the checkerboard 4-patch units.
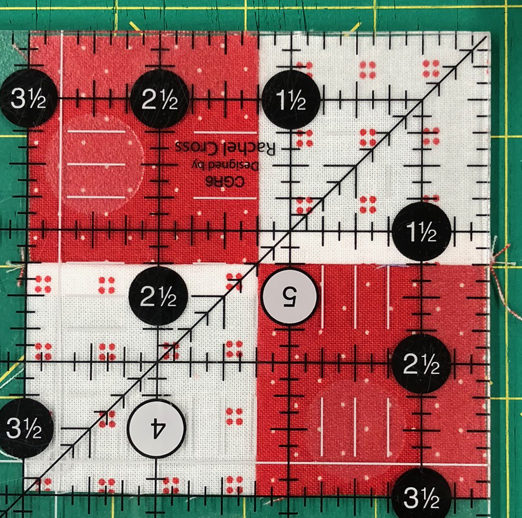
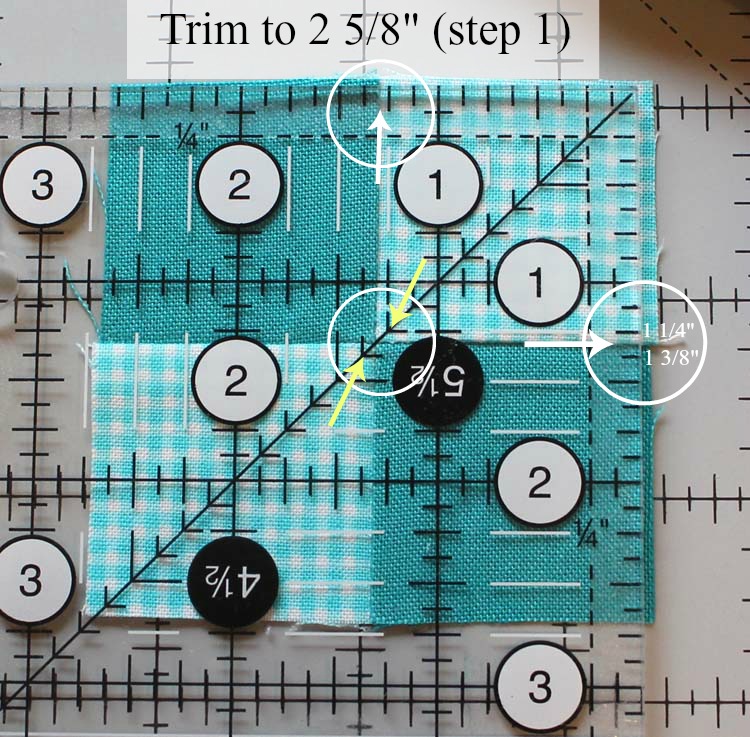
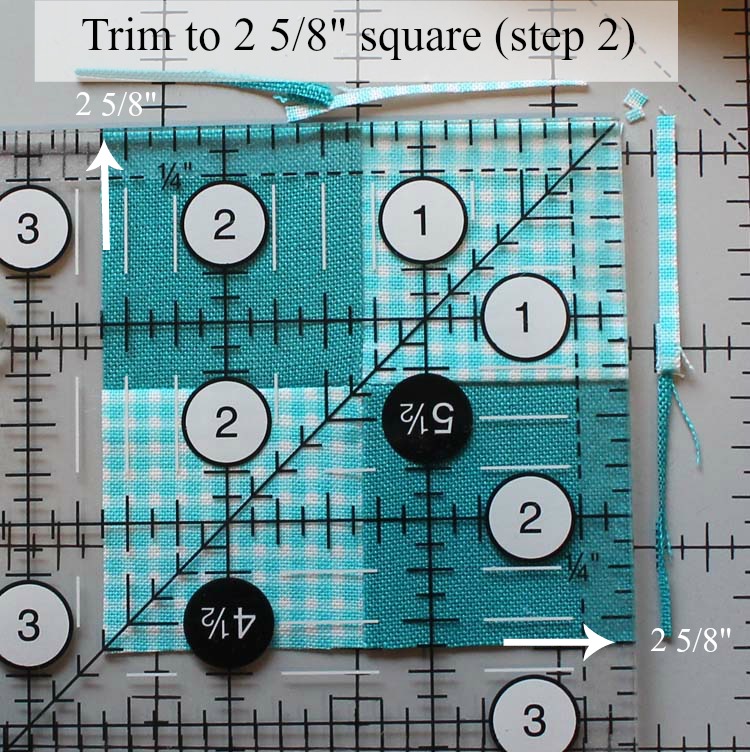
3. Trim to 2 5/8″ square. This needs to be done in two steps. You’ll want to trim all four sides evenly so that the middle of the 4-patch remains centered. The center of 2 5/8″ is between 1 1/4″ and 1 3/8″ (1 5/16″). Yuck, that’s not an easy number! When you’re looking at the ruler, you want the seams of the 4-patch to land between the 1 1/4″ line and the 1 3/8″ line as shown below. The center should be between the two yellow arrows. Trim the right and top sides.
Rotate the 4-patch 180° so that the untrimmed edges are now lined up on the top and right side. Align the previous trimmed edges with the 2 5/8″ marks on the ruler. You should notice that the untrimmed side seams line up similar to the previous step. Take a deep breath and trim!
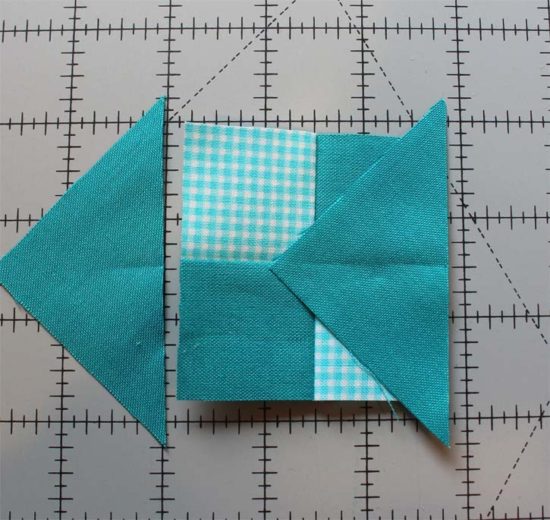
4. Round 1: Sew a dark teal (a) triangle to opposite sides of the 4-patch, matching centers (fold the triangle in half and make a crease). Pay attention to the orientation of the 4-patch. The dark teal squares are on the upper right and lower left quadrants. Press towards the triangles.
TIP: When I stitch the triangles, I feed them through so they’re on the bottom. This way I can see the edge of the 4-patch which is the most important guide for my seam allowance.
Repeat Step 4 with the light teal (a) triangles on the remaining two sides. Press towards the triangles.
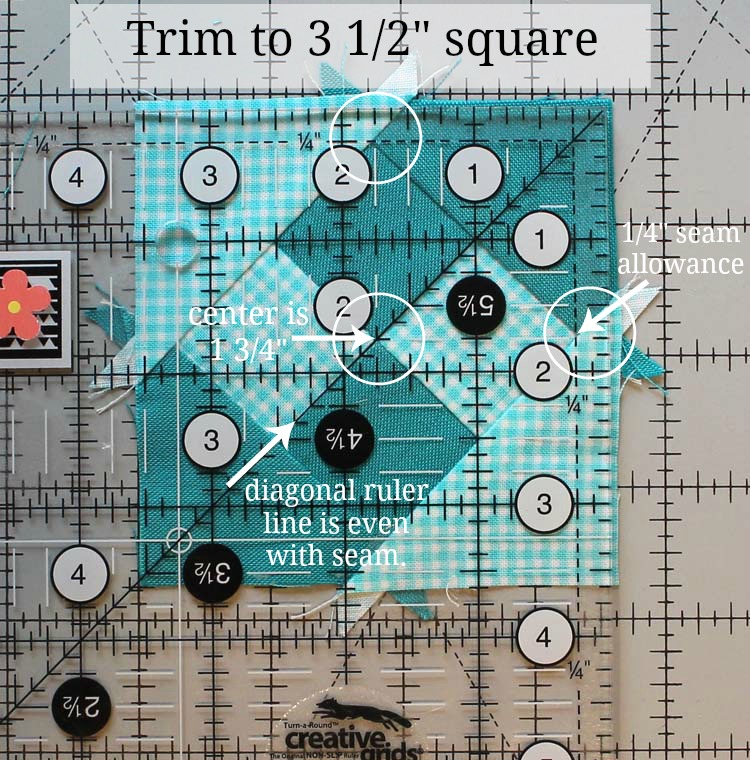
Trim the above unit to 3 1/2″ square. As you trim all four sides, make sure the center is at the 1 3/4″ lines of the ruler. Also, the diagonal line of the ruler should be even with the 4-patch seam and the 1/4″ lines should be on the outer points of the 4-patch.
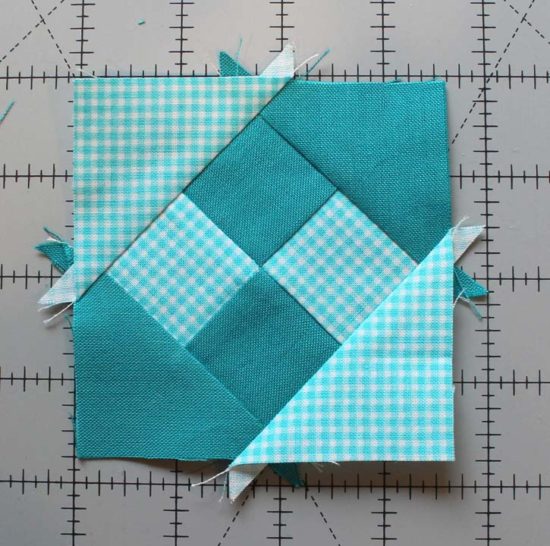
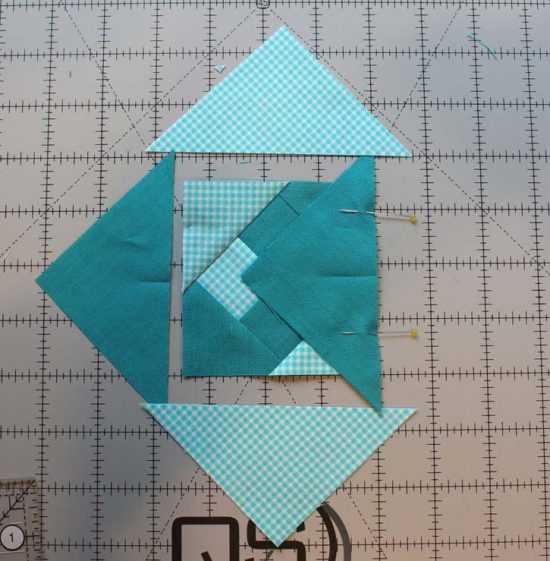
5. Round 2: Sew the dark teal (b) triangles to opposite sides of the unit from above, making sure the orientation of the block matches the photograph below. Press towards the triangle. Repeat for the light teal (b) triangles.
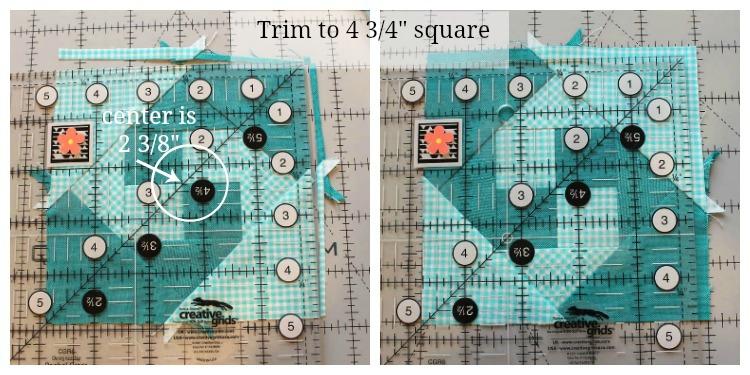
Trim this unit to 4 3/4″ square, making sure the center of the 4-patch is lined up with the 2 3/8″ marks on the ruler.
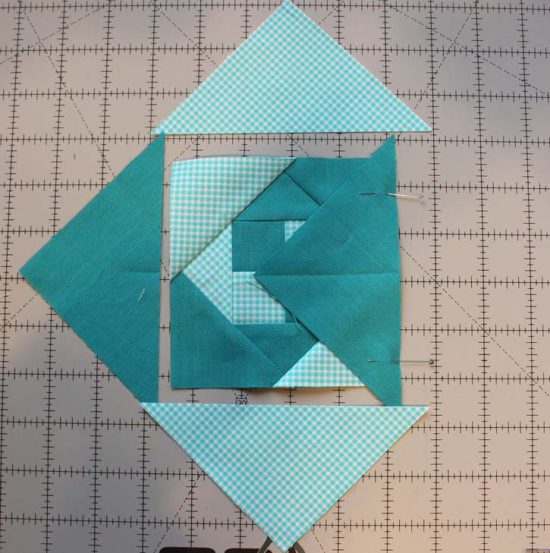
6. Round 3: Sew the dark teal (c) triangles to opposite sides of the unit from above, making sure the orientation of the block matches the photograph below. Press towards the triangle. Repeat for the light teal (c) triangles.
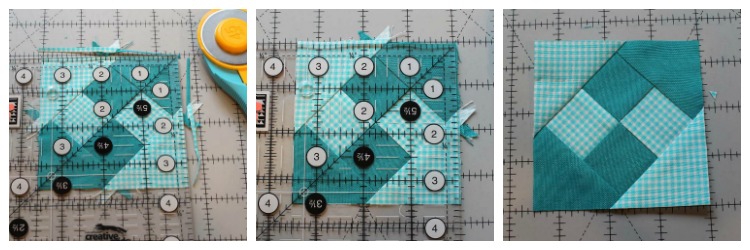
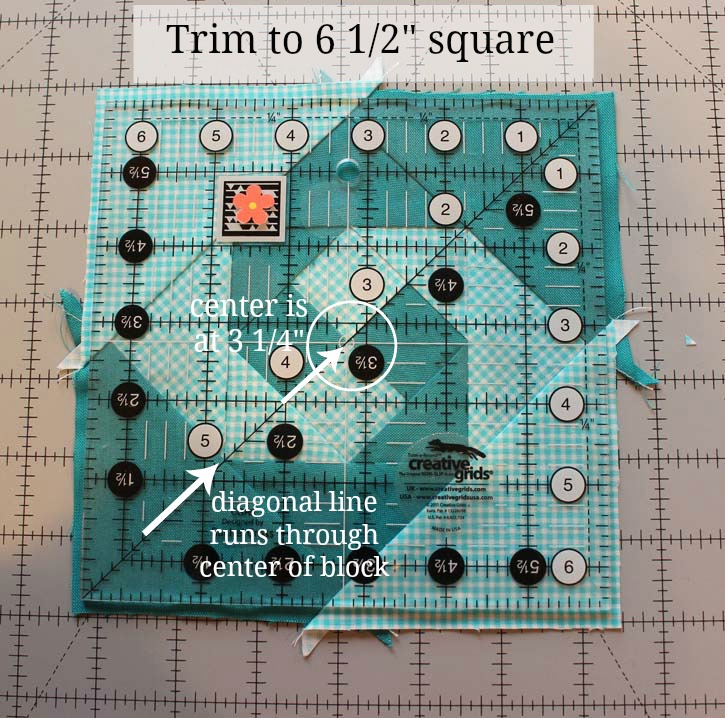
Trim the block to 6 1/2″ square, making sure the center of the 4-patch is lined up with the 3 1/4″ marks on the ruler. The diagonal line of the ruler should run through the center of the block, from corner to corner.
Make three wave blocks and you’re done for this week!
Make sure to use the hashtag #summerfunqal on social media and you can tag me @thecraftyquilter. I’d love to see your progress! If you have any questions, please leave a comment. I’ll try to answer them as soon as possible in the comments and directly through email.
Thanks for following along!



I am about to attempt patchwork and I have come across your site which I SAY is a real treat to read as you show both ways of doing the seams. I have been sewing for many years but I need simple and easy instructions as unfortunately (or fortunately?) I am a perfectionist. I am really excited to get going and thank you for the simple instructions and pictures. You are a star. 🙂
regards
Jean (South Africa)
Julie, I was on Pinterest & saw your quilt block so I came to your sight. What wonderful directions you give!!!!! Thanks for sharing!
This is such a lovely project and you offer it to us for the love of quilting! Thank you. I am recovering from foot surgery and found your website while doing something with my foot up. I can’t wait to get back to the sewing machine and make this project.
I’m hoping to start this late this week (yes, two weeks late due to some unexpected health issues and machine problems). I can’t wait to start because your instructions are so detailed and clear. As a beginner quilter (only finishing my first table runner this week), it is so wonderful to have someone spell out the directions and to have such clear pictures! I’m a very visual, hands-on learner, so a quilt along is the perfect way for me to learn. Thank you so much for these instructions. I’ve never done applique before, so I feel sure if anyone can properly walk me through that stage, it will be you! 🙂
Julie – are we supposed to sew the wave blocks together or wait for the stem blocks?
My red/white strips are too long too. Can I use 9 blocks instead of 10 which would make the strips the perfect size? I also am hoping for fall, winter and spring qals. You are great, Julie. Thanks so much.
That would be 19 blocks instead of 20!! Oops
I do not need a new project. Guess what I did this afternoon? Started this quilt. And other than constructing then snails a bit wrong (my phone – aka instructions – was dying so I made notes on trimming sizes and plugged it in)…oops! But no one is going to notice, right?! Thanks for super detailed instructions. I’ve been quilting a long time, but extras like where on a ruler the center should be are wonderful for the OCD in me!
I love this wall hanging, and I’m going to try and clear the time to do it. Thank you so much for sharing your design and teaching skills with us!
Beautiful design, what a fun quilt along!
Ok, I’ve got the red and white blocks/strips done. I was very careful and did everything I was supposed to do but for some reason, my strips measure at 31.25″ instead of 30.5″. I see some ‘fudging’ in my future 🙁
I can relate. I’m a whole inch off. Looks like I’ll be doing some picking and re-sewing
Isn’t the 30.5 the finished length? We will still be taking up a 1/4″ on each side when we add the boarder… I think
With such awesome detailed instructions, step one was a breeze. All done, although I managed to sew my 4 patches together in a different pattern :^) but they are going to stay that way. Had help from my almost 3 year old granddaughter. Looking forward to next Friday already!!!
Thanks Julie, for such explicitly detailed instructions & photos. It’s just like being in a class with with you!
I am going to try to clear some time in my schedule to participate in this – thank you so much. I am hoping you are designing/planning three more the same size, for fall, winter, spring – or do you already have that? I am rather new to following your blog. I would love to be able to display all the different seasons using the same rod and wall space…you understand.
Thanks again! It looks like fun!
THANK YOU very much for this exciting project!
Yeah! I’ve been anticipating the start of this all week. Your explanations and picture tutorials look fantastic. Thanks for sharing all of this.
Your tutorials are some of the best. I’m joining in because I love the cheerful, fun design.
Julie, I expected the wave blocks to be really difficult – you pleasantly surprised me. ^^