Celestial Snowflake Pillow Tutorial
Today I’m joining Benartex for their 12 Days of Christmas – Quick Gift Project Hop with a new Celestial Snowflake Pillow Tutorial. This is a great project that will last until the snow melts! The pillow measures 18″ square and it’s reversible!

The star of this pillow is the fabric. I’m using four prints from the Celestial Lights collection by Amanda Murphy for Benartex. This fabric has a beautiful pearlescent sheen to it that sparkles like fresh snow.

What makes this pillow a quick last minute gift? The piecing and quilting is very simple and easy. I let the fabric do most of the work by fussy cutting the center square. Also, I used Sliver Metallic thread in Opalescent by Sulky for the quilting which adds a touch of sparkle with straight lines on both sides of the seams.

I made this pillow in less than four hours, which is lightening fast in “quilter time”. I even added a zipper closure (which may remove the lightening speed for some of you). You can also choose to do an envelope back instead.

Celestial Snowflake Pillow tutorial
The instructions are for an 18″ square pillow with a zipper closure on the bottom. All seams are 1/4″ for the pillow front. All other seams are 3/8″ as noted in instructions.
Supplies
- 1/2 yard Celestial Lights, Feature Blue, SKU 9628P-50 (pillow back and center square)
- 1/4 yard or fat quarter Celestial Lights, Starry Sky White/Blue, SKU 9639P-08 (pillow front)
- 1/4 yard or fat quarter Celestial Lights, Starry Sky Navy, SKU 9639P-11 (pillow front)
- 1/4 yard or fat quarter Celestial Lights, Wrought Iron Blue, SKU 9631P-50 (pillow front)
- 16″-18″ zipper (optional)
- Fusible Fleece
- Fusible Interfacing (light to medium weight)
- 18″ pillow form
Cutting:
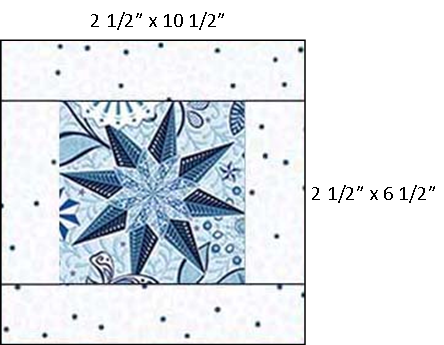
- Feature Blue (main print): Cut (1) 6 1/2″ square and (1) 18 1/2″ square)
- Starry Sky White/Blue: Cut (2) 2 1/2″ x 6 1/2″ rectangles and (2) 2 1/2″ x 10 1/2″ rectangles
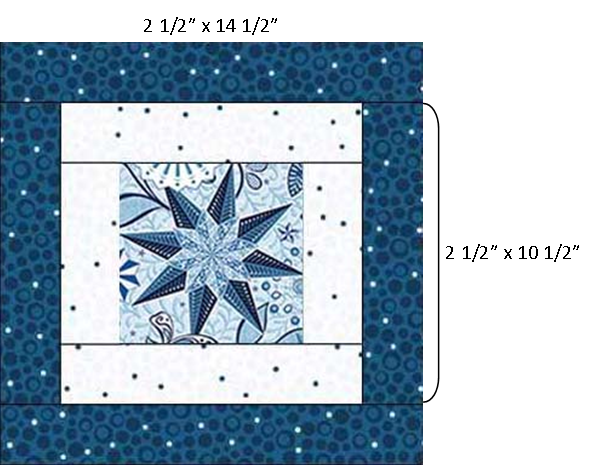
- Starry Sky Navy: Cut (2) 2 1/2″ x 10 1/2″ rectangles and (2) 2 1/2″ x 14 1/2″ rectangles
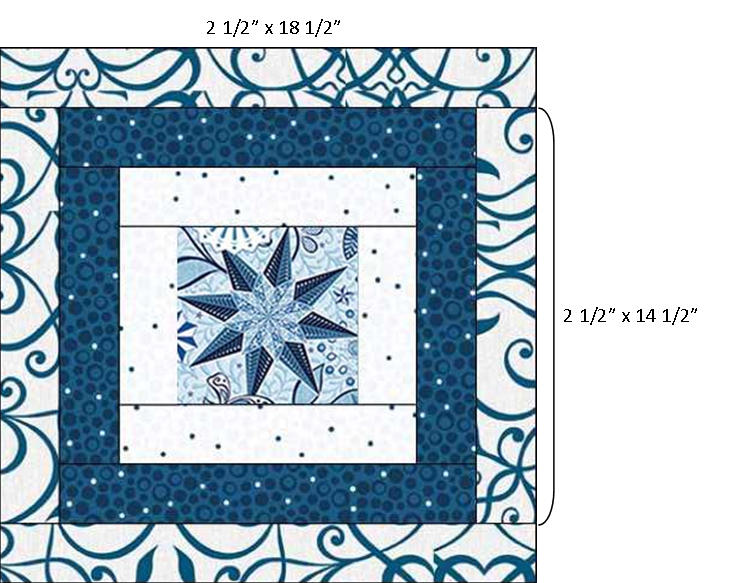
- Wrought Iron Blue: Cut (2) 2 1/2″ x 10 1/2″ rectangles and (2) 2 1/2″ x 18 1/2″ rectangles
- Fusible Fleece: Cut (1) 18″ square
- Fusible Interfacing: Cut (1) 18″ square

Pillow front instructions. You will be assembling this in rounds.
First round: Sew the white 2 1/2″ x 6 1/2″ rectangles to both sides of the center 6 1/2″ square. Press. Sew the 2 1/2″ x 10 1/2″ white rectangles to the remaining sides. Press.
Second round: Sew a navy 2 1/2″ x 10 1/2″ rectangle to opposite sides of the pillow center. Repeat for the navy 2 1/2″ x 14 1/2″ rectangles.
Third round: Sew a Wrought Iron 2 1/2″ x 14 1/2″ rectangle to opposite sides of the pillow center. Repeat for the Wrought Iron 2 1/2″ x 18 1/2″ rectangles.
Following the manufacturer’s instructions, fuse the fusible fleece to the wrong side of the pillow front. Quilt as desired. I stitched 1/4″ on each side of all seams and I stitched around the center snowflake motif using Sliver Metallic thread.

Following the manufacturer’s instructions, fuse the light to mid weight interfacing to the wrong side of the 18 1/2″ square pillow back. This is optional, but I like the added stability it gives to the pillow.

The following instructions include a zipper along one side seam. I did not follow anyone’s tutorial, but relied on my memory from my dressmaking days. Well, that may have been a mistake but it turned out OK. I’ll try to make this tutorial better than my method! For a complete guide, check out How to Make a Zippered Pillow Cover at Hey There, Home.
Basically, you’re going to sew the bottom seam (where the zipper will be) with a long stitch length for the zipper opening. Once the zipper is sewn down (on top of the seam allowance), you will use a seam ripper and open up the basting stitches to expose the zipper.
On the wrong side of the pillow top, mark 1″ from each end of one side. Place the pillow top and pillow back right sides together. Stitch with a 3/8″ wide seam and a 2.0 stitch length until you get to the 1″ mark. Backstitch. Change your stitch length to 4.0-6.0 and continue stitching until you get to the next 1″ mark. Backstitch. Finish the seam with a 2.0 stitch length.
Note: Normally I would use a 1/2″ seam allowance on a zipper seam, but I didn’t want my pillow to shrink in size too much. A 3/8″ seam will suffice.
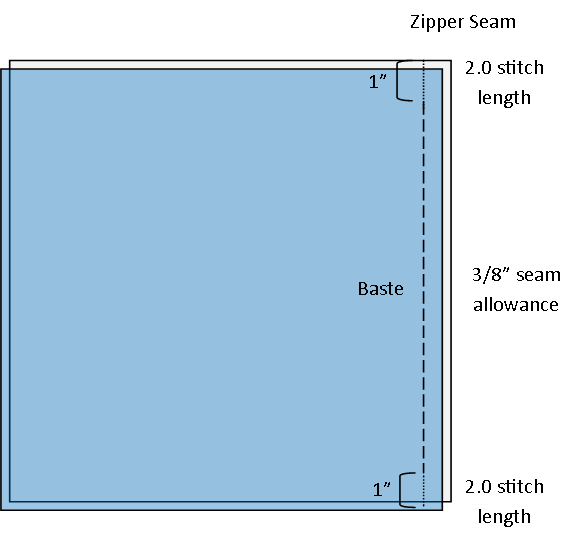
Press the seam open. Place the zipper face down on top of the seam allowance, centering it over the seam. The zipper pull should be at the beginning of the basting stitches and the zipper stop at the end of the basting stitches. If your zipper is too long, cut it so that it extends 1/2″ beyond the basting stitches. Pin in place or use Wonder Tape by Dritz to fuse into place.


Using a zipper foot and matching thread, begin stitching (on the wrong side) close to the zipper teeth. When you get to the zipper pull, you can stop with the needle down, lift the presser foot and slide the zipper pull beyond the presser foot. Make sure the zipper stays centered on the seam. Continue stitching all the way around the zipper.
Note: I used Wonder Tape on one side of my zipper only. I stitched the zipper from the front (right side) of the zipper seam. I later realized this was not the “easy” way to do this because it was hard to move the zipper pull out of the way from underneath. The photo below shows how I sewed the zipper in place from the top, and the red line is the laser beam on my Baby Lock Crescendo which helps guide my stitching line.

Use a seam ripper to un-sew the center basting stitches. Unzip the zipper half way.


Place the pillow front and pillow back right sides together and pin along the remaining three sides. (Make sure the zipper is open half way first!) Stitch with a 3/8″ seam allowance.


Trim corner seam allowances. Turn right side out through the zipper opening. Insert pillow form.


Now you have a Celestial Snowflake Pillow to gift or keep for yourself. Make sure to check out all of the other projects on the Benartex 12 Days of Christmas – Quick Gift Project Hop.

12-Dec Debby Kratovil – https://debbykratovilquilts.blogspot.com/
13-Dec Rachel Rossi – https://www.rachelrossi.design/
14-Dec Ann Lauer – https://grizzlygulchgallery.com/
15-Dec Stephanie Sheridan – https://www.facebook.com/StitchedTogetherStudios/
16-Dec Carol Swift – https://www.justletmequilt.com/
17-Dec Pat Sloan – https://blog.patsloan.com/
18-Dec Julie Cefalu – http://thecraftyquilter.com/ (you are here!)
19-Dec Shelly Cavanna – https://www.corasquilts.com/
20-Dec Linda Leathersich – https://www.facebook.com/StitchedTogetherStudios/
21-Dec Charisma Horton – https://charismascorner.com/
22-Dec Cherry Guidry – https://www.cherryblossomsquilting.com/
23-Dec Lisa Ruble – https://lovetocolormyworld.blogspot.com/
Thanks for stopping by!


Discover more from The Crafty Quilter
Subscribe to get the latest posts sent to your email.

Great idea and supper cute! I love how it makes the calm grey of the bedspread really pop in and say “Merry Christmas”. Thank you Julie.
This is a beautiful pillow…thanks for sharing the instructions!
You are the pillow queen! I think I have made every pillow you have shown on your Blog. You are amazing and thanks for sharing with us.
Cool pillow. Very very pretty. Thank you for the tutorial and information on how to make it. Enjoy your holidays! angielovesgary2 atgmail dotcom
Thank you Julie for a great tutorial. This is a beautiful pillow and the blue is a gorgeous blue. I’ve pinned this.
Beautiful pillow Julie! I love quick, easy, and amazing projects, thanks!
That was a very lovely tutorial! Very thorough and detailed and love all the pics. I really appreciate that you weren’t just giving a link for me to buy a pattern. You showed me what to do with that lovely collection. It was awesome!!
Julie, Your tutorials are the best I’ve seen. So explicit.