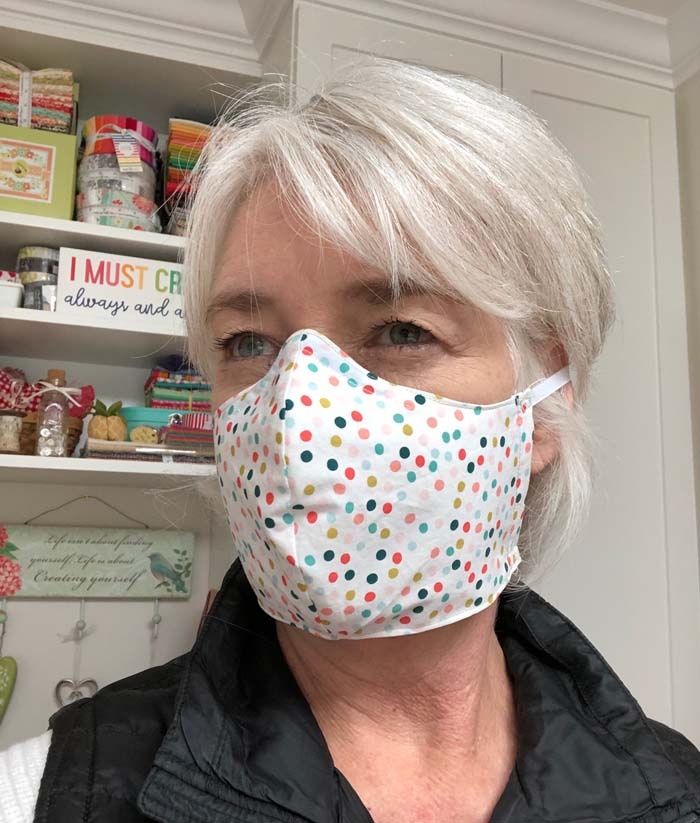
Versatile Face Mask pattern and tutorial
Hi everyone. I have a versatile face mask pattern and tutorial to share with you today. (June, 2020 update: A video is now available too! Scroll down a bit.) It’s versatile because it allows you to use elastic or ties to secure it in place and you have the option of inserting a filter between the two layers and adding a wire nose guard.

I know there are a lot of face mask patterns out there. I have refrained from adding to the menagerie, but I’ve had a few requests, and I’ve become a little frustrated myself when pattern instructions are hard to follow. This tutorial and pattern is a group effort by several ladies I work with at The Granary Quilt Shop. We have come up with something that can be made to suit your own needs and supplies.
Please know that these homemade masks are NOT a replacement for N95 masks or other PPE equipment. They are simply better than nothing. If you want to make face masks, make sure you know the requirements of those you’re making them for. Check within your local healthcare community and/or elderly care providers. Visit GetUSPPE for more information on how you can donate.
June, 2020 update:
- I have a video available on how to make my versatile face mask (scroll down the page a bit).
- To adjust the size of a face mask, check out this video by Gail Kollmar.
- To make your own fabric ties, there is a 2″ Double Fold Binding tool available at Purple Hobbies.
April 6, 2020: Please note the following updates:
- I have updated the PDF pattern to include instructions. It’s three pages total (click the “Download” button under Versatile Face Mask Pattern below).
- Cori at Hey, Let’s Make Stuff has made a SVG pattern using my tutorial for those with a Cricut Maker.
- The latest CDC recommendations for homemade face masks can be found here.
- A new resource for filters: Filti Face Mask Material
- To clean masks, an effective method is “70 C / 158 F heating in a kitchen-type of oven for 30 min, or hot water vapor from boiling water for 10 min, are additional effective decontamination methods.” – from LiveScience.
- I have added a summary of tips that have been shared in the comments at the end of this blog post.
Versatile Face Mask pattern
You can download the face mask pattern templates and instructions here:
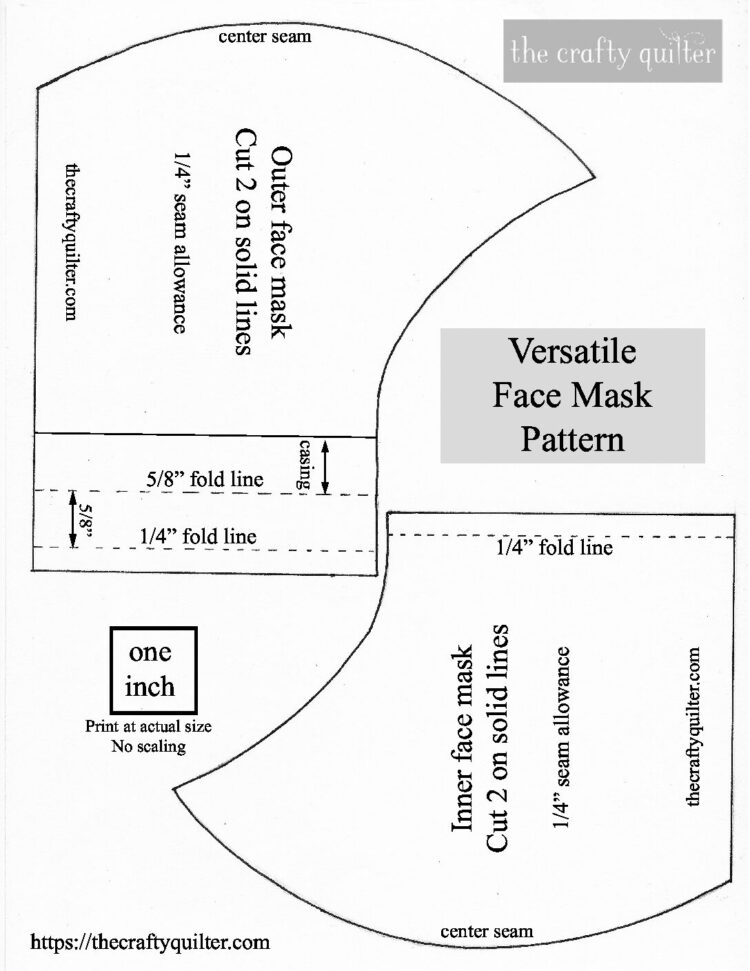
Print out the face mask pattern at actual size. Make sure the 1″ square measures true to size.
You can watch me demonstrate how to make a face mask in this video:
Resources mentioned in the video
- How to resize a face mask pattern: https://youtu.be/u3HM2jVLJdg
- 2″ Double Fold Binding tool available at Purple Hobbies: https://www.purplehobbies.com/store/p…
- Diagonal Seam Tape: https://amzn.to/2A41Vzx
- Filter Material: https://filti.com/product/filti-face-…
- Video Timeline:
- 0:04 Intro: About the Versatile Face Mask
- 01:40 Supplies
- 02:45 Cutting instructions
- 02:55 Size information
- 04:05 Sewing machine set up
- 04:51 Sewing the face mask
- 08:48 Tie and nose wire options
- 12:16 Sewing the ear loops (or ties)
- 13:40 Optional filter
If you have a Cricut Maker, visit Cori at Hey, Let’s Make Stuff. She has made an SVG pattern using my tutorial.
Face mask size: This face mask fits an average adult profile. To resize it, I suggest you watch this video by Gail Kollmar on how to resize a face mask. Her method works really well, and I enlarged one to fit my son. You could also try adding 1/4″ – 3/8″ on all sides to make it bigger. If you want to make it smaller, subtract 1/4″ – 3/8″ from all sides.
Materials:
- Two 8″ cotton fabric squares for outside of mask, washed and dried
- Two 8″ cotton fabric squares for inside of mask, washed and dried
- 1/4″ elastic or hair ties or 1/4″ – 3/8″ wide grosgrain ribbon or double-fold bias tape
- wire or pipe cleaners or twist ties or paperclip (optional)
- filter (optional) 4/10/20 Update: Resource: Filti Face Mask Filters
- pencil or other fabric marking tool
- sewing machine
- scissors
- pinking shears (optional)
- printed face mask pattern

Supply information: Use 100% cotton fabric that has a tight weave, if possible. Batik and poplin fabric are good choices. You could also use a pillowcase or sheet that is tightly woven. Quilting cotton is also fine. If you’re uncertain about the quality/weave, you can hold your fabric up to the light and see how much light filters through. Less light showing through is better. Pre-washing all fabric is recommended. For more information on best materials to use for DIY masks, check out this article.
Update: Instead of pins, use clips such as Clover Mini Wonder Clips to hold pieces in place. This will prevent any extra holes in the material.
For the elastic, I find that 1/4″ flat elastic works best. You can use elastic cording or other elastic that you have on hand. If you can’t find elastic, you could use hair ties, but I find they’re a little uncomfortable and not adjustable.
Instead of elastic (and the one that I prefer) is ribbon or fabric ties. These can be sewn to the four corners of the mask or threaded through the casing using two longer ties (which is harder to tie because it’s loose for me). Grosgrain or twill ribbon is better than satin ribbon because they don’t slip as much. Also, you can use t-shirt material cut into strips. Double-fold bias tape can also be used and you can make your own by cutting strips of fabric 1 1/2″ wide (doesn’t have to be on the bias, straight is fine), folding it in half along the length (wrong sides together) creating a center fold, and folding the raw edges to the center fold. Then press in half along the center fold and topstitch along the outer edge, making a 3/8″ wide tie. The length should be about 16″ long each.

Adding wire to the nose area is optional but very effective. Wire should be thin enough to bend easily and can be found in home improvement and craft stores. Pipe cleaners, floral wire, gardening wire, bag ties, etc. can also be used. Wire cutters are helpful for thicker wire.
Optional filter insert: If you want to add another layer of filtration, you can insert a HEPA filter into the open pocket. These come in the form of air filters or vacuum cleaner bag filters and can be found in home improvement stores. Make sure they do not contain fiberglass. If a filter is not available, you could use a non-woven sew-in interfacing such as Pellon 930 Midweight. Whatever you use, make sure you can still breathe through the mask easily. Again, this is not meant to replace a medical-grade filter system or personal protective equipment.
Face mask instructions
- Cut out inner and outer face mask pattern pieces on the solid lines.
- With fabric right sides together, pin pattern pieces to fabric or just trace cutting lines onto fabric. Cut out inner and outer face mask pieces.
- Transfer solid casing line (1 1/2″ from raw edge) onto the wrong side of outer face mask pieces using pencil or other marking tool.


- With right sides together, sew 1/4″ seam along the inside center face mask pieces. Repeat for the outside center face mask seam.
- Cut notches into the curved seam allowance just sewn or use pinking shears to trim curved seam allowance. This will reduce bulk and help the seam to lay flat. Gently press to one side.
- Turn under 1/4″ along the short side edges of the inner face mask and press. Stitch in place.


- With right sides together, pin inner and outer face mask pieces along upper edge, matching center seam. Stitch using 1/4″ seam allowance (backstitching at the beginning and end).
- Turn right side out and press seam, extending 1/4″ fold along the outer face mask edge.
- Top stitch in place 1/8″ from folded edges.


Repeat the above process on the bottom edge – right sides together and matching the center seam.


- Turn under 1/4″ along the short sides of the outer face mask and press.
- Fold this edge again (5/8″) so that it meets the pencil line and press.
- Stitch along the inner folded edge, creating a casing for elastic or ties.


Add elastic or ties to the mask. If you have elastic, cut a 12″ length and thread through the side casing. Tie a knot and adjust it as needed. Once it’s comfortable, you can slide the elastic around so the knot is inside the casing (optional).

If you’re using hair ties, you can cut them in half and sew them to the outside instead of feeding them through the casing. Otherwise, you will have to place them into the casing before stitching the casing seam closed.

For ribbon or fabric ties, you can attach them two ways. The first way (my preference) is to sew each one to a corner of the face mask. The length should be about 16″ each. This takes a little longer to put the face mask on, but it’s adjustable, the mask sits tight against the face and it makes it easy to remove the mask partially without having to completely remove it.


The second way to attach ribbon or fabric ties is to thread a longer tie (36″) through the casing on each side and tie it behind the head. This method is more difficult to tie it behind the head tightly. It also gathers the short sides of the face mask which might give you a better fit but it also can create gaps.

Optional nose wire: Cut a length of wire or pipe cleaner to 3 1/2″. Turn under the ends a tiny bit and crimp so that there are no sharp edges. I used thin florist wire so I folded a 6 1/2″ piece in half and covered the exposed ends with electrical tape. Sew a channel for the wire 1/4″ away from the upper edge and about 1 1/2″ on either side of the center seam. Insert wire through the side opening. Stitch channel ends closed.


Filter: A filter or another layer of material can be inserted at this point. Since I don’t have access to any filters, I’ve used some interfacing just for example purposes. I cut a rectangle 5″ x 7″ and then cut a curve on both top edges by estimating it (eyeballing it). You could also use the pattern as a guide and even sew the interfacing the same as the inside mask pattern and then trim to fit.

Disclaimer: This pattern has not been tested. If you find a mistake, please let me know. This face mask is not considered personal protective equipment (PPE) and should be used only if nothing else is available.
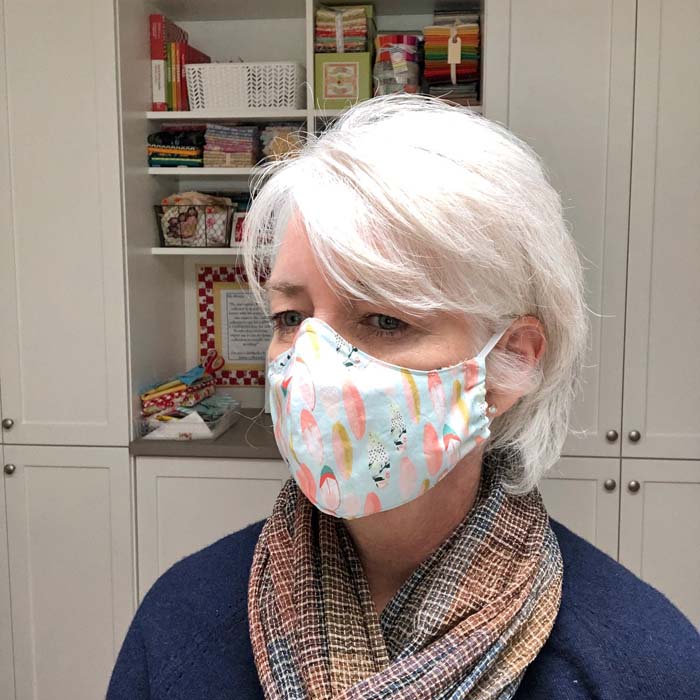
I have made several different types of face masks and this style is my personal favorite. It gives you options to make it as simple or complex as you’d like. Each mask takes about 20-30 minutes to make depending on the type of tie and additional options used.
Currently, I’m part of a group effort to make face masks for veterinarians working at a zoo who are exposed to a certain primate species that can carry and transmit the COVID-19 virus. I’m also going to send some to family members that could use some means of protection.
This pattern is free for any and all to use as long as it’s not being sold for profit. It’s meant to share with the intent of helping others who have no other alternatives. I’ve tried to include as much information in this tutorial as possible. If you have any questions, please leave a comment and I will answer it.
4/6/2020 Update: Many people have commented on this blog post and shared bits of advice that has worked for them. Here’s a recap so far:
- Use clips (such as Clover Mini Wonder Clips) instead of pins when holding pieces together to prevent extra holes in the material.
- Use a Microtex Sharp sewing machine needle, size 70/10 or 60/8. This will leave a smaller hole. Make sure the thread you’re using is not too thick for the needle. If you have an automatic needle threader, do not use it on a size 60/8 needle; it will break.
- If using pipe cleaners for the wire, they don’t hold up in the wash well. Consider leaving one end of the wire channel open so you can remove the pipe cleaner first. You can do this no matter what kind of wire you’re using.
- For the nose wire, it might be easier to put the wire in place first, then topstitch around it from the outside. Sometimes that center seam is hard to push the wire through using the other method.
- Try using a paperclip for the nose wire.
- Other filter/material options being used (I don’t guarantee the efficacy of these): coffee filters, two layers of blue shop towels (non-woven, heavy duty paper towels), t-shirts, Blue wrap (used for wrapping and sterilizing surgical instruments).
- Shoelaces make great ties.
- For the ties, “use two 1/2″ jersey knit strips about 16-20″ long for the ties for each mask (cut on the least stretchy grain). I inserted each strip into the side panel, centered it, and then tacked it down with a 1/2″ zigzag stitch to anchor it so the wearer does not lose their straps! Seems to fit tightly and not gap as you mentioned.”
- “Thread either the ties, or t-shirt yarn, through the sleeve, and then sew it down. That way, you don’t get the bunching but don’t have to fiddle with sewing the four corners.”
- “T-shirt strips work really well. Fold a t-shirt length wise, cut the bottom hem with a rotary is easiest, then 1″ strips. Cut the strip so it isn’t a loop, then grasp the end and keeping it straight, just pull all the way to the end and it just curls naturally. They are super comfy ear loops.”
- “Fold 1/2″ bias tape in half to make a 4 foot tie. Thread the tie through the casings by going down from the top on one side then up through the bottom on the other side. The loop along the bottom goes behind your neck and both tie ends can be pulled on to snug the mask around the face and tied in a bow at the top of the head. I use a safety pin to thread the tie through the casings and leave it on the end of the tie just in case it comes out of the casing.”
- Apply fusible interfacing to the wrong side of the outer face mask material before cutting and sewing for an extra layer of filtration.
- Use fabric glue on the center seam instead of stitching to eliminate holes and gaps there.
- “The concern raised about the center seam having small openings between stitches could possibly also be solved by cutting a 1/2” wide piece of fabric and sewing it (to the wrong side) through the seam allowance and outer fabric about 1/8“ from both sides of the center front seam (inner and outer mask seams)”. I have pics of this if anyone would like.
Stay safe and stay positive!


Discover more from The Crafty Quilter
Subscribe to get the latest posts sent to your email.


Hey there! Just finished reading this awesome blog, and it’s a delightful read! If you’ve ever pondered the age-old question of whether cucumber is a fruit, you definitely want to check out this informative piece: https://www.nourishwithfruit.com/is-cucumber-a-fruit/ Such an interesting exploration! Click the link and satisfy your curiosity.
Thanks for sharing this useful article with us..Keep up the good work
What an interesting read and a very nice website. I really appreciate your content, this is very interesting to us. You might also want to engage here.
Thank you for this pattern, tutorial and the video!
I just need to point out one bit of information I think important: for the general public the masks were never meant as PPE, but as source control.
https://www.cdc.gov/coronavirus/2019-ncov/prevent-getting-sick/cloth-face-cover-guidance.html
Hi Julie, Just wanted to say thank you for making this mask tutorial! It is the most versatile and best-fitting mask I’ve made by far. I especially wanted a pattern with a channel for the elastic so that its length could be customized; a good fit makes a big difference and making masks for different people with this pattern allows them to adjust the elastic length as needed. I’m a novice at sewing but this was easy to follow.
Thank you for this pattern and such a clear and easy to follow video! I bought Adjustable Elastic Bands for sewing from Amazon to use for the earlobes! They work great to adjust to most anyone. Thanks again! I am looking forward to reading all the posts on your website.
https://www.amazon.com/gp/product/B088PTXFYZ/ref=ppx_yo_dt_b_asin_title_o08_s00?ie=UTF8&psc=1
Hey there! I have loved this mask pattern! Do you know anyone with a 3D printer that could make a file for it to be 3D printed? Instead of me cutting out cardstock and tracing which softens the edges so then I have to print more. I just feel I’m wasting a lot of paper, if my friend could 3D print it that would be awesome but he wasn’t sure he could make a file since he doesn’t have the original pattern/etc.
Thank you for the pattern and the tutorial video. I’ve used this to make masks for family and now I’m making some for a teacher friend. It’s been a bit since anyone asked for masks, so it’s great that I can return here to watch the video (I guess I haven’t been making enough!).
I found that a small dart at the side helped to make this fit my face even better, but it’s really good just as it is, too.
Cheers!
Thank you so so much! This was so clear and the finished masks have such a nice, comfortable shape! 🙂 Thanks again!
Thank you so much for the free pattern. I love it and so easy to make the masks with the excellent easy to follow instructions. Am making them for family friends and neighbours. June
Tip: I re-used a nose wire from an old N95 mask. Love this pattern!
I made the muzzle using the second method – one long tie – my favorite. I used organic muslin so that the tie stays in place without even knotting. Thank you for your precise instructions which quilters are known for.
Thank you for the clear, concise instructions Julie – clearly written by someone who sews!
Thanks you very much for the patten. It was exactly what I was looking for have check out lots of masks. I made a sample perfect.
Hello and thank you for the great mask pattern. Haven’t made one yet but in order to get the 1 inch box to be 1 inch I had to scale to 106%.
Thank you so much for this pattern. It goes together very well and has the pocket for inserting a filter. Plus, plus the finished product is one all my family loves to wear. Thank you for wearing a mask !!!!!
Thank you very much! I’m addicted to sewing these. Today I taught a 10 year old how to sew and she made one for herself very quickly.
Hello! Thank you so much for your generosity in sharing this pattern and for the time to put together the detailed written instructions and video. I’ve been using a different pattern provided by our local hospital, but yours provides much better face coverage. I’m a fairly novice sewer, so it was helpful to have the instructions as a reference and visual guide. I love all the different options, as different people have different face shapes and sizes. My sister is a pediatric OT and is going back to providing in home health care; I’ve made about 10 of these for her in fun kid-friendly fabric, so the kids won’t be scared by the mask. Thanks again.
Thank you! This tutorial is so well done and easy to follow that I went from learning to thread my sewing machine on Saturday to following this pattern and making a mask on Saturday! THANK YOU!!!!
This is such an easy pattern to make, I have several candidates to receive some, but I have a few questions before I cab proceed.
Nobody wants the ties that go behind the head, I made one adult one with 1/4″ elastic threaded through the channel and adjusted it to that person’s requirement. But I have a large gap on the ear side. Am I doing something wrong? I am not making it very tight around the ear (so the ear bends forward).
I was wondering, If I used elastic with pony beads (I talked to a lady with a beautiful mask in the store the other day who told me about the beads) whether that would do it?
I have used craft beads on the elastic ties. With 1/4” elastic it holds size adjustments very well. So glad for this mask pattern. Much more comfortable than other patterns.
Great pattern and tutorial. I tweaked for elastic hoops and interfacing in between. I applied to pleats to fit sung onto the jawline. Made them at 91% for my children. Thank you so much!
This is the best tutorial I’ve ever seen for anything. I’m a novice seamstress but DIYer all around. Thank you for fantastic and easy to follow instructions. Best masks I’ve made yet!
Love that there are so many options to attach with this design. I plan to try one continuous loop for the ties with a cord lock to adjust it rather than tying.
Thank you, thank you! This was my first time sewing to a video, which was really helpful to me. You do such a nice job giving sewing tips in addition to mask instructions. I made one long closed loop of elastic for an under the hair bottom loop and over the hair top loop. I used thick craft wire from the dollar store for the nose piece. It took some adjusting, but eventually I got that so it keeps my glasses from fogging and lifts the mask away from my nose a bit below, which makes it more comfortable to me than the pattern I tried before this. Love your design! This will be the one I make from now on.
I wanted to say thank you for this truly versatile mask pattern! It is a huge improvement compared to the simple pleated ones I had been making. I have been able to make them for myself and friends and family across the country – everyone loves them! Thank you!
Thank you so much for posting this pattern! I’ve made over 27 so far for family members, but I finally have the nose wire and elastic to add onto them. In trying to insert the bendable nose pieces I bought (they are wider than floriest wire), I am having trouble because they can’t break through the center seam that I’ve already sewn. Do you have any suggestions? Should I rip open the center seam on the front side of the mask so that I can insert it, or do you think that will compromise the integrity of the mask if that piece is then left open? The nose pieces I bought are also adhesive, so I could simply stick them to the inside of the mask without sewing the channel. I would love your advice on this. Thanks!
Sew a seperate piece of bias over the nose piece area on the inside of the mask so that the wire piece is removeable that will allow you to replace the wire or take the wire out when washing.
I’ve made about 60 of the masks, some with ties and some with elastic ear loops. I also had problems pushing the nose wire through the center seam. I found that the really thin Bobby pins are the best. They are Thin and easy to bend. Best of all, the edges are coated with a tiny bulb that helps push it through the center seam.
Thank you so much for this great pattern and tutorial. I have made several for friends and family. My suggestion is to use a shoestring through the casings with a pony bead and knot at each end. this way it can hang necklace style until you are ready to pull it up to your face and attach to your ears. I also have used a soft 300 tpi pillowcase for the inner layer and fusible nonwoven interface on all pieces. thanks again!
Excellent pattern. I’ve made 10 so far. Do not need wire for the nose. I use elastic looped through the casing to go over your head. My husband can’t use his right arm so this works well one handed.
Hello, I am so grateful for your time and generosity. My husband needed a mask tomorrow for church and all we have had is the N95 and it’s getting to warm for him. I was overwhelmed with all the “how to’s” and detailed instructions, but you made it simple and understandable. I am also a visual learner, so your video helped me the most and the printable instruction helped remind me as I sewed. For a woman who doesn’t sew much you made this possible. Thank you so much. May God bless you!
Thank you for the pattern! I very much appreciate you taking the time to do this!
I can’t thank you enough for putting such a great pattern out here for us to use. It means so much at this time to be able to make these masks to keep people safe. I’ve made several for my family. You and the need for these masks have inspired me to do more sewing. Thanks!!!
I find a great website that can buy the masks. I wanna share with your guys. Hope you can protect yourself. Take care.https://www.testextextile.com/product/n95-masks-alternative-kn95-masks-for-anti-virus-protection/
Thank you so much for posting this! I work for a medical equipment company. These masks are great for employees who still have to report into the office but don’t see patients face to face. I have made many for my coworkers and they love them. Thanks again!
Thanks so much for sharing this wonderful pattern! For the past couple of weeks I’ve been sewing these masks and giving them away to anyone to everyone….family, friends, neighbors, my rabbi, employees of stores I frequent, members of my synagogue, people volunteering with dog rescue groups, etc. Everyone seems to really like them!
We’re in age where there’s not much we can do or control. Sewing the masks has become almost therapeutic for me. It gives me something to focus on and do during these uncertain times. Since I can’t currently do volunteer work (something I normally do), making these masks and giving them away helps to fill that void.
Thank you again for sharing your pattern! Stay healthy and safe!
Thank you Julie- great and easy instructions. I wonder if you could give size for the masks? We do not have a printer….
A big thank you for this great pattern Julie. I’m new to sewing and have been trying out lots of face mask patterns. Yours is the best fitting, neatest mask I have found for myself. I really appreciate all the detailed instructions and the printable pattern you have provided. I have posted about what I have learned so far making face masks on my blog & have featured your pattern there.
Thank you so much. I have enjoyed using your pattern so much. I’m going to remember you in a prayer.
I looked at several patterns and was not impressed. With yours I thought it looked simple and self explanatory. I was mostly correct, I’m not much of a seamstress but when I looked over a few of your instructions I was able to make sense of it. Thank you! I was hoping you’d have child sizes as well and saw links others had posted and again wasn’t impressed, so I took yours and printed it at 80% and 90%. I’m super excited to try those for my kids.
I wound up using the one I printed at 80%. I think it fit them really well but maybe a bit on the small side. If I make more I will either still use the same one or print another at 85% as I think the 90% would still be a little bit too large. My kids are 8 and 11 years old. Thank you for your pattern it was great and worked really well!
Julie,
Thank you so much for sharing your pattern and tutorial with me. Even though I can use a sewing machine, I by no means am a seamstress. While searching for face masks for myself and family, there are several sites whereby other requirements must be met before receiving the pattern. There are no such requirements for your pattern and tutorial. I greatly appreciate your kindness in meeting a necessary need without asking for something in return. Your generosity will not go unnoticed for “…when you do a charitable deed, do not let your left hand know what your right hand is doing, that your charitable deed may be in secret; and your Father who sees in secret will Himself reward you openly” (Matt 6:3-4).
My employer is planning to lay off 1400 workers. They’ve established an emergency fund to help employees in the most need. I would like to use your pattern to make masks to sell as a fundraiser, for a suggested donation of $3 to $5. I’m donating my time and materials, I won’t keep any of the proceeds for myself. Do you consider that a fair/acceptable use? Thank you for the pattern, it’s one of the best I’ve seen so far.
This is wonderful! I am a beginner, and I easily followed the directions. Mine isn’t nearly as polished as yours, haha, but I’ll get there. Thank you!
Thank you for making this pattern available for us! We didn’t have to search for other patterns, this is the go-to-one! We’ve made several for ourelves and friends & family.
Thanks for the pattern! I’m using long shoe laces for the tie. One lace threaded through both side channels and hung around my neck, then pulled up to my face, pulled snug and tied in back once.
Thank you VERY much for this pattern. It has become THE pattern I use when making masks for family and friends (and myself!) I’m curious how the grain lines run for your pattern. I’ve been placing the long base line (part of mask that runs along the chin) parallel to my selvedge. Is this correct? Thank you.
Hi Julie,
Do you have this same pattern but in a child size? I have used this one many times to make masks for adults, and now they want me to make them for their children! Thank you!
Heavy duty long rubber bands work for ear pieces when I couldn’t find elastic.
The instructions were very clear, thanks! I used flannel for the inner mask material. It seems to help prevent my glasses from fogging up.
Novice here… I used your pattern and it was wonderful! I made some slight changes to the ones I made: 1. reversible, 2. sewed a pocket for the nose strip to be inserted into (in case they didn’t want that option), 3. left the base of the mask open so filter media could be inserted easily and used snaps to hold it shut! I would love to show a pic of what my final product looked like, but I can’t! ☹️
Hi! This pattern makes a wonderful mask, but after talking in it awhile it slips down my nose. Someone else asked the same question but I did not see a response from you. I have tried sizing down the pattern of the ear loops or ear loop placement to no avail. I am using a nose piece. Also, with men, it seems large over nose and cheeks. How can I adjust them? Thank you so much! I have a bunch of these made, but I am apprehensive to give them out because of the slipping. I look forward to hearing from you. – –
I have the same problem! Looking for a fix.
I think it could be the way the ear loops fit that makes it slip down. You might try using ties instead. These require a little more effort when putting on the mask, but the fit is much better and more comfortable.
I have made some of these and also have been given some of these. A great fix for slipping is to add a single 1/2″ pleat into the side of the mask on the cheek portion. It tightens up the chin area nicely.
This is excellent! Thank you so much for posting this. My husband requested this style of mask and I had no idea how to make it. Your instructions and photos are wonderful. I am very grateful to you for posting this and so glad I found it!
Thank you for making this available! Could you make a video tutorial for those of us who are visual learners with less experience in sewing?
Please do a tutorial, it would help me tremendously
Hello!!! I love this pattern, so far has been the best one and I have utilized this to make my family and friends and co-workers masks! I am a nurse practitioner and appreciate all the time and effort you put into explaining and showing! I want you to know that I never sewed before and they have turned out great. I wish I could post my pics. I have ONE question, do you have any kid sizes that you suggest? My daughters are 5 and 9 and I was going to make some for them but wanted to utilize this same technique! Please let me know if you have any suggestions, I highly value your insight. Thank you!
This does not work so thank you for wasting an hour and a half of my precious time.
Wow that was rude. You could just explain why you had issues and what your difficulties were.
AGREE!
I tried a few different patterns and this one is my favorite by far. Great pattern and quick, too. Glad I found it.
This was a rude statement and I disagree. I have used several patterns now and this has been BY FAR the best pattern and tutorial that I have used. I think that maybe you should take your “precious time” and work on gratitude. If this did not work for you, then fine, don’t waste everyone else’s time with non-constructive negativity.
no need to be a d*ck just because you’re too stupid to follow a pattern lmao
Yes, you may want to list what you had problems with instead of being ugly. She took the time to make the site to help make masks. The steps were perfect for me and a lot of others here, maybe it is not her or her instructions!
I’ve just used it to make a mask for myself and four of my family. I found it easy to follow and the results look great. Very neat and well fitted with some really thoughtful additional features. I assume you are not familiar with basic sewing terms or haven’t followed a pattern before? Perhaps some of your time, whilst undoubtedly precious, could be used to learn how to sew or – rather better still – master basic civility.
Thank you for this pattern! I’ve tried other mask patterns but was not happy with the coverage/comfort/glasses factor. My husband is a pharmacist and needs to wear a mask 8-10 hours a day while at work. N95s hurts his face. This pattern is actually comfortable for him. I’m whipping up several of these for him now. Thank you again.
Thank you for this simple yet very effective design. The pattern was very easy to both follow and alter. I think even someone new to sewing wouldn’t have difficulty ending up with a perfect mask. The pattern as-is fit me perfect. However, my husband and son are both very tall guys who obviously have much bigger heads. (How weird would they look if they didn’t? lol) My husband also has a full beard. This pattern has such simple, clean lines it was incredibly easy to alter it to a larger size for a perfect fit. Thank you for the time and effort you invested to create and post this pattern.
I’ve made 833 pleated and curved, then I saw your pattern. I’m now sewing to send to our Navajo Nation neighbors. I’m going to print the pattern and put the pedal to the metal! Thank you so much!!
Thank you for taking the time to post this. I’m a police officer and temporarily assigned to our training center helping oversee the recruits. Our day to day has changed drastically with Covid, which has included hourly classroom cleaning, staying 6’ apart and wearing masks during scenario training… and there is a lot of scenario training. I made these masks for the recruits and sent some with my husband (also an officer) to pass out amongst patrol officers. Everyone LOVES them. I appreciate the time taken to create this pattern and post instructions. Thank you from many Texas officers!
This is a great, easy to understand pattern! Thank you so much for sharing! And thanks to all those DONATING their handmade mask to those who need them.
thank you for sharing this pattern. i’m a new sewer and despite your clear instructions i’m still having a hard time understanding each instruction step by step. Is there a youtube tutorial that shows each step?. thank you so much
I used Julie the RN’s pattern and tutorial for making face masks. I am a self taught sewer and found it very helpful. I have made over 100 masks & sent them to NO, TX, WI and in MN (my home state). Thank you for helping me help others. I do not sell them. I take $ for fabric/material donations but simply give the masks away to people I know & even those I don’t know. You did your country a solid by putting this pattern out. Thank you
Karen J. MN
Thank you so much for posting this tutorial and free pattern. You’re a God-send!!! Much blessings your way❤️
I love the masks but i’m having a problem with the ribbon breaking when tying it. is the ribbon too thin or what am i doing wrong?
Cut a strip of fabric and sew length of the fabric together making a pipe, then using a pin on the width edge of one layer, turn (loop) the tube inside out. Press down with an iron. It’s strong and neat.
Speaking of the Filti face mask material(filter), how often can you use it? Is it washable? Wonder if anyone has used it yeT/
I purchased the Filti face mask material ( filter) and I have the same questions! I received the material in a timely manner and the material has a definite front and back. The website tells the correct placement of the fabric but does not share washing instructions. Are people using it as an add in to the pocket or are people sewing it in place? I found it cumbersome to add to the pocket, but until I know how to care for it or to know if it is reusable, I don’t really want to sew it onto the mask. If anyone can answer these questions, that would be great. Thanks.
A quick follow up: The filti mask material washes up beautifully! No worries! I will use it as an extra layer of protection by putting it in the pocket of my mask. Thank you for this pattern and all your kindness.
I have done this also (wash the mask with the Filti inside) I like the “cushy” look it gives my masks, also.
My husband was complaining about the square type mask hitting his eyes….So grateful for this angled pattern that should fit the face better!
I’m a super beginner and I am so proud of the mask I was able to make with these instructions. Thank you!
thank you for this. i am an amateur sewer and self taught. if i were to make 100 of these masks, about how many yards of fabric do you recommend?
Gena you would need 9 yards for the outer layer and 9 yards for the inner layer of 45″ wide fabric.to get 100 mask. That will be lots of elastic if you can find it or lots of strings and I can’t figure how much fabric the string would be.
I have found elastic on EBAY with a good turnaround time.
Thank you for a great pattern. I was finding that the linings of my masks had a tendency to bunch, so I trimmed about 2mm off the bottom and curved edges of the lining pattern, and cut the lining pieces on the bias. This seems to have fixed that problem.
I’ve been having the same problem too. So glad I’ve seen this I will give it a go!
I agree about the inside lining of the mask having bulk, (because of the outer curve) so I cut about 1/4” off the bottom of the inside lining pattern.
Thank you so much! 🙂 Could you please put together a template for a pre-teen size? I tried to reduce the size of the pattern, but it’s not working out for me. I’m hoping to sew some masks for my grand daughter and her friends. Love this mask! 🙂
Thanks a bunch.
Julie, After looking at patterns online I came across yours and thought it looked the most comfortable and had great face coverage. Well, I just finishing my mask, and your instructions were great! My face is small so I added a small pleat at the top edge on either side of my nose about 1 1/4″ in from the center. It sealed up the gaps below my eyes pretty well. My husband thought is looked great. Even suggested I paint on a pink nose and some whiskers 🙂 Really came out great, thank you so much for posting. One tip if you want to add it to your ongoing list…prior to cutting my elastic, I used scrap ribbon to check the ear loop length, 12″ was way too long. Thank you for posting this, it has become invaluable to many of us!
I agree with the pleat idea! Really helps improve the fit for me.
thank you so much for the easiest mask pattern I have found
Hello, Julie. I am passing on many thanks on behalf of all the grateful Canadians who are using your mask pattern. As well as making face masks for friends and families, we are also using your pattern to make face masks for folks who work in group homes with vulnerable children and adults.
With thanks,
Cindy from Waterloo, Ontario
Thank you so much for creating a pattern that makes sense! I have never followed a pattern before but have now made 12 masks for the NHS!
Thanks so much! This is, in my opinion, the best pattern on the internet for face masks! I’ve made 30 and they all turned out great!
Hi Julie,
Thanks for sharing your mask pattern. I had been wanting to try out this fitted style. I sewed your pattern exactly as you depicted (including adding wire and elastic for behind the ears) but after wearing it for a walk I noticed it kept slipping down. I kept adjusting it’s tightness, but it was still sliding down my face and exposing my nose. My husband had the same issue but his head is larger than mine. Any ideas on how to fix this?
Did you get a reply to why yours was slipping?
I don’t know if you got an answer as to why yours were slipping. I was having the same problem. I was using paracord through the slots to go around your neck and tight at the top/back of your head. I didn’t have a problem but it kept sliding when my husband and son would talk with the mask on and since they were having to wear them for work that wasn’t okay. I sewed 13” of an elastic headband to the top corners and it fixed the problem.
could you make one with a seem allowance already put into it so other don’t get confused. cause this would be my second item i made sense middle school. it would help me out alot and i’m still learning some of this stuff for sowing.
Thank you for your clear and thorough explanation. I love the pictures along the way!
Thanks for the pattern! I made straps from the extra fabric from my mask and ran into some problems. When tying the mask, the top tie doesn’t stay put and falls down. When I try tying it really tightly, the mask it smothering and it’s difficult to even talk. I’m not sure what I’ve done wrong, perhaps the fabric on the straps needs to be a specific type? Anyone else have these problems? I’m going to mess around with it and see what I come up with.
Thanks again!
The fabric is supposed to be cotton and you should be able to breathe through it. Most of the top ties are tied on top of the head, not the back of the head. To be effective, you should be able to breathe through the mask fabric, not the room air around you.
Thank you so much for this pattern! I didn’t want the pleated type of fabric mask and this pattern and instructions are PERFECT!
okay i have no elastic but got bias tape extra wide double fold. could you also show how to make one of these with that instead of elastic too.
I have made a pattern that closely resembles yours. The one thing I do differently is to use household electrical wire for the nose. It is 14 gauge copper and will not rust. Easy to buy at the hardware store, 3 strands of wire, so a 15 foot package yields 45 feet of wire after cutting and stripping off the outer wrap.
I wanted something washable and also used copper wire. I used, I would guess, an 18 gauge pair, which yields something flatter and not as stiff I imagine. I left the plastic coating on, and put a drop of hot glue on each cut end to avoid gettng poked.
I don’t understand the Velcro comment
I have used your patterns THANK YOU FOR SHARING. I also have been searching for new ideas for the ties. One solution..The selvages from the fabric you are using (or not). I also have been putting wider elastic thru my serger, serging the center and leaving the edge. Then serging the other side’s raw edg.e. two for one I am now almost out of even the wider elastic.
I think I have 35 masks in progress for firefighters. Cute dalmations!
That sounds great how can they not love them.
I love this pattern – I am a beginner at sewing and it was very intuitive. Has anyone adapted it to child sizes? Any tips?
Various size patterns can be found @ http://www.craftpassion.com. I’ve made the children’s masks for my grandchildren and they went up well.
She has four different sizes. They all run small-ish. I’m not very big so the women’s mask fit me, but my sister needed the men’s size, and she’s an average female (Caucasian) size. I’m trying to find one sized for men.
Marian, I created my own Adult Large/Male size pattern from these if you want me to scan it in.
I am trying to resize for men – would love to see what you’ve come up with. Thanks!
i need a little bigger pattern for my husband and sons. i can resize it on my cricut but not sure how much bigger it should be. Any Ideas?
Thank you for this pattern! I am not good at sewing, but I have made two and they came out great!
Hi Julie, thank you for this wonderful pattern! I was looking for something that would cover a little better than the mask I had been using but had versatility for the ties/bands. I also wanted to share, for those who are having issues with ear irritation, Lilla Rose has an elastic band with lobster claw ends (from their headbands) that detaches and can be used to comfortably lift the elastics/ties off the ears. I donated to some nurses, and they said it really helped with the ear chafing. I wish there was a way to post a photo here to illustrate. I have also seen crocheted bands with buttons on each end that would help with this.
Thank you so much I have been looking for one of these. It is a scary time, but with all the support and encouragement from all American’s and everyone from around the world, it makes it easier to push through. You all stay safe
Elizabeth, Silverdale, WA
Thank you so much for providing this pattern! We are on lock down in San Francisco and I have been using your pattern to make masks for friends, family, and neighbors. It takes a very minimal amount of fabric and covers the nose and mouth nicely. I streamlined the process a little by stitching the inner and outer layers right sides together then turning it right side out, pressing, and top stitching. Just makes the process quicker so I can get more done in a day. 🙂 THANK YOU! Stay safe.
That’s a great tip. Ashleigh! Thank you. I just started doing the same thing.
I am not sure I understand what Ashleigh explain. Can you pls show us how in video?
This what I’m going to do to because not adding filter or nose piece
Many thanks for this clear, detailed tutorial, Julie. I’m just wondering if there is any discomfort from the ribbon being directly on top of the ears, as opposed to above the ears. I’m tempted to adjust the pattern a bit, but concerned it might create gaps…hmm…
Thank you so much for this amazing pattern!! I didn’t read all the comments, so I apologize if this comment has already been made. I wanted to suggest using a casing for the wire nose piece. A separate fabric piece sewn onto the inside of the mask during the construction process. Just an idea. Thank you again!
I make a casing using double bias tape and leave both ends open. I insert a metal file folder tab that has been shortened to about 5 inches. The tabs will rust, so need Tobe removed before washing the mask.. thanks for the great pattern!
Thank you so much, great pattern and instructions! I am a nurse and making some for my nurse friends to wear over their N95. Thank you so very much!
Julie, thank you so much for such a great pattern and a great tutorial. I have made this mask and love it, the fit is tighter than the ones with the pleats. I also used an iron on interfacing that gave it more stability and we can still breathe through them. Again, thank you and stay safe!
Thanks for the pattern and instructions. I plan on making my first one today in my family Kilt colors. This face mask period in American history is going to be very ETSY.
Im using 2 layers of 3M’s 1500 Filtrete material and 1 layer of Honeywell’s Pre-Filter material as a filter. With the 20”x30” 3M 1500 Filtrete and the 15.5”x48” Honeywell Pre-Filter I should be able to make about 10 masks. You should be able to find it at a hardware or big chain retail store. You can also use the HEPA filter inside of vacuum bags, but I would only recommend making HEPA mask if you ABSOLUTELY have to.
I have read NOY to use these for filters, that they have glass fibers anthem – be ware and make sure you know what is in the filter materials you use.
Thank you
When you print the pattern, make sure to set your printer to “actual size”, NOT “fit to page”, to get the correct dimensions.
Thank you! I made this mistake.
Thank you from central BC Canada! I’ve been making these all morning for family members. They’re gorgeous! I had to tweak the pattern a bit for different sizes but this is easy peasy. You Rock!!!
Thank you ! you have gone to a lot of trouble with this.
I only have one comment on people concerned about the sewing holes at the centre seam, you could put some Ailene’s glue over them? or some other type of glue. Thanks again for all your time & energy!
Would Fray check work?
You can also use a solid piece of fabric in the pocket.
Does the printable pattern include the seam allowance or do I need to add it?
It says the seam allowance is included.
Thank you so much for this! I’ve been making mask covers for a week now and has been having a hard time finding instructions for the nose channel. This was immensely helpful.
Thank you! Great pattern. You’ll enjoy great karma from this.
Note: repeated washings with the wire insert might wear a hole at the ends of the wire. I suggest handstitching the open end with just one or two stitches so the wire can be inserted to rest snugly without falling out. This would allow the user to remove the wire insert (and hand wash/sterilize it between washings) separately from the machine wash/dry cycle for the mask. Thanks so much for providing such a nicely detailed pattern for folks to use. Also, forgive me if this has been addressed in earlier comments/revisions, but the comments were too numerous to read through! The danger of popularity!
Hi Julie,
Your pattern and instructions were perfect! I was so lucky to have all supplies on hand that I needed. I added fusible
interfacing to both front and inside fabric and still have the slot to add extra layers if needed. I’ve made 11 so far! Thanks for sharing!
A fantastic pattern! My wife used your pattern and All the masks turned out beautiful! We appreciate your excellent efforts.
As a note, I recently found a doctor/Wife utube Video who found a suitable material…new HEPA vacuum cleaner bag material. You can purchase ones “without” fiberglass content.
https://youtu.be/W6d3twpHwis
https://www.ebay.com/itm/6-Pack-Premium-HEPA-Style-Vacuum-Cleaner-Bags-for-Hoover-Type-A-Royal-Type-B-/303532507356
IMG_8671.jpeg
What about the raw edges that come with having a open pocket?
Hi Lisa,
The raw edges are not exposed to the outside unless you turn in inside out. Also, if you’re using very tightly woven material as suggested, there will be minimal raveling. Thanks for asking.
I love this pattern and it gave me the inspiration to dig out my sewing machine after not using it for 15 years of course it had a little in the house overhauling to do but it’s working well enough for me to get the job done my problem is I’ve made four of these and I get to the very end and I still am having a problem in the instructions the instruction that tells you to pin the inner and outer mask at the center seems at the bottom I get that and I’ve done that and when I complete the rest of it I end up with a raw edge on that bottom what step was I supposed to turn up the bottom and a quarter of an inch before attaching the inner and outer masks together this is driving me batty I’ve done it four times and I’ve learned something different each time but I still haven’t gotten that one step down pat oh my God can you please help me I am not going to give up on this until I make it absolutely correct thank you
These are fabulous; thank you. I made a couple of modifications, if it is of use to others. On the inside at the top, I either use the serger or a zig zag stitch. Then I use those stitches to insert the small piece of wire ( twist ties, for now) and then fold them over the end stitches both to secure the wire and so there is not pointy wire inside. The other modification is to thread either the ties, or t-shirt yarn, through the sleeve, and then sew it down. That way, you don’t get the bunching but don’t have to fiddle with sewing the four corners. But so far, hands down, my favorite pattern. Thank you for sharing!
Thanks for the tip about sewing the ties within the casing. Just trying to work out what to do and now I know. Perfect. From Jane
Thank you for this pattern and I love to read all the comments with great suggestions. I did make some for my young teenage girls who are petite like me. I took the pattern in about 3/8 of inch and they fit perfectly for them. I suggest doing a trial run with other fabric to see if scaling down the pattern will work for you. First mask took some time, my second mask went quickly. Stay safe, healthy and positive everyone!
After making sever of these wonderful masks, I have decided to move forward making a few hundred using four pieces of the outer layer, stitching them together pillowcase fashion, turning them inside out, folding over the end for casing and top stitching. So much faster than all the short finishing seams as the pattern is written.
Thanks for putting this out for us all to find.
Can you explain what you mean by ‘pillowcase fashion’, are you making more than one mask at a time?
Thank you, Julie, for the easy to follow pattern and illustrated instructions. This coaxed me to excavate my Bernina sewing machine from decades of disuse. I rummaged through my closets to retrieve a well-worn cotton shirt and odds-and-ends of notions. Now my husband and I each have one-of-a-kind face masks!
Hi Julie! Thank you so much for providing this free pattern! That was a great service. You’ve explained it very clearly and the printable pattern was really helpful. I’ve completed 11 of them so far, with many more in process. I’m getting requests from friends and it brings me joy to be able to offer the masks to them as my service, in return for yours. And it uses such small pieces of fabric–much of which I have on hand from larger sewing projects. Besides the current pandemic, I often need masks for mowing my property in the summer, not to mention our frequent fires here–when N95’s often sell out of stores. Very gratefully, LR.
Very clear tutorial. These masks will be useful for supermarket runs and others outings as winter come to the southern hemisphere.
I made 2; one for husband who is in construction and out in the community daily, and one for my son who is also working out in the community. We are on lockdown and so I had to use what I had on hand. Cut up an old t-shirt and bandanna. Turned out perfect! Thank you so much for this pattern and instructions!
I’ve been looking for a version that wraps around your face and fastens with velcro in the back – seems like that would be secure and easy to get on or off. I can extend yours and I guess I will, because it otherwise seems great. I like how it molds to your nose. I just commented about it as a thought for another version you could play around with. I’ll attach at each corner, leave a triangle open for the ear and blend them down into one strap for the back of my head. Attach sew-on velcro at the end of each strap. Easy on, easy off. 🙂
I like your idea. I am specifically looking for a version that fastens with velcro for my special needs son. He struggles with ties and I can’t find elastic anywhere at this point.
If you have any tights you can cut off the toe then cut 1” pieces to use as ear pieces instead of elastic. Very soft and comfy.
I ended up taking off the ear part. The strap goes under the ear and wraps around my neck and keeps the mask on – as long as you keep it snug and use the nose-wire to mold it to your face. Wore it about 2 hours today and it was pretty comfortable even with 2 layers of fabric and 2 layers of blue shop towel as filter. I used her face pattern but left the chin almost straight, and then just extended it back and tapered it. For different sized heads just adjust where you sew on the velcro – my straps have much more overlap than my husband’s.
I just made three masks for my family – each with a different tie method. Your pattern fits so well that I plan to make many more for family and friends. Thank you so much for sharing! I bet your quilts are magnificent!
Thank you for the pattern! Is the purpose of the topstitching to make it more durable? Would it be possible to skip that step? I used a reusable grocery bag for an inner lining between 2 cotton layers as I don’t have any interfacing.
Hi Holly,
You can skip the topstitching if you want. It’s there to keep the outside edges in place and helps the mask to keep its shape.
I found that using shoelaces as ties is a really great alternative. Bonus I now have rainbow ties to brighten things!
Could you do one that has a slot for putting in a replaceable filter fabric?
I have been making masks similar to yours. My daughter is an operating room nurse. She has been saving the blue wrap used for wrapping and sterilizing surgical instruments and bringing it to me. At first I made the masks totally of blue wrap. Now I’m making the mask from fabric and a removable filter from 2 layers of blue wrap. In my masks I use a fabric tie and wire over the nose to mold it to the face. Blue wrap filters and the fabric masks are washable and can be sterilized in the oven at 170 for 30 minutes. Surgical instruments sit in the the blue wrap on a shelf until needed for a case and are considered sterile when opened. The blue wrap is a polypropylene product. It is thrown away by the surgical staff unless you can get a nurse to save it for you prior to being thrown into the garbage with all the other yukky stuff generated by a surgical case. Huge quantities of blue wrap are generated every day in surgery. The University of Florida’s anesthesiology department has tested blue wrap and found it to be quite protective against viruses. One can breath through a mask with a blue wrap filter. Operating room staff are very busy these days and it takes some convincing to get them to save this for sewers. My thought is that we should try to keep ourselves out of the hospital so I make masks for myself, family and friends. I have been sharing my blue wrap with sewing friends that I know will actually make a mask. I put a bag with some blue wrap and a pattern on my front porch and let them drive by and pick it up. Our hospital hasn’t yet asked for them but I’ll be ready if they do. Margie
I am going to try this one. Someone sent me a similar link that has different sizes, and I know people were looking for kid sizes. Maybe they could look at the size of this one and adjust your pattern accordingly?
https://www.craftpassion.com/face-mask-sewing-pattern/
Hi Julie,
Thank you so much!! It was so easy to follow and I really appreciate it. My only problem is that I have no elastic and the ribbons are kind of hard to tie behind the head. Do you know of any sources for 1/4″ elastic either on line or in the Sunnyvale area. I have tried everywhere.
Thanks
Martha.
Hi Martha…I am making a different pattern but t-shirt strips work really well. Fold a t shirt length wise, cut the bottom hem with a rotary is easiest, then 1″ strips. Cut the strip so it isn’t a loop, then grasp the end and keeping it straight, just pull all the way to the end and it just curls naturally. They are super comfy ear loops.
I don’t know if they would work well for ties as they are stretchy but if you are making ones with a nose wire, they hold perfectly well on the ears.
If you are threading through a side channel..cut 9 3/4″ and thread, then sew the ends together and pull the sewn part into the side channel.
I love this idea! I have been making my own ties out of the mask fabric and it doubles the time required. I am going to try your t-shirt idea as it sounds very quick, easy, and comfortable. I have heard and read from many who are wearing the masks all day every day that the elastic is uncomfortable behind the ear. Thanks for the tip!
Me again–I tried the t-shirt material and it works quite well. I have made ~50 of these masks for friends and family and just leave the tails long for them to trim to length. The rotary cutter makes quick work of making the straps.
Try using the elastic cut from old panties. The ones from the waistband are usually about ½ inch and from the leg holes about ¼ inch.
Julie – thank you so much! Simple pattern and easy to understand instructions. My daughter is working at a grocery store and I feel much better with her wearing a mask. I would also like to make one for my four year old grandchild and was wondering if you have any child mask patterns. Thanks again for helping us get through this safer!
Thank you for this tutorial. Your step by step photos helped me so much!
Love this, but am confused as to where the wire go in….the photo looks like there is no opening, so are we poking the wire through the fabric?
Hi Dianne,
The opening is from the side – the same opening that you would insert a filter into. You just guide the wire from the side opening into the channel that you created from the stitching. It was hard to get a picture of that process so I understand your confusion. I hope that helps.
Hi Dianne Gonzales she does show a step for the wire. You have to make a channel. Sew a channel for the wire 1/4” away from topstiching about 1 1/2”-2” on both sides of center. Scroll up. There is a photo.
Julie – this is AWESOME! I have been making masks and I found your pattern and instructions – thank you so much! What a great instruction and pictures! Will get back to your site as soon as I get through making masks!
I want to thank you for making this available to the world. I want to make some for my neighbors, but. There are several children around the age of 7 or 8 I think they definitely will need a much smaller mask. I do not know how to size it down. I did notice you mentioned to cut total pattern down by 1/4 in. However I’m still thinking it might be to big. Have you made any child size, and if so how much did you cut it down?
Thank you
Hi Wanda,
I have not made any child-size masks. I think it would be a process of trial and error. If anyone else has made a smaller version, it would be great to hear how they did it. I would also consider shrinking the pattern by 20% on a printer.
Everything worked the only thing I found was putting in the pipe cleaner difficult so I flipped the mask to the right side slip the pip cleaner in then top stitch under it instead of making a separate top stitch for the pipe cleaner. Love the pattern!
Hi Jade,
That’s a great idea. Thanks for sharing.
Thank you. Would it be possible for you to make a downloadable version of the instructions?
Thank you for this pattern. I made two, one for me and my husband. I did insert a t-shirt layer for three layers.
Thank you for this pattern. I was just wondering how much you think the pattern would need to be reduced for a child? I would like to make one for a child in my family. Thank you so much
Hi Cecilia,
I have not made any child-size masks. I would consider shrinking the pattern by 20% on a printer, but you might need to experiment to see what works for you. I would love your feedback if you do this.
I messed up my first one. I want clear on the pattern. I’m not an experienced sewer so I guess I don’t know this about instructions, but you had separate instructions on the pattern that didn’t assist in the how to that I’m following here, so I want able to figure out the distinction of the outer face mask and the inner face mask. I think it would be an improvement to include those instruction in the how to here to make it one easy flow. It’s okay to have them on the pattern as well, but separating them out messed me up for sure.
Paul, if you make the outer fabric and inside fabric from two different colors or prints it may help you keep the inside and outside straight. If you only have the same fabric, mark one with chalk, washable marker or even a pen. It is a good idea if possible to be able to distinguish the outside and inside so if you take it off, and then need to put it back on, you won’t accidentally put the “contaminated” side next to your face. This is less likely to happen with this bull nose design than with the folded style but it could still happen.
I haven’t sewn anything but pillow covers and curtains for years but I broke out my machine and spent a looong time making the first one. Now that I’ve got the hang of it I’m looking forward to a faster turn-out for our little island community! Thanks for the pattern, easy instruction and motivation 🙂
Were making them for ourselves to start, then relatives that have a need.
thanks for the comprehensive tutorial. we will then check our community for need and help.
Elly
Please update per most recent information. Some medical professionals are discouraging any mask with a front seam since it presents small openings (space between threads) for passthrough of particles. They are even asking for as few pin/needles holes in the mask as possible and recommend using paperclips or sewing clips instead of pins in the construction. Hoping at some point the CDC will put out some guidelines. Thanks to all who are helping in the fight!
For the center seam, why not try fabric glue on the inside of the seam? The glue will be on the inside but should still seal the seam. The type I have is flexible and clear.
Thanks so much. I am on oxygen and making these for my protection and my loved ones. I love the filter pocket. I was told I could also use a coffee filter and change it often with washings.
Hello Julie,
Could you still wash these masks with a filter in it?
Hi Mandy,
I would remove the filter before washing and replace the filter as often as possible if you have them.
One of the gals in the comments down below says you can sterilize them at 170 degrees F. for 30 minutes. No need to wash unless they are stained. I don’t know if a chenille stem/pipe cleaner would be okay with that, but you could experiment with a couple pieces on a baking sheet on tinfoil.
Thanks Julie for the free pattern. I used batik outside and a tee shirt fabric for inside. Also two tie wraps hocked together for nose wire. Then made double fold ties. Fits great. I am retired nurse and these fit better than some of the surgical masks I used to wear. The way I look at it, these help keep some of the larger particles out and much better for casual use than not wearing anything. Stay safe and well. God bless you and your family. Judy
Excellent step-by-step instructions! My first one turned out quite well and was worn to my retina doctor’s office this week. The doctor commented that this is the style that is being recommended as it offers the most protection. He liked it so well, he called the next day and asked if I could make some for his immediate family of four. I am flattered, however, the credit goes to you!
Thanks so much for the clear and well-illustrated instructions.
To add an additional thickness/layer of fabric to the mask for protection, should the inner layer be a duplicate of the outer mask or the inner mask?
Inner mask as then it will not be poking out.
Hi Lisa,
If you’re talking about the optional middle layer where a filter would go, you could use another layer of the same fabric used on the inside or outside instead of a filter. You could also use t-shirt material or interfacing.
Hi J%ulie – as you can see I’ve posted a few times tonight, going over information. I’ve seen two sites talk about blue shop towels as filters, since they use a non-woven material and are pretty tough. Apparently 2 layers of shop towel will filter out about 95% if the mask is well-fitted. That’s what I’m going to try… Thanks for the great pattern!!!
Hi Julie,
Thank you for posting this and including such detailed instructions. I have made 7 so far and mailed them off to family and friends. I will be making more – getting donations of fabric from apartment neighbors dropped off outside my door 🙂
Wore mine outside yesterday on a walk with the dog and it felt secure and comfortable!
Thank you for this pattern!! I just downloaded and will be making masks for my community. Is there a way to send you a donation for your work? Would love to support you.
That’s very thoughtful of you Brenda, but no; I’m glad I can contribute to the community in some way.
Thanks for the great pattern and tutorial. I’m making almost three hundred of the pleated versions for our local hospital to wear over their n95 masks. I’ll be making some of these when finished with those.
Just a tip, please don’t wear the mask part way off. If anything drops in it while halfway off, you’ll put it back on your face when you put it back on again. This comes from the Nebraska Medical Center where they know how to treat very serious infectious diseases. They have the worlds best Bio Containment unit.
Not much of a sewer so this may seem to be a silly question. Would you iron on interfacing? Or should I just cut the iron on interfacing and sew it in. Your directions seem easy to follow and will excited to start today. Thank You
Sandy, I used iron on interfacing and fused it to the outside squares before I cut them. Then you can just use the fused pieces as one fabric.
Hi Sandy,
I think that ironing on fusible interfacing would be fine – as long as you can still breathe through the mask. Sew-in interfacing would work, too.
I plan to iron on the interfacing on the outer part; cut the interfacing 1/4 inch smaller around the curved edges of the mask to reduce bulk. Hope this helps and happy sewing!
I haven’t made this yet, but have read all the comments. (I was a clothing construction teacher.). The concern raised about the center seam having small openings between stitches could possibly also be solved by cutting a 1/2” wide piece of fabric and sewing it through the seam allowance and outer fabric about 1/8“ from the center front seam on both the outer fabric and the lining.
May I also recommend a Microtext 70/10 needle. (A 60/8 is even smaller.). It will go through the woven fabric easier, not making a big hole, and will do less damage to the fabric. Please don’t use a big-honkin’ needle, especially a ball point on woven fabric (Ball points are for knit fabrics.). Also be careful that the needle isn’t damaged…blunted or burred, as that will do a lot of damage to your fabric. The center front seam is our biggest concern here. If you can hear the needle punching it’s way through the fabric, you are way over-due for a new needle.
I commend you on your excellently written instructions. I’m going to start making these today. You are, indeed, a blessing!
Hi Maxine,
Those are great ideas! Thank you for sharing. If you have a picture of the extra piece you would add to the center seam, I would appreciate it!
This tutorial and pattern are so clear and sewer friendly that I won’t have any trouble even though the only thing I’ve sewn in the last few years is a seam here and there. Thank you!
Thank you for the awesome pattern. I made several of them and made filters using hepa filters from vacuum cleaner bags.
Carol, please be sure your vacuum bag filters do not contain fiberglass. You don’t want to be inhaling small particles of fiberglass. Hope this helps. I know there is a video around, in which a Dr. actually recommends these filters, but I’m guessing he doesn’t vacuum much and not aware they contain fiberglass! lol
Julie…It´s a wonderful and useful tutorial…i already did mine..thanks…
Thanks Julie. The details and photos are such a great way to expedite the mask making. I have shared a short cute video on Facebook with a link to your site. The fit and feel of this mask is really great, and the open ended pocket is super. David Scarbie Mitchell. Scarbie.com
i couldn’t find your video on YouTube
Thank you for your time and attention to detail when writing this tutorial. The pictures are great too.
Thank you for this my husband and I are both high risk-and I love this pattern. I’m not much of a sewer, but I think I can follow this and make some masks for the effort with my machine. Not only for us but for the cancer unit. Thank you for making this possible! AMT
Thank you for sharing; so helpful and timely!!
If you put a pipe cleaner or other wire in this mask (or any home made fabric mask), can you still wash it and re-use it? I assume you have to wash it after every wearing?
Hi Anne, Yes you can still wash it with a wire insert. I recommend washing the mask after wearing it each day.
Pipe cleaners don’t last through washing. Better to use florist wire or some other lightweight wire. All I have is pipe cleaners, so I left one end open so I can take them out before washing.
Pipe cleaners are steel or iron wire and will rust from washing or sweat. Make them removeable/replaceable somehow. Lead-free solder would work well. You need the NON-flux-core type. Hardware stores and electronics supply stores should have it.
Also, rubber coated garden tie material from the dollar store. Comes in a long roll.
Anne, I found that one pipe cleaner was not strong enough to keep the nose piece tight. I use 3 and wrap one around 2 of them, then cut at 3″. I turn the ends down a bit with needle nose pliers to prevent sharp ends. It just take a bit to turn under. Hope this helps.
Thank you, Julie! Best mask pattern I’ve seen — and I’ve read a LOT of them. Mask is comfy and fits well. Wishing all the best for you and your family.
I have been making masks very similar to yours from Blue wrap. I’ve also made the mask from fabric and used 2 layers of blue wrap for a filter.I fold 1/2″ bias tape in half to make a 4 foot tie. Thread the tie through the casings by going down from the top on one side than up through the bottom on the other side. The loop along the bottom goes behind your neck and both tie ends can be pulled on to snug the mask around the face and tied in a bow at the top of the head.I use a safety pin to thread the tie through the casings and leave it on the end of the tie just in case it comes out of the casing. Mold the nose wire to keep the mask as snug as possible. Blue wrap is used by the hospital operating room to wrap and sterilize surgical instruments. The sterilized instruments sit on the shelf until needed for a case and are considered sterile when opened. The wrap is usually thrown away unless the person setting up the room will save it for you. My daughter is an operating room nurse and is actively trying to get the other nurses to also save the blue wrap for us sewers.Huge amounts of blue wrap are generated every day in the OR and go to the landfill.The University of Florida anesthesiology department has tested masks made from blue wrap and found them to be very protective if you can get the mask snug against the face. Fabric mask are not very protective as viruses are extremely small.
What a great tutorial! I haven’t used my sewing machine in like 10 years, so this detailed lesson is much appreciated! Thank you for taking the time to do this.
Bless you, Julie, for your kindness! Of all the facemask designs, I like yours the best. Stay safe!
Thank you so much for this pattern and tutorial. No face masks of any kind are available here, at least I have found none. The nose wire is an added plus. Making some masks tonight for sure.
Thank you for the tutorial, Julie! I love this pattern and think it is one of the best options out there. I like that it has a channel for wire for the nose and that you can add a filter. Also it’s great that the wearer can take it partially off and not have to take the whole mask off and risk it being contaminated or lost. As usual your instructions are precise and easy to follow. I used two 1/2″ jersey knit strips about 16-20″ long for the ties for each mask (cut on the least stretchy grain). I inserted each strip into the side panel, centered it, and then tacked it down with a 1/2″ zigzag stitch to anchor it so the wearer does not lose their straps! Seems to fit tightly and not gap as you mentioned. Perhaps the softer, stretchy fabric helps with this? Thanks again, Julie! Be well everyone!
Just read that volunteers in Birmingham AL, including a friend, donated 10,000. She mentioned a pocket to hold a coffee filter. Thanks for sharing. I plan to start tomorrow.
Hi! I really love this mask as it seems to cover a large section of the face and includes the option of the nose wire which I think it makes it more effective! Unfortunately, my printer is out of ink so I was hoping to draw my pattern off of yours but I don’t see measurements. Is there any way you could provide that information? I could eyeball it, but would rather have something more exact. Thank you so much!!
First of all I would like to thank Julie for her kindness! Your tutorials are always a source of peace and goodwill ( English is not my first language, I find difficult to find words to describe my gratitude) To Emily, I had the same problem… I used Adobe illustrator to get some measures in order to draw the pattern accurately, because I am short of fabrics, I only have little pieces. I would like to find a way to send the measures to you, but I will try to describe:
OUTER FACE MASK
A. Horizontal: In the base, from the chin to the continuos line (“casing”): 3.9 inch
B. Vertical Line: From the “peak of the nose” (the point of the triangle) to the base: 6.30 inch
C.Horizontal… In the base, from the chin to the “vertical line” (B.) there is a distance of 1 inch.
D. The diameter of the curve of the mouth-nose area is about 9-10 inches.
E. The diameter of the curve of the cheek area is about 7 inches.
Thanks Julie, If something is wrong, please tell me… I did mine with these measurements and seems to work fantastic.. I used fabric ties
I’m a month behind, but if you have the PAPER, try this.
Download the file and then get ready to print; you ought to be able to size the electronic (virtual) piece of paper to be the same size as your actual paper – hold it up to your monitor and compare sizes.
then holding your paper up, you ought to be able to see the pattern lines through your paper – might have to turn the brightness of your screen up.
Next, either hold or tape the paper in place, and VERY GENTLY – with a PENCIL – trace the outline, or enough of it, onto your paper.
With the paper back on a firm (non-screen) surface, draw in the pattern nicely, with Sharpie maybe, and the other details needed.
I’ve done this several times.
Hi do you have a video tutorial ?
No, not at this time.
I was curious, Not sure if others asked this as I havent read all of the comments. On the pattern it has a 1/4″ and a 5/8″ line which adds up to 7/8″ Is the 1 1/2″ line another line we have to draw on?
The 1/4” and 5/8” lines are reference lines. You only need to draw the 1 1/2” line. When doing the math, You need to double the 5/8” because the fabric is folded (doubled) and it all adds up to 1 1/2”.
Hi Julie,
When I print the template it runs off the print area on the right side. Does the pattern end on the end of the paper? There’s about a 1/4″ margin there. I did measure and my 1″ square is correct. Please advise.
I would make sure the measurement (or height) of the fold line edge is equal to the other piece and you should be fine.
I’m having the exact same issue even after triple checking my settings for printing
Make sure you’re printing it in portrait mode, not landscape. I just tested it on my printer and it printed fine. There should be about 1/4” border around the edges. I’m not sure what else could be going wrong.
My pattern did the same thing. I took the other pattern and lined up the curve and traced what was missing, using the other pattern. I cut out the material and everything lined up. Hope this helps you.
Make certain your printer settings for the page are set to print the default area and not fit to page etc.
Thank you so much Julie
Does the pattern include the 1/4” seam allowance?
Hi Jessie, Yes it does include 1/4” seams so you’ll cut out the pattern exactly on the line.
Thank you so much for this wonderful pattern. Directions are very easy to follow.
Thanks so much Julie! I just made your mask and it’s wonderful. With addition of the wire the fit was great and my glasses don’t fog up! Appreciate all your effort that went into making this available for all of us.
I guess ditto to the above responses – this is such a detailed clear tutorial. Kudos for your work and clear directions!
These words come directly from a citizen of the Czech republic.
“I know that they told us that home made masks can only be partially protective, partially. But any protection is essential today. The Czech republic has repressed infection quickly and though they follow all the directives other western countries do eg: staying home, washing hands, social distancing….the one thing we do differently is that EVERYONE when they leave home MUST wear a mask. Because we couldn’t purchase them in the stores, in three days, the entire country got together and sewed home made masks for every citizen.
3 days = 10 million masks. Their philosophy is that is everyone wears a mask, “I help protect you and you help protect me”. Our scientists say that its working. The numbers certainly reflect it. Something is much better than nothing”.
I love your design, thank you.
I like huh out face musk I would like 2 of them
Thank you for this great pattern. Can’t wait to try it. A suggestion might be to add a t-shirt yarn piece for a tie to be a little softer behind the ears. I’m going to try that and see how it works. Thanks again for sharing!
I loved this design! I’m a slow sewer and it was a bit tricky getting the first one made, but I think the following ones will go much quicker. I went ahead and sewed my filter into the front fabric. I used Pellon Fuseible Featherweight and heat pressed it into the back of the front fabric (per Pellon’s instructions) and then sewed it per your instructions. I find it is very breathable and I won’t have to take it out and replace it. I guess as time goes on and with washings we will see how it holds up. I had trouble getting my floral wire threaded into the nose piece so I will make that pocket wider next time. Thanks so much for the design/pattern!
Hey Kim you might try pushing the wire into the seam where you want it, then use a zipper foot to stitch the little box afterward. Works like a champ and it’s nice and snug!
I’d suggest you bend the ends back to create somewhat of a flat loop to help you draw it through and to also prevent it from poking through
Hi Julie! Thank you so much! I saw another tutorial where they cut up a vacume cleaner bag to use as a filter. Stay well!
Nancy
Thank you so much for making this pattern available. I don’t have a machine but the pattern was simple enough to complete it all by hand with a bit of time and patience.
Thank you, Julie! What wonderful, clear instructions! I’ve made about 6 different patterns now, and this one is far and away the best fit, even thought it takes slightly longer to make. Thank you for taking the time to simplify and streamline the craftpassion design, and create some clear instructions. I’m using plastic coated garden wire for my nose pieces- it has been a challenge to find something that will hold up to multiple washings!
I must say, your pattern and directions are, by far, the most detailed, easy to understand, and makes a wonderful mask that allows for wires or filters. Thank you for taking the time to do this! I am giving you a standing ovation from my sewing room!!! I have been sewing for over 45 years, and you win the best on this one! I love all the options included! Thank you!
Thank you, Julie. This mask at the very least lets people get a message to stay away. I am making them out of dense batik and since now the message is “wear a mask”. They are appreciated as preferred N 95 mask is totally unavailable to the average person and therefore, I am so ever grateful for your pattern and have been making many. Washing in hot soapy water, drying them in hot dryer is better than not having a mask My friends and family appreciate them as do some other places I have sent them. Thanks for your good work…you are appreciated.
From Joanna’s mom
This is the most comprehensive pattern. The research link is very good also, addressing the passage of microns etc. I would like to know what your thoughts of using Interfacing product “soft and stay”. It is a non-woven fabric. It was suggested by another site I was on. Also, my concern was the stitching line, I am thinking that would reduce the effectiveness of the fabric. So I was thinking of making outside first, wash in hot water to shrin and the do a bead of glue on it after it comes out of the dryer.
Thanks for this pattern and I am probably going to make one, now.
This was the most attractive and best coverage of the regions of your face for full protection. It would be nice if you could do a video as well!
Thank you for sharing!
Naomi
You are such a thoughtful woman. I read instructions for several masks and thought, ‘too much work’! I actually thought,” where is a Simplicity pattern for one of these?” Even with pictures, just too much brain work. Frustrating. So your pattern makes sense and the pictures work with those instructions. Thanks for simplifying a simple mask. Masks help. No they may not totally do what the professional ones do. But up against this mask and nothing? The mask is a better option. I want to make some masks for my family and friends.
I made three. So easy. Thanks for the great pattern!
Thanks for these instructions. It really helped
THANK YOU from the bottom of my heart for posting these instructions! I’ve found poorly written instructions and spent 3.5 hr making one only to discover at the very end there were two ‘variations’ I should have incorporated. This type is necessary to protect the parents of an infant who had a rough start in life when they must go for groceries, dr appts etc. It’s also requested by medical staff in the ER. God bless you for taking the time to do this. You are an angel in my eyes. Stay well!
I hope everyone understands that without the PROPER filter this is no safeguard against COVID-19! Also if you are dealing with infected patients, you need to throw away whatever you wear afterwards.
Please do your research!!
Aside from safety issues it’s a beautiful design.
Thanks for the reminder Laurie. If anyone is in direct contact with an infected patient, they should be using PPE such as N95 masks and face shields.
Thx you Im going to make this for my girls,just for fun. They love masks
Thank you so much! I really like the filter approach. Bless you. Keep safe. Blessings.
Julie, what about fusible interfacing, like Pellon 931 – available at Walmart?
Hi Primrose, Good question. I don’t know if the fusible component of the interfacing contains something that might be undesirable to inhale. I’d rather err on the side of safety.
Can you use Seersucker fabric then line with muslem ???
Thanks for the great tutorial & other info! Stay safe!
Thank you, Julie! This is a very good tutorial! 🙂
Thanks so much for this. I’d been using a similar pattern that gave no measurements, and though I worked it out through trial and error (luckily only one error), yours is clearer and has better instructions for the side channels.
Thank you so much for this, I really appreciate it 🙂
Thank you, Julie and the Granary, for an excellent pattern. Your pattern and instructions are the best I have yet seen of the many available. Instructions are complete and clear. One idea for those who have neither elastic nor hair ties – I found that long, flat-braid shoe laces make excellent ties. They are comfortable, easy to insert into the openings and stitch in place; and adjustable.
Julie, thank you very much for this pattern. I am trying to make masks for my DIL who works in a local hospital – I have tried various patterns and have been frustrated with some of them. I will be making yours this afternoon. Actually, I just read an article that said all of us should be wearing some kind of a mask when we go out. So, I guess I’ll be making them for lots of folks. Thanks again for sharing this – I can imagine it took a lot of time to prepare but I know it will do a lot of good! Blessings to you and your family.
(Btw, I am using furnace filter material for the insert.)
Thanks, Julie!
Thank you Julie. Best directions I’ve seen. I hope you and your family are safe.
I think its great what u are doing…I want to make some to help at my hospital or nursing home…God Bless…stay safe
Great pattern and tutorial, Julie. Thanks so much. Batiks was a great suggestion! I also saw someone mention pillowcase fabric is often very tightly woven, and T-shirt fabric also. I was wondering about using the t-shirt fabric as a filter. For your final tutorial, I wonder if it would be prudent to use clips instead of pins, to avoid putting more holes in the fabric. I am starting on these tomorrow. Hope we do not need, but really want to be prepared! Thanks and take good care!
Great idea, Linda! I just updated the blog post with using Wonder Clips instead of pins.
Thanks for the great face mask pattern,always enjoy all your posts! Many prayers go out for everyone in our great country.
THIS IS GREAT THANK YOU SO VERY MUCH
Thank-you Julie for your typical big-hearted and public spirited offering x
Julie, is there a print option for the whole pattern?
Thank you.
Hi Marty, I’m working on a printable pattern than includes written steps. For now, you can use the “print” button at the bottom of the blog post. This allows you to edit out photos and information you don’t need and just print necessary content.
Thanks, Julie! This looks like a great mask, one that will stay put better than the flat rectangular mask. I think that I will send these to my grocery story working family members. Not sure if my CHP son can wear one…..it’s not “uniform”. I’ll make it black or beige. I know this is serious, but we need a smile. Thanks for all that you are doing. Lots of Hugs..
Thanks for this pattern. I am making pleated ones and hope to drop some off at the hospital Monday.
thank you, the pattern I have been making fogs up glasses. This looks much more functional
Thank you Julie. There has been so many patterns. I made several of a very basic mask. As the need becomes great I think these will be great.
Hi Julie.
Thank you so much. These are actually my sentiments: so many masks, so much confusion which one is the right one, so many patterns that are not easy to make or don’t fit well, or don’t have the opening for a filter/extra layer.
I will print your pattern and start making these.
Thank you for you always being on top of stuff in the sewing and quilting world. And thank you for your donations to the zoo and family!
We all need all protection we can get right now and reasons to sew to stay in doors and make a contributions.
You are wonderful!!!
Safe and positive back at you.
Kathrin
Julie,
Thank you. When I first heard of people doing this, I rolled my eyes and thought “no one will want them.” Boy was I wrong. Initially, providers here did not want them but in the space of just 2-3 days, that’s changed. The effort and practical thinking in your post is much appreciated. I’m going to make some tomorrow. My batik obsession will come in handy!
Well said with appreciating the effort and practical thinking! Julie, this all is very much appreciated; thank you!!