How to box the corners of a cushion or pillow
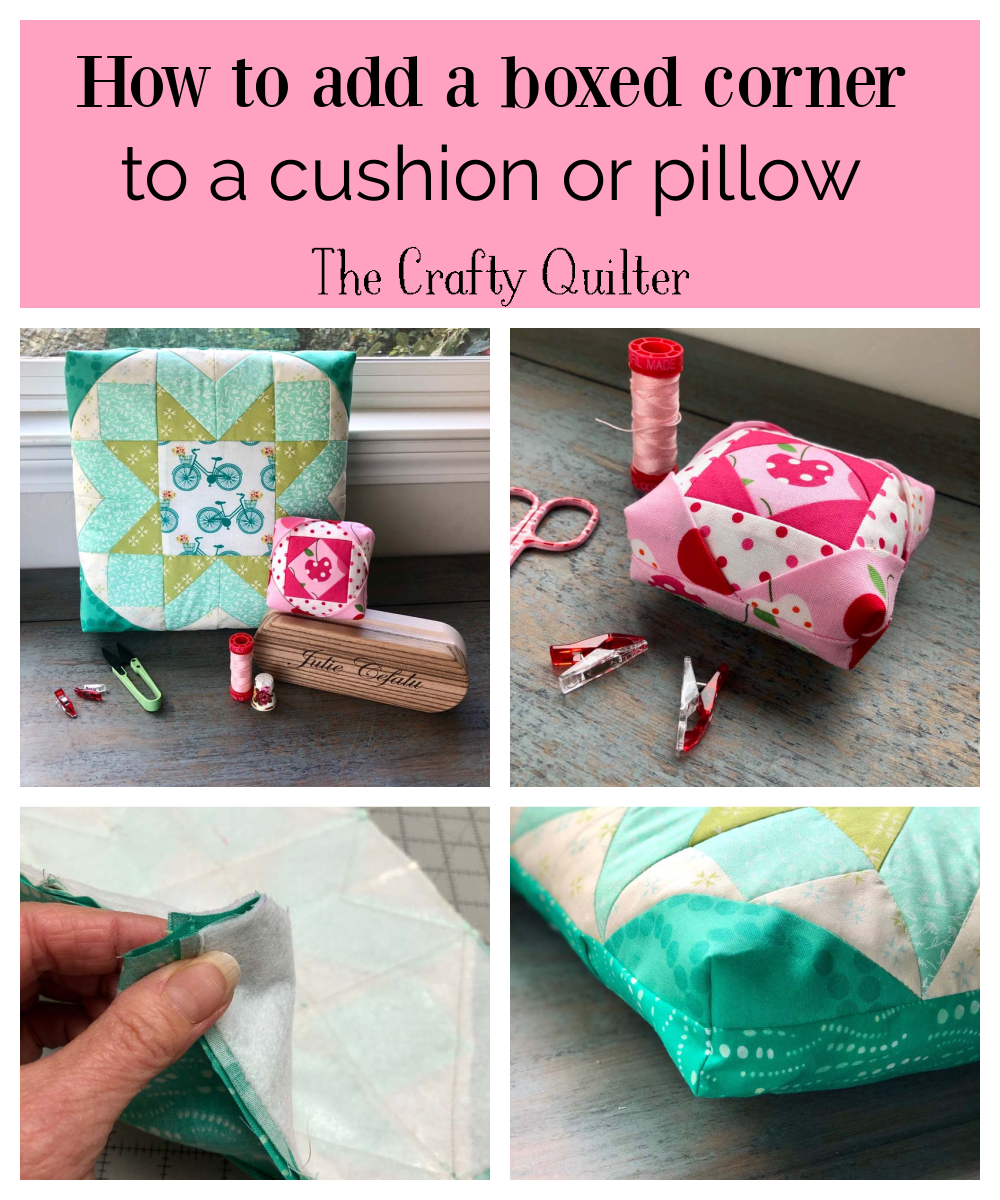
Today I’m going to show you how to box the corners of a cushion or pillow. After I made a dozen Folded Corner Pincushions, I decided that I didn’t like how “pointy” the corners were. Since I’ve made plenty of bags and pouches with boxed corners, I thought it would work on these pincushions. Not only did it work, but it was really easy to do!

Boxing the corners of my pincushion rounded the shape of the finished project, and I think it looks really cute. I’d say it’s a bit chunkier. Here is a comparison of the pincushions with boxed and unboxed corners.

How to box the corners of a cushion or pillow
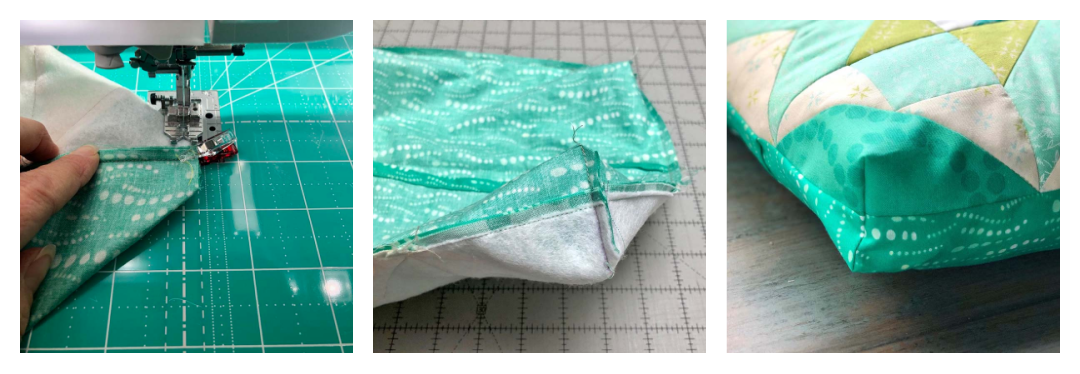
There are a few methods to box the corners of a project. I’m going to show you my favorite way which is the corner cut-out method. I think this technique is faster and easier than other methods.
To demonstrate the boxed corner technique, I’m using photos of a pillow that I just made. It’s the same technique I tried on my Folded Corner Pincushion, just larger scale.

Steps to box the corner
NOTE: The boxing steps come after you have sewn the front and back of your project together on all four sides.
- Draw a square on each corner of your project. For this pillow, I drew a 1″ square. For the pincushion, I drew a 1/2″ square. (More information about the square size in a bit).
- Cut out each square on the line – I like to use scissors for this.
- Pinch the corner so that it opens up and you can align the seam from each side.
- Match the seams and pin or clip in place.

- Stitch with 1/4″ seam along the raw edge, backstitching at the beginning and end.
- Repeat for each corner.
- Turn right side out.
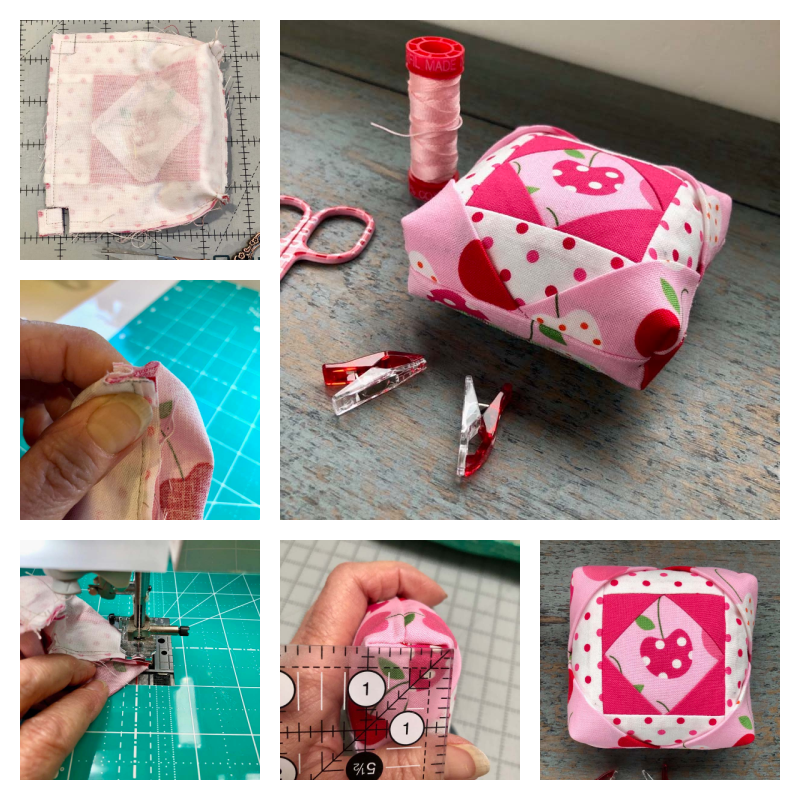
The end. Really it’s that simple! Here is what that same process looks like with my little pincushion.
Boxed corner sizes
The size of the square you draw and cut for a boxed corner will determine how “boxy” the corner will be. The bigger the square, the greater the depth.
Basic formula: The size of the finished corner is TWICE the size of the drawn square. (Note that the square size is drawn from the raw edge, not the seam.)
For my pincushion, I drew a 1/2″ square so the finished size of the corner is 1″. For my pillow, I drew a 1″ square, so the finished size of the corner is 2″.

Most patterns will tell you how big to make the corner. If you don’t know, you’ll have to experiment a little (like I did). The next pillow I make, I’m going to try 3/4″ square for the boxed corner. This will give me a 1 1/2″ finished seam. I feel like 2″ corner seam was too much for a 12″ pillow.

I hope you give this boxed corner method a try. It’s really easy to do and the results are so worth it!

Discover more from The Crafty Quilter
Subscribe to get the latest posts sent to your email.
This is brilliant Julie! I made and sold bags back in my early twenties and know this method well, but never thought to use it on a pillow. I make a different style Christmas ornament every year for gifts and I’m now excited to start that project! Thanks for the tip!
I would have never thought of boxing pillow corners but I LOVE the way it looks! I’ll definitely try this next time I make a pillow. Thanks for this great tutorial!
I love this idea of boxed corners on a pillow. I’m definitely going to give it a try on my next one. Thank you for sharing!
Thank you, better (and easier) than the way I’ve done this in the past. I’ve made two of your cute pincushions, will have to try another with boxed corners.
Thank you Julie for very informative and clear instructions regarding boxing corners for a cushion.
I have saved the pictures for future reference.
Must add that the pin cushion is very cute indeed.
Thanks again
Gayle Z
I love this idea. Thanks for the tutorial.
It does look neater with the boxed corners, especially the pillows…have always hated the tiny little pointed corners on mine, even stuffing a little while using a pillow. Next time
I’ll use the boxed corner method, definitely. Thank you for that idea!
I love this look and your tutorial is perfect! Thanks for sharing!
Thank you Julie, I can’t wait to try this. Your pillow and pin cushion are beautiful.
Joann H
Thank you for the corner tutorial & pincushion pattern. Always easy to understand and follow along.
Thanks for the simple explanation and showing it on a very small boxed pillow. It does help to see the possibilities on a smaller scale. I have “ just winged it on one side of a small to give the pillow a “ base”
but this reaffirms the process
This is great! Wish I’d known this earlier :). Just finished a pillow that could have used this method. I’ll certainly remember this :)!!! Thank you for creating such a lovely post!
Love the boxed corners! The pincushion really does look nicer! 🙂
Thanks for this, I like the look of the boxed corners. I always do my backing for pincushions in two pieces sewn together with an opening in the middle because I find it easier to stitch the opening closed on the back instead of along one of the edges/sides when it’s been stuffed. I sometimes appliqué a small heart or other shape in wool felt over the join if I don’t think my stitching is quite perfect!
That boxed corner is easy to make, it does make the pin cushion so much better. You always have great ideas. Thanks for sharing.
What a great idea! Thank you!!