Free Vintage Heart Quilt Block pattern!
Hello quilters! I’m spreading some love today with this free Vintage Heart Quilt block pattern. It is so stinking cute! It checks all the boxes: scrappy, vintage, hearts, and easy. Yes, there is some applique, but you can leave that out if you’re not a fan. But you really should be a fan. 😉
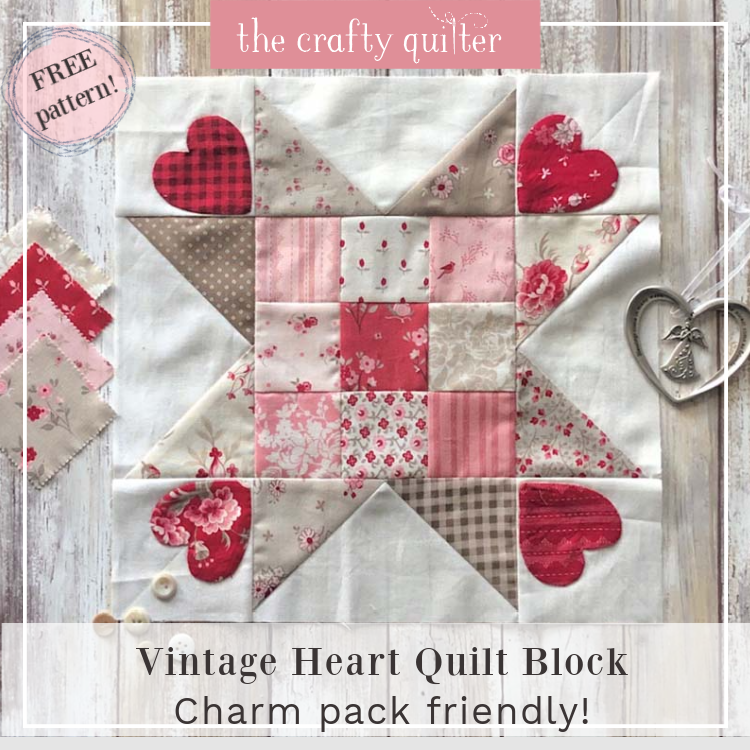
I was inspired to make this quilt block when I “re-discovered” this charm pack and mini-charm pack of red, pink, and cream prints. I constructed the block to make good use of a charm pack and I used the mini charms for convenience. You can use any type of yardage, however, and it can be as scrappy as you like!
You can find the Sugarberry Charm Pack at Fat Quarter Shop or your local quilt shop.


Supplies to make one block
- One charm pack OR a mix of (9) 2 1/2″ squares and (4) 5″ squares in your favorite colors.
- (2) 5″ squares for the heart applique
- 1/4 yard of background fabric
- Fusible web product such as Heat ‘n Bond Lite OR non-woven lightweight fusible interfacing
Note: the fabric used in some of these steps are different than the main image. I didn’t have enough left in my charm pack for the photo tutorial. I used scraps of some Art Gallery Fabrics and the flying geese are not scrappy. But still cute!
Also, one charm pack in addition to 1/3 yard of background fabric will result in four quilt blocks (at least). Results may vary depending on the colors needed and used.
Basic steps
The pattern includes all of the instructions and diagrams, but I thought I would show you the process with photos, too. (You can download the pattern at the end of this blog post.)
I used the four-at-a-time method for making the flying geese. I also oversized them so I could trim them perfectly to size. If you’ve never tried this method, I suggest you practice with some scraps. It’s really amazing and easy once you know the steps. You can read more about that process and get my cutting chart for a range of different flying geese sizes here.
Below are the basic steps for the four-at-a-time method of making flying geese.

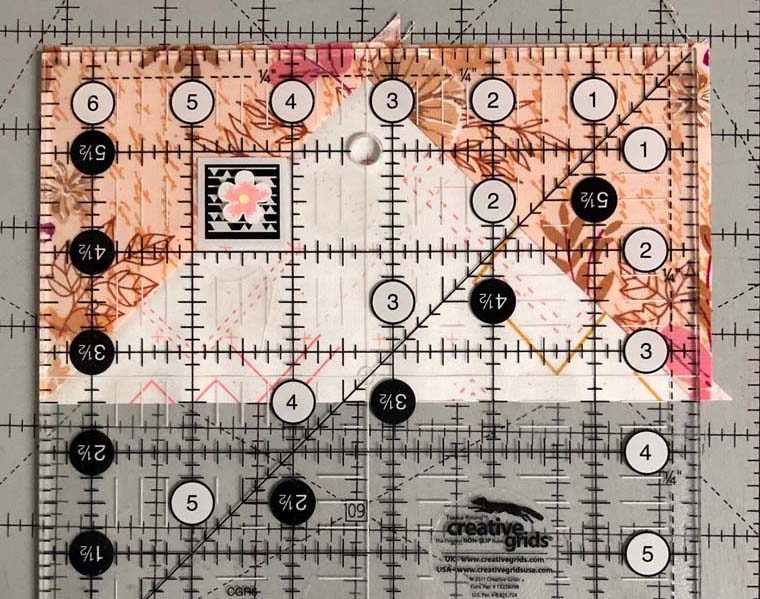
The next step is to trim them to size. These flying geese need to measure 3 1/2″ x 6 1/2″. If you happen to have a Bloc Loc Flying Geese ruler for that size, that’s the easiest way to do this. If not, use a 6 1/2″ (or larger) square ruler. Here are the steps for that:
- Place the flying geese unit so that the “V” or valley is facing down. The diagonal line of the ruler should be on the diagonal seam to the right and the 6 1/2″ edge (or line) of the ruler should be on the left diagonal seam. The 3 1/4″ line of the ruler should fall on the bottom “V”. This will give you the 1/4″ seam allowance and it is the mid-point of the long side.
- Trim the right and top edges.

- Turn the unit and place the previously cut edges along the 3 1/2″ and 6 1/2″ lines of the ruler. You should see the 1/4″ line of the ruler hits the “V” intersection at top.
- Trim the remaining two edges.

The center 9-patch is the easiest part! Just arrange the 2 1/2″ squares into a 3×3 grid. I alternated dark and light for mine. Sew the squares into rows and sew the rows together. The resulting square should measure 6 1/2″

Now you put all of the units together, along with the corner squares. Arrange them as shown below and sew the units into rows. Then sew the rows together to create the block.


My applique method

I love all forms of applique. If you’re familiar with applique, choose whatever technique you’re most comfortable with. I chose a turned edge applique using the faced method. This is a lot easier than it sounds. Once the applique shape is made, you have the option of stitching it in place by hand or machine. I used hand applique for the first set of blocks and machine for the second set. I’ll explain how this method works and you can decide if it’s right for you.

Faced method
For the Faced method of applique, you’ll need a non-woven, lightweight fusible interfacing such as Pellon 907F. I recently used Quilter’s Select Cutaway which is a very sheer, non-stretch material that has a temporary fuse. It has the same properties as the Pellon, but it seemed to be more durable and still very thin.
Here are the steps:
- Trace heart onto smooth side of fusible interfacing. Cut shape outside of line (allow 1″ all the way around shape).
- Pin the traced heart to the right side of heart fabric.
- Carefully stitch directly on the line. Use a short stitch length such as 1.6. An open toe applique foot is really helpful for visibility during stitching.
- Trim 1/8″ outside of the stitching. Pinking shears helps to ease in the fullness when turned.
- Clip inside point a few threads away from stitching.
- Clip bottom point a few threads away from stitching

Next you’ll be turning the shape right side out. You can do this by cutting a slit and using your fingers to turn it right side out. But, I like to use a wide straw and a ball point bodkin to do this. Say what? Yes, a ball point bodkin does all sorts of things and it’s perfect for this. If you don’t have one, you can use a blunt chopstick or thin pencil (eraser end). As long as it doesn’t have a sharp tip, because you don’t want to poke a hole while you’re turning. Back to the steps:
- Separate the interfacing from the fabric and cut a slit or and X into the interfacing.
- Insert the straw into the slit.
- Push the bodkin into the straw from the fabric side. You’re pushing the fabric into the straw.
- Remove the straw and pull the fabric through.
- You can repeat this with the other half of the heart if needed.
- Turn the fabric right side out.
- Use the bodkin to smooth out the edges.
- Do not iron the shape yet. It has fusible on the outside, and you don’t want it to stick to your iron or to your ironing surface!

- Next, place the heart shape on each corner of the quilt block. I found it helpful to make a diagonal crease in the corners so I could position the heart accurately.
- Fuse the heart in place with a medium hot iron. This won’t be a super strong hold. It’s just enough to keep it in position while you stitch it down.

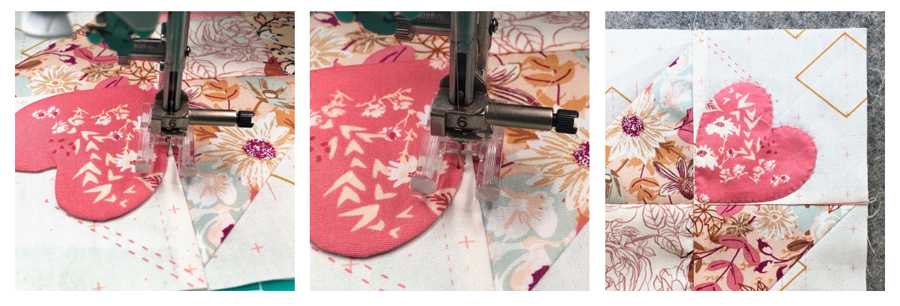
- Stitch the heart in place by hand or by machine.
- For machine, I like to use clear, monofilament thread and a size 70/10 Microtex needle.
- I use a very small zig zag stitch so that the “bite” into the shape is just catching the fabric edge.
- The right swing of the needle is just outside the shape and the left swing of the needle is just inside the shape.
- This produces a nearly invisible stitch that looks like it could have been done by hand!

Hand stitched applique
I hand stitched the applique with my first set of blocks. I prefer this method when I have the time. The applique shapes were prepared the same way with the faced technique. I used 80 wt. Aurifil cotton thread in a matching color and a blind hem stitch. I didn’t take any photos, but you can search for hand applique and find some great tutorials.

Fusible machine applique
I’m not going to go into great detail here, but I know this is a popular method of applique. I use it often as well. I have a great tutorial on fusible machine applique here and a roundup of raw edge applique techniques here. These are great resources if you want more information for working with fusible web and raw edges.
Option A and Option B
I thought it was fun to play with the applique positioning. Option A is to place the hearts in the corners. Option B is to place them in the valley of the flying geese. You can’t go wrong, either way!

Ideas for using your blocks
I’ve made four blocks and I’m going to turn them into a table runner. I think this will look so cute for Valentine’s Day and the entire month of February!
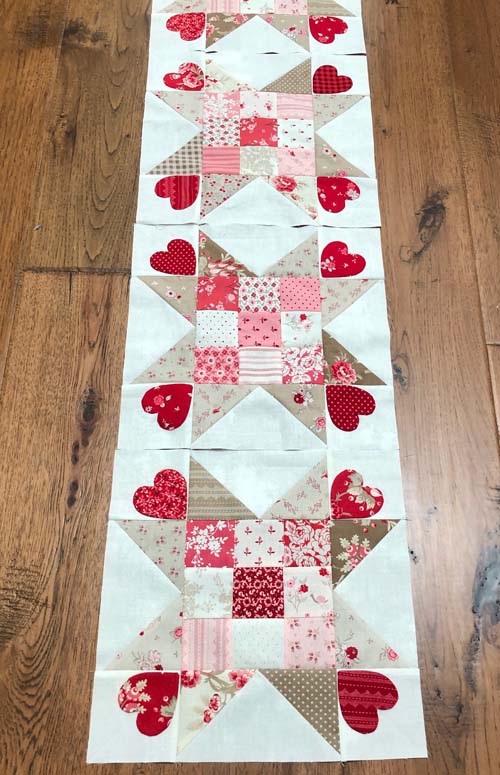
I also like the look of them in a square. This could make a cute wall hanging, table topper, or a baby quilt with the addition of sashing and borders.

Here’s a look at some quilts with the quilt block using applique Option A and Option B; with sashing and without.

Vintage Heart Quilt Block Pattern
I hope you love this quilt block as much as I do! Just click the button below to download the pattern. If you’re reading this in an email, you may need to go to my blog to see the button.
Thanks for reading through this post! I hope you make some of your own Vintage Heart Blocks and create something special with them.


Discover more from The Crafty Quilter
Subscribe to get the latest posts sent to your email.


Just made it. Sooo cute. Thank you so much,
Thank you for this sweet pattern. I have been working on a project with hearts and this will really make it pop! Love this!
You are SO sweet and wonderful
I want to make some pretty table toppers like this.
Thank you so very much for this pattern. You are generous and lovely
Beautiful quilting! Thank you for the pattern
This is a lovely pattern. Thank you! Happy Valentine’s Day!
Julie, I’ve seen the news reports of the terrifying weather in your area. I hope you are safe and sound!!
After having seen your heart quilt and before you created the pattern I wanted to make it. So I used charm squares. It was much bigger of course but turned out great.
Trying to upload photo with no luck.
Love this block, thank you! Can’t wait to make it.
Julie, thanks so much for your generosity! I love the pattern you shared and all the great tips you always have for us. I am constantly learning new ways of doing blocks and different techniques to update older methods from you.
Cheers, have a fabulous February!
❣️thank you for gifting your vintage heart block pattern ❣️
You are so generous in sharing your knowledge and ideas
Very much appreciated Julie. Thanks
It’s so pretty! This would look good in so many different colorways. Thank You 🙂
Julie, thank you for sharing such a cute and appropriately timed block. I was just tasked with making my granddaughter some Valentine’s placemats and here you are! You are so generous to us and much appreciated!
So sweet; both the block and you! 🙂
This is such a pretty block! Thank you for the pattern and your alternate ideas.
Thank you so much for the BEAUTIFUL! Vintage Heart Block pattern. I like how unique it is and it is just such a sweet reflection of your work! I love it and thank you for sharing!
Very pretty and easy to make the colors is perfect for me thanks for sharing your projects. This is Alma Reimer by the way I am going to make it
Julie,
So adorable! Thank you for sharing this pattern.
This is such a cute block with so many possibilities. I can see it as the center for some Valentine placemats. Great gifts for your favorite people. As always, Julie, thank you for so many wonderful ideas.
Thank you for another sew cute pattern. I can’t wait to try it. You are so very generous with your ideas and we are the lucky recipients.
Thank you so much for the beautiful Vintage Heart Quilt Block pattern.
Julie, you are so generous with your patterns. This is sooooooooooooooo beautiful, Love it, Thank you