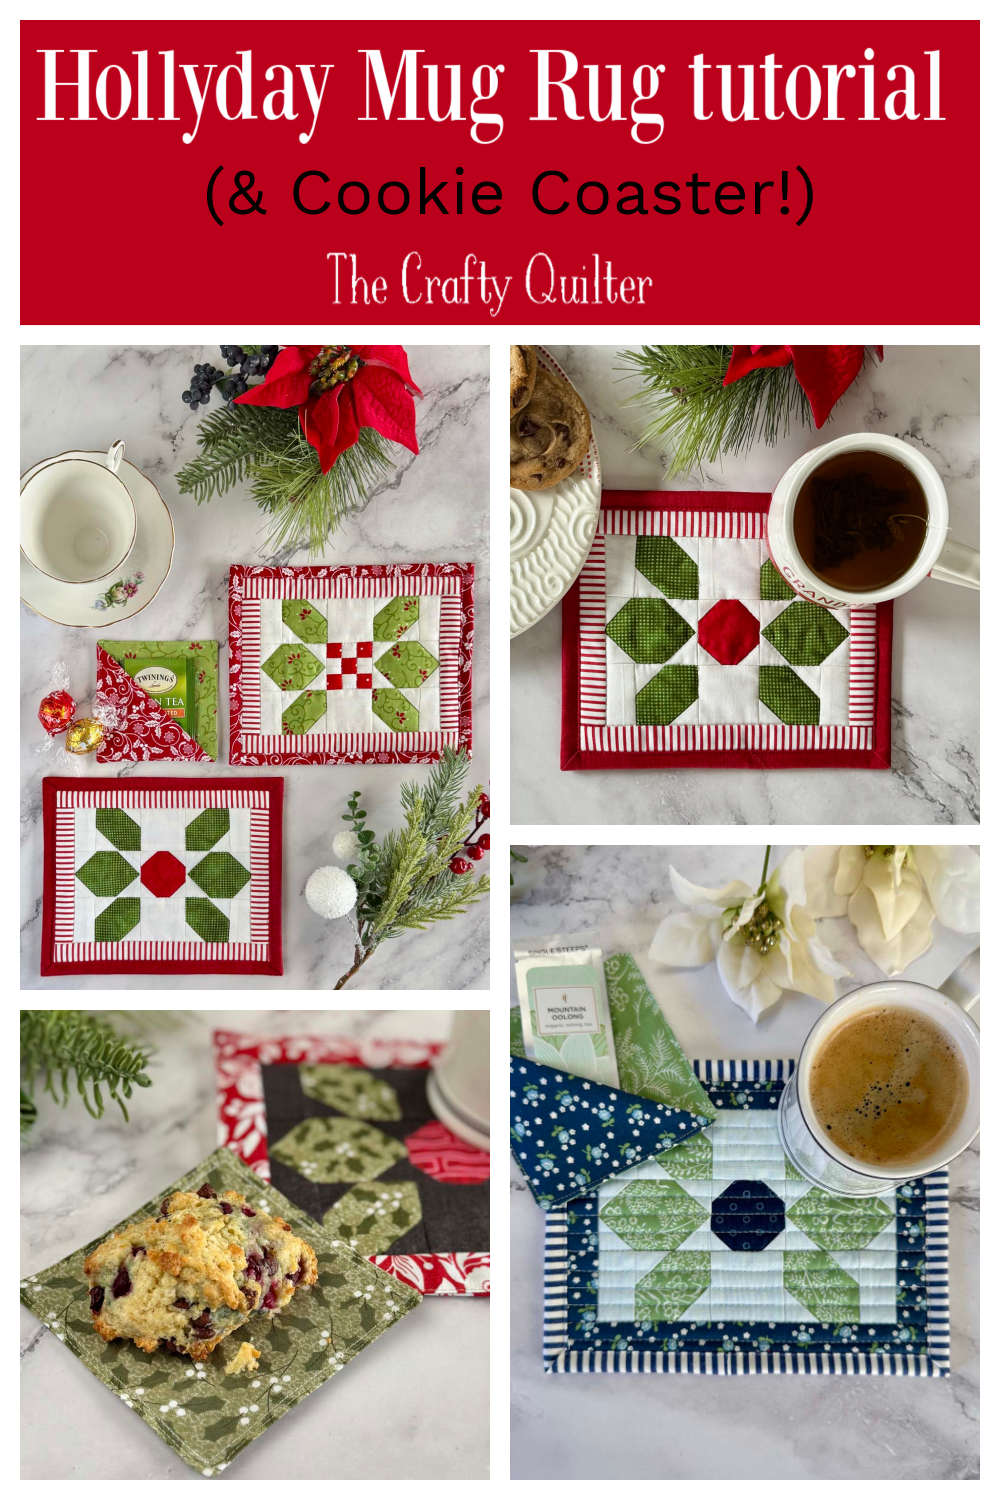
Hollyday mug rug & cookie coaster tutorial
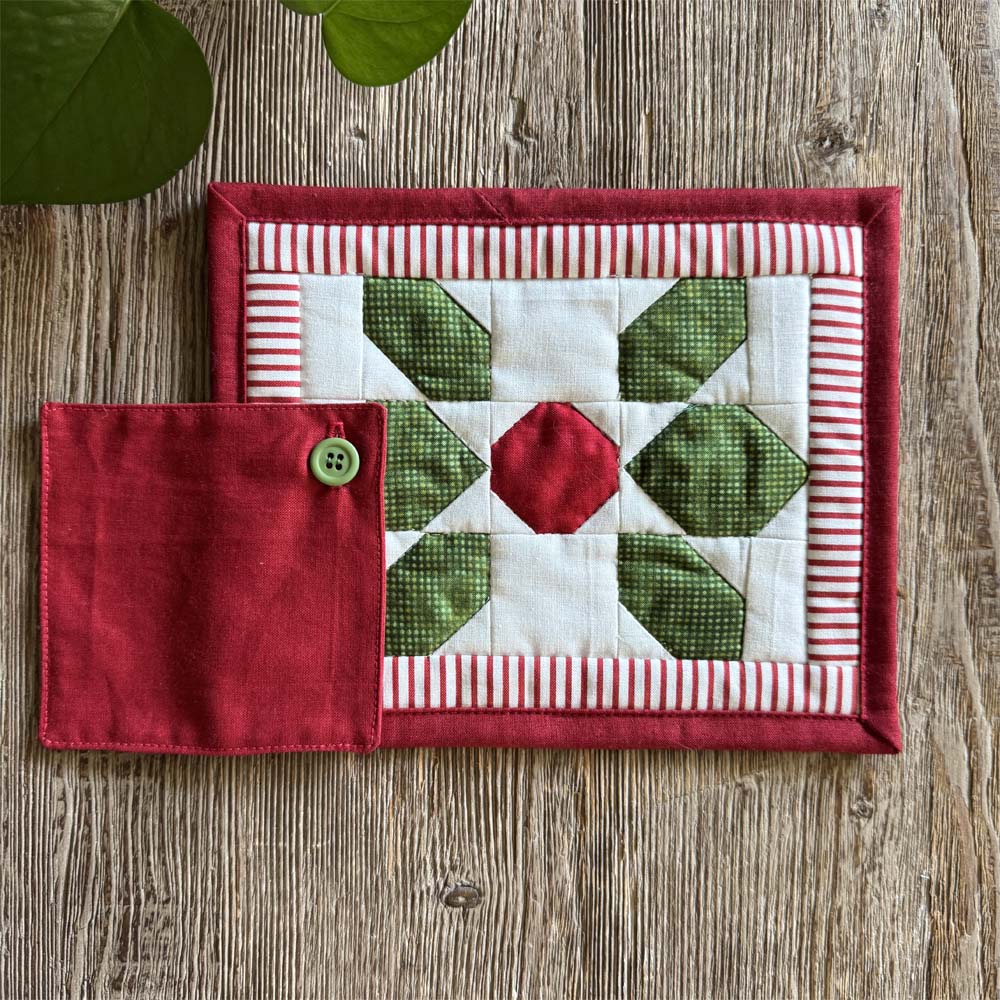
Happy holidays, my friends! ‘Tis the season for gift making, especially the quick and easy kind. My new Hollyday Mug Rug tutorial is here, and I’ve added an optional cookie coaster to make it extra sweet! Mug rugs make the best gifts and this one can be adapted to suit anyone on your list.
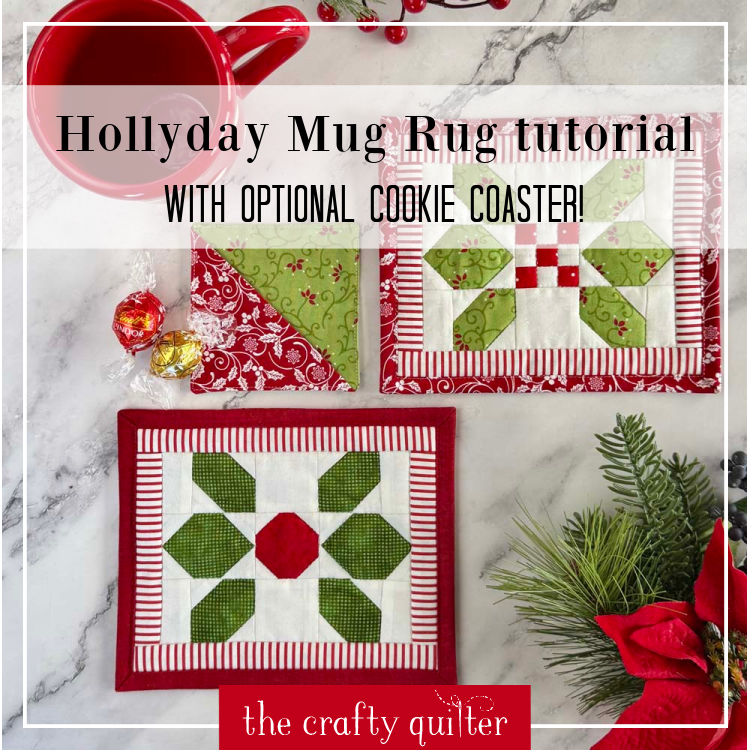
About the Hollyday Mug Rug
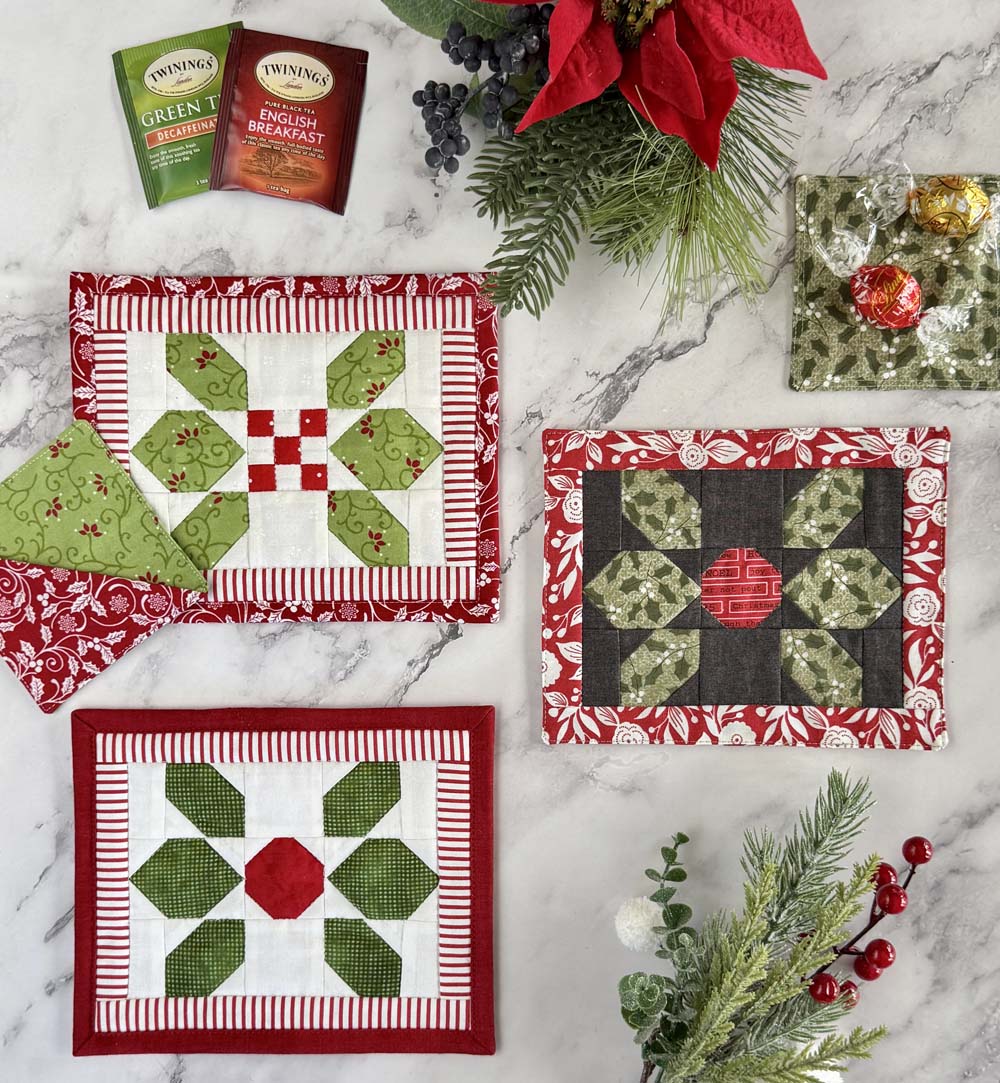
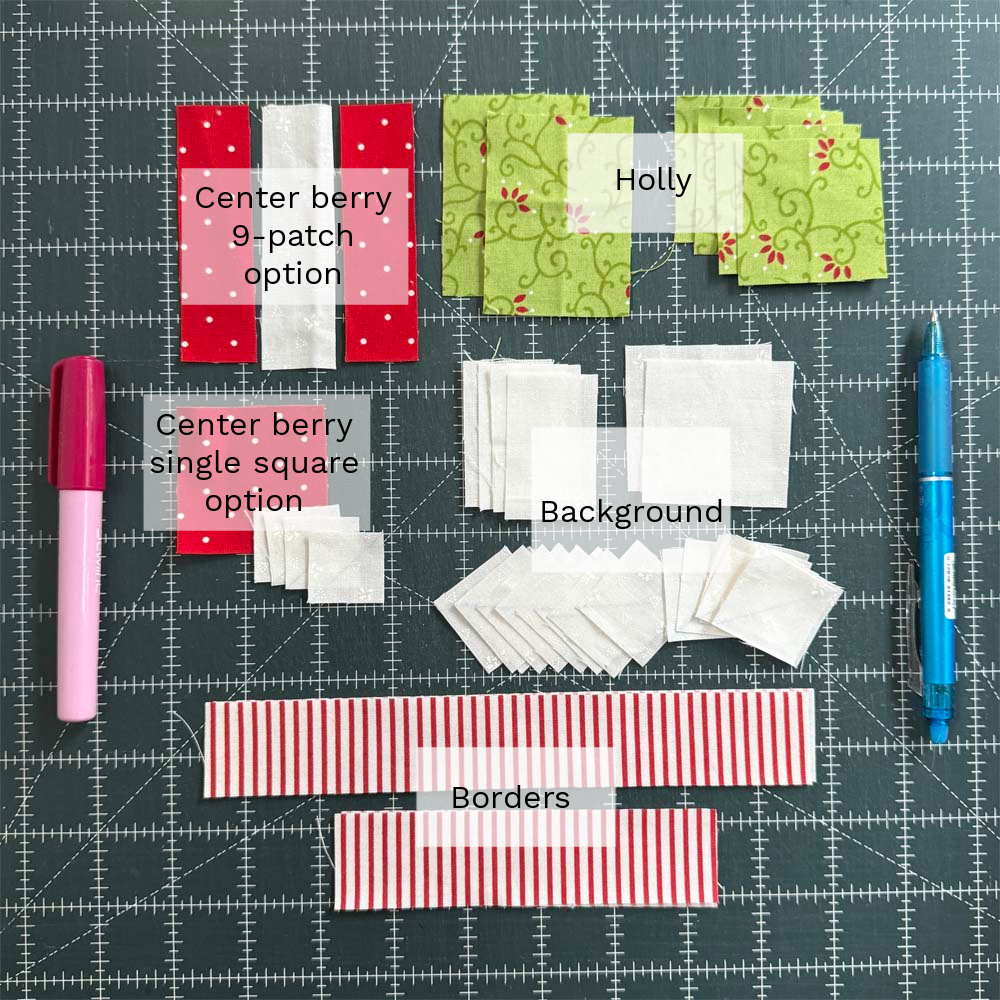
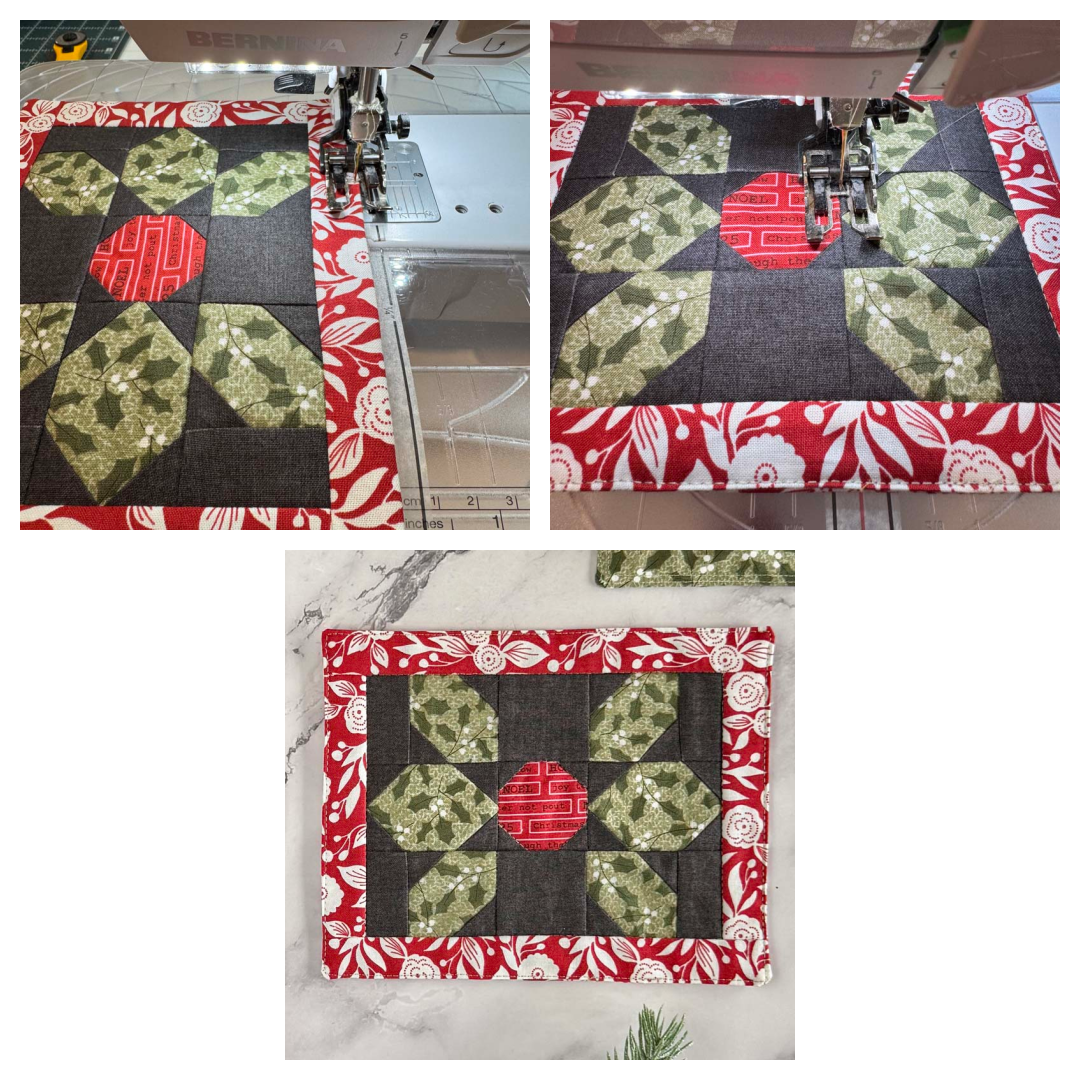
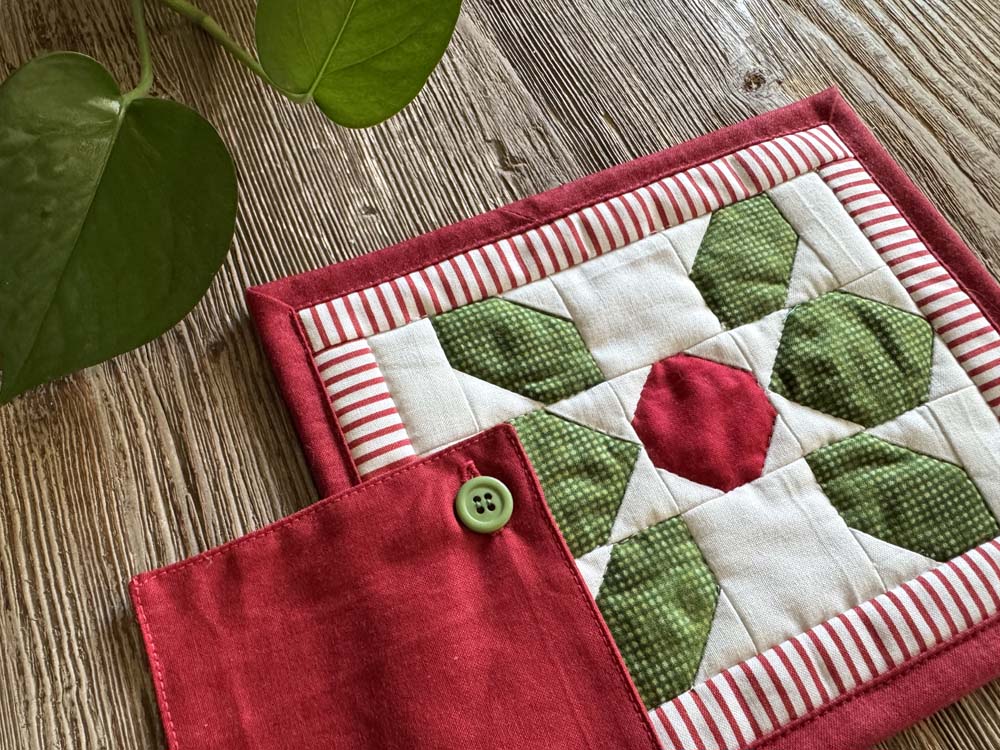
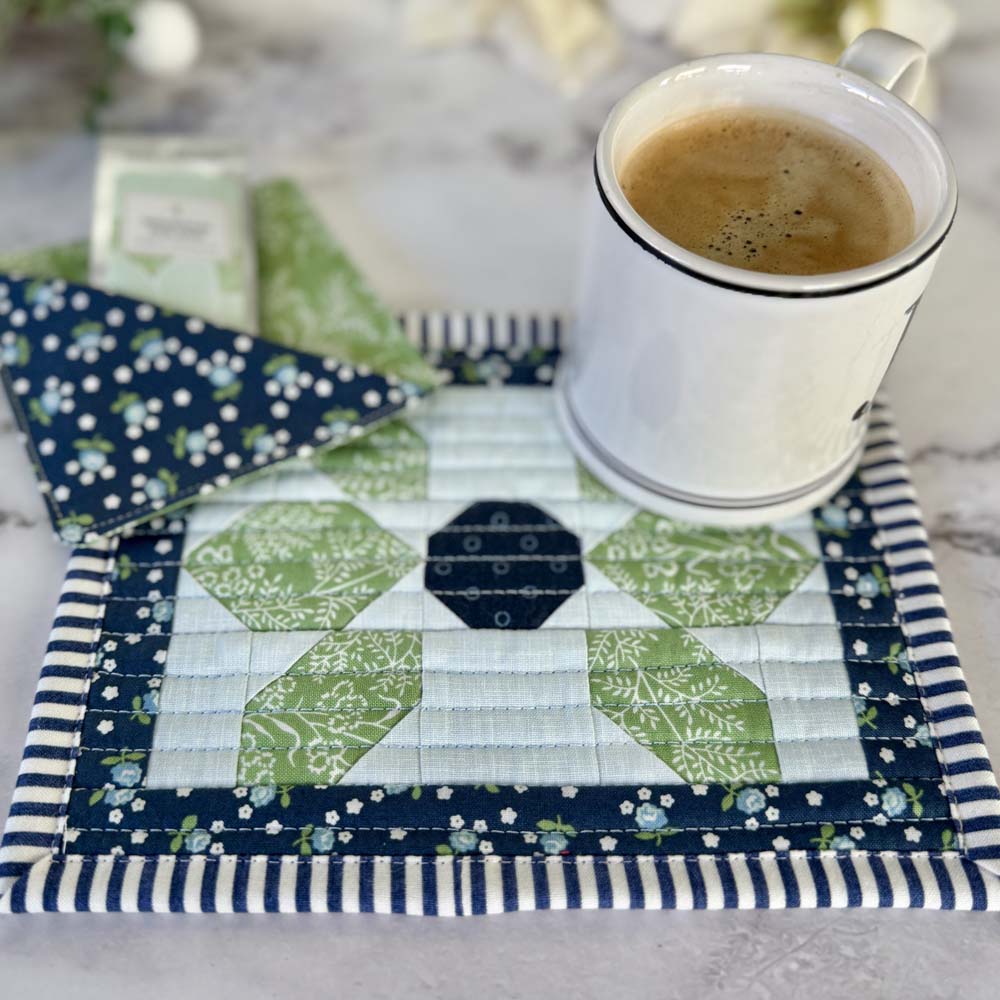
The Hollyday Mug Rug is full of options to make it the perfect holiday gift. It’s accented with holly leaves around a single berry (or 9-patch berries if you prefer). It’s so easy to swap out the central berry for multiple berries of the 9-patch kind.

It measures 6.5″ x 8″ and it can be made with or without binding. The no-binding option is a self-binding technique (also known as the “pillowcase” method) which is faster and easier to complete than traditional binding. It also gives it less of a quilt-y look than an edge with binding.
About the Cookie Coaster
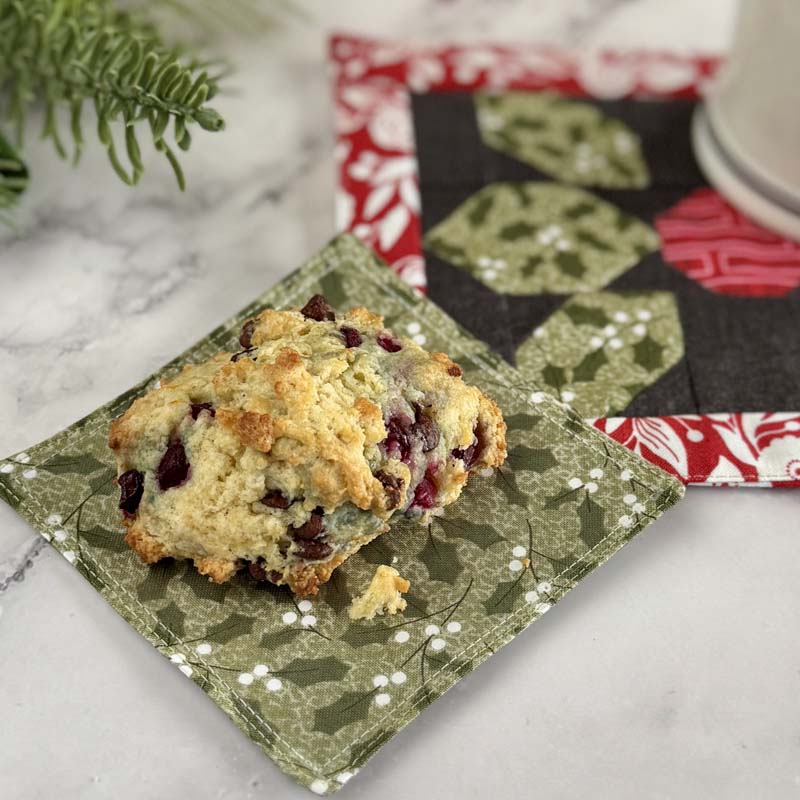
Is it just me or do you also find it worrisome to place a cookie (or any food item) on top of a beautiful mug rug? Even though mug rugs are washable, I hate to see chocolate or oil stains left on them. I came up with the idea of a separate cookie coaster to act as the perfect landing spot for something sweet or savory! It can be washed easily by hand or machine, leaving the mug rug clean and pretty.
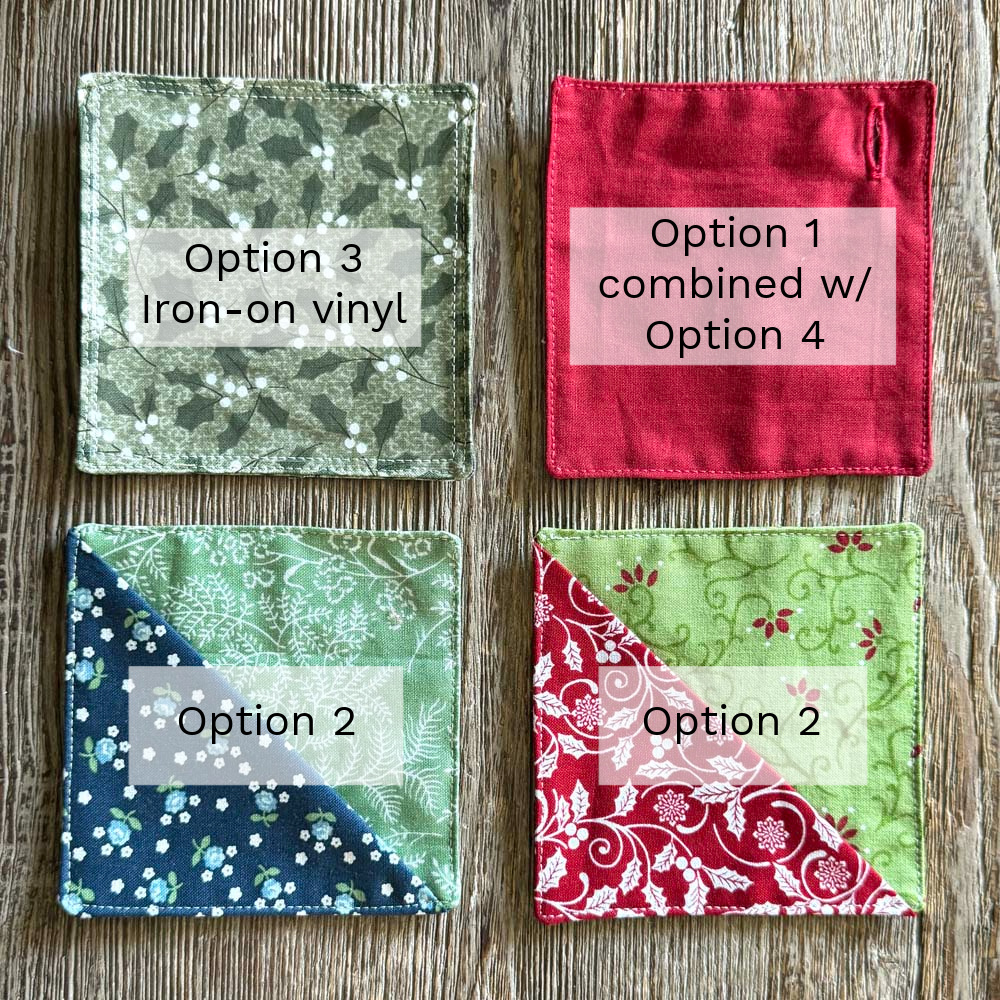
The Cookie Coaster has options built into it as well.
Option 1 is basic with two squares sewn together and topstitched.
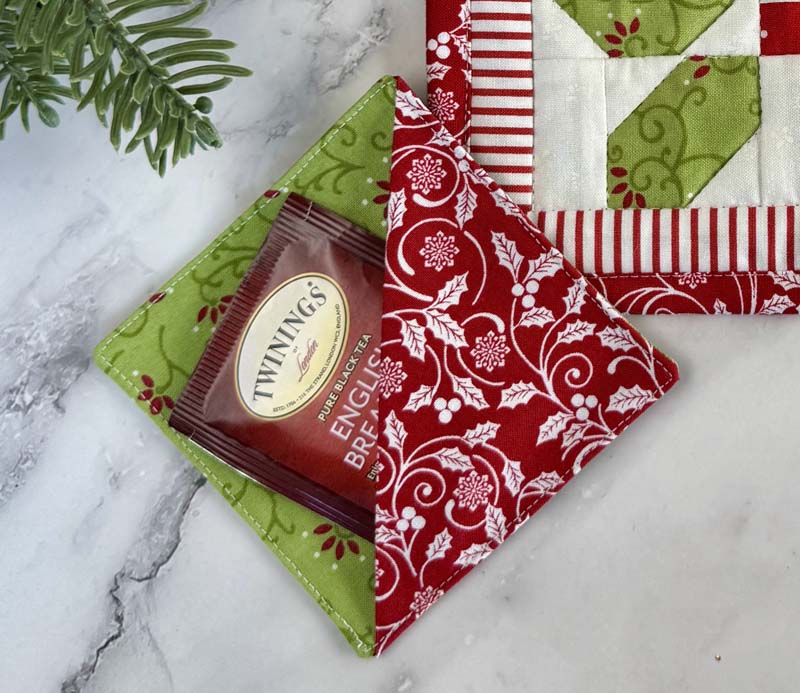
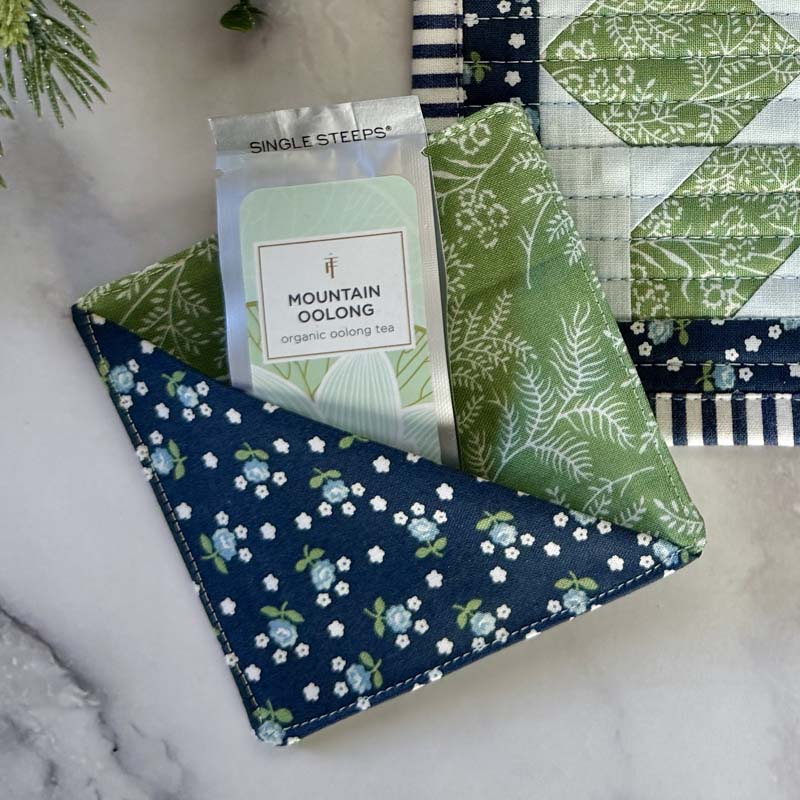
Option 2 includes a folded triangle that acts as a pocket for a gift card, tea bag, or a sweet treat.
Option 3 includes the addition of Heat ‘n Bond Iron-on Vinyl adhered to one side of the Cookie Coaster. This makes it resistant to water and stains, and allows for easy clean up with a cloth.
And there’s an Option 4 (because why not?) This buttonhole option provides a form of attachment to the companion mug rug by means of a button.
HollyDay Mug Rug Tutorial
- Please read through the instructions before beginning this project.
- All seam allowances are 1/4″.
- RST = right sides together.
- There are two options for the center berry(s). Choose one and follow the instructions accordingly.
Note: This is a free tutorial that has not been tested or tech-edited. If you feel there are inaccuracies, please leave a comment or contact me by email.
Supplies
- Background – (1) fat eighth or large scrap
- Holly – (1) fat eighth or large scraps
- Center berry(s) – scrap larger than 3.5″ square
- Border – (1) fat eighth or large scrap
- Binding (optional) – (1) 2.25″ x 30″ strip
- Backing – (1) fat quarter or scrap measuring at least 8.5″ x 10″
- Batting at least 8.5″ x 10″ OR fusible fleece, 6.5″ x 8″
- Erasable marker
- Glue pen (optional)
TIP: glue pens (and sticks) are perfect for holding small pieces together instead of pins.
Cutting Instructions
Background
- (2) 2″ squares
- (16) 1.25″ squares
- (4) 1.25″ x 2″ rectangles
- OPTION 1: (4) 1″ squares (single berry)
- OPTION 2: (1) 1″ x 3.5″ rectangle and (1) 1″ square (9-patch berries)
Holly
- (2) 2″ x 2.75″ rectangles
- (4) 2″ squares
Berry(s)
- OPTION 1: (1) 2″ square for single berry
- OPTION 2: (2) 1″ x 3.5″ rectangles
Border
- (2) 1.25″ x 5″
- (2) 1.25″ x 8″
Binding (optional)
- (1) 2.25″ x 30″ strip
Piecing Instructions
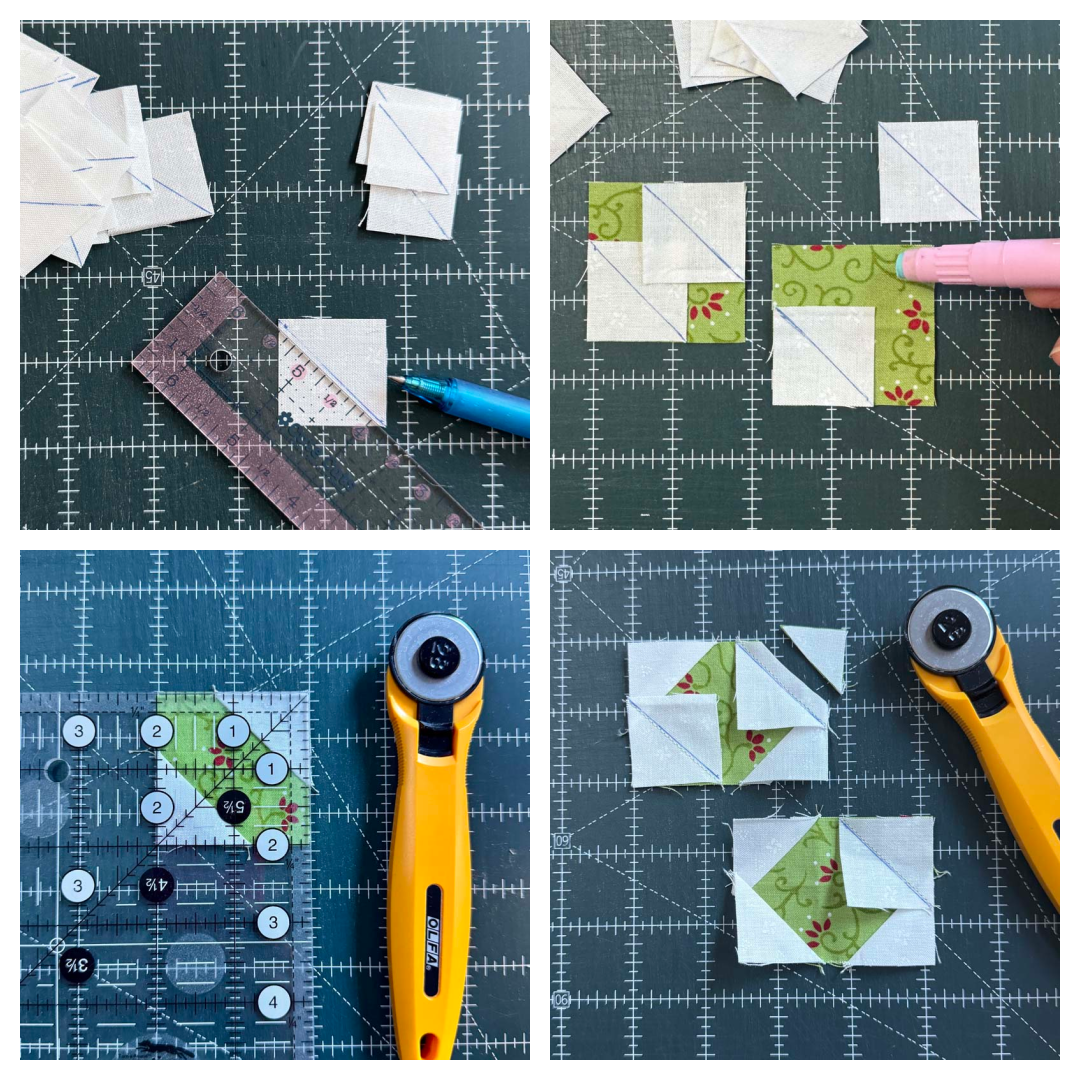
Holly Units
- Draw a diagonal line from corner to corner on the wrong side of each background (1.25″) square.
- Place a marked background square RST on opposite corners of each 2″ holly square.
- Stitch on the marked line, trim the seam allowance, and press to the corner to make four short holly leaves. Check that it measures 2″ square and trim if necessary.
- Place a marked 1.25″ square RST on opposite corners of the 2″ x 2.75″ holly squares.
- Stitch on the marked line, trim the seam allowance, and press to the corner.
- Repeat on the remaining corners to make two long holly leaves that measure 2″ x 2.75″. Check size and trim if needed.
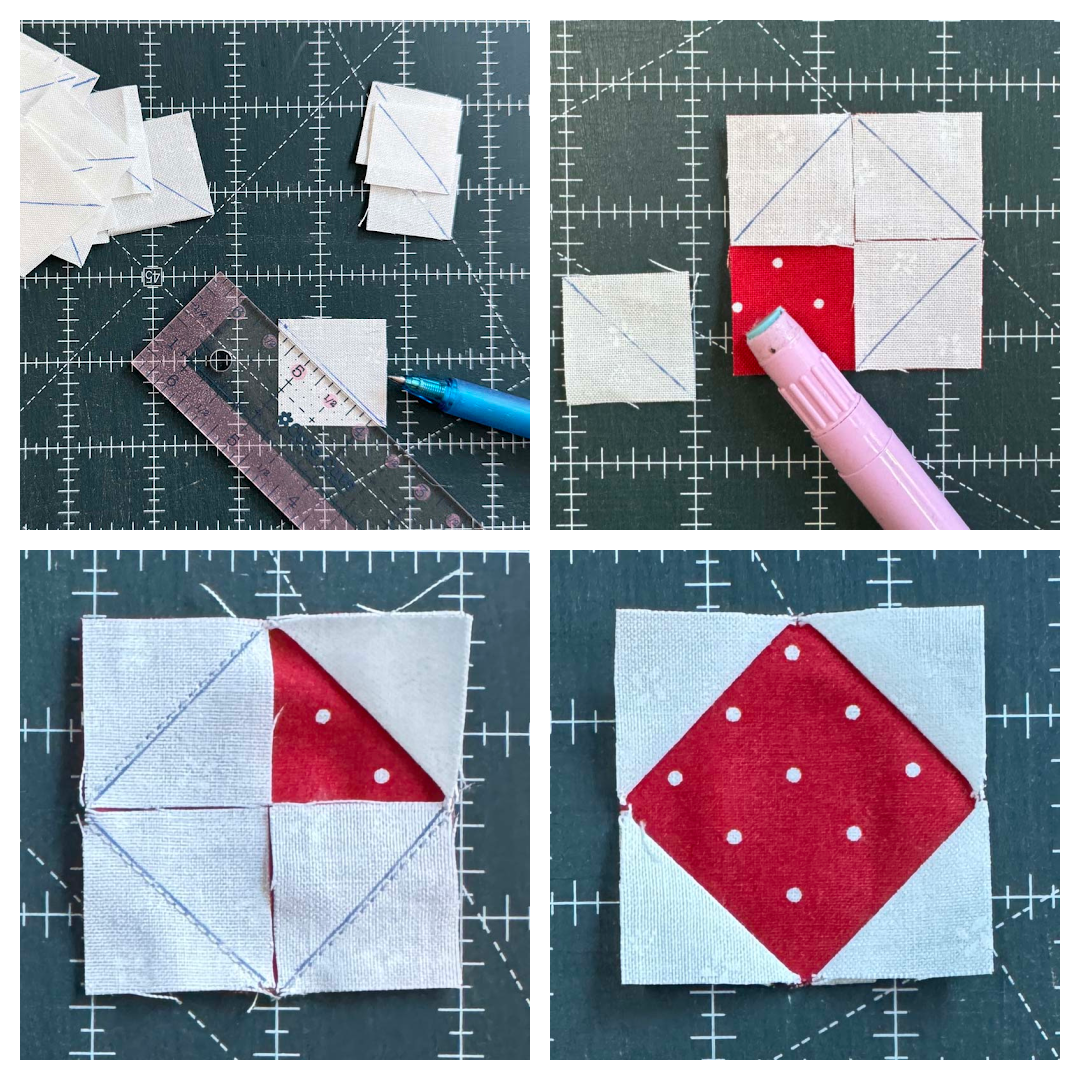
Center Berry (Option 1)
- Draw a diagonal line from corner to corner on the wrong side of each background (1″) square.
- Place a marked background square RST on each corner of the 2″ berry square.
- Stitch on the marked line, trim the seam allowance, and press to the corner to make one center berry. Check that it measures 2″ square and trim if necessary.
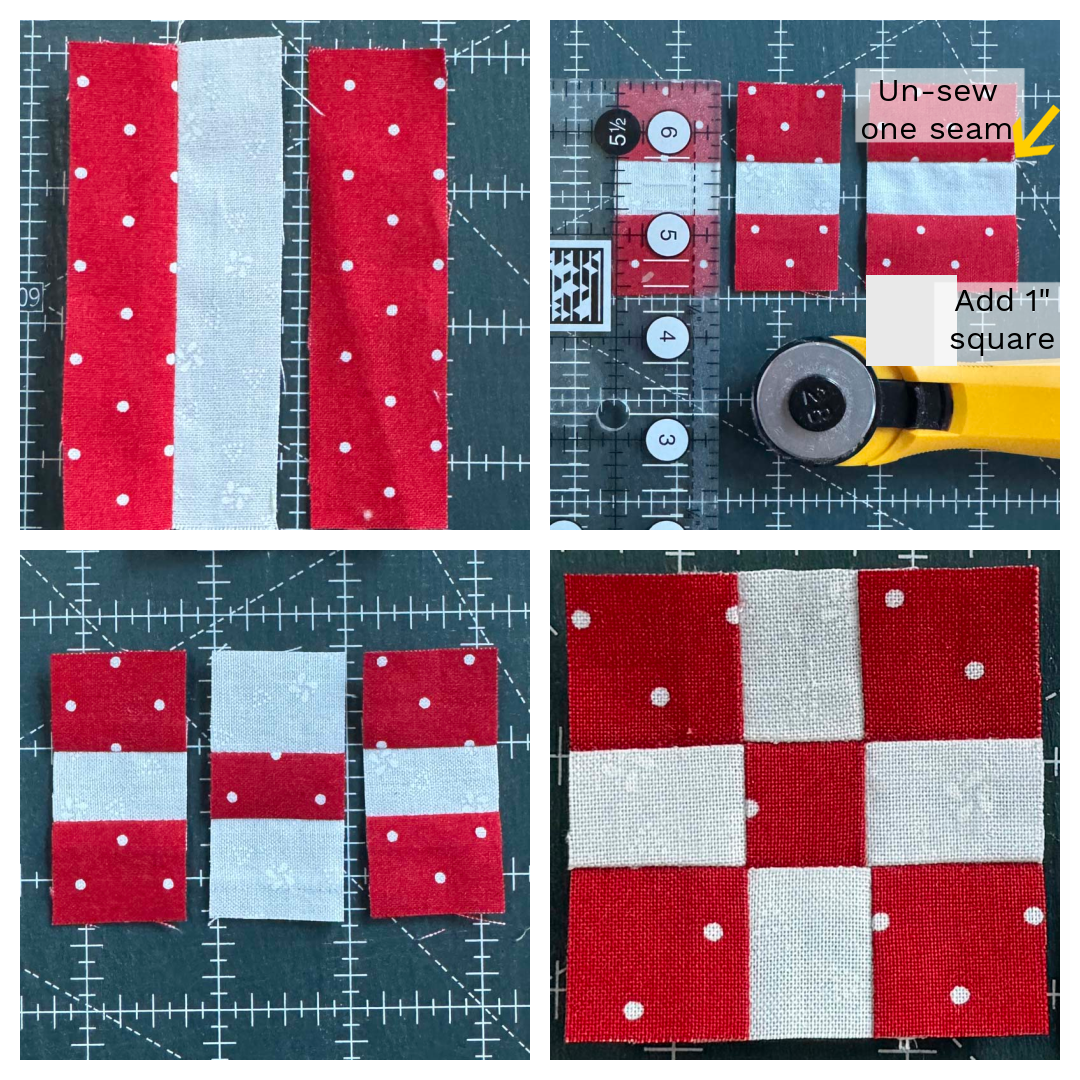
9-patch Berries (Option 2)
- With RST, sew the (2) 1″ x 3.5″ berry rectangles and the 1″ x 3.5″ background rectangle together to form a strip set.
- Press towards the berry fabric.
- Cut the strip set into (3) 1″ wide segments.
- Take one of the segments and un-sew one seam and replace with a 1″ background square.
- Sew the three segments together, matching seam intersections, to form a 9-patch. It should measure 2″ square.
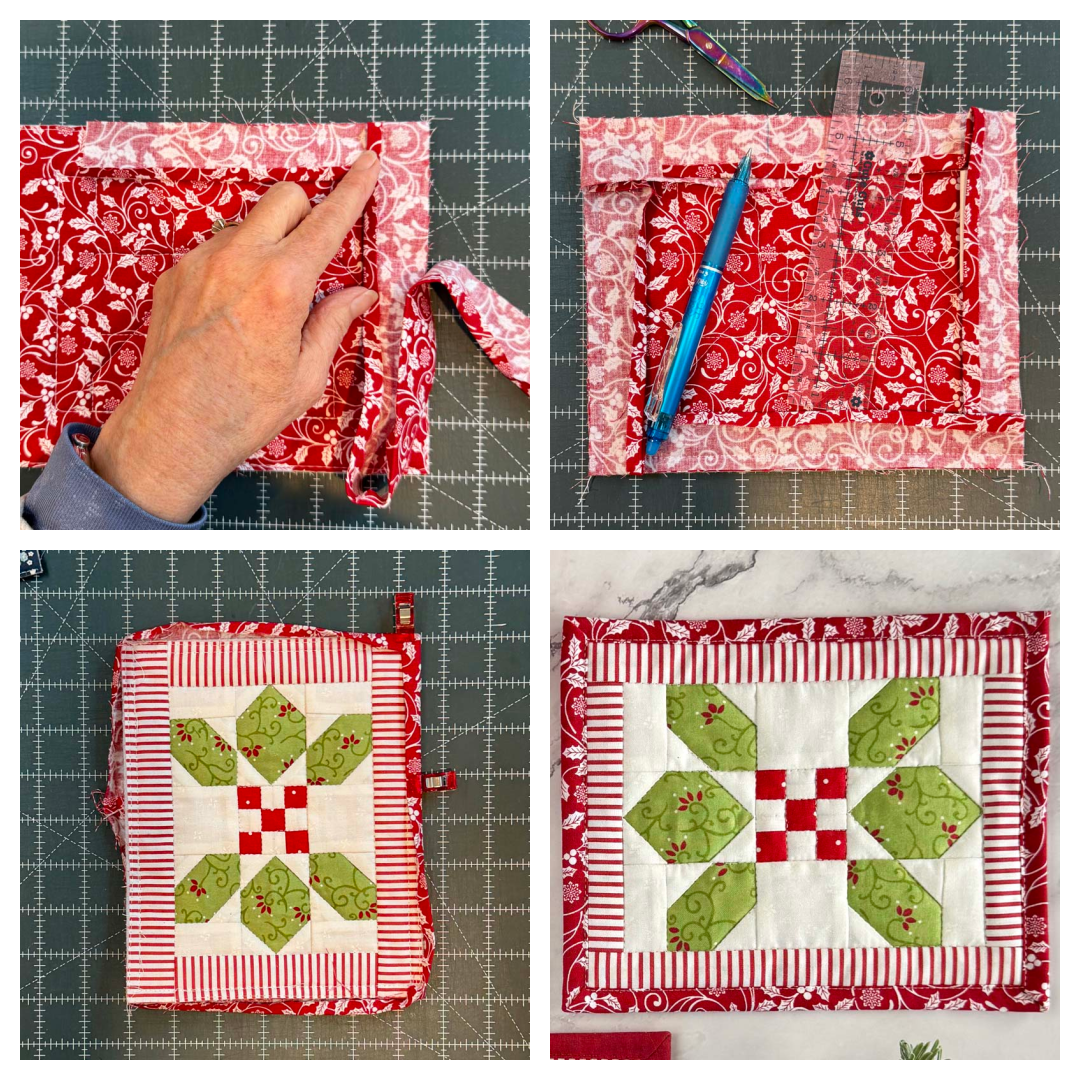
Assembly instructions
- Arrange the holly units, center berry(s), (4) 1.25″ x 2″ background rectangles, (2) 2″ background squares as shown in photo steps below.
- Sew units into rows and press as indicated by arrows.
- Sew rows together. Press row seams away from the center or open.
- Center mug rug should measure 5″ x 6.5″. Trim if needed.
- Sew the 1.25″ x 5″ borders to each side of the center mug rug.
- Sew the 1.25″ x 8″ borders to the top and bottom.

Finishing with binding option
If you’re not using binding, skip to the self-binding option.
Quilting
- Layer the mug rug top, 8.5″ x 10″ batting and backing and baste layers together.
- Quilt the layers. I stitched in the ditch for three samples and I stitched straight line stitches .5″ apart for one sample.
- Trim edges even with top. (I like to machine baste along the raw edges before trimming).
Binding
- Apply binding using your favorite method. I used traditional binding with a 2.25″ wide strip for two of the samples, and I used single fold binding at 1 3/8″ wide for one sample. See my tutorial for mug rug binding tips here for details.
- In all cases, I stitched the joining tails of the binding with a straight 1/4″ seam allowance because there’s very little room for a diagonal seam here. For this, I overlapped the binding tails by 1/2″ and trimmed. Then stitched them together with a full 1/4″ seam.
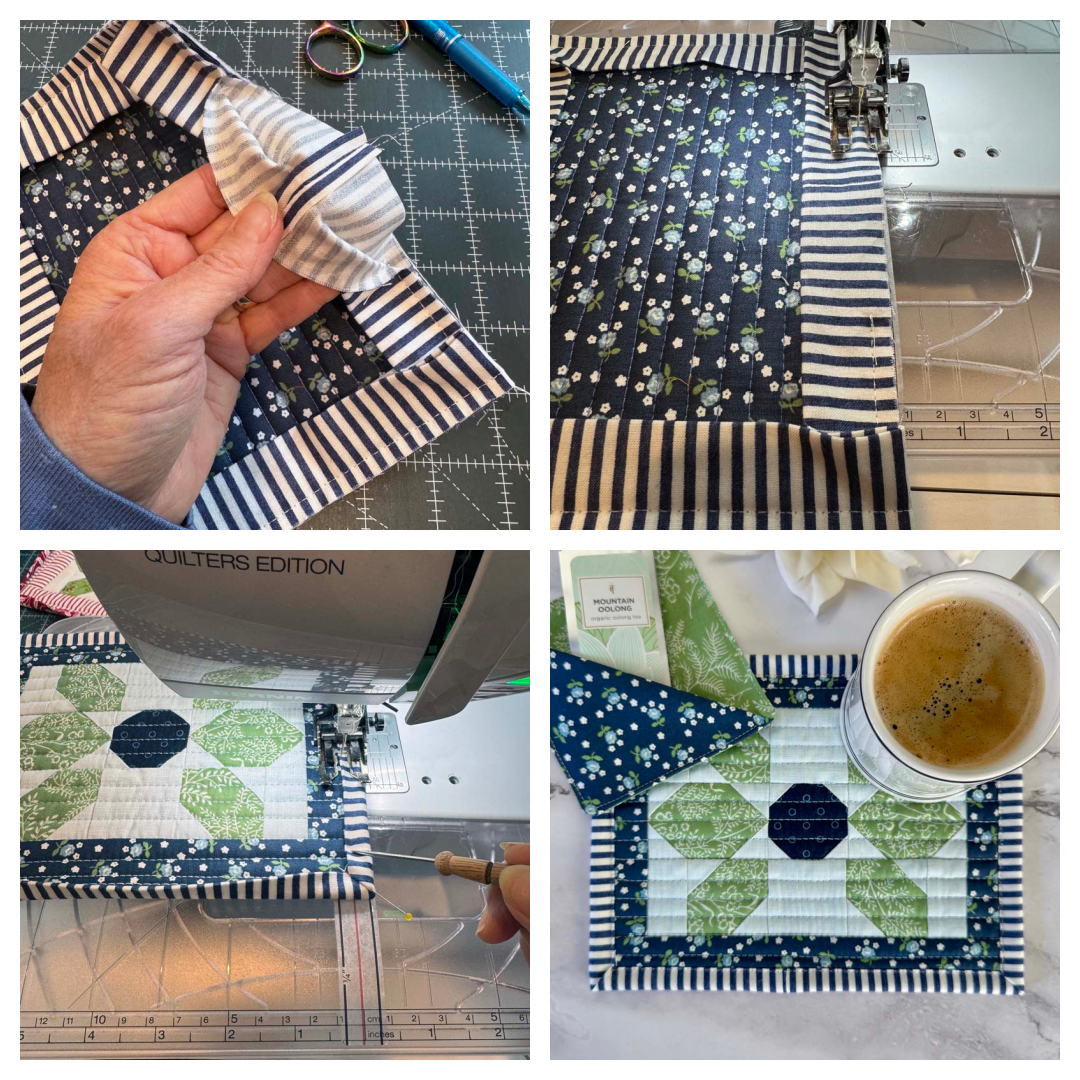
Finishing with self-binding option
This finishing option creates a flatter mug rug and is very easy to do. If you don’t have fusible fleece, you could use a medium-weight fusible interfacing or thin layer of cotton batting (which would require basting).
- Cut a 6.25″ x 7.75″ rectangle of fusible fleece.
- Cut a 6.5″ x 8″ rectangle of backing fabric.
- Fuse the fusible fleece to the wrong side of the backing fabric following the manufacturer’s instructions.
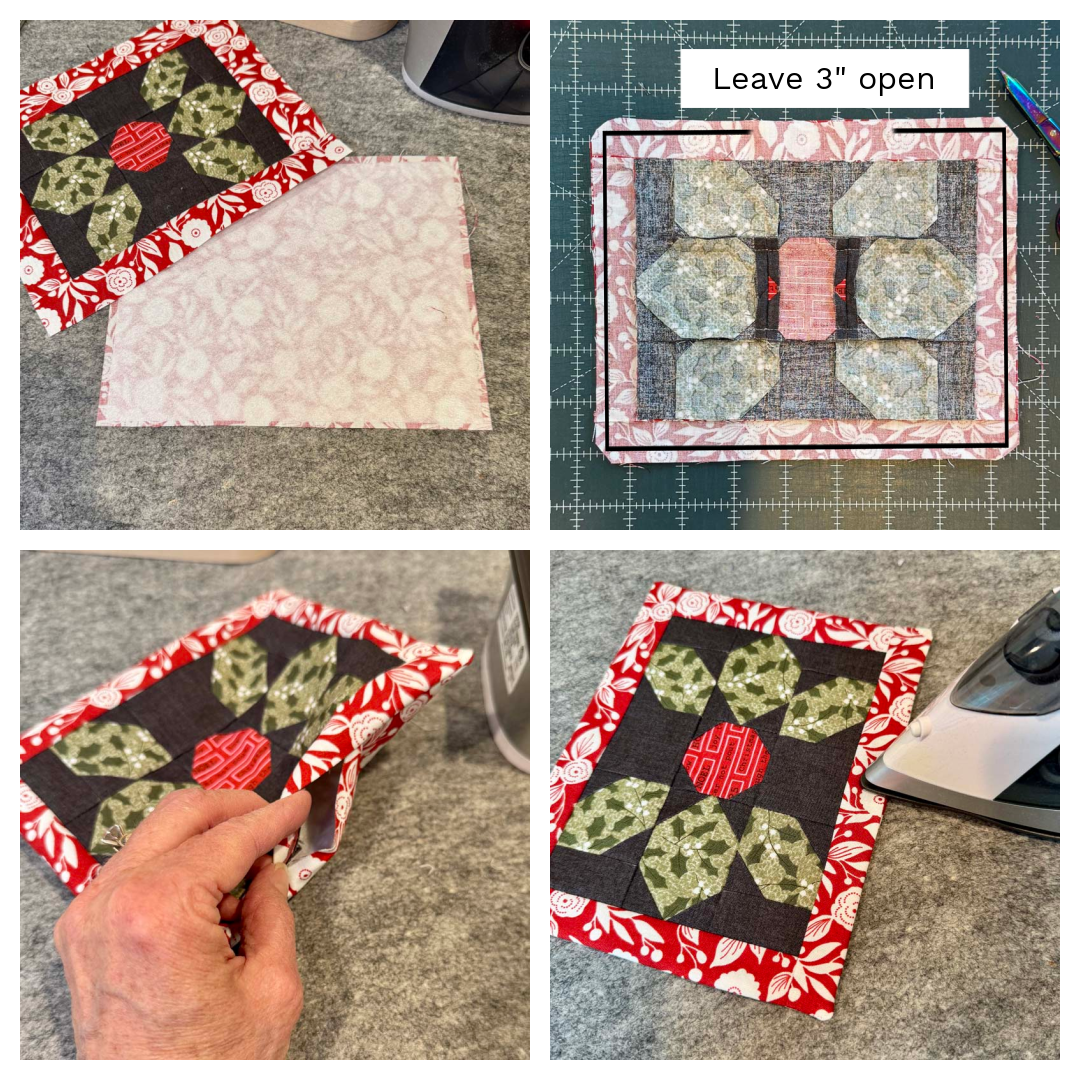
- With RST, sew the mug rug top and the prepared backing with 1/4″ seam along all four sides, leaving a 3″ wide opening on one long edge.
- Clip the corners and turn right side out.
- Press the edges, turning in the seam allowance along the opening.
- Edgestitch all the way around, sealing the opening closed.
- Quilting is not necessary, but I chose to stitch in the ditch along most seams.
Cookie Coaster tutorial
The Cookie Coaster is an optional component that will work with any mug rug. There are four alternatives when making the Cookie Coaster. You can combine them anyway you like:
- Option 1 is to make it simple with two squares sewn together.
- Option 2 is to add a corner pocket to one side.
- Option 3 is to add an iron-on vinyl coating to one side, making it resistant to stains and easy to clean.
- Option 4 is to add a buttonhole to one corner which would provide a way to attach the cookie coaster to a mug rug with a button.
Supplies and cutting
- Fabric to match the mug rug, cut into (2) 4.5″ squares
- Pocket Option: Contrast fabric, cut into (1) 4.5″ square
- Vinyl Option: Heat ‘n Bond Iron-on Vinyl (mat or gloss), cut into (1) 3.75″ square
- Attachment Option: One button
- Coordinating thread for topstitching
Instructions
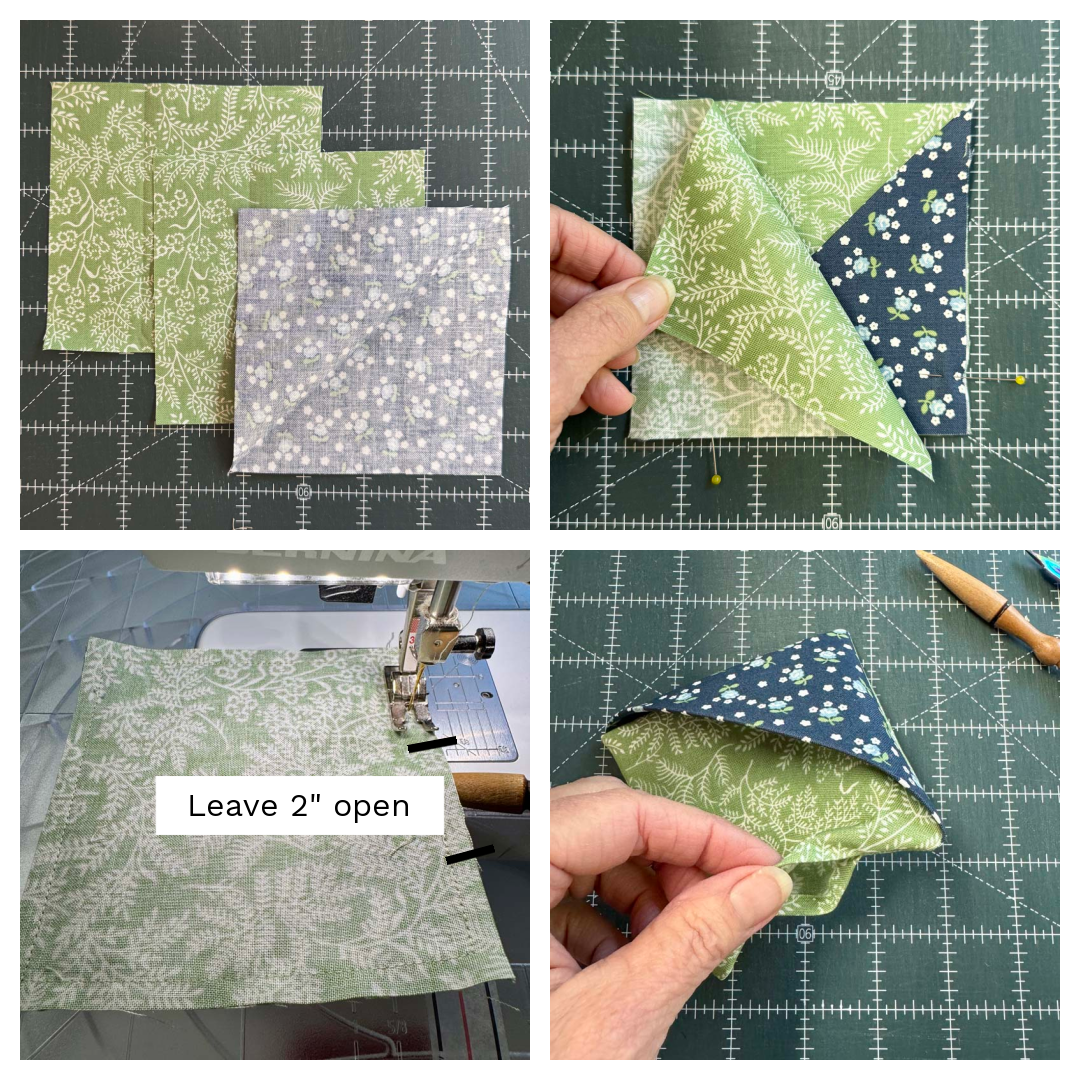
If using Option 2 (corner pocket), follow the instructions in Steps 1-2. Otherwise, skip to Step 3.
- Fold the contrast 4.5″ square in half diagonally, with wrong sides together to create a triangle. Press.
- Place the the triangle on the right side of one 4.5″ square, matching raw edges. Pin in place.
- With RST, sew the 4.5″ coaster squares together, leaving a 2″ wide opening along one side.
- Clip corners and turn right side out.
- Press the edges, turning in the seam allowance along the opening.
- Topstitch close to the edges, sealing the opening closed.
- For Option 3, adhere the iron-on vinyl to one side of the coaster according to the manufacturer’s instructions. Topstitch close to the edge of the vinyl to secure.
- For Option 4, create a buttonhole in one corner of the coaster. Attach button to the mug rug.

PDF download
I’ve made an ad-free pdf that you can download for free through the end of the year! It will be available in my Etsy Shop starting January 1, 2026.
The Hollyday Mug Rug and Cookie Coaster would make a great gift for anyone who enjoys their tea or coffee and a sweet snack. That’s me in the afternoon! Even though there are holly leaves in this project, you can change the theme with your choice of fabric making it suitable for any time of year.
As you can see, the Hollyday Mug Rug has many options depending on your time and needs. Make it with or without the Cookie Coaster and choose to use binding or try the self-binding option. Whatever you decide, I’m sure you will love this project!

P.S. Make sure to Pin the image below so you can find it easily later.

Discover more from The Crafty Quilter
Subscribe to get the latest posts sent to your email.
Thank you for the cute projects. Have a wonderful Christmas with your family!
love it, thank you so much
Thank you so much! What a beautiful pattern. I love all the options you included for the cookie coasters. They are perfectly practical yet simple ideas. A nice gift that can keep giving – from you to me and from me to my friends and family. May you have a Merry Christmas and wishing you and your family many blessings in the coming year.
This is a sweet pattern, thanks for sharing! I love the idea for the cookie coaster – so needed at times to prevent the treat from messing up the pretty mug rug…brilliant.
This is adorable. Love making coasters to go with some hot chocolate packets and marshmallows, along with a few special cookies. Thank you very much. It is so appreciated.
Julie, the Holly mug rug is so cute!
Thanks for your great tutorial.
Joanne
Thank you so adorable!
Not time for this year but a great idea to embrace and hope this is downloadable to me.
Merry Christmas and Happiest of New Year!
m
Thank you!