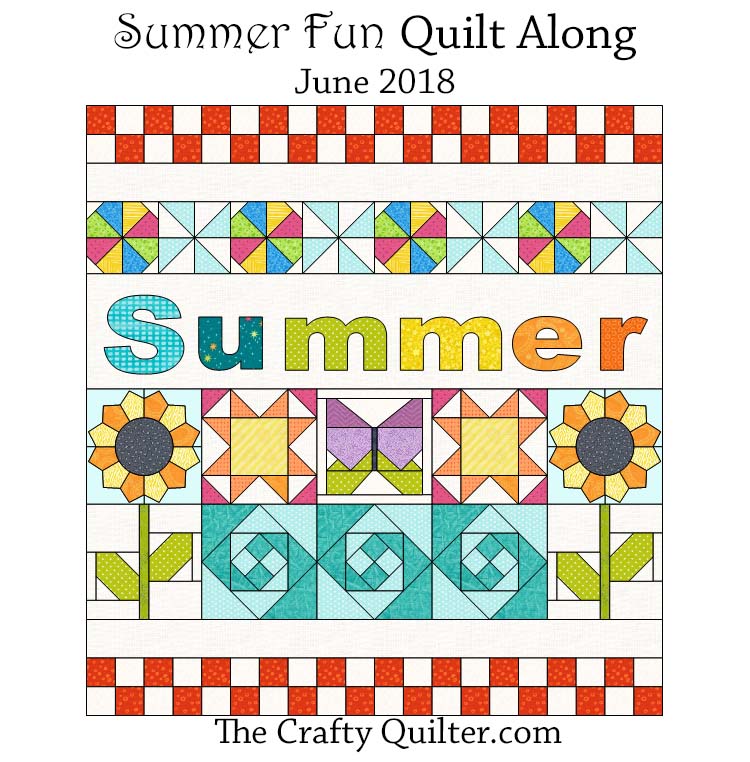
Summer Fun Quilt Along, week 3
Welcome to Week 3 of the Summer Fun Quilt Along ! Today we will tackle the sunflower and stem block. And I did have to do some tackling on this one! Getting the sunflower to be the right size took a bit of trial and error.
I intended to make the sunflower from a traditional Dresden Plate block. And I did, but it wasn’t easy getting the size correct because my blades are chunkier. (Check out my original Dresden Plate Tutorial for more size options.) I tried two methods and I’ll show you both, but one involves templates and the other uses a special ruler.
You’ll also have the option of making a hexagon flower using English paper piecing (EPP) techniques. That’s a nice way to go if you want to do some hand piecing on the go, especially if you’re traveling.
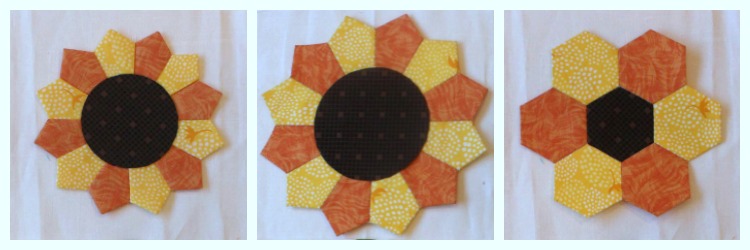
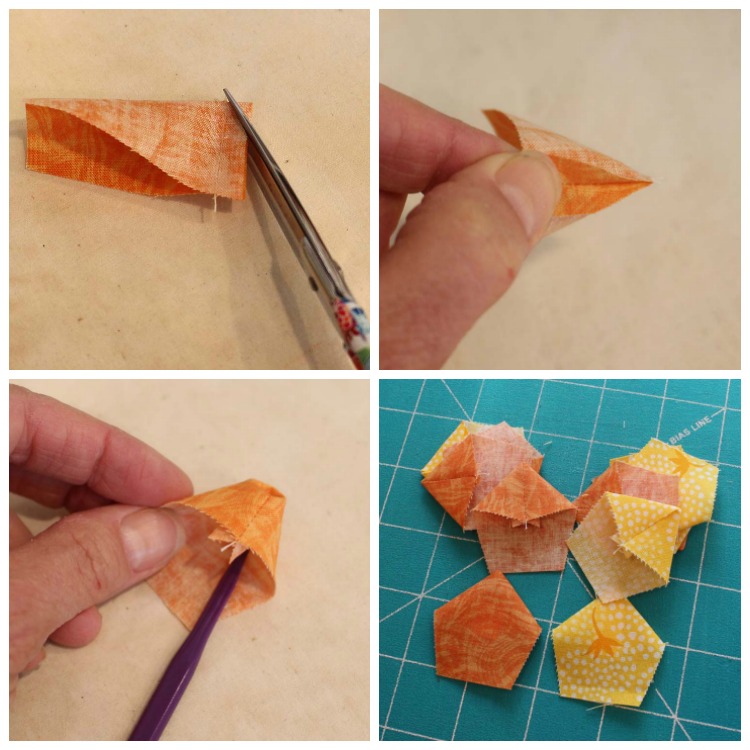
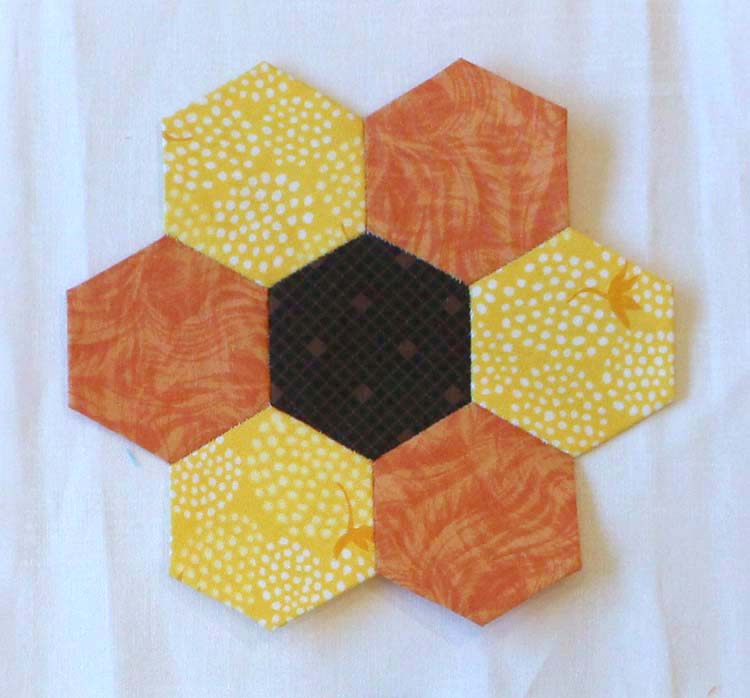
Here is a comparison of the three sunflower blocks. On the left is the traditional Dresden technique using a 30° triangle ruler. In the middle is a Dresden block using templates and sewn together by machine. On the far right is a hexagon flower using English paper piecing by hand. Personally, I like the middle flower. It looks like a big, fat sunflower to me.
Here are the techniques we’ll be working on this week:
- Changing the 1/4″ seam allowance to suit your needs 😉
- Making a Dresden quilt block two different ways
- English paper piecing with a hexagon flower (optional)
- Invisible machine stitching
Quilt size: 30″ x 32″ Sunflower and Leaf block size: 6″ finished
All seams are made with 1/4″ seam allowance, unless otherwise stated.
NOTE: Because of the options and complexity of the sunflower block, the pdf instructions will only include templates for the sunflower block and instructions for the stem block. You can download the simplified version of these instructions here: Summer Fun Part 3
Supplies needed for the sunflower and stem blocks:
- 1/8 yard each of yellow and orange fabric for the sunflowers
- Scraps of brown for the sunflower and two green fabrics for the stem block
- 1/4 yard of background fabric for sunflower and stem blocks
- Sunflower templates (see pdf download) above.
- Fusible stabilizer such as Quilter’s Select Print & Piece Fuse Lite
- Fabric glue such as Sewline Water-Soluble Fabric Glue Pen

- Monofilament thread – I like Superior’s MonoPoly
- Simpli-EZ 30-Degree Triangle Ruler by Darlene Zimmerman
Sunflower Block, Dresden technique using Simpli-EZ 30-Degree Triangle Ruler
Cutting Instructions:
- Orange: Cut (1) 2″ x 20″ rectangle
- Yellow: Cut (1) 2″ x 20″ rectangle
- Brown: scraps that are at least 3 1/2″ wide
- Background: Cut (2) 6 3/4″ squares (slightly over-sized)
Assembly Instructions:
1. Place the yellow and orange strips on top of each (it doesn’t matter if they’re right sides together or not).
2. Locate the 1 1/2″ line on the triangle ruler. This is where you’ll line up the bottom of the fabric strip. The top edge will be even with the 3 1/2″ line of the ruler. Cut on both sides of the ruler. Flip the ruler around so that you can cut the next shape and continue until you have six “blades” of both orange and yellow.


3. Fold each blade in half, right sides together, and stitch along the wider end with a 1/4″ seam allowance. Shorten your stitch length to 1.5 or so. This will help prevent the seam from unraveling.
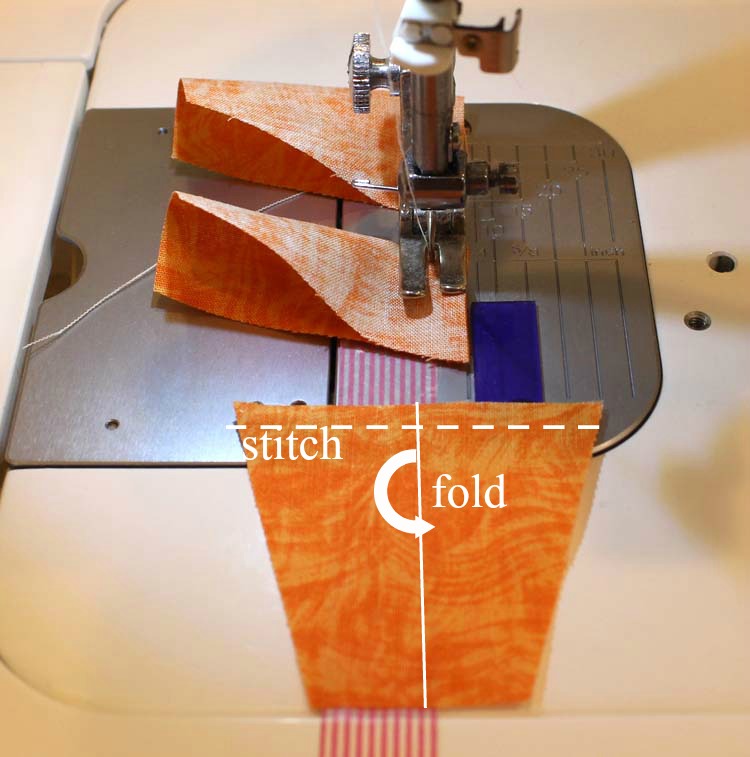
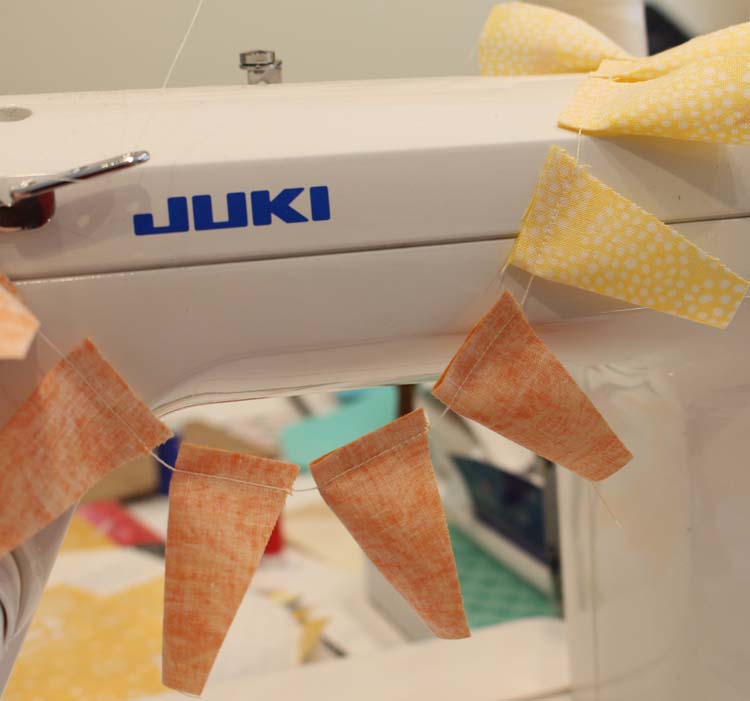
4. Finishing the blade:
- At the folded corner of each blade, snip at an angle just before the seam to reduce the bulk at the point.
- Open the seam allowance with your fingers and then turn right side out.
- Use a point turner (or a purple thang) to poke out the tip.
- Press, making sure the seam is centered.
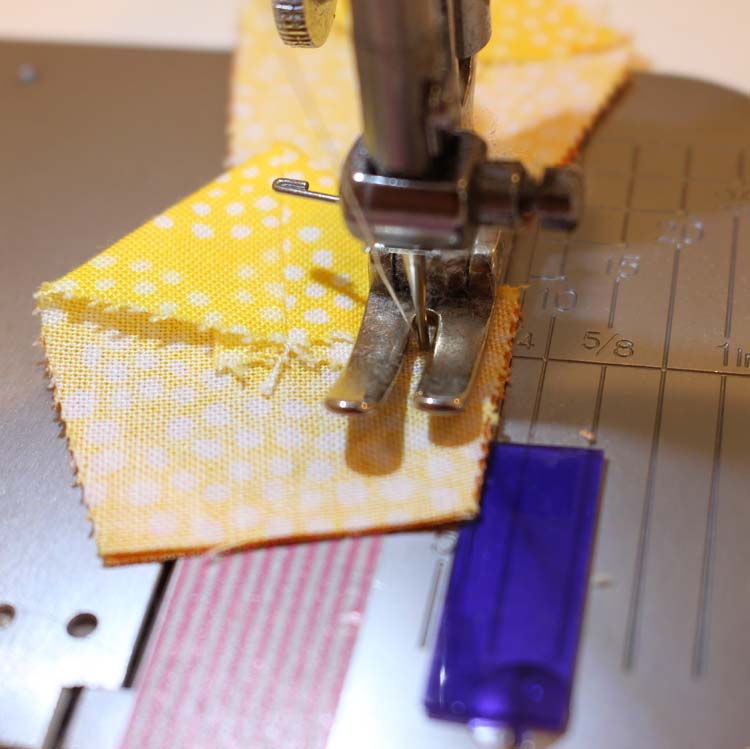
5. Sew the blades together, starting with pairs. You need to use a GENEROUS 1/4″ seam allowance to make them fit together. I lined up the raw edges with the 1/4″ mark on my throat plate. You could also move your needle position to the left a bit. My seam allowance could have been a tad wider, but it still worked out.
Also, backstitch at the beginning (top edge) of each seam just to secure the stitches.
6. Continue sewing the pairs together until you have a completed circle of blades. Press the seam allowances in one direction.
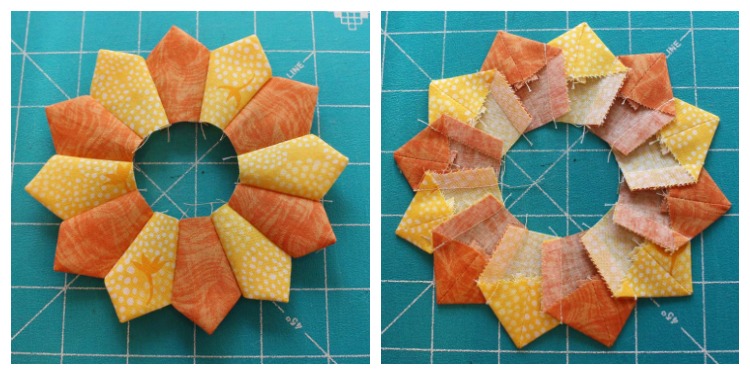
7. The center of the sunflower is appliqued. You can use your favorite technique for this and you’ll need a circle that measures 2 1/2″ across or use the circle template provided in the pdf.
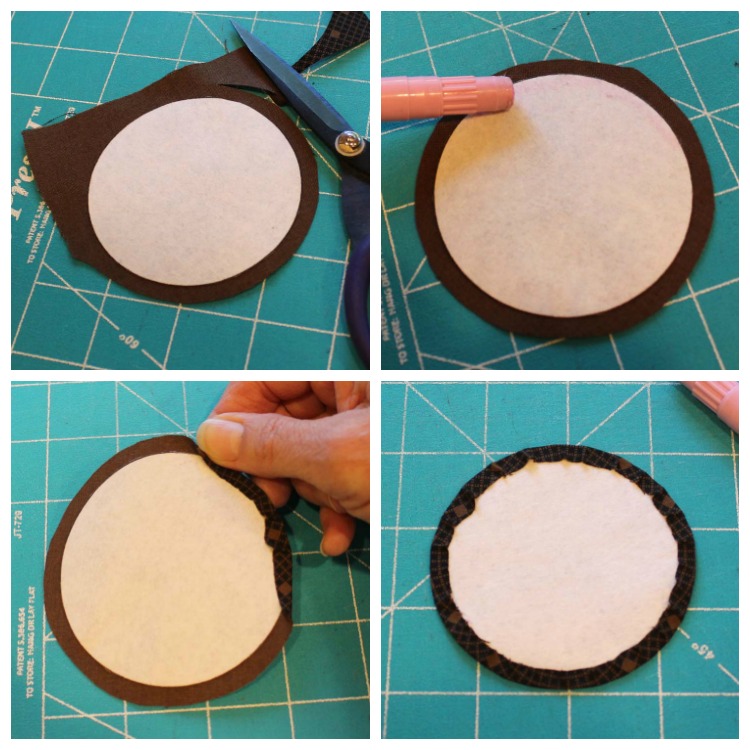
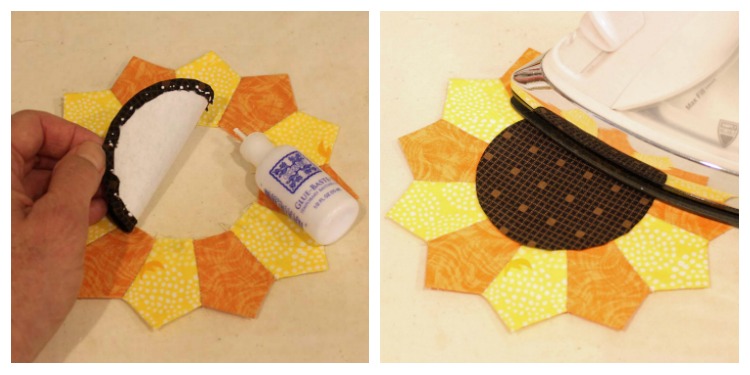
I used a turned edge, machine applique technique. Note: all the photos below were taken while making the larger sunflower (using templates).
- I traced the circle onto the non-fusible side of the Quilter’s Select Print & Piece Fuse Lite stabilizer.
- Cut it out on the line.
- Fuse the circle onto the wrong side of the brown fabric.
- Cut the fabric leaving a 1/4″ seam allowance.
- Using a water soluble glue stick “draw” a line of glue along the edge of the stabilizer.
- With the side of your finger, turn the seam allowance over the shape. Make sure to take tiny tucks, evenly spaced around the circle to ease the fullness.
- Glue the circle to the center of the Dresden Sunflower with water soluble glue. I use Roxanne’s Glue Baste It for this.
- Press to dry the glue.
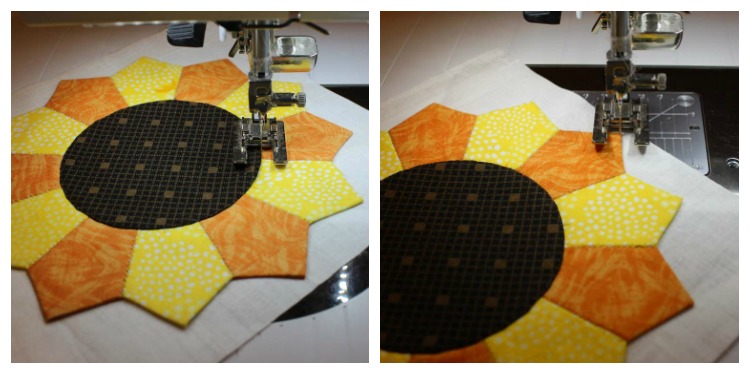
8. Stitch the center of the sunflower into place and the sunflower to the background square. You can do this step by hand or by machine. I did mine by machine.
- Place the sunflower onto the background square, centered, and gluing or pinning into place.
- Use monofilament (clear) thread in the top of your sewing machine and a neutral, cotton bobbin thread.
- Use an open-toe applique foot or a clear foot if you have one.
- Use a size 60/8 Microtex Sharp sewing machine needle. A small needle leaves a small hole.
- Set your sewing machine to a zig zag stitch, 1.0 wide and 2.0 long. Test this setting out on your machine as they may differ.
- Stitch around the center circle first and then the outside of the sunflower. The right swing of the needle should land onto the background fabric right next to the flower. The left swing should just catch the inside of the sunflower. This will create a very invisible stitch.
- Continue all the way around.
- Trim the block to 6 1/2″ square.
Sunflower Block, template technique (larger sunflower)
Cutting Instructions
- Background fabric: cut (2) 6 3/4″ squares (over-sized)
- Yellow, orange and brown fabric: don’t need to be cut into any particular size
Assembly Instructions
Note: I used Quilter’s Select Print n Fuse Lite stabilizer. If you don’t have this product, you could also use Wash-Away Applique Sheets by C&T Publishing![]() or Appliquick Fusible Stabilizer
or Appliquick Fusible Stabilizer![]() . The instructions are written for the stabilizer, but this technique can also be done using paper (similar to English paper piecing by machine). I’ll include those instructions when I can, but I don’t have photos for it.
. The instructions are written for the stabilizer, but this technique can also be done using paper (similar to English paper piecing by machine). I’ll include those instructions when I can, but I don’t have photos for it.
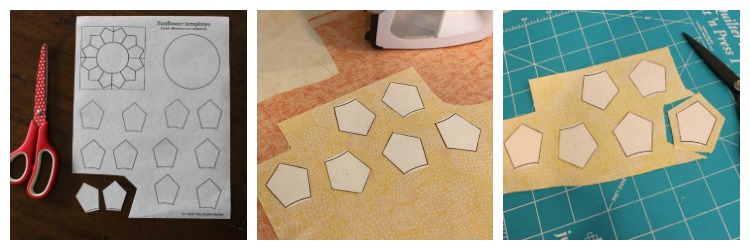
1. Print out the template page (see the pdf link at the beginning of this post) onto paper or Quilter’s Select Print & Piece Fuse Lite (if using). Make sure to print it at actual size.
2. Cut out all of the blades on the line.
3. For the stabilizer, fuse it onto the wrong side of the orange and yellow fabric (6 on each). For paper, pin or use a dab of water soluble glue to secure to fabric.
4. Cut out each shape with 1/4″ seam allowance on all sides.
5. Using a water soluble glue stick, draw a line of glue onto one of the long sides of the fusible shape.
6. Use the side of your finger to fold the fabric over the shape, pressing onto the glued edge. If you’re using paper, just thread-baste the folded edge of the fabric in place.
7. Continue on the other three sides, leaving the bottom edge open.

8. Now we’re going to sew the blades together. You can do this by hand, as in traditional EPP, or you can do it by machine. Here is my machine method:
- Set up your sewing machine just like you did for the sunflower center circle from the Dresden Sunflower block above, except the stitch length should be .8 wide and between .7 and 1.0 long (on a Bernina 770). You may need to play with those settings for your particular machine.
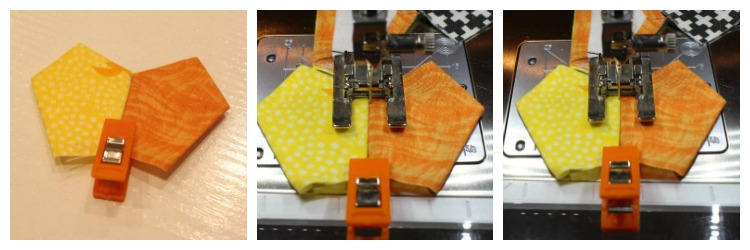
- Use a clip to hold two blades together, making sure the center top edges are lined up.
- Starting at the top edge, begin stitching the blades together with a zig zag stitch. Back stitch at the beginning to secure.
- The right swing of the needle should just pierce the right blade and the left swing of the needle should just pierce the left side of the blade. Continue to the end and then stitch the next pair together and so on.
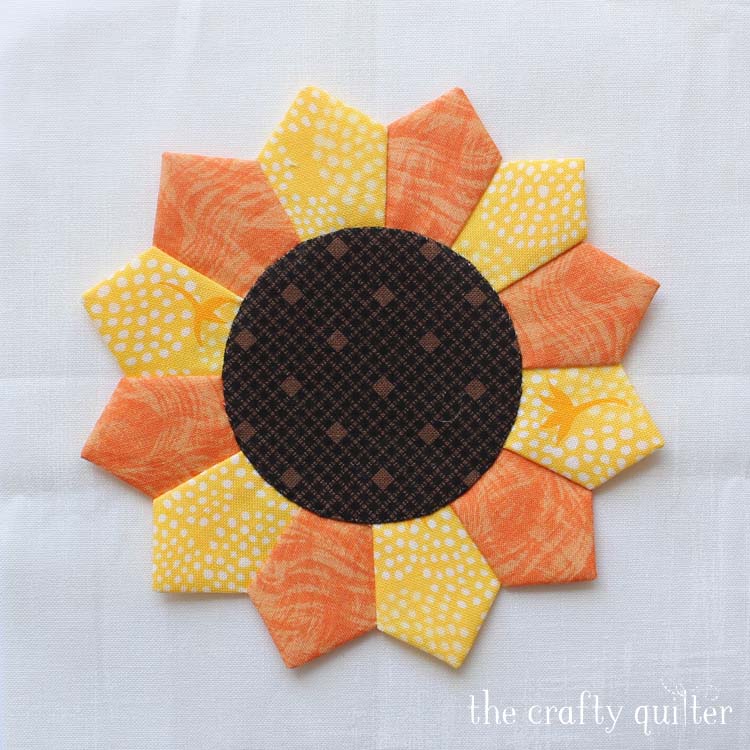
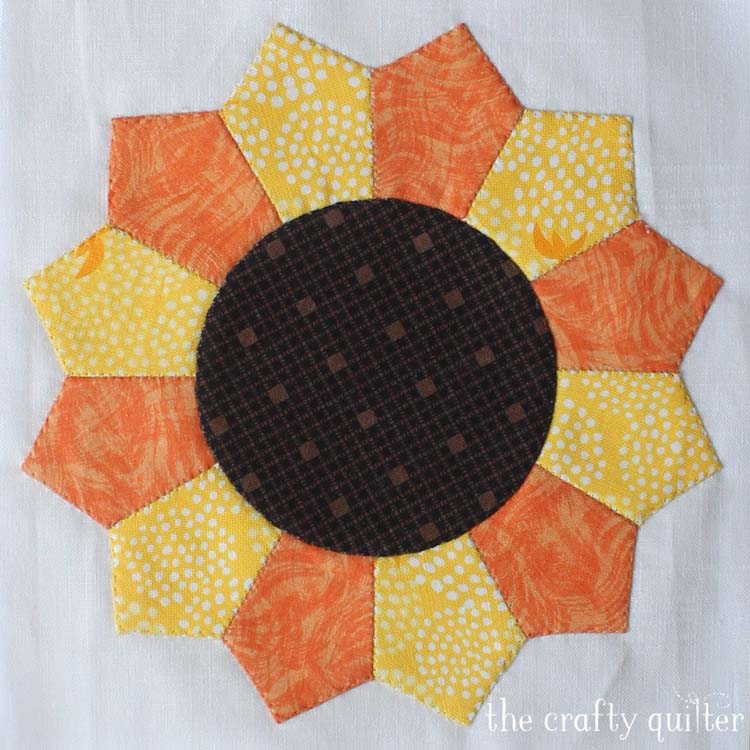
Once all of the blades are sewn together, you should have a nice big sunflower. You will make the center circle just as before, but the circle will be larger as shown on the template (pdf link at the beginning of this blog post).
Applique the sunflower onto the 6 3/4″ background square. Pay attention to the rotation of the sunflower. You’ll want the valley of the blades to be centered rather than the points to maintain your 1/4″ seam allowance. I learned this lesson the hard way.
Trim to 6 1/2″ square.
Hexagon Flower, English paper piecing technique
I am going to refer you to several tutorials for this technique if you’d like to give this version a try. I’ve included this option just because many people are familiar with it already and you may have the supplies you need.
The hexagons need to be 1″ in size (as measured along one of the sides).
I recently finished the class, Quick & Easy English Paper Piecing on Craftsy. It was fantastic and I highly recommend it. I learned so much! One of the techniques Helen Stubbings gives in her Craftsy class is to use an applique paper (similar to the Quilter’s Select Print & Piece Fuse Lite that I’ve been using) that is precut into hexagon shapes instead of traditional paper hexagons. With these EPP iron on hexagons, you can leave the foundation paper inside. Plus, it’s much easier to work with.
A great resource for printable hexagon shapes and a quick and easy way to cut them is at Geta’s Quilting Studio. Geta provides hexagon templates in six different sizes that you can print, cut and sew with. I used her templates to print out my hexagons onto the Quilter’s Select Print & Piece Fuse Lite. It worked perfectly.
Here’s a visual of some of my steps:
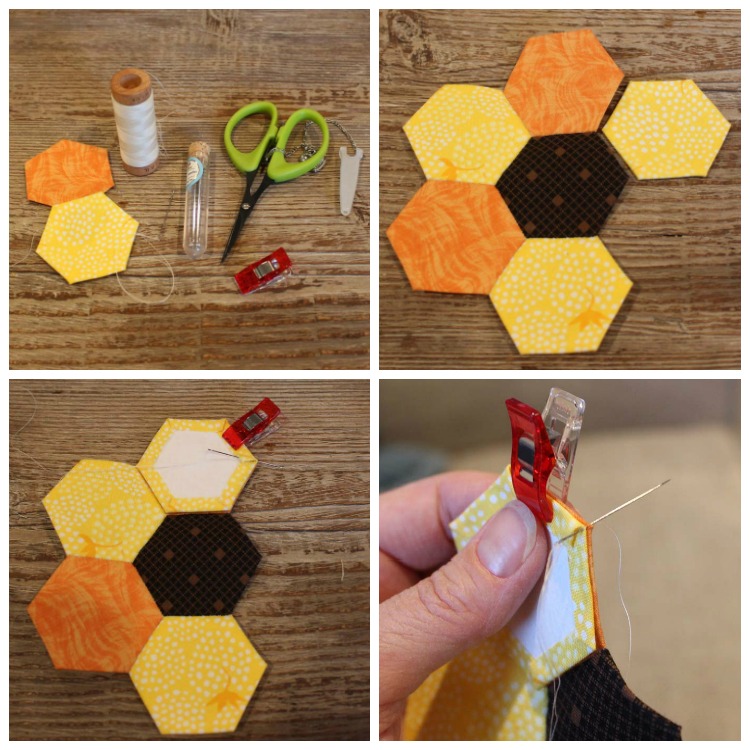
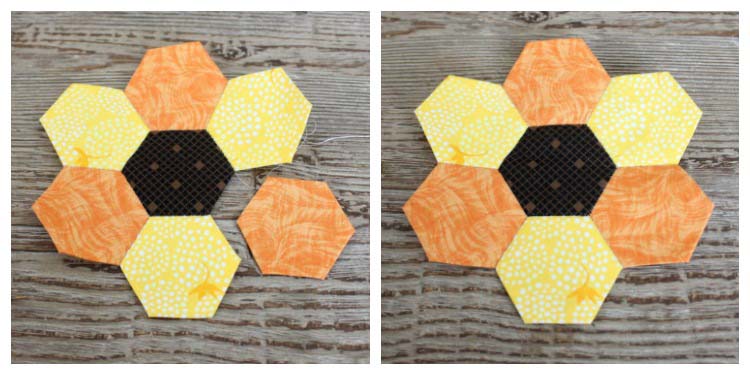
My last step would be to applique the hexagon sunflower onto the background fabric. It’s a great option if you like handwork.
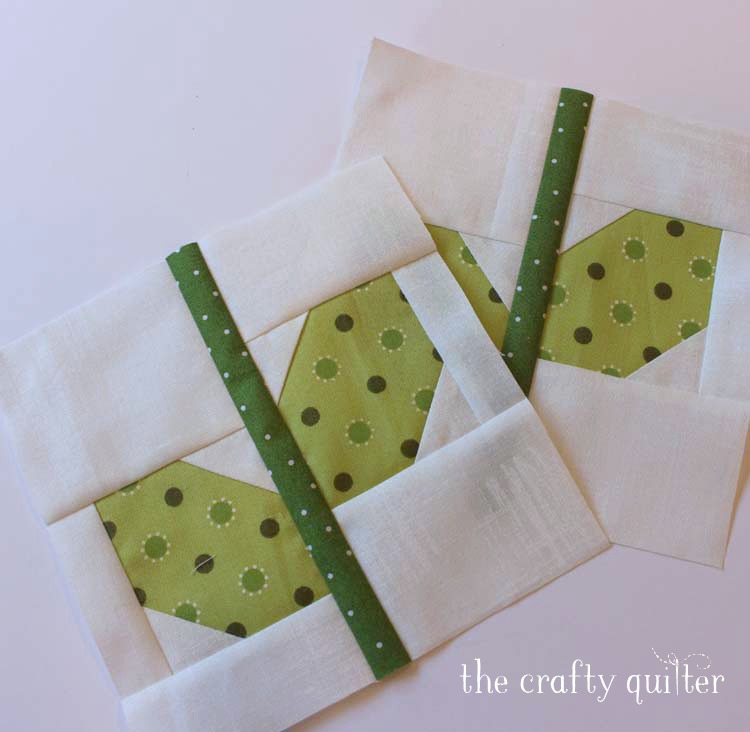
Stem Blocks, 6 1/2″ square

Cutting Instructions for two blocks
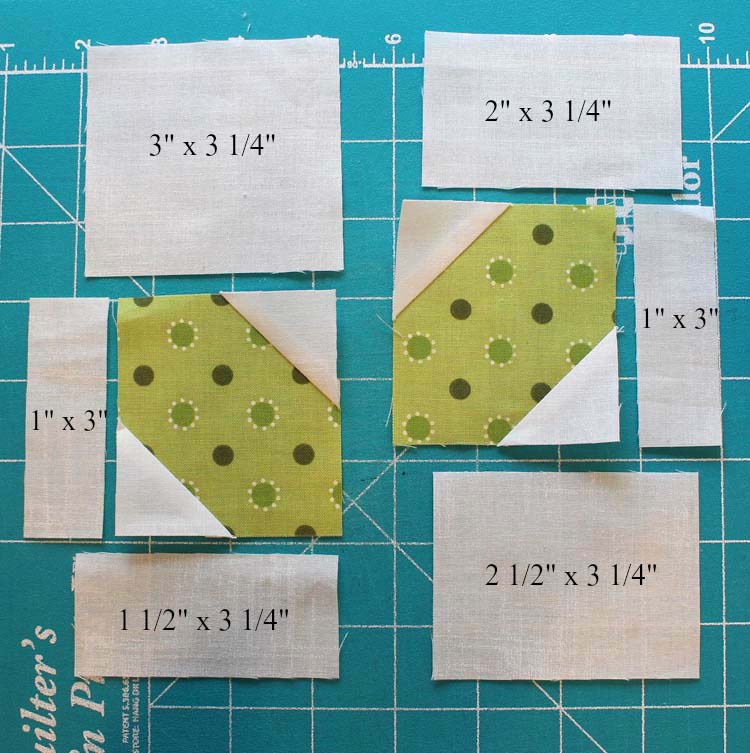
From the background fabric cut:
- (2) 3″ x 3 1/4″ rectangles
- (2) 2 1/2″ x 3 1/4″ rectangles
- (2) 1 1/2″ x 3 1/4″ rectangles
- (2) 2″ x 3 1/4″ rectangles
- (4) 1″ x 3″ rectangles
- (8) 1 1/2″ squares
From the green dot fabric, cut (4) 2 3/4″ x 3″ rectangles
From the dark green fabric cut (2) 1″ x 6 1/2″ rectangles
Assembly Instructions
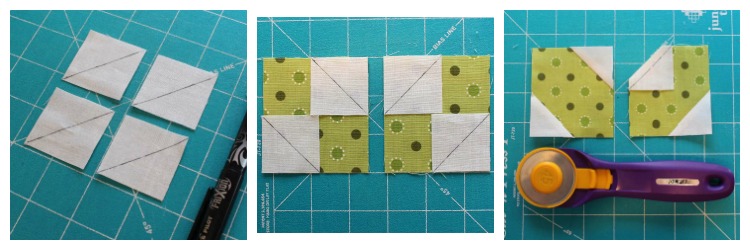
1. Draw a diagonal line on each 1 1/2″ background square.
2. Place a marked 1 1/2″ background square on opposite corners of the 2 3/4″ x 3″ green dot rectangles. Make sure they are a mirror image of each other as shown below.
3. Stitch on the drawn line, trim and press towards the corner.
4. Arrange the remaining pieces as shown and sew together.
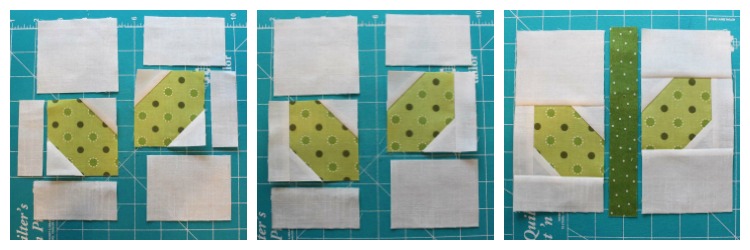
Make two leaf blocks. They should measure 6 1/2″ unfinished.
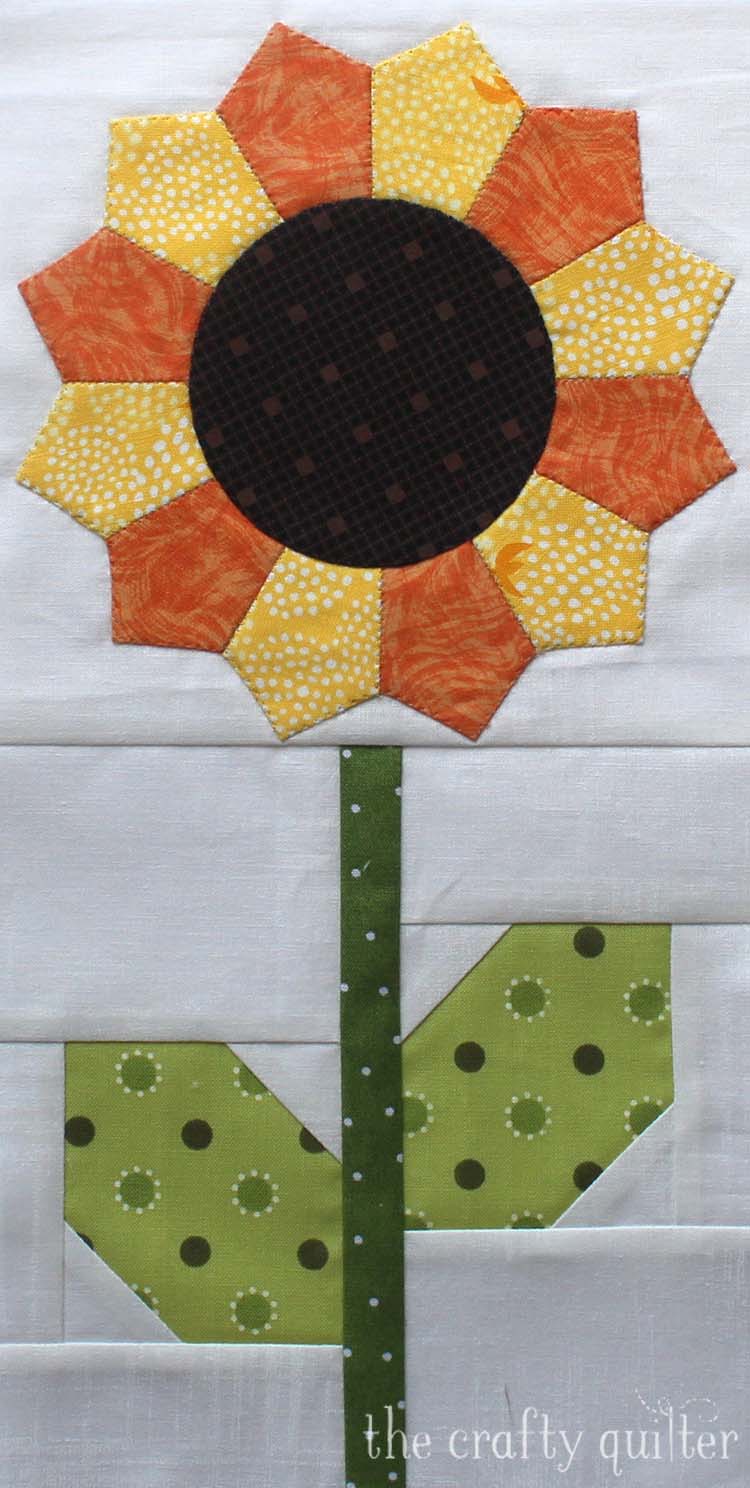
Final Sunflower and Leaf Assembly
Sew a Sunflower block to a Stem block to create the final sunflower unit. Make two!
I hope you’re having as much fun as I am. Next week we’ll be making a butterfly and some sunny stars. Enjoy your weekend!

Hello Julie; I had a wonderful time today assembling the Sunflower Stem sections and preparing the Sunflower petals to hand stitch them onto the background. I have never made Dresden pieces so small before and it was quite a fun new experience. Plus, I have never tried Hexagons either. So, they became my second choice. I am really enjoying each and every section of this Quilt Along Julie! Thank You so much for sharing your delightful designing and teaching talents with us! I know I am learning many new techniques and just thoroughly enjoying every aspect of the entire project! Have a great day!
I have my blocks done, but will wait to add my sunflowers. I used a creative grids ruler and lots of small pieces. The sunflower is just at the quarter mark. I just love how they turned out. Great instructions again. Thanks, Julie.
Beautiful, beautiful sewing and clear explanations! I always look forward to your postings. A thought about the center of the sunflower–why tiny tucks? Baste the curve (like a set-in sleeve) and pull the threads. This could be done before cutting the piece to preserve the seam allowance. Basting works well for Drunkard’s Path, too. Perfect curves every time.
As a beginning quilter I love reading all your tutorials. You are such a good teacher! I really would like to do your summer quilt along for there appears to be so many new techniques I could learn. How long will you have the summer quilt along on your blog? I will of be able to start it until later in August. Thanks again!
My quilting mostly consists of finishing my mothers projects (she has dementia), but this project is super cute and I think it’s perfect for my scraps…I’d love to learn some new techniques. Thanks for the great instructions and pics
Julie, I love your blog, tutorials, etc. I hope this SAL stays up – I have too much on my plate this summer. Any thoughts of a European vacation – and come teach at our Guild in Ramstein?