How to line up sashing on a quilt so your blocks stay straight
I just finished making Cardinals, a quilt pattern by The Pattern Basket. Because this quilt had sashing around each block, it seemed like an opportune time to give you some tips on how to line up sashing so your blocks stay straight.

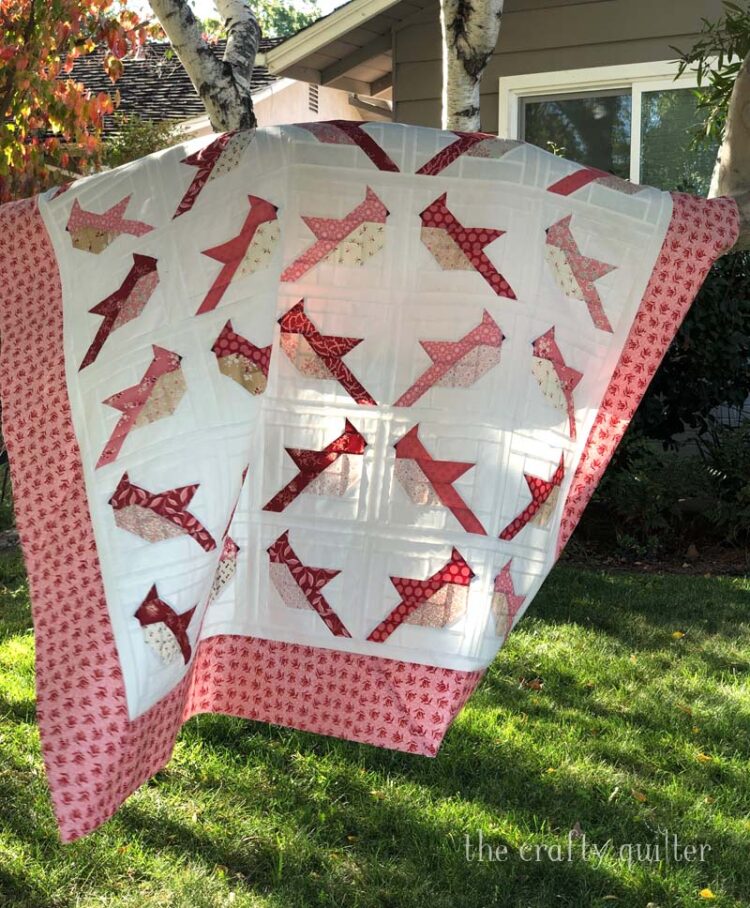
Pattern by The Pattern Basket
Quick refresher: Sashing refers to strips of fabric that are sewn between blocks and rows.
The first time I added sashing to a quilt, I had no idea that it mattered how they were sewn on. What could possibly go wrong? Well, if you’re not careful, your quilt blocks will not line up from row to row and you’ll get a slightly topsy turvy effect (without the wine).
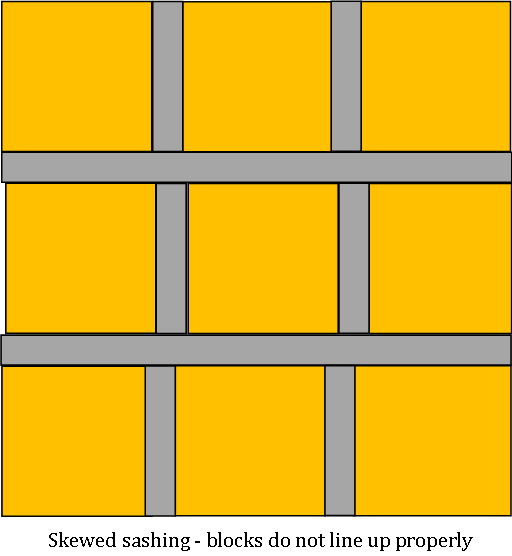
You can see in my Sew Happy quilt below (free tutorial here), that the last two blocks on the bottom right have shifted slightly to the right compared to the row above it. I wasn’t paying attention when I sewed the sashed rows together, but I didn’t think it was a big enough error to go back and fix (aka lazy quilter).

Back to the Cardinals quilt. It was really important that I match the sashing strips from each row so that my blocks lined up neatly. This quilt is a sample for The Granary Quilt Shop so it had to look “professional” (and no more lazy quilter). It’s an easy process, though, and doesn’t require a lot of extra fussing.
How to line up sashing so your blocks stay straight
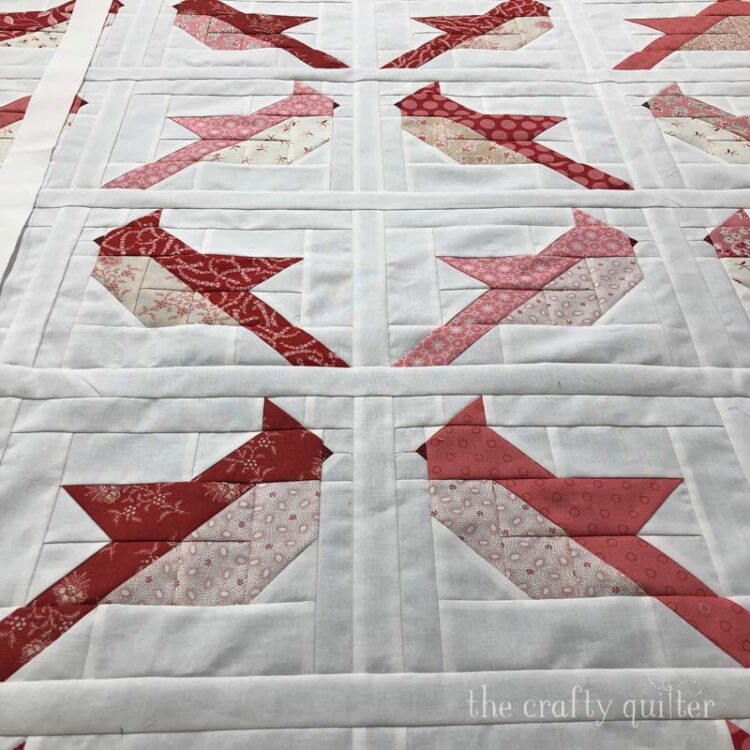
Once you’ve sewn your short sashing strips to the sides of each block and formed a row, you will join the rows together with a long sashing strip. This is when you need to pay attention.

- After you sew a long sashing strip to the top or bottom of a row, draw registration lines on the unsewn edge of the long sashing strip.
- Using a small ruler, position its edge along the short sashing strip (between the blocks) and mark the edge of the long sashing strip on both seams.
- Repeat for each set of sashing seams.
- Join the rows together by matching registration marks to the short sashing seams of the next row.
- Pin well and stitch.


Your blocks should line up perfectly, and be stacked neatly. Easy peasy!
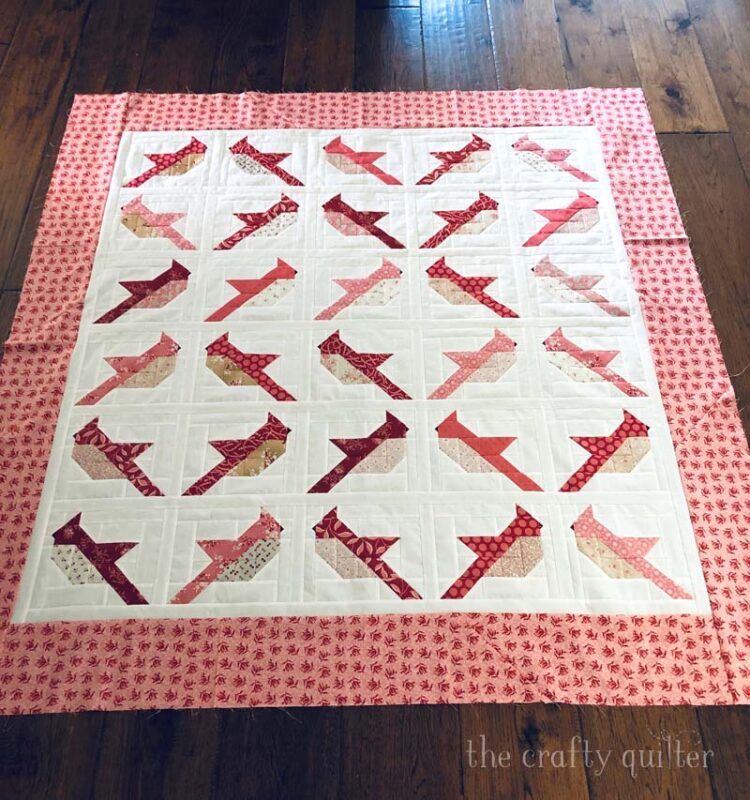
Pattern by The Pattern Basket
Many patterns use sashing and cornerstones between the blocks. This extra square piece (the cornerstone) is its own little gate keeper. You’ll have a seam to match where the cornerstone is instead of a long piece of sashing. You can see an example of that in my Franklin Star pattern.

I’m sure there are other ways to line up sashing strips, but I hope this gives you a little direction the next time you make a quilt that has them. Until next time, happy quilting!

Discover more from The Crafty Quilter
Subscribe to get the latest posts sent to your email.


Why didn’t I read this before I sewed the long strips together?
Haha. Same here ♀️
Hello, thanks so much for your advice! Do you have a tutorial on the cutting dimensions on the sashing and how to apply? Adele
That’s brilliant! I used to have crooked rows, then I started using cornerstones. On quilts that don’t have cornerstones, I still used them out of the same sashing fabric just to keep them straight. This method is much quicker! Thanks so much!
Great tip! I admit to being a lazy quilter and my ros are frequently off. I’ll try this next time and see if I can do better.
Thanks so much for this tip Julie. It seems so simple and “easy” now. 🙂
Thanks for the tips, this is very helpful.
Love this! Thank you so much. Question…can you use a jelly roll for all the background piecing? I am buying the pattern today and looking for a nice selection of reds in a layer cake. I am wanting to know if jelly rolls will work for all of the sashing etc. Thanks again.
I use jelly rolls for sashing. I also cut my own strips from yardage if I do not have a jelly roll. Jelly rolls much easier.
I’ve had wonky sashing troubles too. This idea is brilliant in its simplicity and I’ll be using it the next time I make a quilt with sashing! Thank you so much Julie.
I pinned this for a quick reference….thank you!
I too learned the hard way that sashing without the cornerstones can cause your rows to go a little wonky. I quickly found out if your sashing is too wide then it was difficult to align everything. This method will work great to keep rows and columns aligned perfectly!
Great tip for making something we all struggle with easier. Thanks, Julie.
That’s a great way to do it, wish I would have thought of it, LOL Thanks for sharing!
Well, there surely are other ways to make sure that your blocks line up when you put on sashing, but yours is obviously so much better than what I was doing. I used to flip fabric, place pins just so, hold my breath . . . Your way is obviously so much easier and more accurate. Thanks for sharing it.
Thank you. This is a great tip. I admit I have avoided patterns that have sashing because there have been too many times where it was just slightly off and I have had to rip out.
Brilliant tip. Thank you Julie.
Thank you for the suggestion. I have a quilt that need to be assembled, and the dashing shows no cornerstones. NOW, I know how to confidently connect the blocks! The quilt is beautiful!
All of it is beautiful, Julie.
That is a very good tip. I always used Pins, and alignment was hard and not always accurate . Thanks a lot
Good info – never thought of doing that to line up the blocks!
Thanks for the tip.
Thanks Julie for your post. I work alone so I’m very happy to learn that I use the same technique as you described in the blog here. You’re like window to the world for me. Thank you!
It seems so simple, thanks for the timely tip!
This is a really helpful tip! Thanks for sharing.
You leave the bestest tutorials ever!! I never question your directions as they are always on the mark
Hello Julie, I so enjoy your blog and demos. The Franklin Star quilt is beautiful. Thanks again helping all of us quilters to do a much improved job of quilting. Sincerely Judy
Fabulous tip, Julie! Thanks!
Great tip. You know I learn something almost everyday. I learned two things today. How to line up smashing and how to pronounce cacophony.
I learned something today by reading your blog thanks for the tip to mark the sashing for making sure it lines up . It will help me a lot.
Very helpful tip Julie, thank you.
Now why didn’t I think of that!?!? That’s so easy & makes perfect sashing sense. My sashings are going to be looking a lot better in the future. I do have one question regarding your beautiful cardinal quilt. Why did you piece the borders with on a 45 degree angle?
Great question, Mary. I use a 45 degree angle when piecing border strips because it TENDS to make the seam less noticeable. It gives the border a cleaner look, I think. If the border strips are really wide (more than 6″), I think it’s best to have enough fabric so that you can cut them parallel to the selvage and avoid any seams at all.