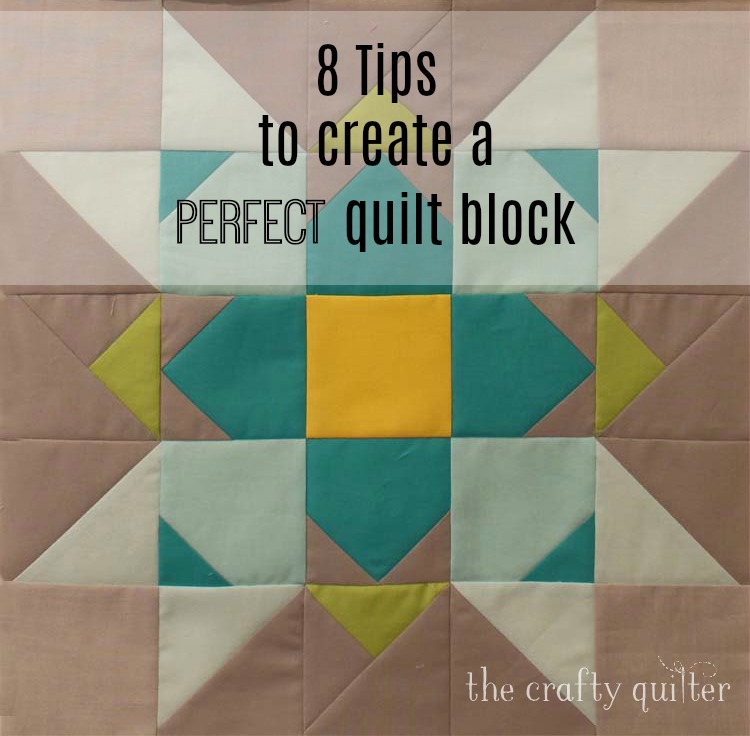
8 Tips to create a perfect quilt block
Today I have 8 Tips to help you create a perfect quilt block. I know perfection is over-rated, but when it comes to quilting, it sure does help when you’re putting a quilt together.
Now that I’ve been quilting for over 20 years, I can happily say that my quilt blocks turn out just right (most of the time). I pay attention to what works and what doesn’t, and fix the parts that don’t work. I also take lots of classes and watch for new products and trends.
I love being able to produce quilt blocks that are accurate and quilts that are easy to put together because all of the puzzle pieces fit! I hope you find a few good tips in the following list so you can experience that, too.
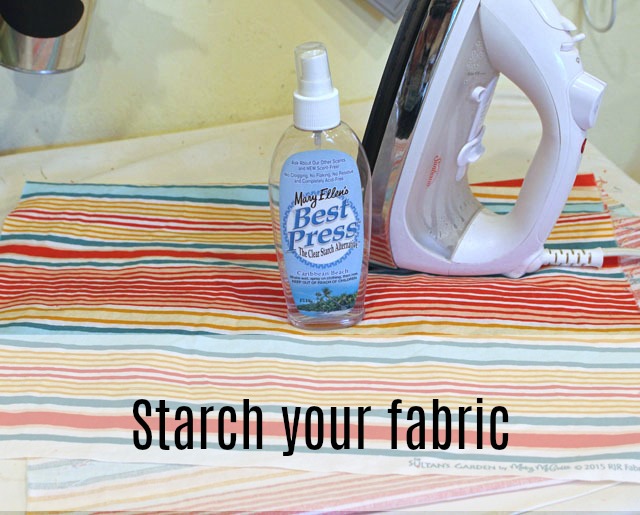
- Starch your fabric before cutting into it. Regardless of whether you pre-washed it or not, press your fabric and use starch to add more stability and control. This will help with all aspects of quilting, from rotary cutting to matching seams. Check out – What type of spray starch to use for quilting – for more information.
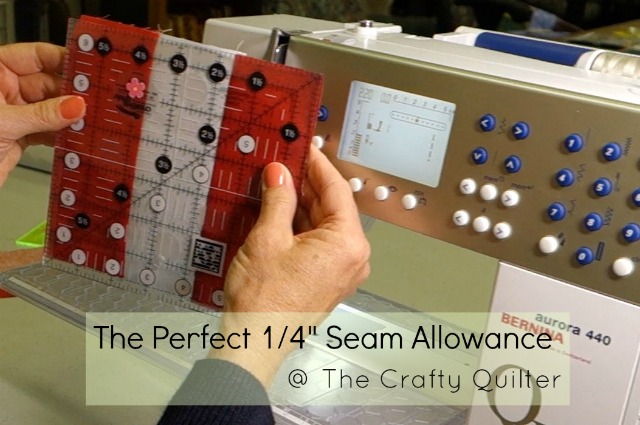
2. Make sure your 1/4″ seam allowance is accurate. This is often the hardest thing to get just right. If your quilt blocks are turning out too small or too big, it’s probably because your seam allowance is off. I have a tutorial on the perfect 1/4″ seam allowance that will give you plenty of tips to get yours exact.
3. Use pins to keep pieces aligned that you’re going to sew together, especially at the beginning and end of a seam. (I’ll address seam intersections in tip #5). If you don’t have an integrated dual feed foot, what can happen is the top piece will get pushed by the presser foot ahead of the bottom piece. Kind of like a snow plow. This will shift your fabric and cause the top and bottom of the seam to not line up. Having a pin there will help to keep everything matched up.
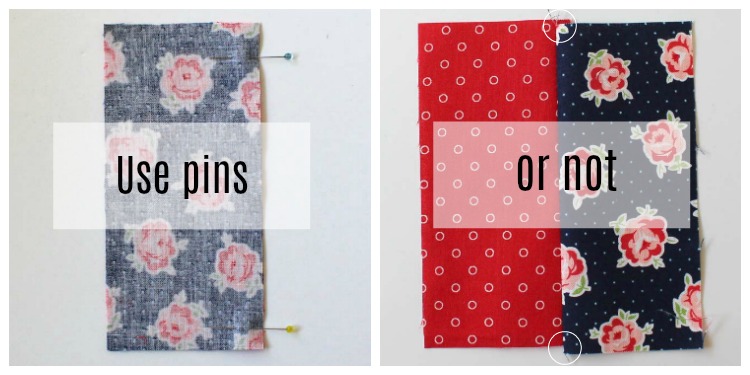
TIP: Pay attention if you’re chain piecing; you might need to lift the presser foot just a bit and position the top edge just right. Otherwise, the top fabric will scoot down at the very beginning (even though you’ve pinned).
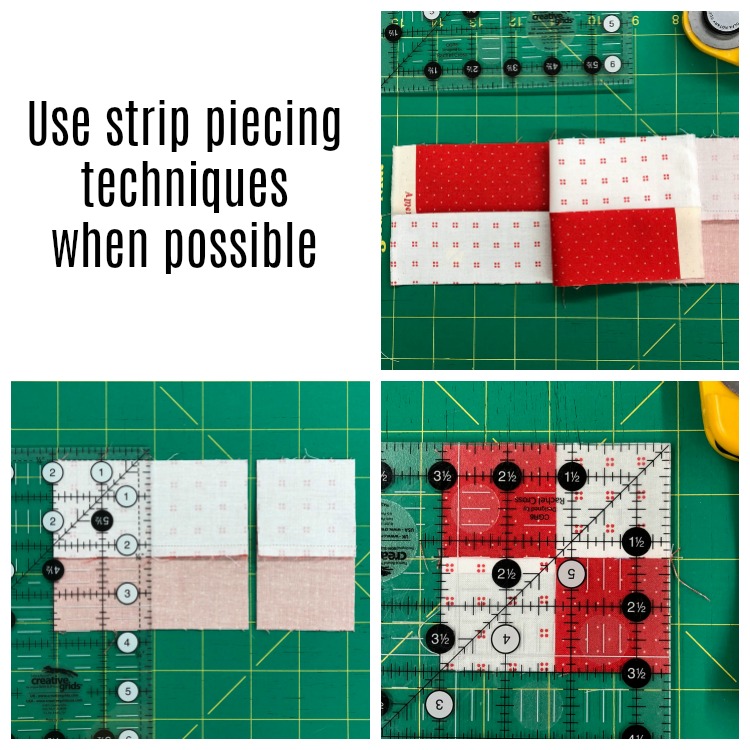
4. Use strip piecing techniques when possible. This is not only more efficient, but it tends to be more accurate as well. I always analyze a pattern first to see if I can make it more efficient by cutting strips of fabric instead of individual squares, for instance. I just ran across this on a complex block for a BOM pattern where it had me cutting out individual squares for 4-patches. I made them with strips instead and they turned out perfect.
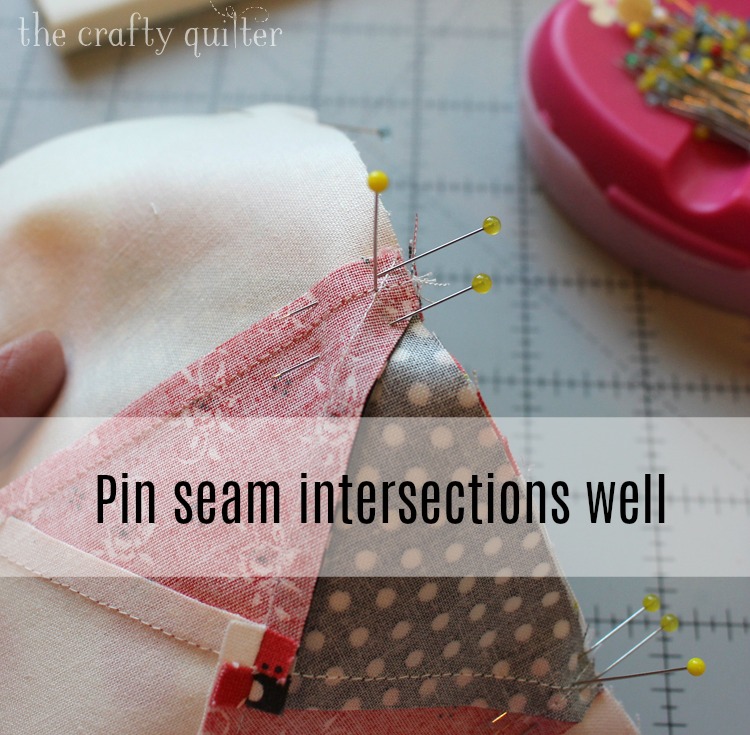
5. Make sure seam intersections are aligned and pin them well. I like to pin most intersections with one pin inserted at an angle. This way I catch both sides of the seam allowance, and I can keep the pin in longer before I have to remove it. For intersections where I have diagonal seams that need to match, I use a setting pin and pin on both sides of the seam allowance. Glue basting seam allowances is another good method and it’s becoming quite popular. I used both of those technique here.
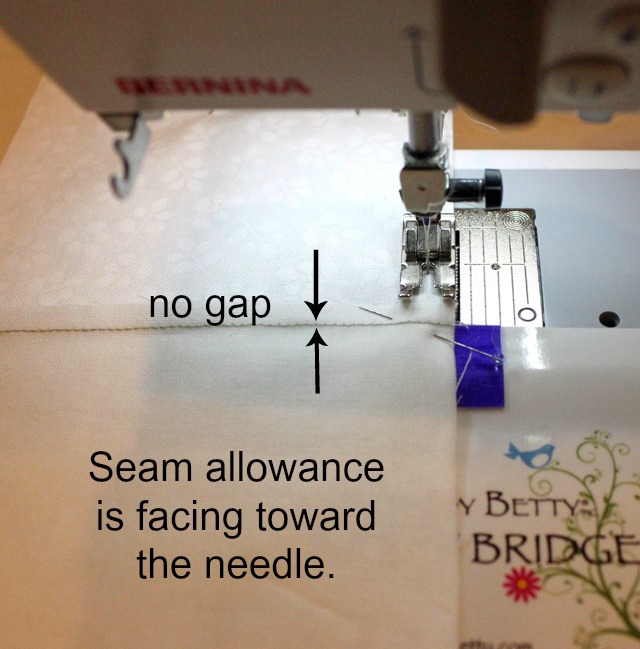
TIP: When a top seam allowance is facing down as it reaches the sewing machine needle, it will more likely create a gap at that intersection. When the seam allowance is facing the needle, you’ll get a more snug intersection because the presser foot is pushing the top seam allowance into the bottom seam allowance.
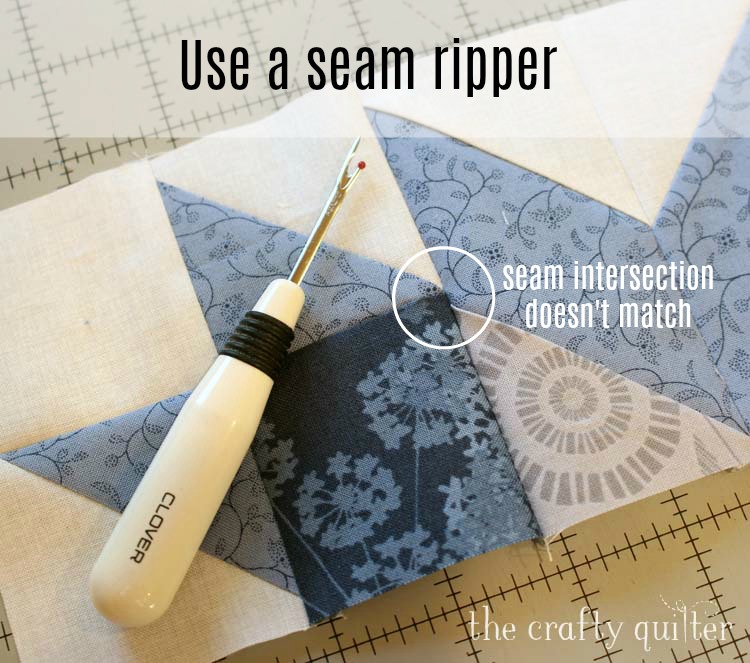
6. Don’t be afraid to use your seam ripper, or might I add, don’t be too lazy to use it (like I was). I’ve finally resigned myself to just do it – and it always pays off. Plus, I’ve perfected the quick seam rip technique. Check out this video; it’s life changing.
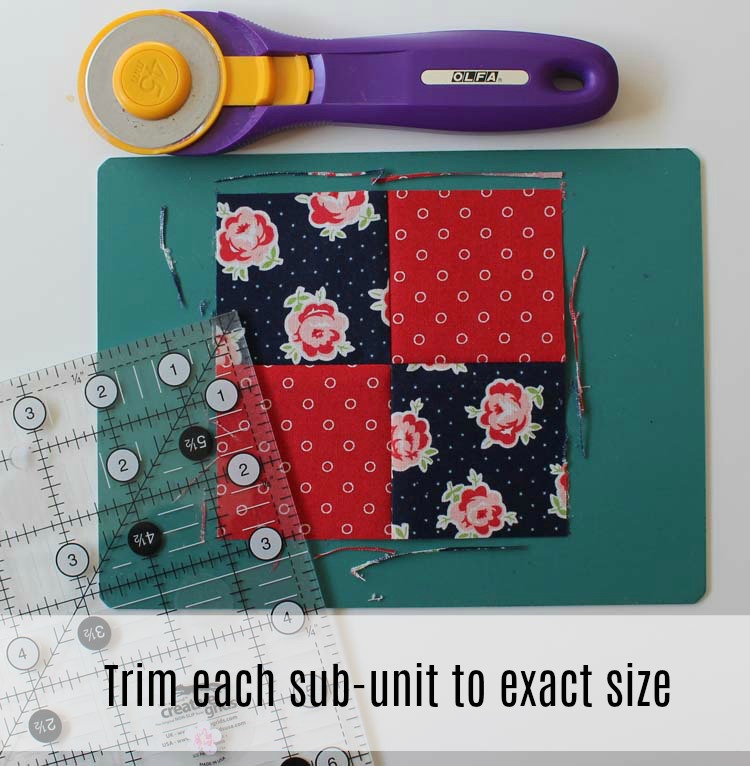
7. Trim each sub-unit to the exact size. This has made a big difference in the accuracy of my quilt blocks. I love to make certain units larger such as half-square triangles, flying geese, square in a square, and quarter square triangles and then trim them down to the exact size. But even if it’s just a 4-patch or some other kind of sub-unit, take the time to check the size and square it up if needed. Sometimes that means just shaving an edge, but that’s what I do and it makes a difference.
8. Press carefully and thoroughly as you go along. By that I mean to make sure you’re pressing your seams flat (whether it’s to the side or open). My blog post, Pressing seams open vs. to the side, explores that topic more in depth. Leaving a little tuck at the seam will make your quilt block inaccurate. Make sure you give the finished quilt block a good pressing, too. Sometimes you can shrink or grow a quilt block just enough by pressing. It’s similar to blocking a quilt or a garment.

Hopefully, if you follow just a few of these tips, you’ll find your quilt blocks are more accurate and maybe even perfect! Do you have any other tips that work for you? Please leave a comment and tell us!
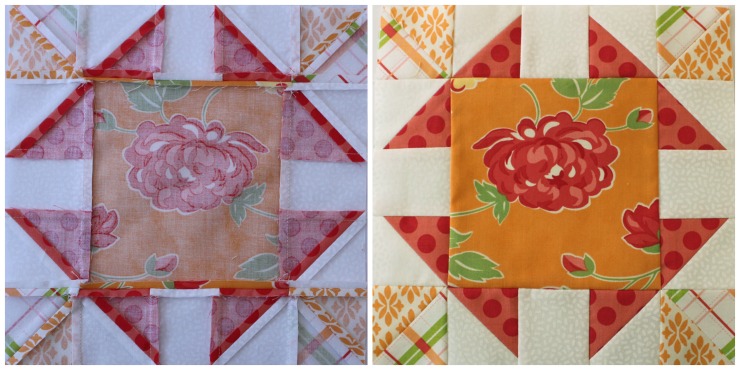
The quilt block shown above is the Boundless Flower block, a free tutorial from several years ago. (I know someone’s going to ask). Happy quilting!

Discover more from The Crafty Quilter
Subscribe to get the latest posts sent to your email.


Hey, I just found these tips. Thank you for the reminders of good habits.
Sometimes I put a special pin (bigger ball or butterfly) in a location to show that there is attention needed ahead. All of your tips are great.
I have also become an excellent ripper.
Funny thing, I found an OLD ripper from like junior high school or something…. and started using it. Stuff made in America is the best all around wow
Oh! my goodness, how good are the reminder of these tips. I’m a gluer, when it’s necessary, but most, pins are my favorite. Thank U so much Julie
Hell Julie, Thank you for putting these great tips together. I am going to take the advice on having the black line of ruler on top of fabric. Heretofore, I have had the line straddle the fabric and cutting mat.
I am a serial glue baster. I find that glue basting coupled with making a test block to define what seam allowance is needed for thread and fabric choices. And…..all of your other points are terrific.
I’m a beginner and no better time to start putting in place good sewing habits while I’m a newbie. Thanks.
Same here, can’t wait to get started
Thank you Julie. I am a beginner but have learned Pressing & starching before cutting and piecing is critical then checking size of block. These tips need to be embedded in every quilters brain.
These are some excellent tips. The most favorite is the video on using the seam ripper. Had I known this as a kid, I would have saved a year’s worth of sewing by this time!
Thanks..good food for thought as i’m on my lunch 1/2 hour in the office. 🙂 the sewing TIP was great and I need to remember when seams are toward the needle….AND pinning at an angle. I normally use my husband “Jim the ripper” for boo boo’s 🙂 He doesn’t mind seam ripping and does a great job-his mother has taught him well, so he says. 🙂
Ladies, Bookmark this page- it’s a Keeper!
Excellent tips, and written so well. I love learning something new that will make my blocks better and better.
Most of your seams are pressed open, can you elaborate on that? Or do you have another post that explains why and when you do that?
Terrific tips as always, thank you. I had never tried seam ripping in the way shown, will certainly be using it in future. Making the trimming of blocks part of your routine is one of my favourite tips it makes joining blocks accurately so much easier.
Thank you for sharing your list of tips. I read each tip carefully and will keep them in mind for my next block. Have a wonderful weekend!
Just wish someone would tell me —- scant 1/4” or 1/4”??
Making a test block will guide on scant v true. Also the number of seams in a block. At least that is my experience.
So timely – I was just staring at this small block and agonizing why it wasn’t perfect. I really appreciate these tips. thank you!
I would add one additional tip, accurate cutting. You can have a perfect 1/4″ seam, but if your pieces are a thread or two too small, your block will be small as well. I cut with the line on my ruler on top of the left edge of the fabric. Took me years to figure it out, but it makes a real difference. Also I don’t fold twice as I’ve found I don’t get accurate strips.
Pat
Excellent advice, Patricia! I agree and I cut the same way you do.
Most excellent tips! I embrace, depending on how the seam will be pressed, both a micro dot of glue and the pin method for precision points & seams.
One idea/tip you might try is loading your pins from the left so the head is to the left of the needle and the pin tip is just left of your 1/4″ seam. You never need to remove the pins (which allows the fabric to shift) while stitching and there is no risk of needle hitting the pin.
Thank you so much for this excellent post!
That’s a good tip, Karee. I must try that pinning technique.
These are great tips, Julie! Thanks! It’s weird, I’ve always used that method to rip seams! I’m self/grandmother-taught, back in the days before internet (dating myself here – LOL). I guess that just felt natural to me. Though I have ripped a few holes in fabric when I was in too big a hurry! So beware of rushing!!
Wow! Thank you Julie!
-Jean
As ever … grateful for so many good tips … thank-you.
Thank you so much for these tips. As a novice quilter, I have made all the mistakes you talk about. So many thanks to you.
I have found that your rulers edge can wear, so if you have a well used ruler check to see if the edge is wearing. I put the ruler on top of a new ruler and line up the 1/4 inch lines to see how much difference there is. 1/16th of an inch makes a difference.
Just started a new quilt project and discovered my first 3 blocks were off by 1/4″ to 1/2″. After reading through the 8 Tips…Perfect Block, I took them apart, using the “proper” seam reamer method as shown, sprayed, pressed, measured as you suggested in the tips, and the makeover blocks came out true! Thank you Julie for sharing this excellent information. I have been making quilts for years, but always enjoy learning how to sew better.
Such great information. I loved the tip about pinning the angled intersections. I will give it a try soon. Thanks so much
LOVED the tip about how to sew/nestle angled seams!! SO important. I read it just in time to help me piece a Lone Star block!!! Many other good tips too and I’ve been quilting for ~25 years! Thank you, Fran Madler
I’ve been sewing for over 50 years and I really love the seam ripper tip. I’ve been doing it wrong all these years! How much time I could have saved over time. Thanks for all the good tips.
THis is a great list! I just practiced seam ripping and it works. Many thanks.