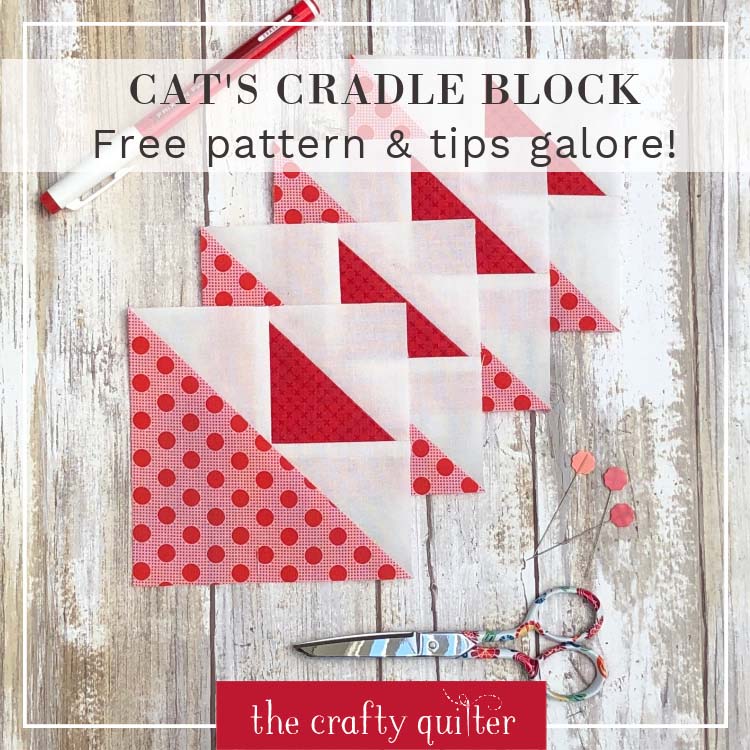
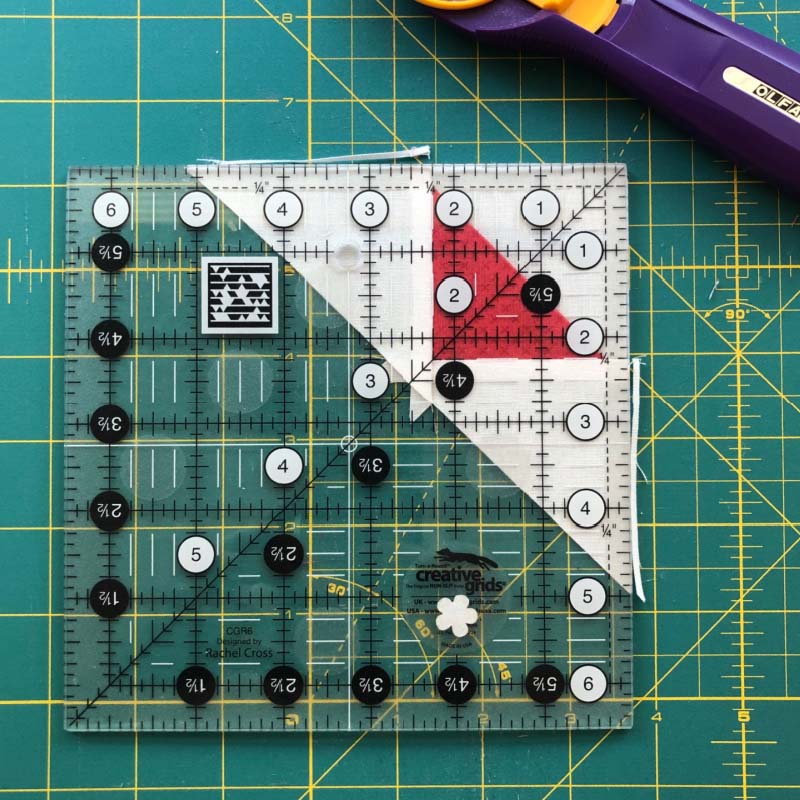
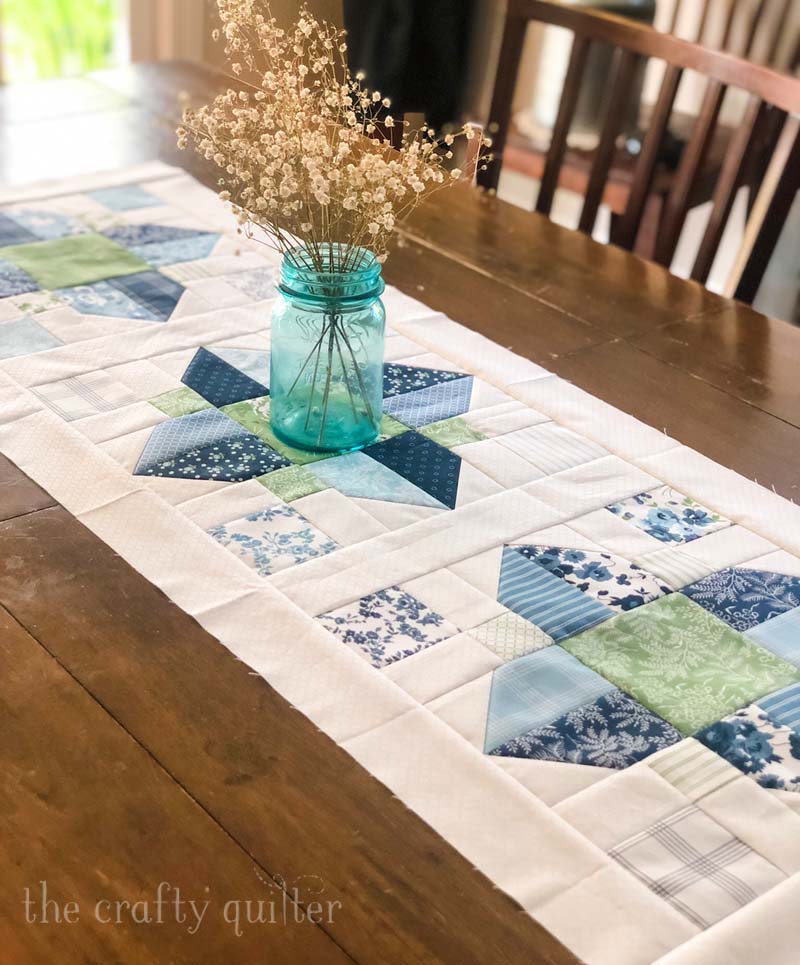
The Cat’s Cradle Block: free pattern, tips and more
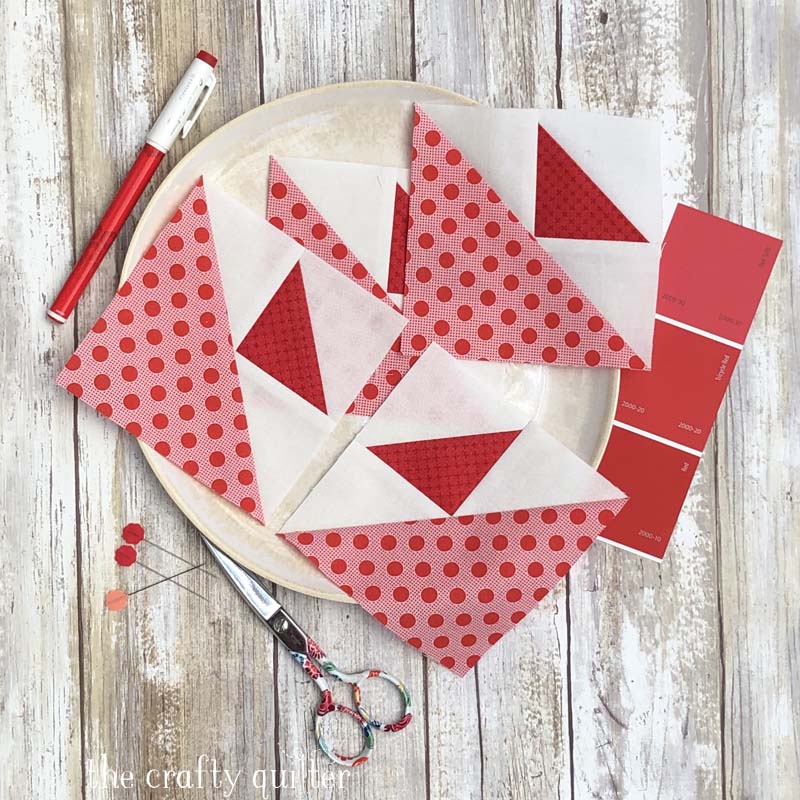
Have you ever made a Cat’s Cradle block? If so, you’ll know that they can be tricky little buggers. After a bit of experimentation, I’ve come up with a way of making them perfectly. Today, I’m excited to share a FREE pattern for the Cat’s Cradle block and plenty of tips to help you make it exact. I’ve included some history about the block as well as a few popular variations.
What is a Cat’s Cradle Block?
This is one of those classic quilt blocks that has several different names associated with it. By itself, it has been called Birds in the Air and Grandmother’s Choice. The most recent iteration is the Cat’s Cradle block which became popularized after the release of the Creative Grid’s Cat’s Cradle Ruler. I’ll share more about that ruler in a bit. For simplicity, I’ll be referring to this block as CAT’S CRADLE.
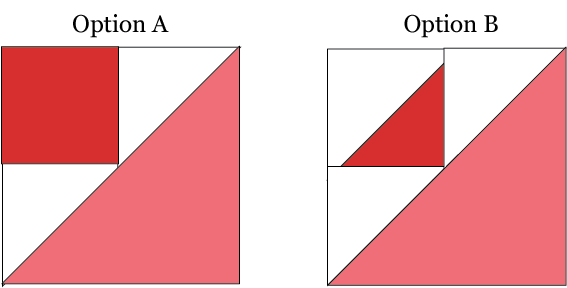
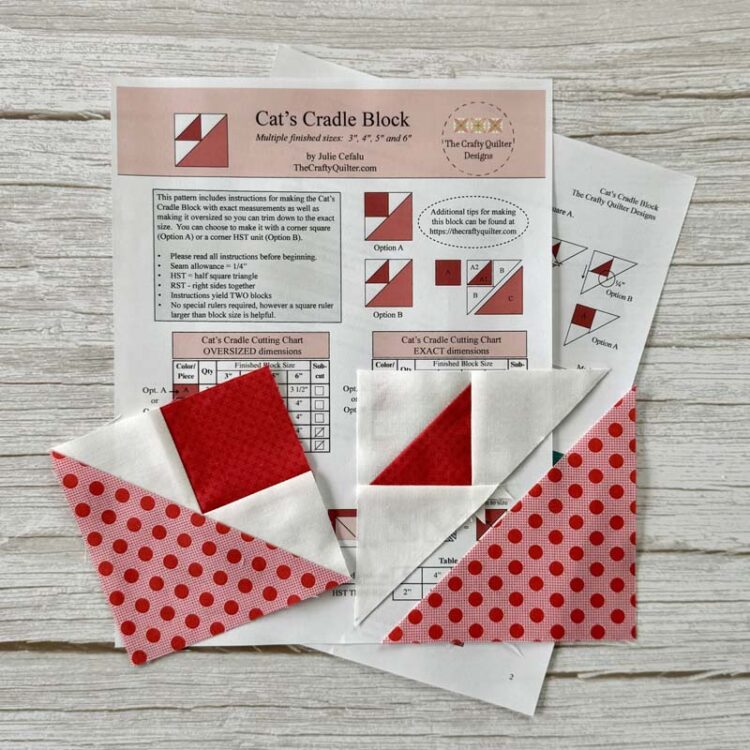
Basically, this block is made up of one large triangle and (A) 2 smaller triangles and one square or (B) 4 smaller triangles (depending on the variation). With all of those triangles, it’s easy to lose some accuracy during the piecing process. To prevent that from happening, I highly recommend you try the oversized method that I’ve outlined a little further down in this blog post.
In this tutorial, I’ll be focusing on Cat’s Cradle B, but it’s a piece of cake to turn it into the A version. The free pattern includes instructions for both as well as cutting instructions for 3″, 4″, 5″, and 6″ finished blocks.
Cat’s Cradle variations
I almost want to call this a unit instead of a block. I say that because it becomes a pieced unit within so many other blocks. Similar to how a flying geese unit is used inside many quilt blocks, the Cat’s Cradle unit can be a building block as well.
Finding the history of a quilt block and the actual name assigned to it can be a project in itself. Depending on the source, any given block will have several names. I used the Barbara Brackman Encyclopedia (also used in EQ’s Block Base+), the Ladies Art Company and C&T Publishing’s Quick & Easy Block Tool as my sources. Below are four popular quilt blocks that contain the Cat’s Cradle Block or unit.
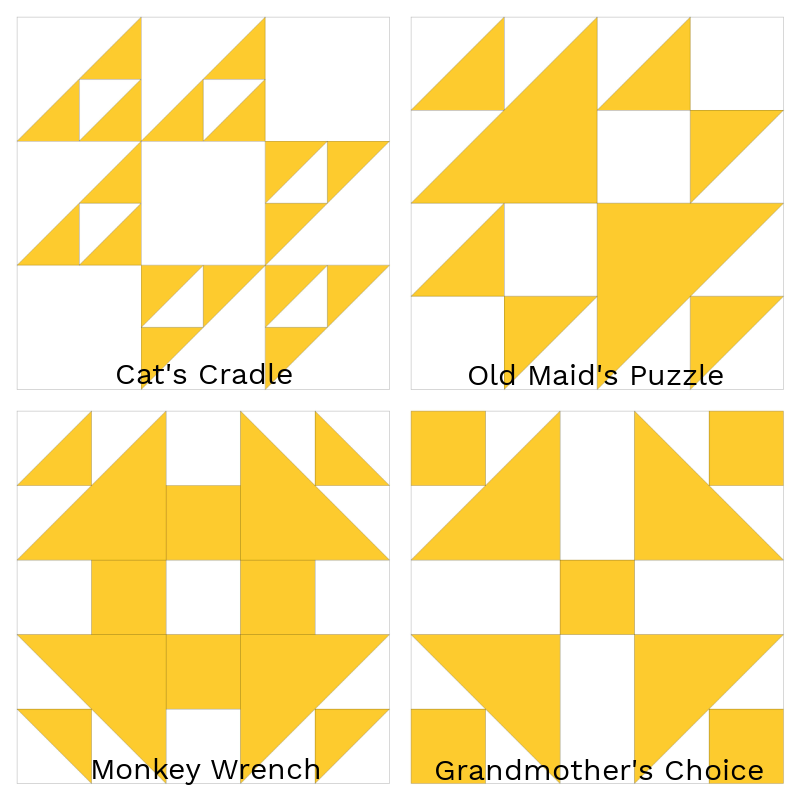
For this blog post, I will be working with one single Cat’s Cradle Unit. The nice thing is you’ll be able to use this information for a variety of different quilt blocks and patterns!
How to make a Cat’s Cradle Block
As you can guess, there are many ways to skin a cat 😉 (I couldn’t resist). You can use exact measurements, oversize all the pieces or just a few, or make them with a very clever two-at-a-time method. The majority of this blog post will focus on making the Cat’s Cradle block oversized and then how to trim it just right. I feel that this method gives the most accurate results.
Basic steps (exact method)
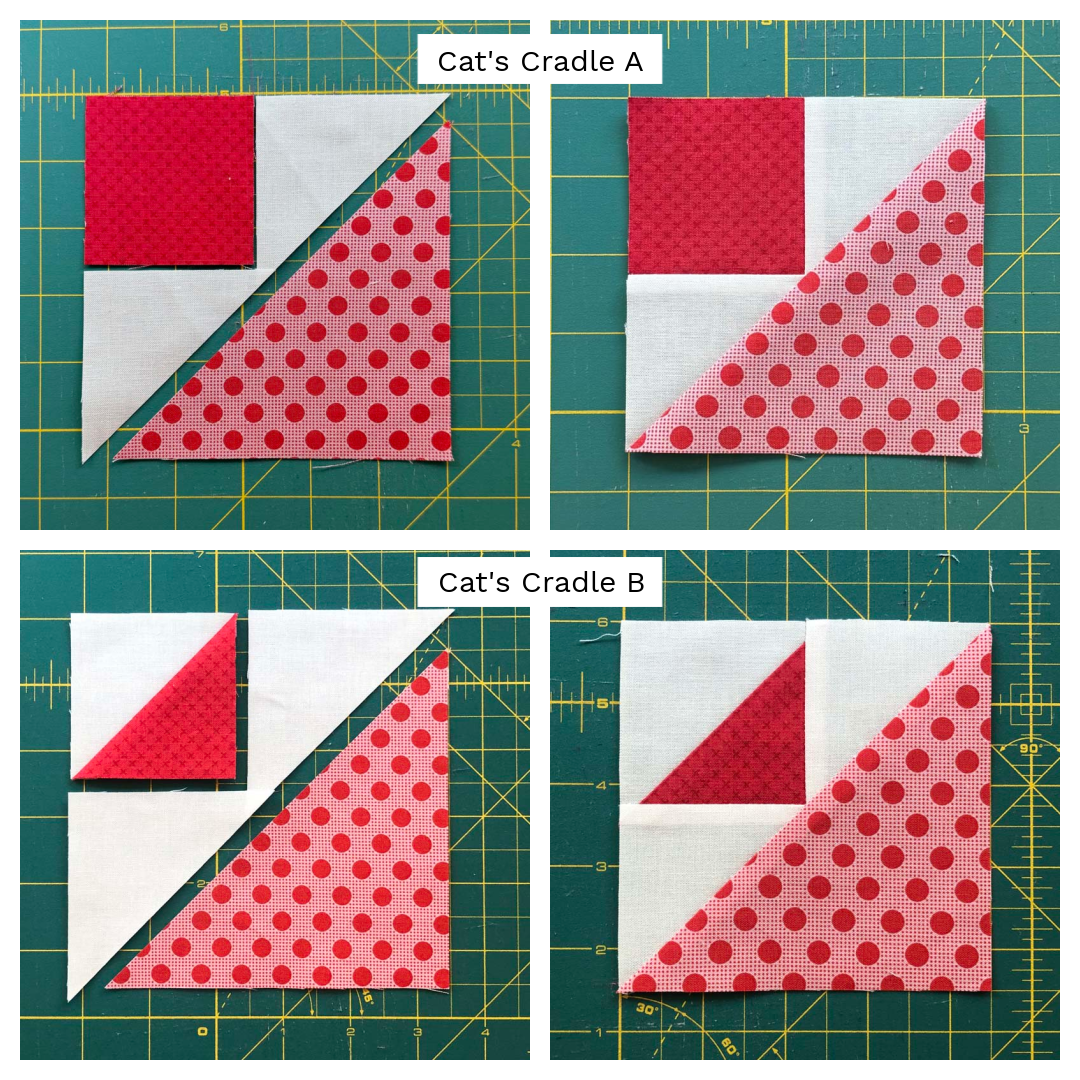
Remember, there is an Option A and an Option B for the Cat’s Cradle Block (as shown below). The diagrams will reference Option B. The exact cutting size of each unit can be found in the downloadable pattern instructions.
- Arrange the square (A) or A1/A2 HST unit, the two B triangles and the C triangle as shown below.
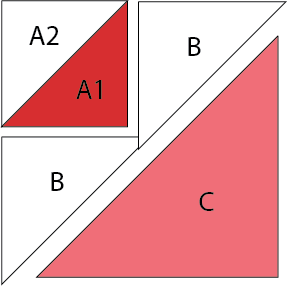
- With right sides together, stitch the B triangles to two adjacent sides of the square or HST unit.
- Press towards the triangles. There should be 1/4″ overlap of the triangles on the long edge to accommodate the seam allowance.
- With right sides together, sew the C triangle to the long side of the pieced unit. This should measure the desired unfinished size.
Basic Steps (oversized method) READ THIS!
There are a few extra steps in the oversized method, but it is SO worth it! One of the prohibitive factors to oversizing this block is the ability to easily trim the pieced triangle portion of the block. Unless you have a specialty ruler, this can be tricky. But I have come up with a great trick for this! When I “discovered” this trick, I was silly excited. So, I hope you’ll read through this section and give it a try.
Note: Most of the pieces cut for this option are oversized to start. The cutting instructions are included in the pdf pattern.
- If you’re making Option B, you’ll make the HST units oversized and then trim down to the exact unfinished measurement needed. (The cut pieces will make two blocks.) If you’re making Option A, the square will be cut to the unfinished size needed.
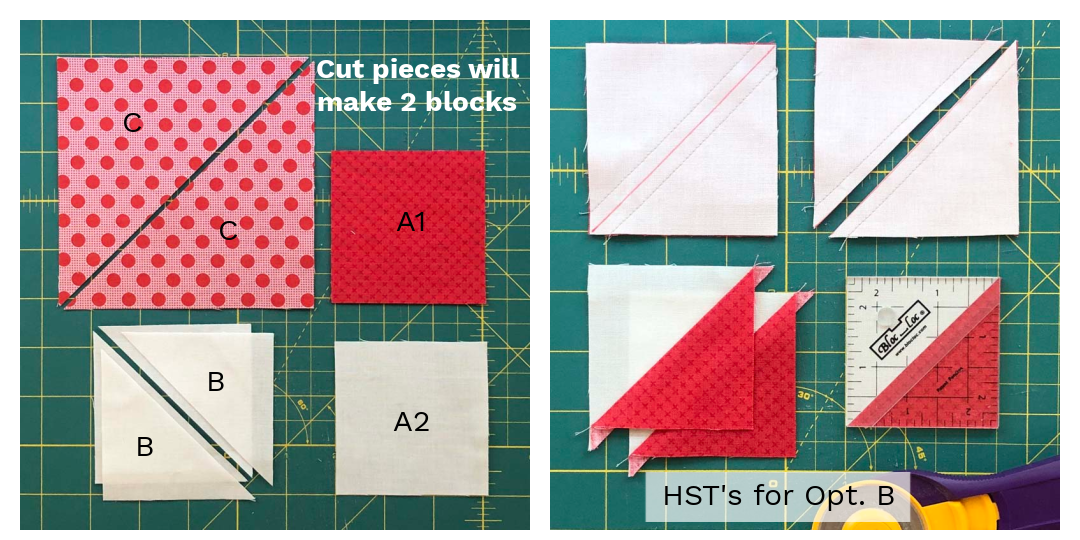
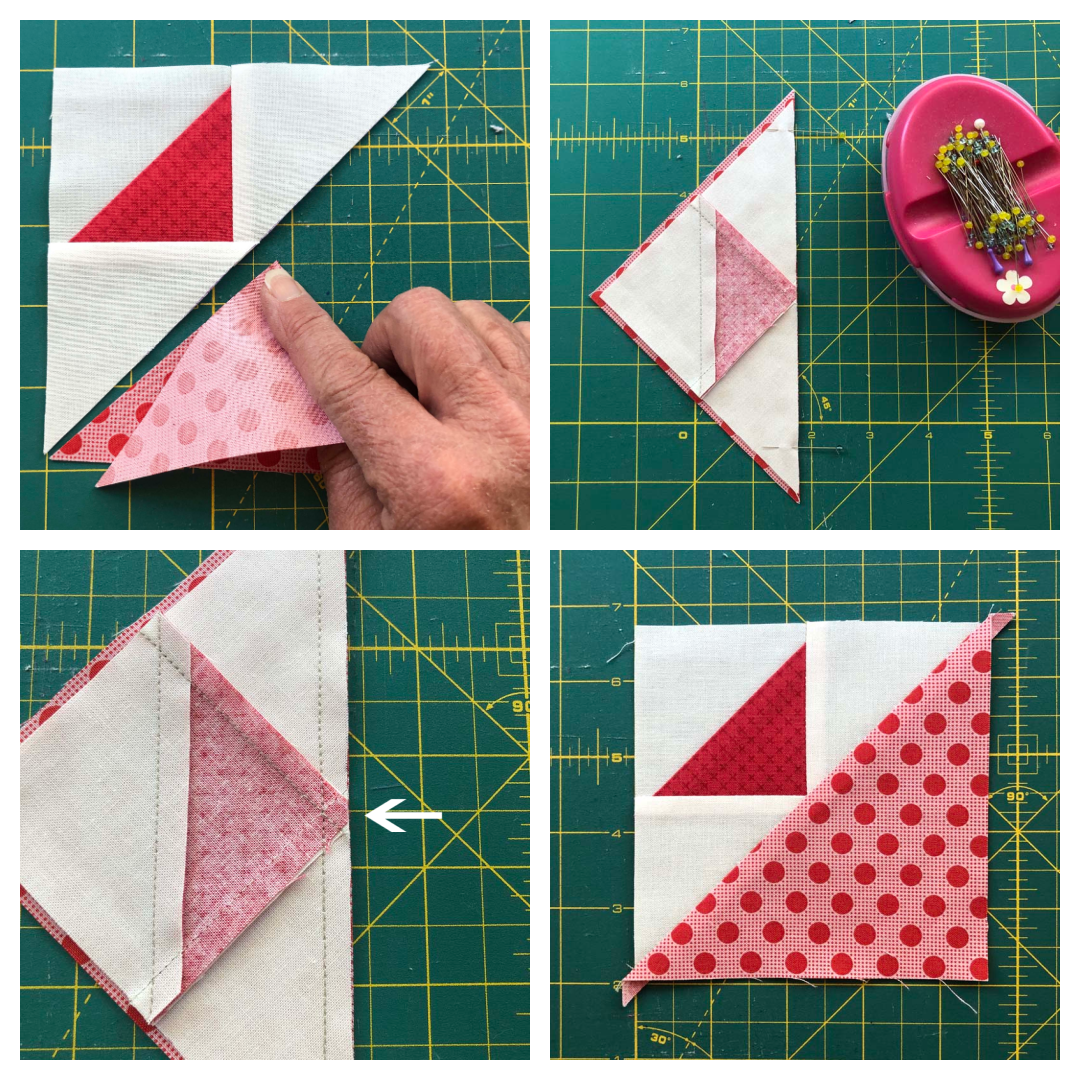
- Arrange the HST unit, B triangles and C triangle as shown below.
- With right sides together, stitch the B triangles to two adjacent sides of the square or HST unit.
- Press towards the triangles.
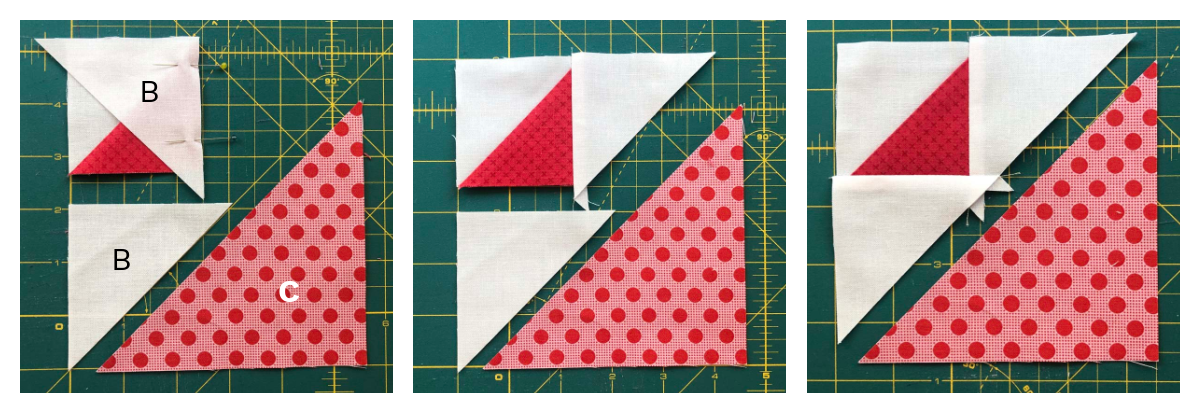
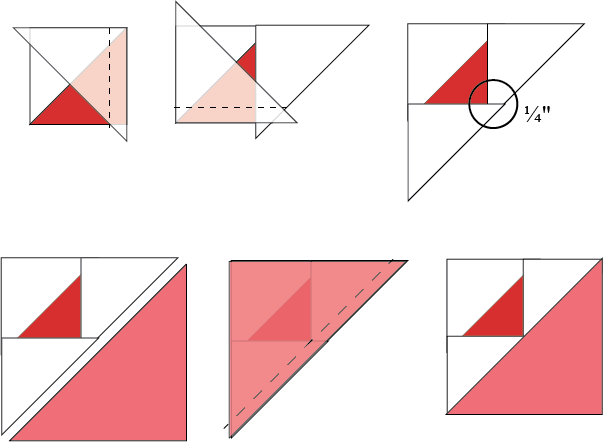
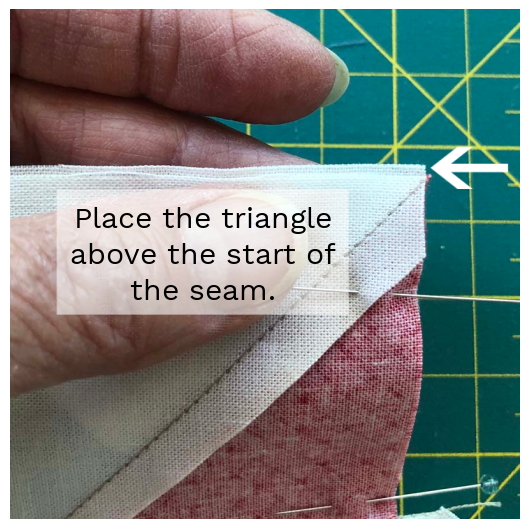
TIP 1: Because the triangles are oversized, you’ll get better results if you offset the triangle a little above the start of the seam. This will give you trimming space in the next step.
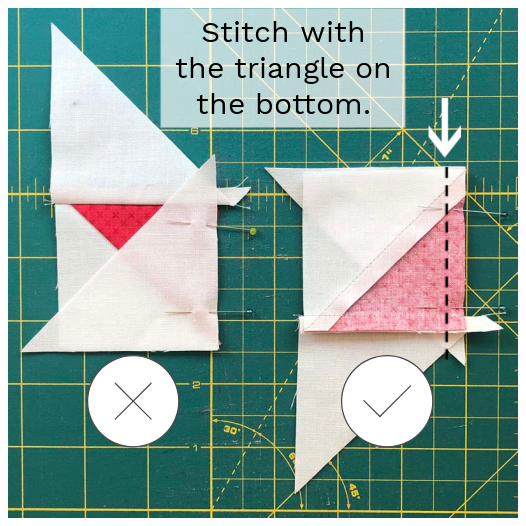
TIP 2: When you stitch the seam, sew with the triangle-side down. This gives you complete visibility of the top square or HST which is an important guide for the 1/4″ seam allowance. Also, you’ll get better accuracy when you start a seam with a right angle (as opposed to a “V” shape).
Trimming the oversized units
The following steps are required before you continue sewing the large C Triangle to the pieced triangle.
- Trim (if necessary) the pieced triangle unit along the two short sides. If you used my tip from above, this will definitely be necessary.
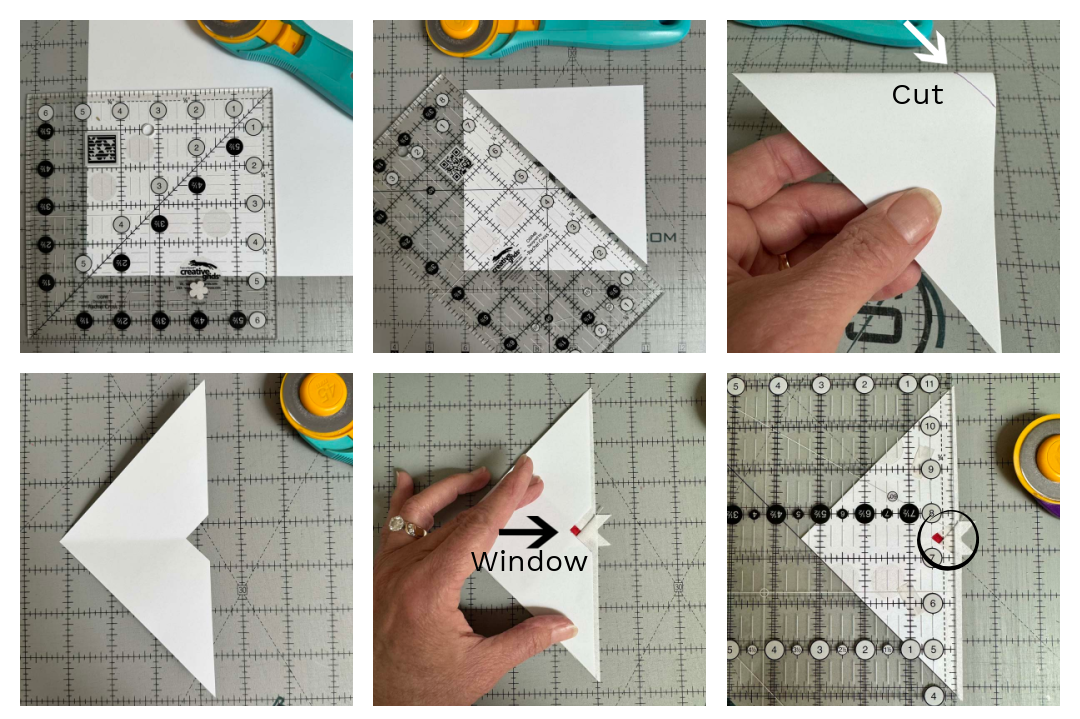
Step 6 with paper template
- Trim the long edge of the pieced triangle unit using the following steps to make a paper template. (If you don’t want to make a paper template, then skip to the alternate Step 6.)
- Determine the unfinished TRIANGLE size of the block you’re making. For this example, I’m making a 4″ finished Cat’s Cradle Block. To get the triangle size to cut, you add 7/8″ to the finished square size. Example: 4″ + 7/8″ = 4 7/8″. That’s the size to cut for the paper template.
- Cut a square from paper (or cardstock) using the formula above.
- Cut the paper diagonally in half, creating two triangles. You’ll only need one triangle.
- Fold the triangle in half along the long edge and cut a small triangle out of the center.
- This creates a window so you can see that the 1/4″ seam allowance is in tact before trimming.
You can place the paper template directly onto the pieced triangle and trim, but it tends to shift easily. Here’s a better way:
- Place three pieces of double sided tape (or roll a piece of tape into a tube) onto one side of the paper template.
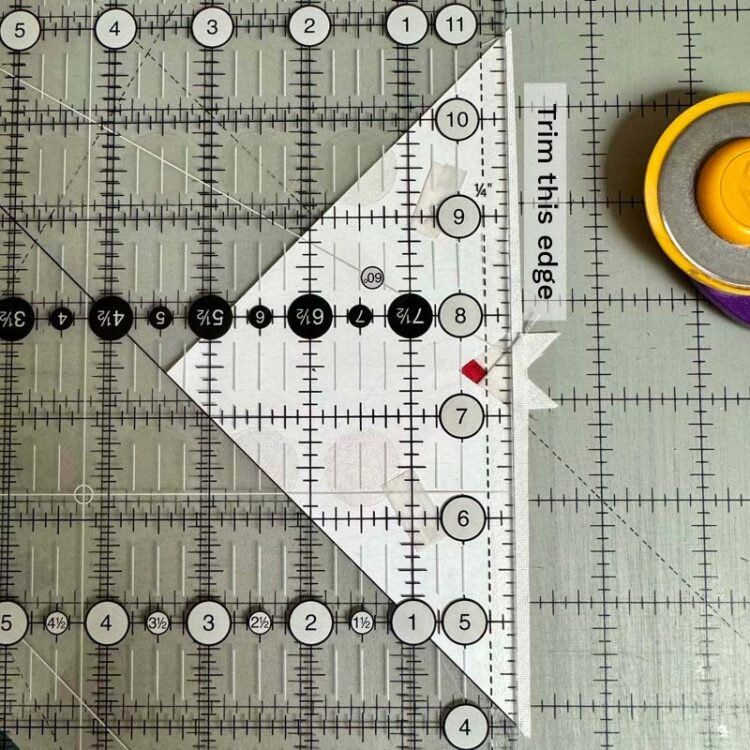
- Line up the long edge of the template with the cutting edge of a ruler and adhere. I find it’s easier to ALSO line up a 45 degree line of the ruler with a short side of the template.
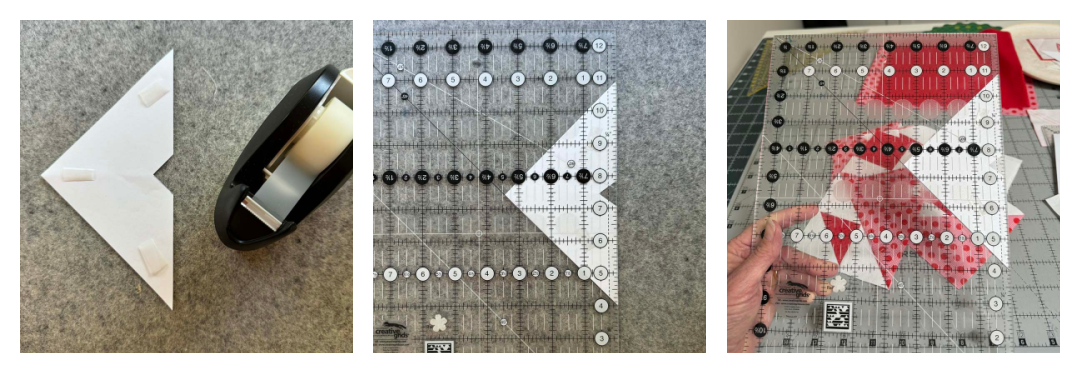
- Place the ruler so that the template is aligned with the two short sides of the pieced triangle unit. Make sure the 1/4″ line of the ruler is at the center intersection of the triangle unit (thus the window). Trim the long edge.
Alternate Step 6 (no template)
- Trim the long side of the pieced triangle using a ruler. This is a good option if you don’t want to make a paper template.
- Determine the unfinished TRIANGLE size of the block you’re making. For this example, I’m making a 4″ finished Cat’s Cradle Block. To get the triangle size to cut, you add 7/8″ to the finished square size. Example: 4″ + 7/8″ = 4 7/8″. That’s the size you’ll be trimming to.
- Mark both short sides of the pieced triangle starting from the square corner. For this example, I placed the 4 7/8″ line of the ruler along the left side of the triangle unit and placed a mark on the right side. I rotated the unit and did the same thing on the other corner.
- Connect the marks by drawing a line from point to point on the long edge.
- The line should be 1/4″ away from the inner square center point.
- Trim on the line.

Oversized steps continued
- Fold Triangle C in half and mark or crease the center. (Triangle C is oversized).
- Pin Triangle C to the pieced triangle, matching the centers.
- Carefully sew the seam, making sure the stitches run through the center square point.
- Press towards Triangle C.
- Trim both Triangle C edges to the correct size using a square ruler.
- Make sure the diagonal line of the ruler is along the diagonal seam.
- You’ll only be able to trim one side at a time.
- Admire your perfect block!
About the Cat’s Cradle Ruler
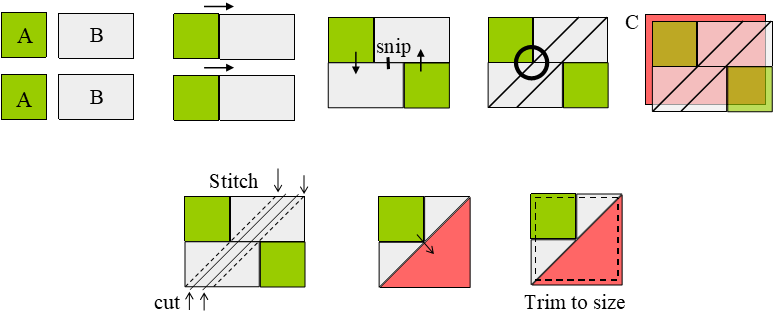
As with most quilting methods, you’ll hear “There’s a ruler for that”. And this one is no exception. The Cat’s Cradle Ruler by Creative Grids uses a clever piecing technique that eliminates all triangles from the equation. It’s made with squares and rectangles only, and you make two at a time. Plus, you can choose between six different sizes! I know, how is all that possible? Let’s take a quick look.
- You’ll start by cutting two squares. two small rectangles, and one large rectangle. The ruler gives you the sizes to cut based on the finished block size.
- Each square is sewn to a small rectangle and the resulting units are sewn to each other creating a large pieced rectangle.
- Two diagonal lines are drawn on the pieced rectangle. These are stitching lines.
- Place the pieced rectangle right sides together with a plain rectangle and stitch on the lines.
- Cut apart between the stitching lines.
- Press towards the large triangle.
- Trim using the Cat’s Cradle Ruler (not pictured).
Pros
- The ruler eliminates triangles, so accuracy is easier to attain.
- The unit is made oversized and trimmed to the exact size using the ruler.
- Two units are made at the same time.
Cons
- The cost of purchasing another ruler vs. using what you have.
- The ruler is not intuitive. It takes practice to get used to the different markings.
- Separate instructions are needed to follow the steps and have success.
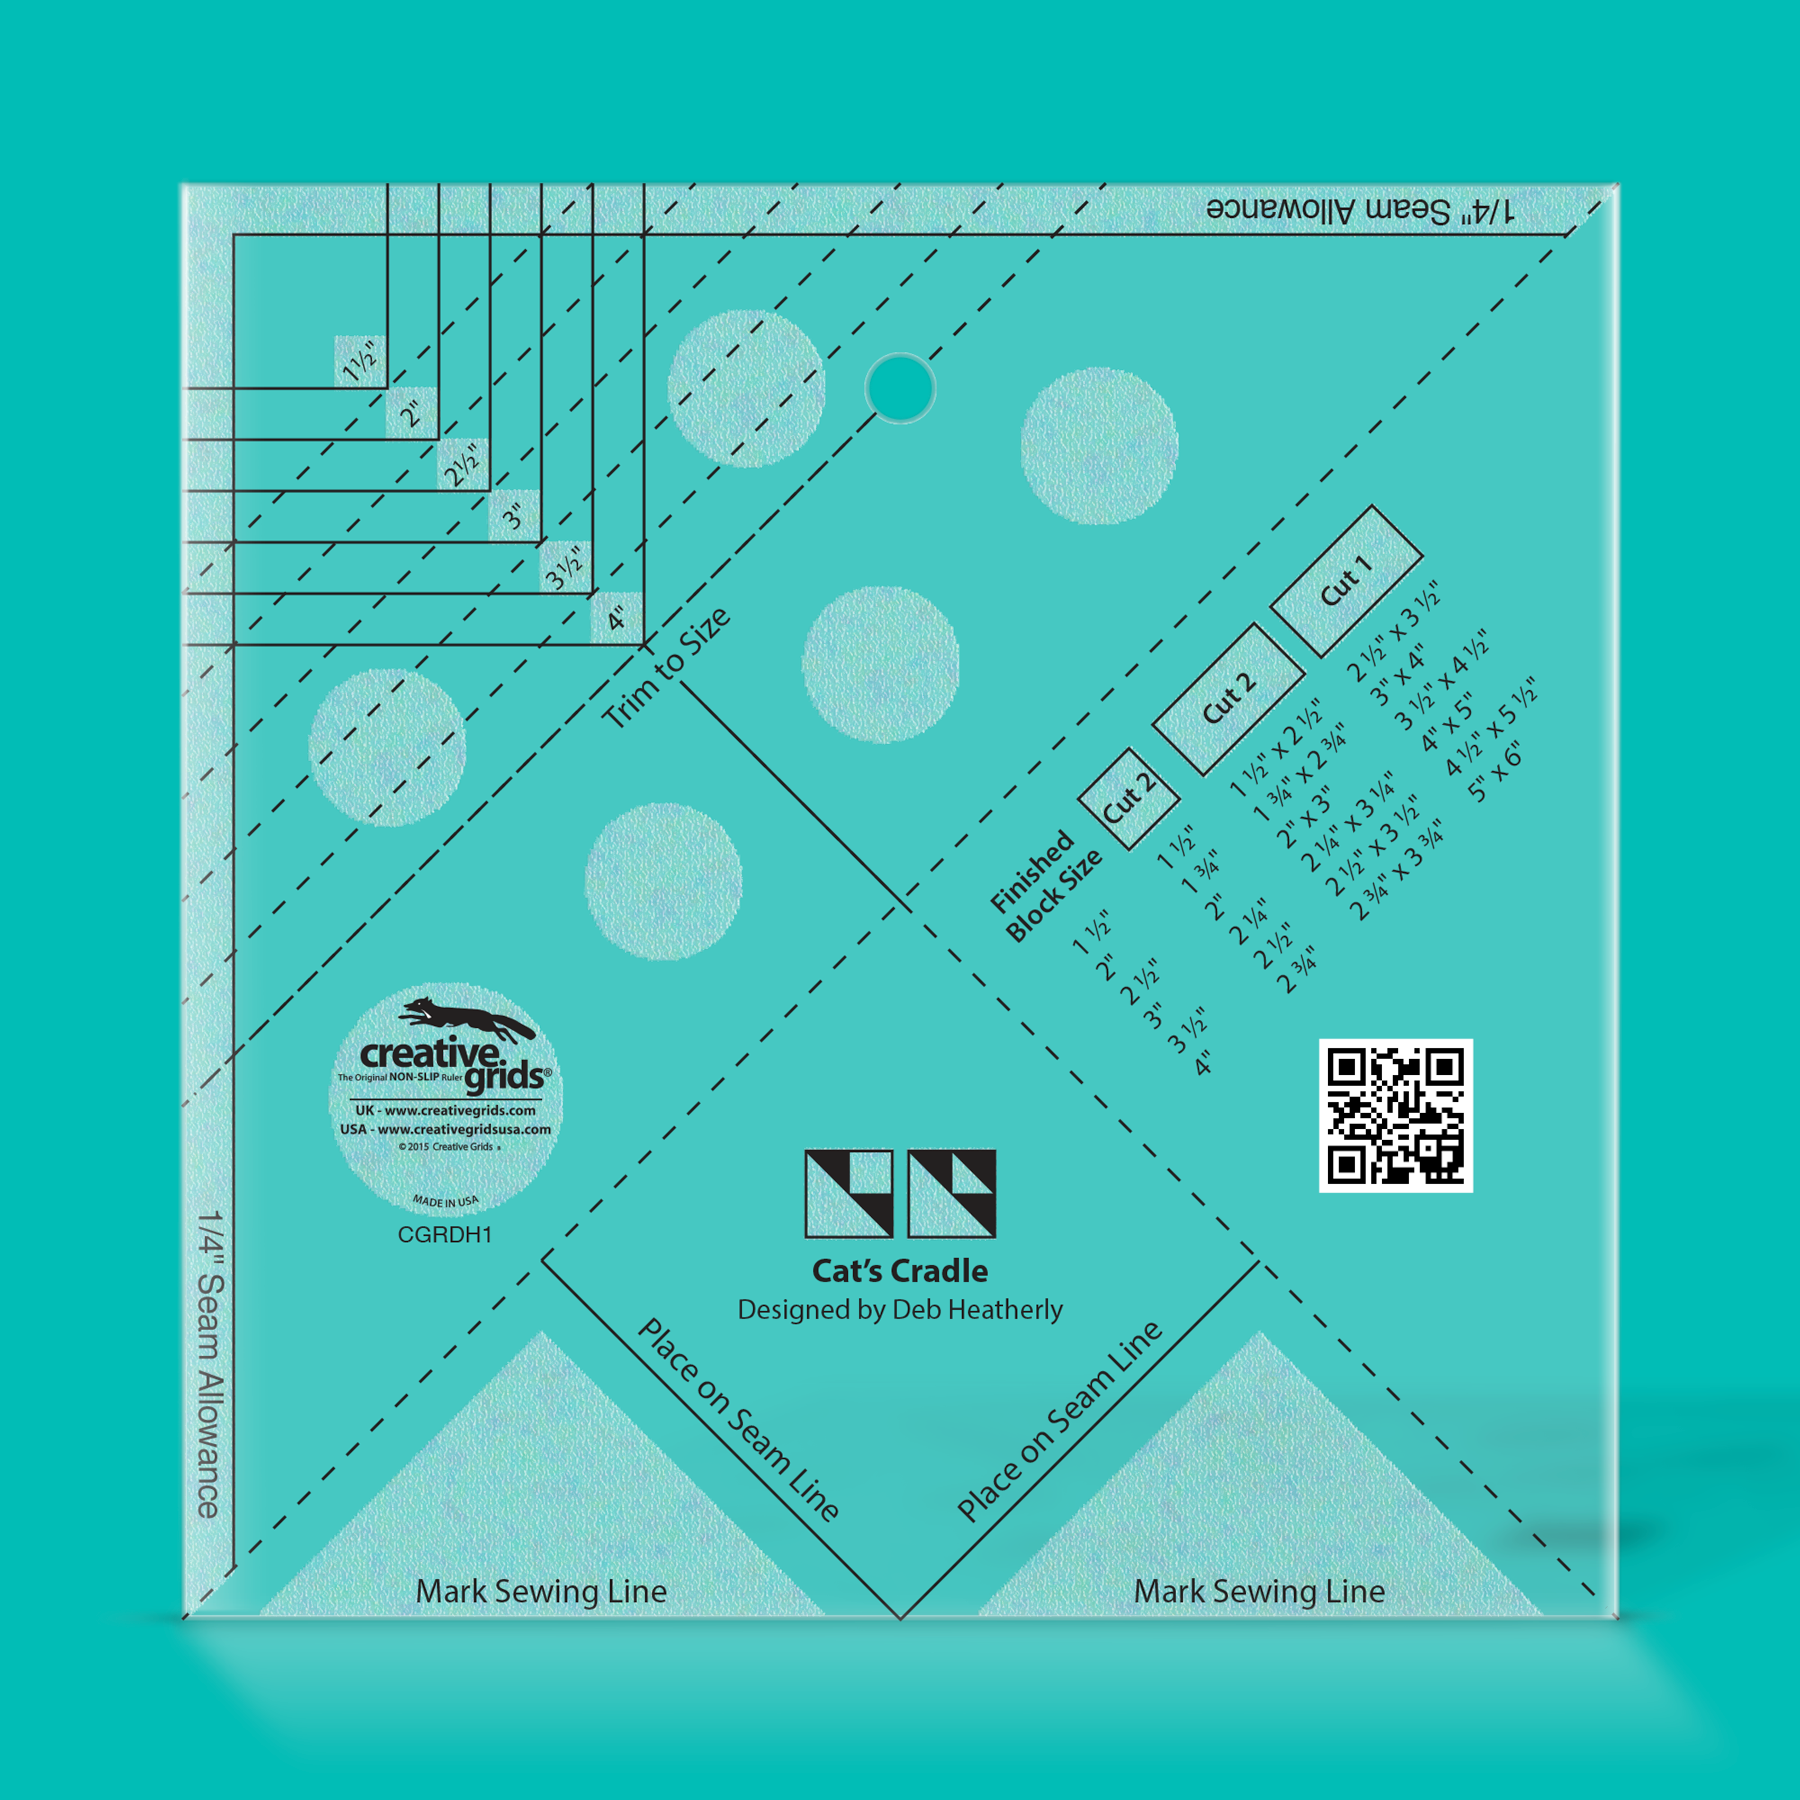
The Cat’s Cradle Ruler is a genius tool, in my opinion. If you like playing with different rulers and techniques, this might be a good addition to your inventory. Be mindful that there is a learning curve to using the ruler. Once you get the hang of it, you’ll reach for it when needed.
I’ll have a follow-up tutorial on the same technique used with this ruler and how you can make it successfully (with or without the ruler).
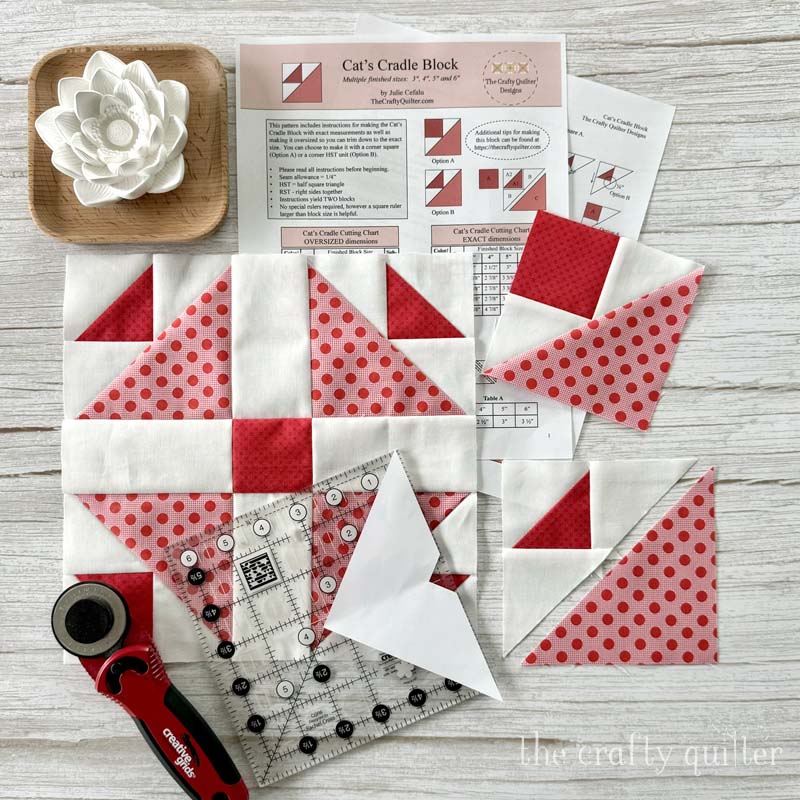
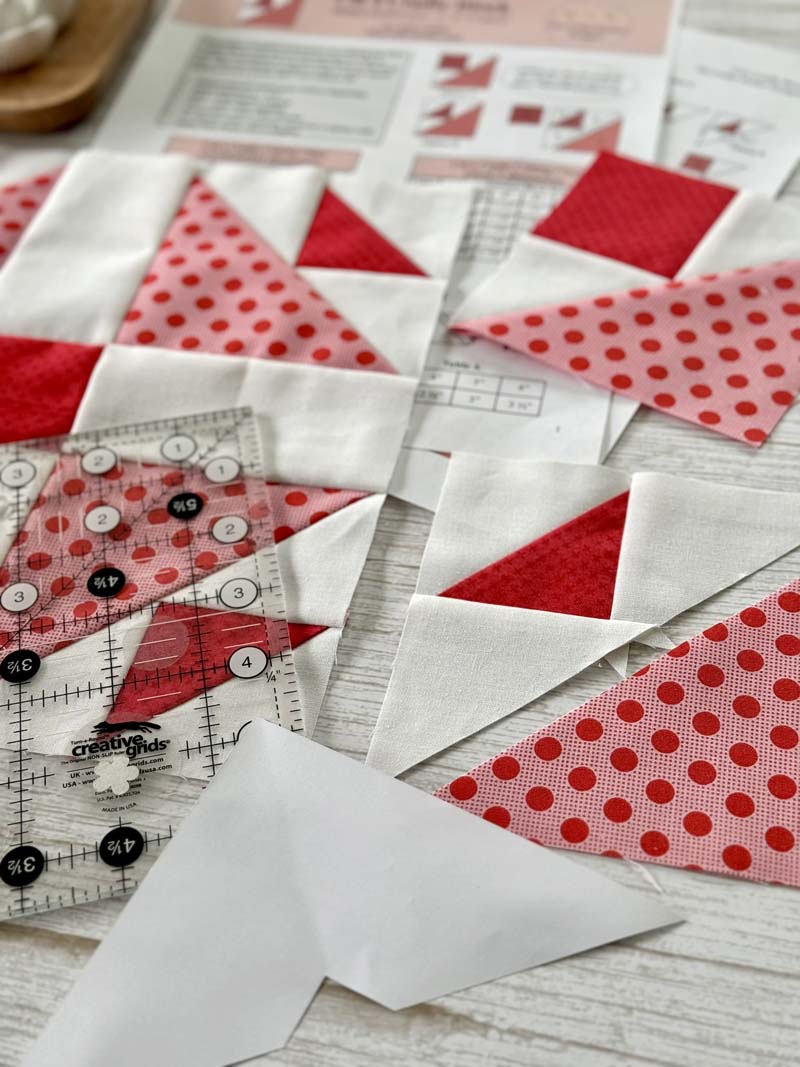
FREE Cat’s Cradle block pattern
This is a free pattern and I’ve tried my best to make sure it is accurate. With that being said, it has not been tech edited or tested by others. Feel free to contact me if you find any inaccuracies.
I recommend making a test block first and see how it goes. You may choose to increase the oversized dimensions just a bit. My cutting instructions have measurements that have been rounded up to the nearest increment. For example, 2 7/8″ has been rounded up to 3″. Some people like to bump it up by 1/4″ – 3/8″ to give them even more wiggle room. In that case, 2 7/8″ could be rounded up to 3 1/8″ or 3 1/4″.
Piecing tips
These piecing tips are important if you’re using the exact method. Otherwise, the oversized instructions give you the wiggle room needed for those minor inaccuracies that can occur during cutting, piecing and pressing.
- Prepare your fabric by pressing it with starch before cutting. This will give the fabric more stability and you’ll have better control throughout the process.
- Carefully cut and label your fabric pieces.
- When cutting a square in half diagonally, make sure the ruler is lined up exactly corner to corner.
- Use pins to keep triangles from shifting as you stitch.
- Sew with a scant 1/4″ seam allowance.
- Check for accuracy along the way. In other words, make sure the corners are square and the seams are straight. Trim if needed.
- Take your time and breathe!
The next time you need to make a Cat’s Cradle Block, I hope you’ll have success with these tips. It may seem like a lot of effort to make the block oversized and then trim it down, but I feel it’s worth it. And try the paper template! It’s easier than you think, and you’ll love the results!
For more quilt blocks and tips, check out Golden Peaks Quilt Block, Garden Sunflower Quilt Block and Chunky Dresden Plate.


Discover more from The Crafty Quilter
Subscribe to get the latest posts sent to your email.


Julie, this tutorial is Fabulous. Thank U so much, I will give the Creative Grids ruler a try. Got it as a gift, but never use it.
Thank you Julie for sharing this beautiful block with us. Your instructions for making it is very clear!
I do like to read your blog
Regards
Rina Scholtz
South Africa
I love it when you use Creative Grids:). And I enjoy learning more about the blocks. Your pros and cons are great on the Cat’s Cradle Ruler too. I’m thoroughly enjoying your posts:)
Thank you. You are so generous with your time and talent
Good morning, Julie. Excellent tutorial as always!
Great tutorial! Thank you!
Julie you always inspire me to try new things. I love your oversized method. Thanks, Patsy
OUTSTANDING email!!!!! Your talent and gift for explaining things is amazing.
Thank you for doing this Julie.