Applique Part 2 – Machine Applique with Fusibles
Part 2 of the Applique Series is all about using fusible products with machine applique.
You can find Part 1 here: Machine Applique Terminology and Part 3 here: Machine Applique Stitches.
So let’s start with a review of what a fusible product is and the different brands available.
Fusible web is a thin, man made substance that melts when it is heated, thereby allowing two pieces of material to be fused together. It can be purchased by the yard, on a roll, or in flat sheets. I will be focusing on paper-backed fusible web which is just like it sounds – a double sided fusible that is backed with paper on one side.
Here are four of the most popular brands used for applique: Lite Steam a Seam II, Heat ‘n Bond Lite, Wonder Under and Shades SoftFuse. Let me tell you a little about each and why I like them (or not).
Lite Steam-A-Seam 2 by The Warm Company has a pressure sensitive adhesive side that allows you to temporarily position your materials until everything is in place. When you’re ready, you can press it for permanent placement. I like this product, but I find that figuring out the correct side to trace my shape onto is a little “tricky” and it’s not as thin as some of the other fusibles.
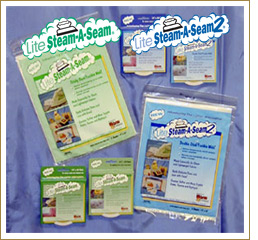
Wonder-Under (805 by Pellon) is a paper backed fusible web that is very thin and lightweight. This is a great product, but often the fusible will peel away from the paper before I’m ready for it to.

Shades SoftFuse is one of the newer products on the market and I’m really liking it so far. It is also very lightweight and has a paper backed side which stays put a little better than Wonder-Under. This is my number two favorite.

HeatnBond Lite is probably my favorite fusible web, especially for beginners. It’s very easy to use and it is lightweight, but probably not the lightest out of the group. Even still, I like the stability of the paper side and the ease of use.

So let me take you through the steps of machine applique using a paper backed fusible web. Then we’ll talk specifically about the sewing machine set up and stitches to use.
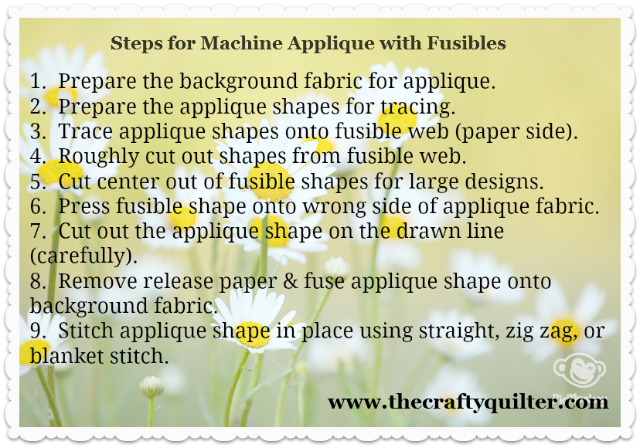
Step 1: Prepare your background fabric for applique. This is sort of like your canvas. It can be one solid piece of fabric or a pieced background using multiple fabrics.

Bloom Quilt Pattern by V and Co.

Ellingham Elephant Quilt Pattern
In general, your background should be one inch larger than the finished measurement. The cutting instructions for most patterns will provide this extra amount for you, but double check to be sure.
TIP: If you don’t normally pre-wash your fabrics, this might be a good time to give it a try. The main reason is because the fusible product will generally adhere better to fabric that is free of chemicals and sizing. However, you will still find me working with unwashed fabric (cause I’m a little lazy or too anxious to get started) and I’ve only had an issue once so far.
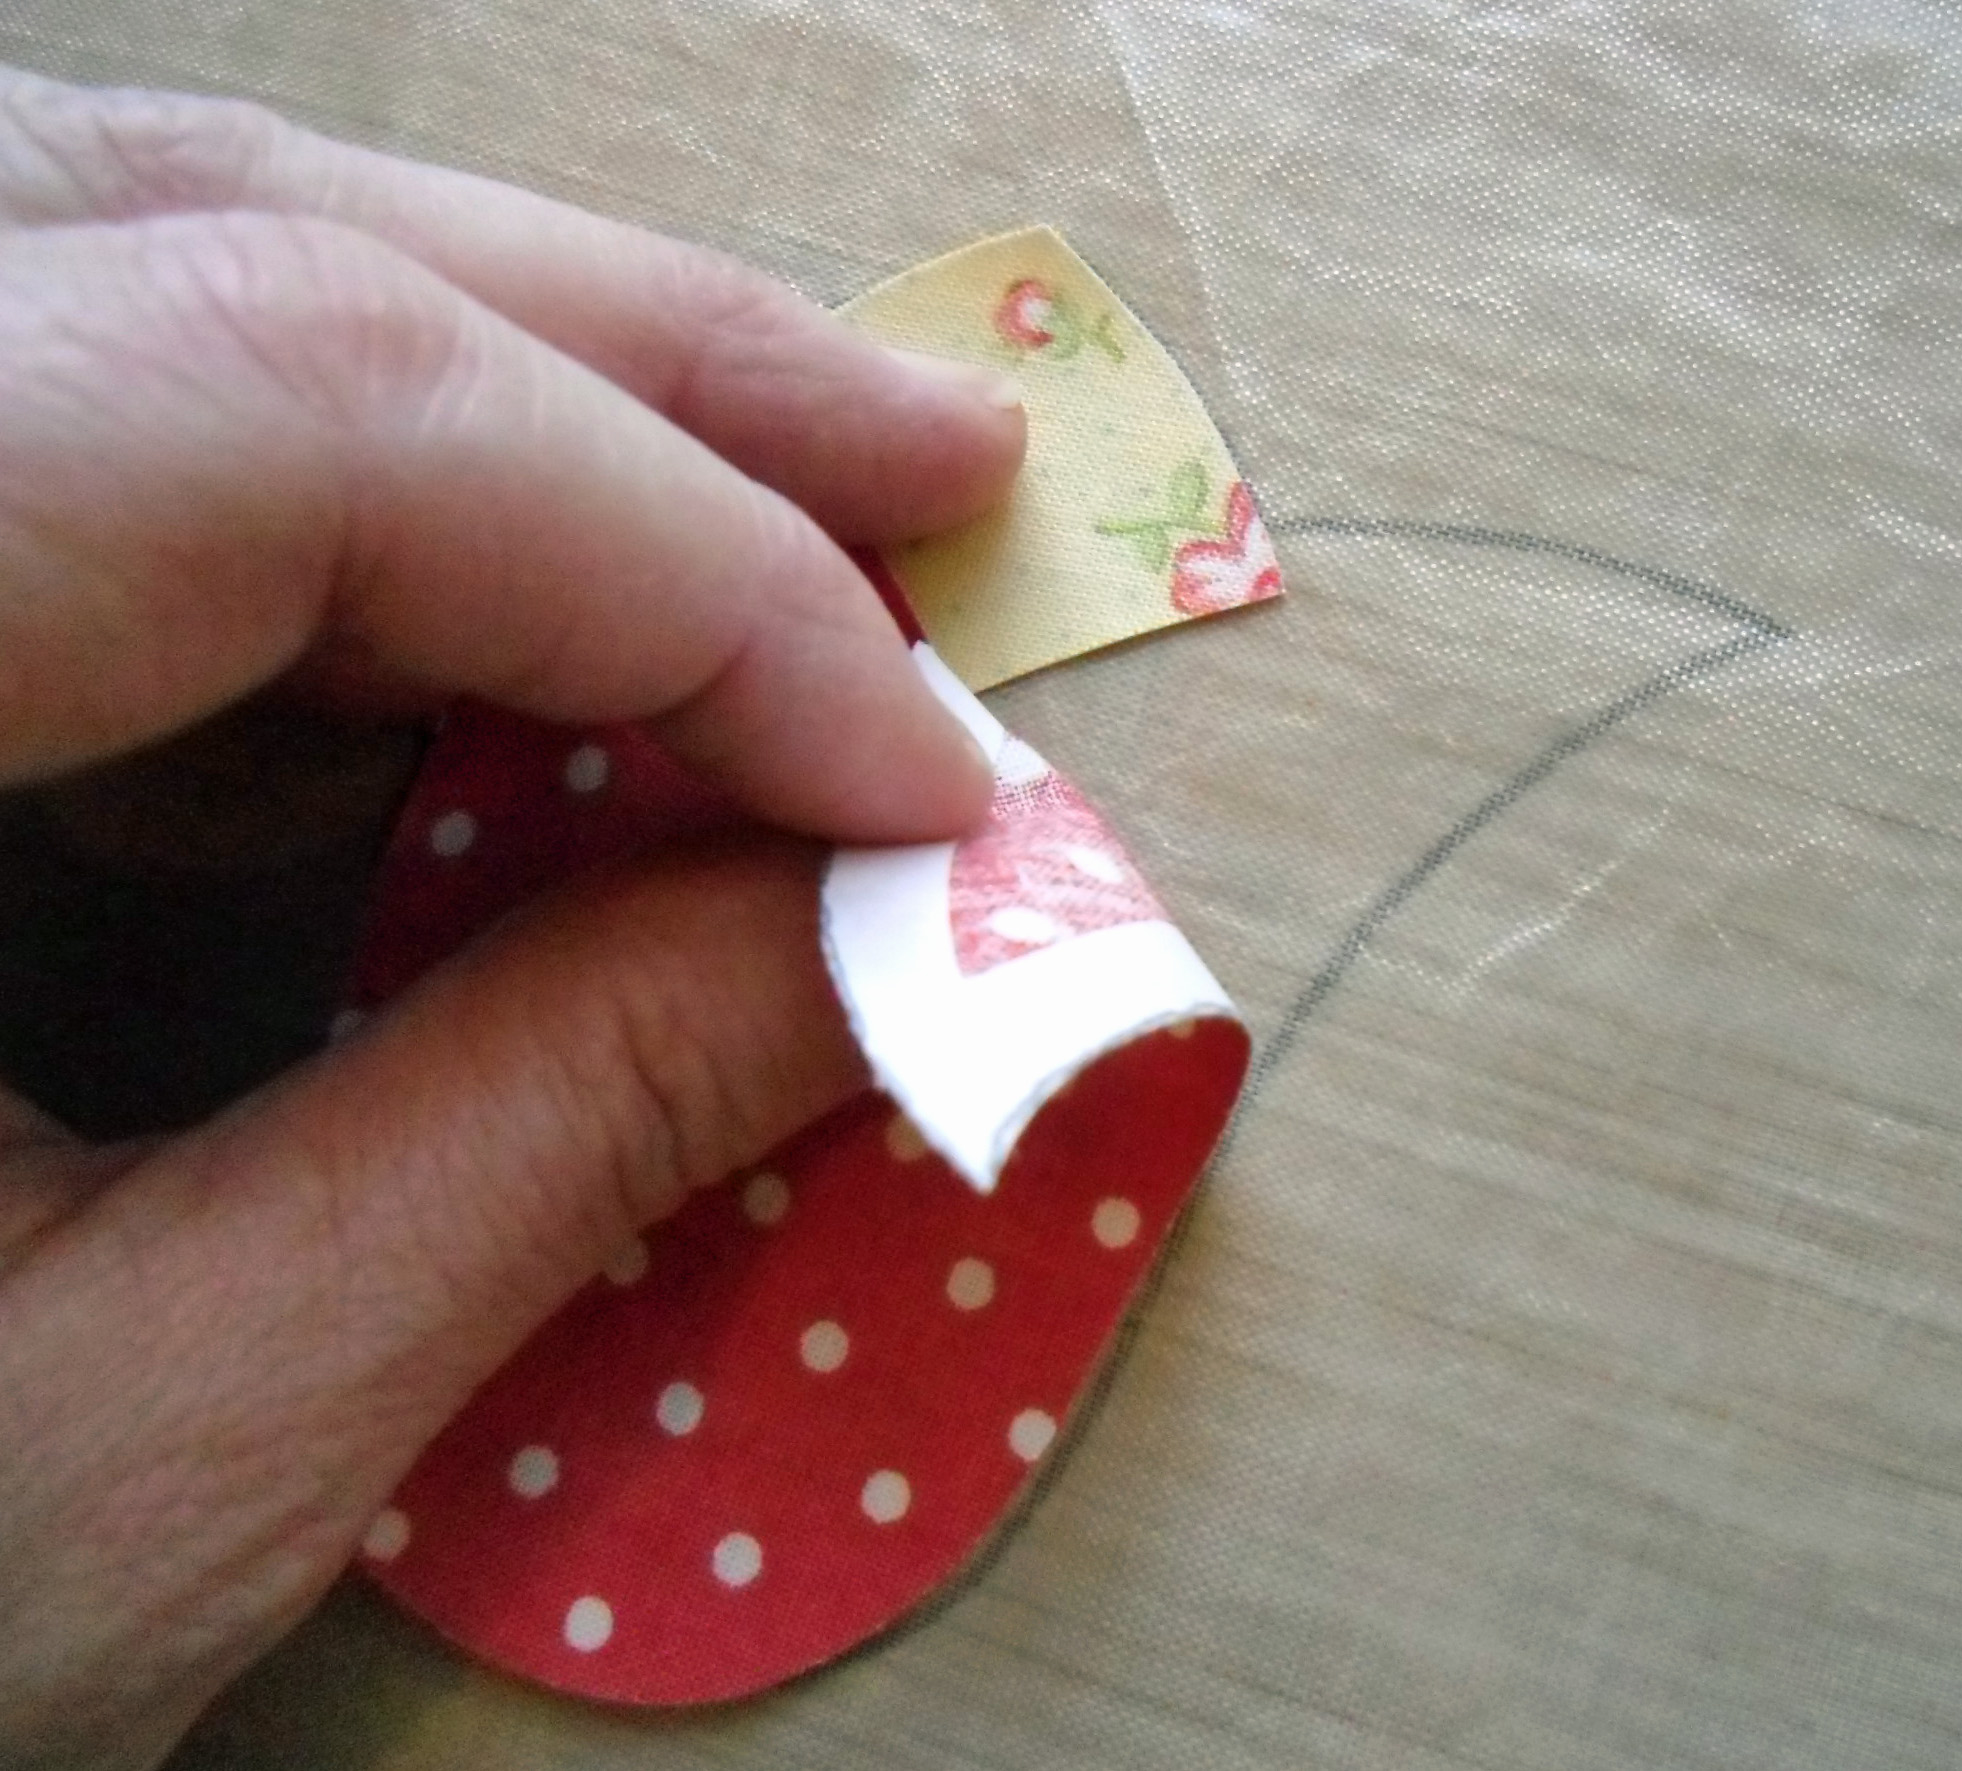
Step 2: Prepare your applique shapes for tracing. When using this method of applique, whatever you trace onto the paper side of the fusible will be mirrored once it is applied to the wrong side of the fabric and then fused to the background. This is especially important when you’re working with an applique that has letters.
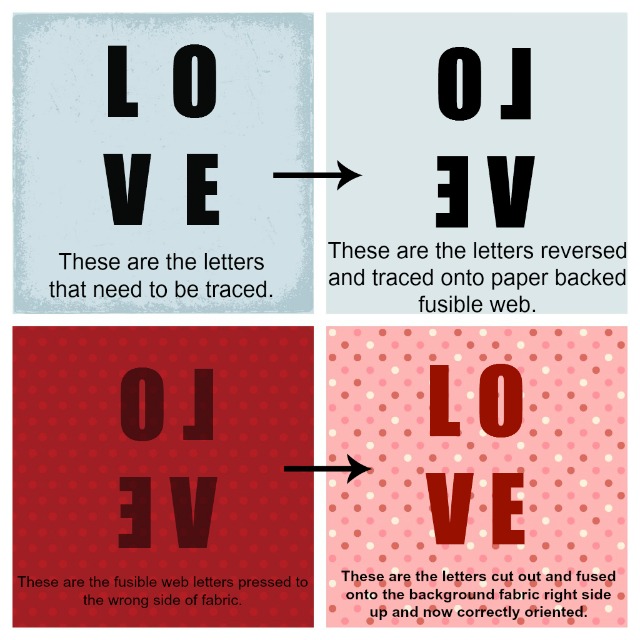
Many applique projects are symmetrical, therefore you don’t need to worry about reversing the images first. Here is an example of a symmetrical design:
If your pattern is asymmetrical, you will need to determine if the shapes should be reversed first, or if the pattern has already done that for you. The easiest way to reverse the image is by tracing it from the back side. You could also run it through a copy machine and select the mirror image option.
The next thing to look at before tracing, is to see what, if any, shapes will be overlapped by another. Most applique projects are made up of pieces that go in front of or behind one another. It’s smart to mark those edges on the pattern first, before you start tracing. You want to avoid having raw edges “butt” together, so overlapping or underlapping is necessary.
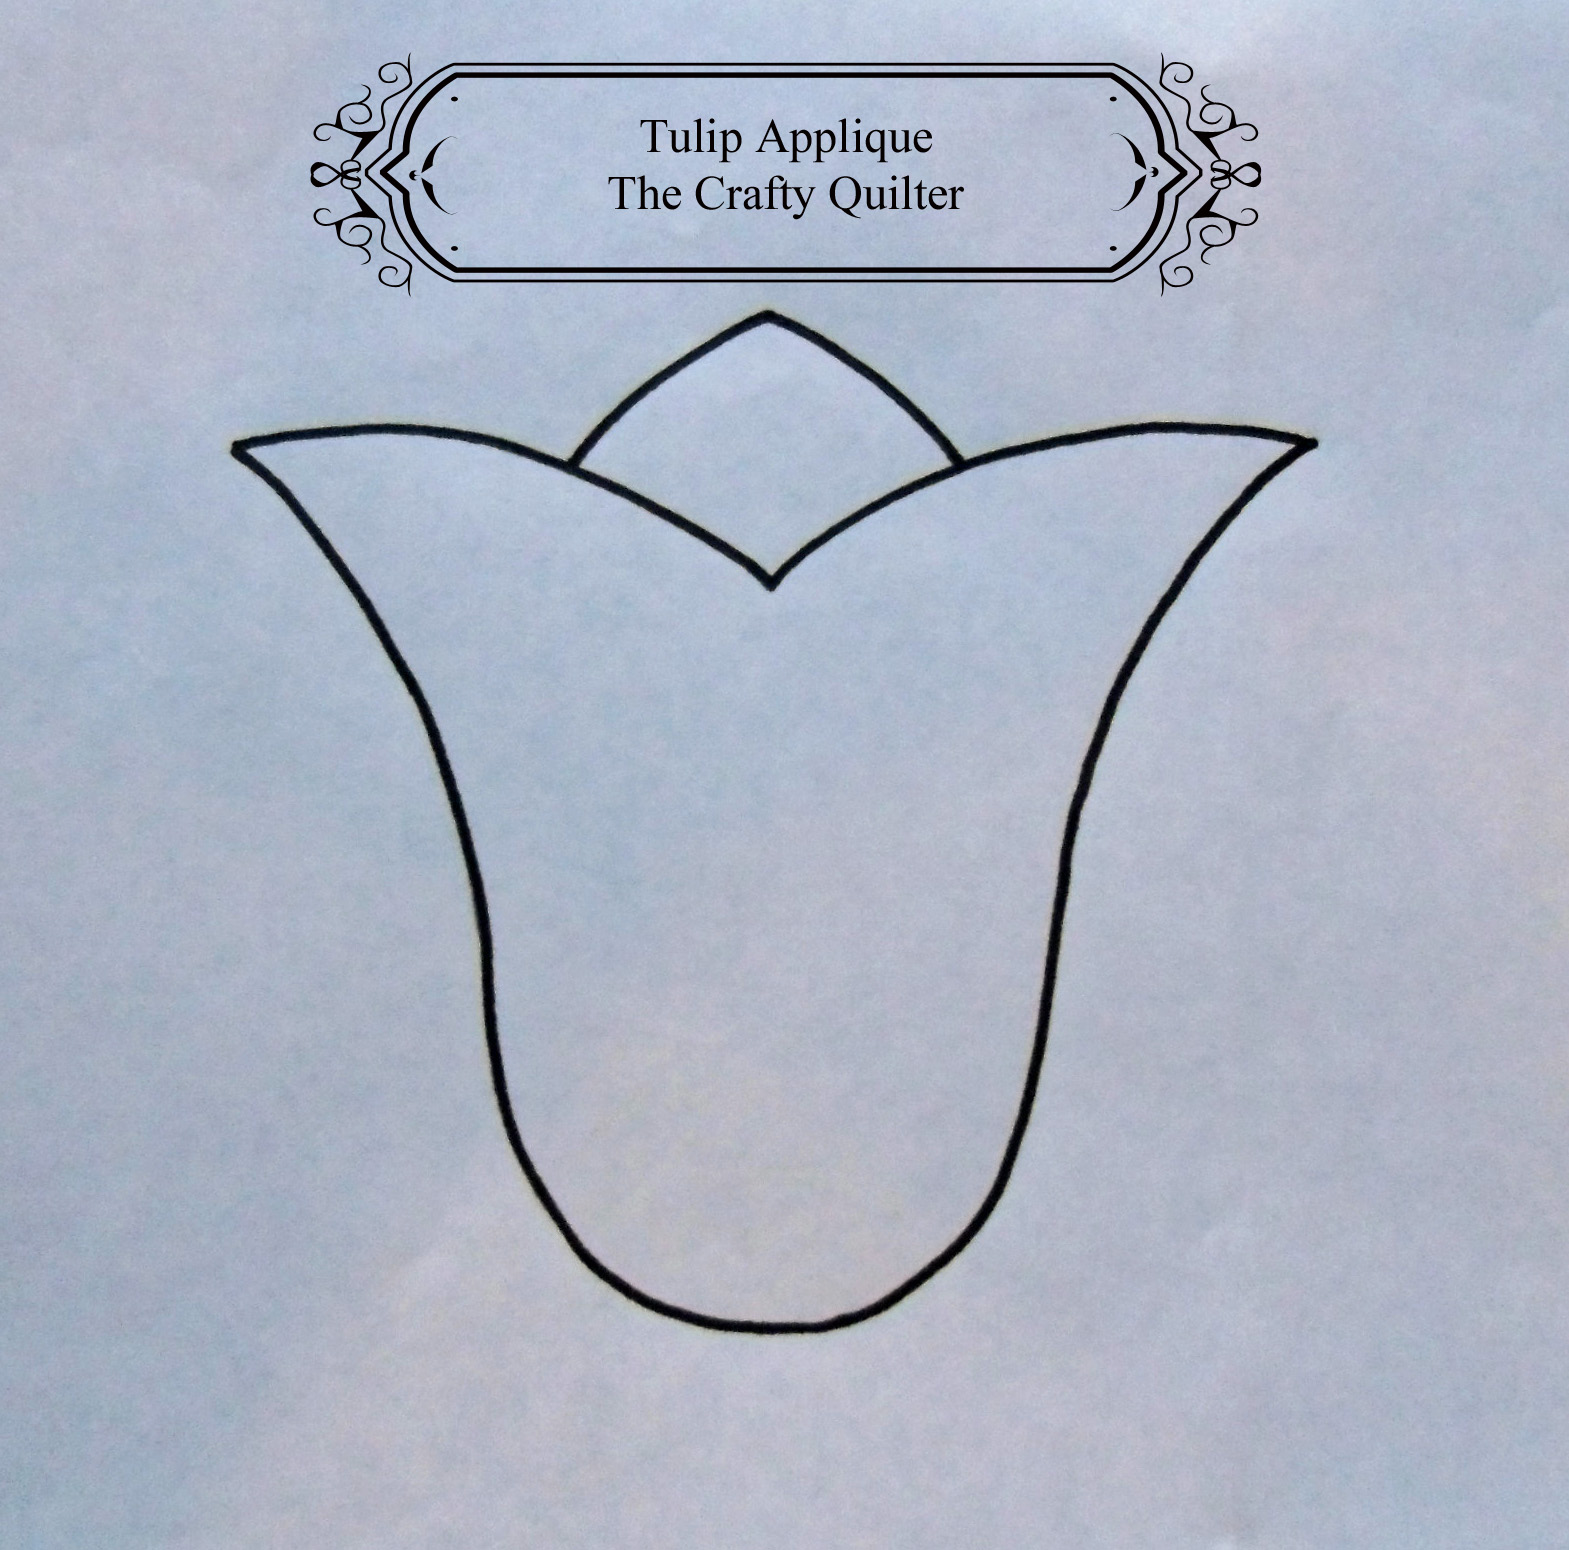
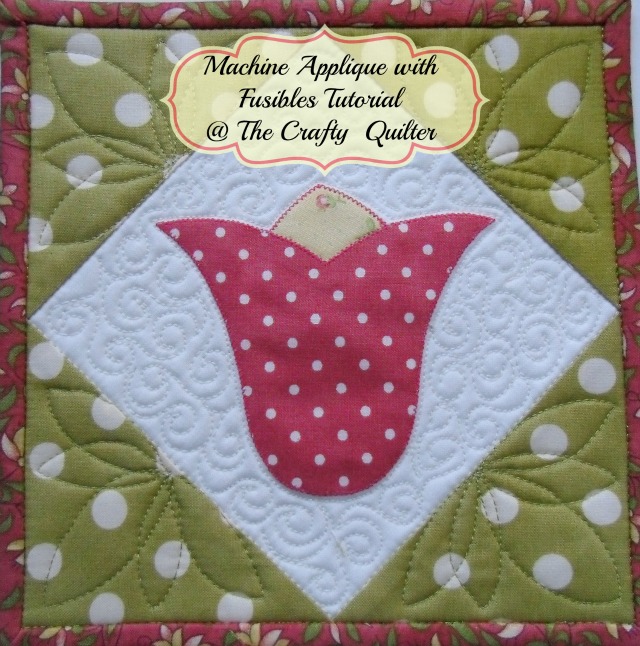
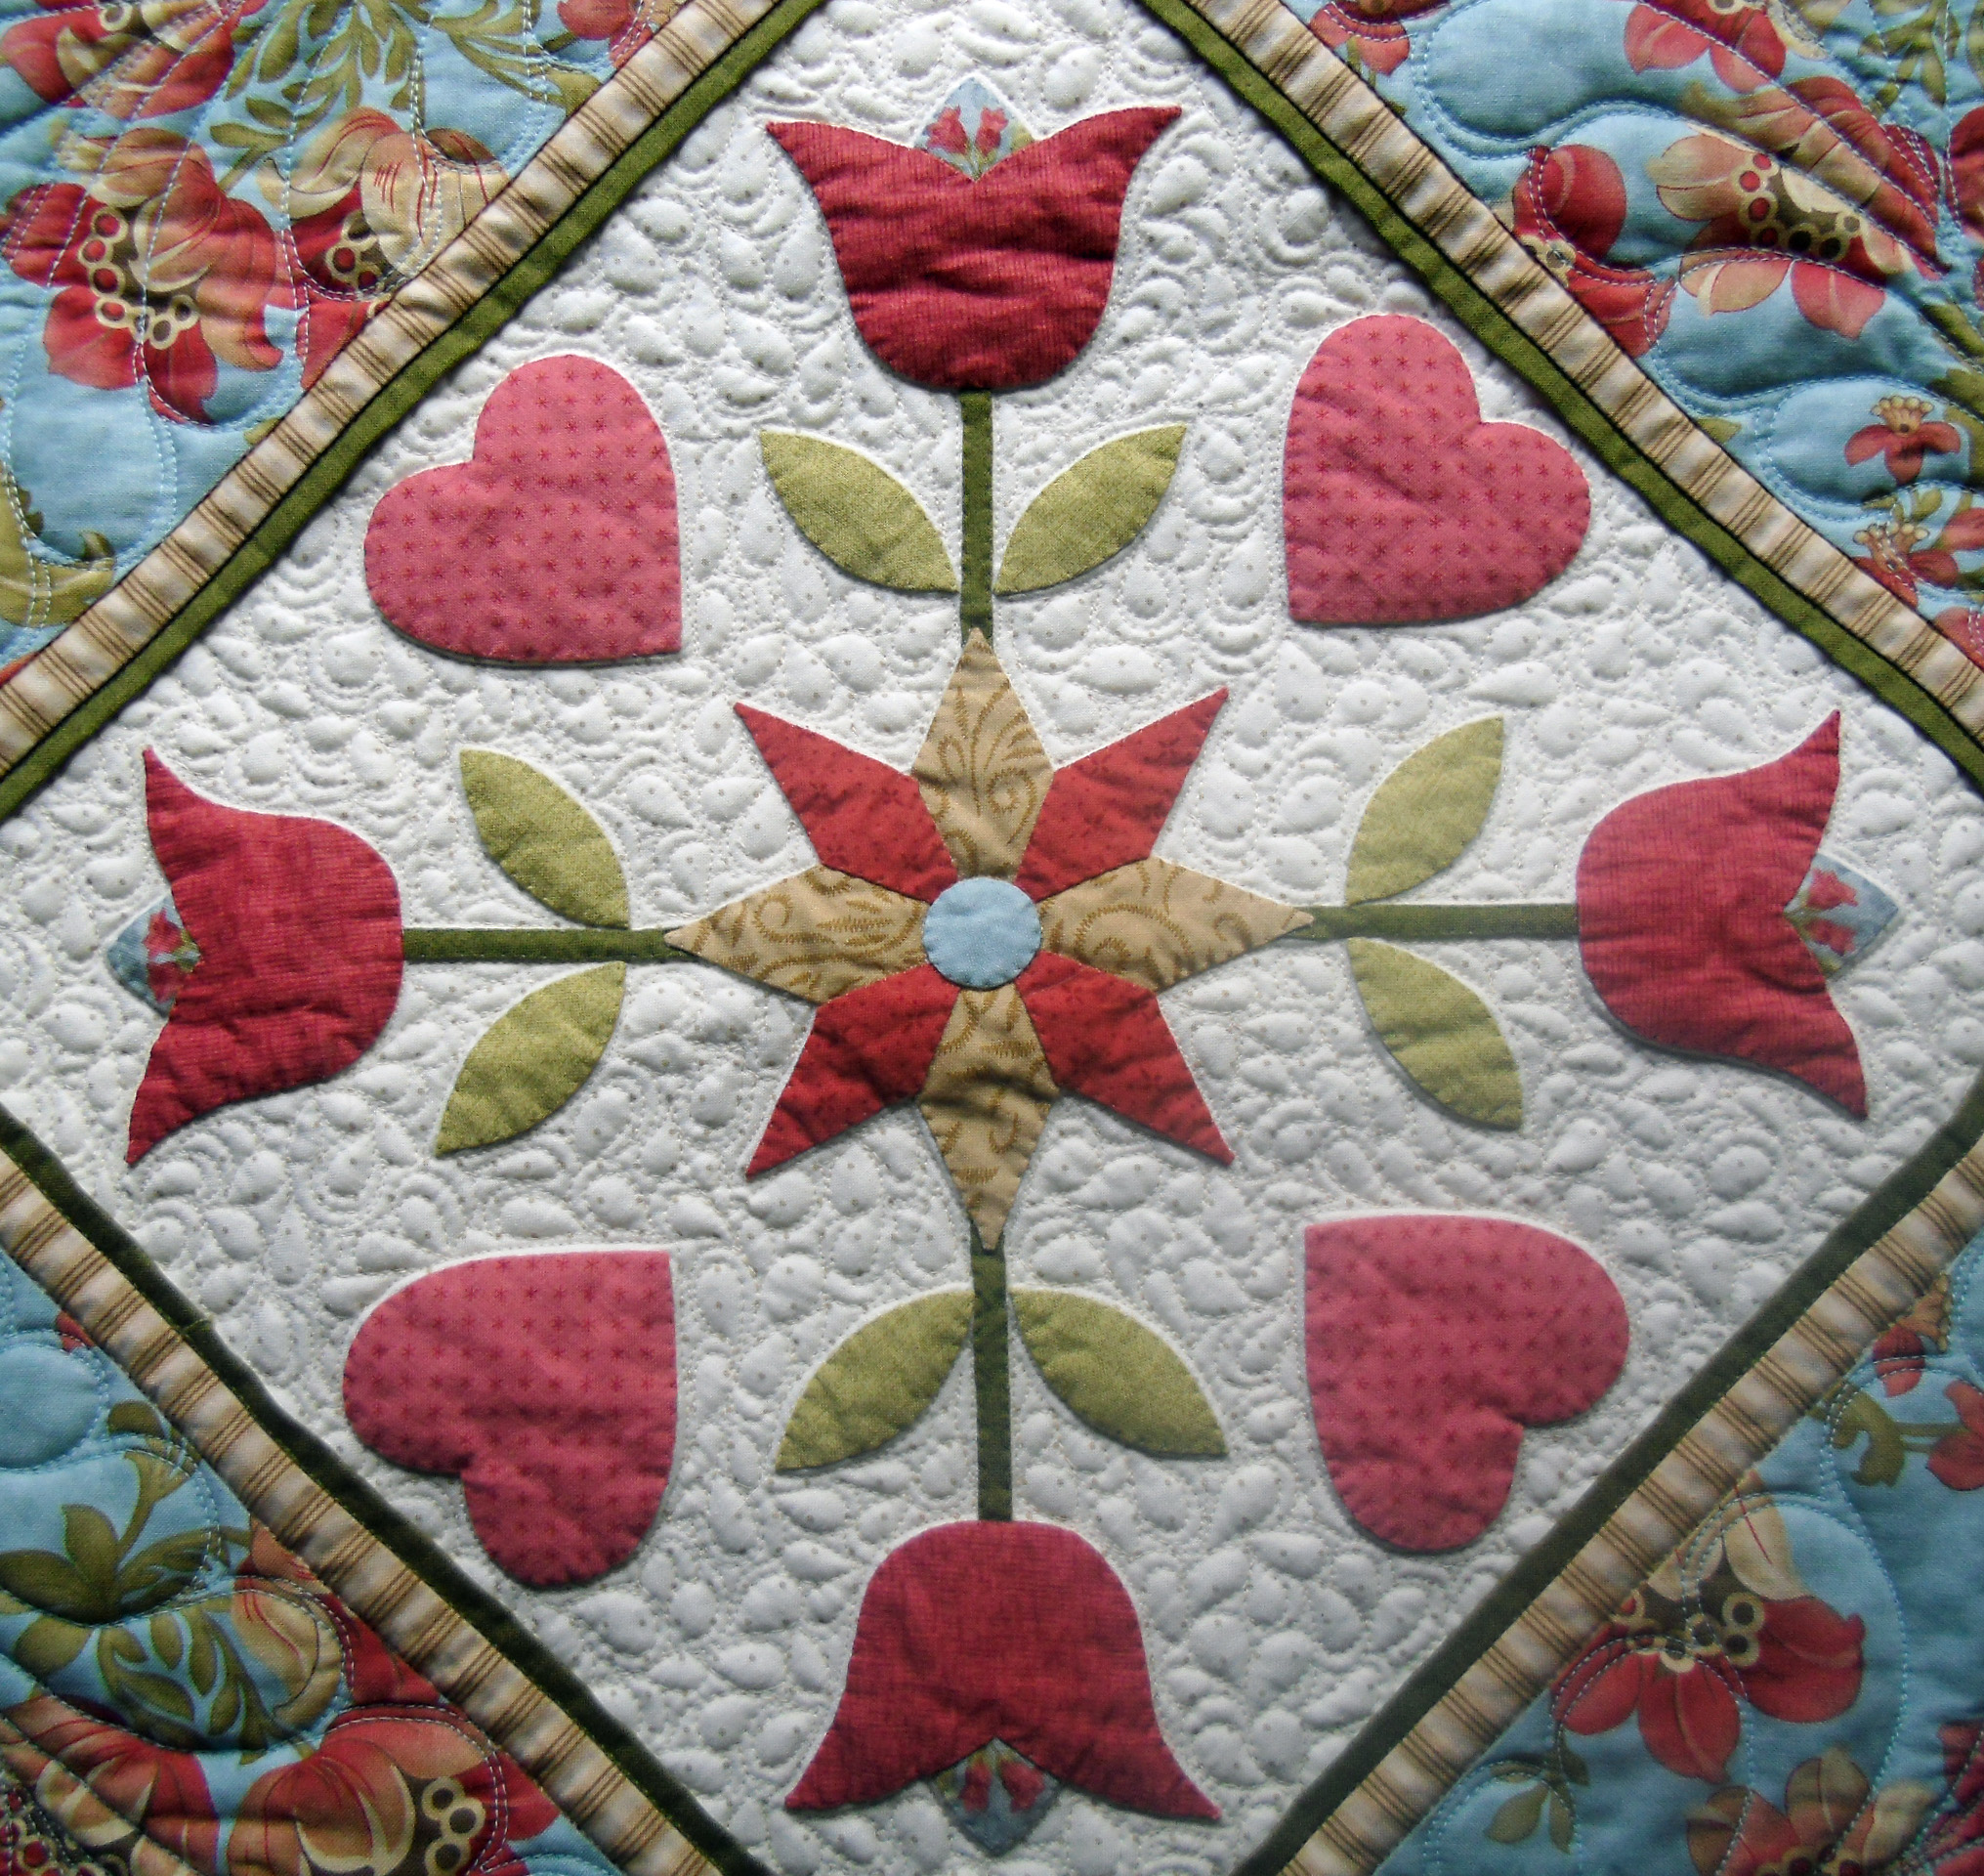
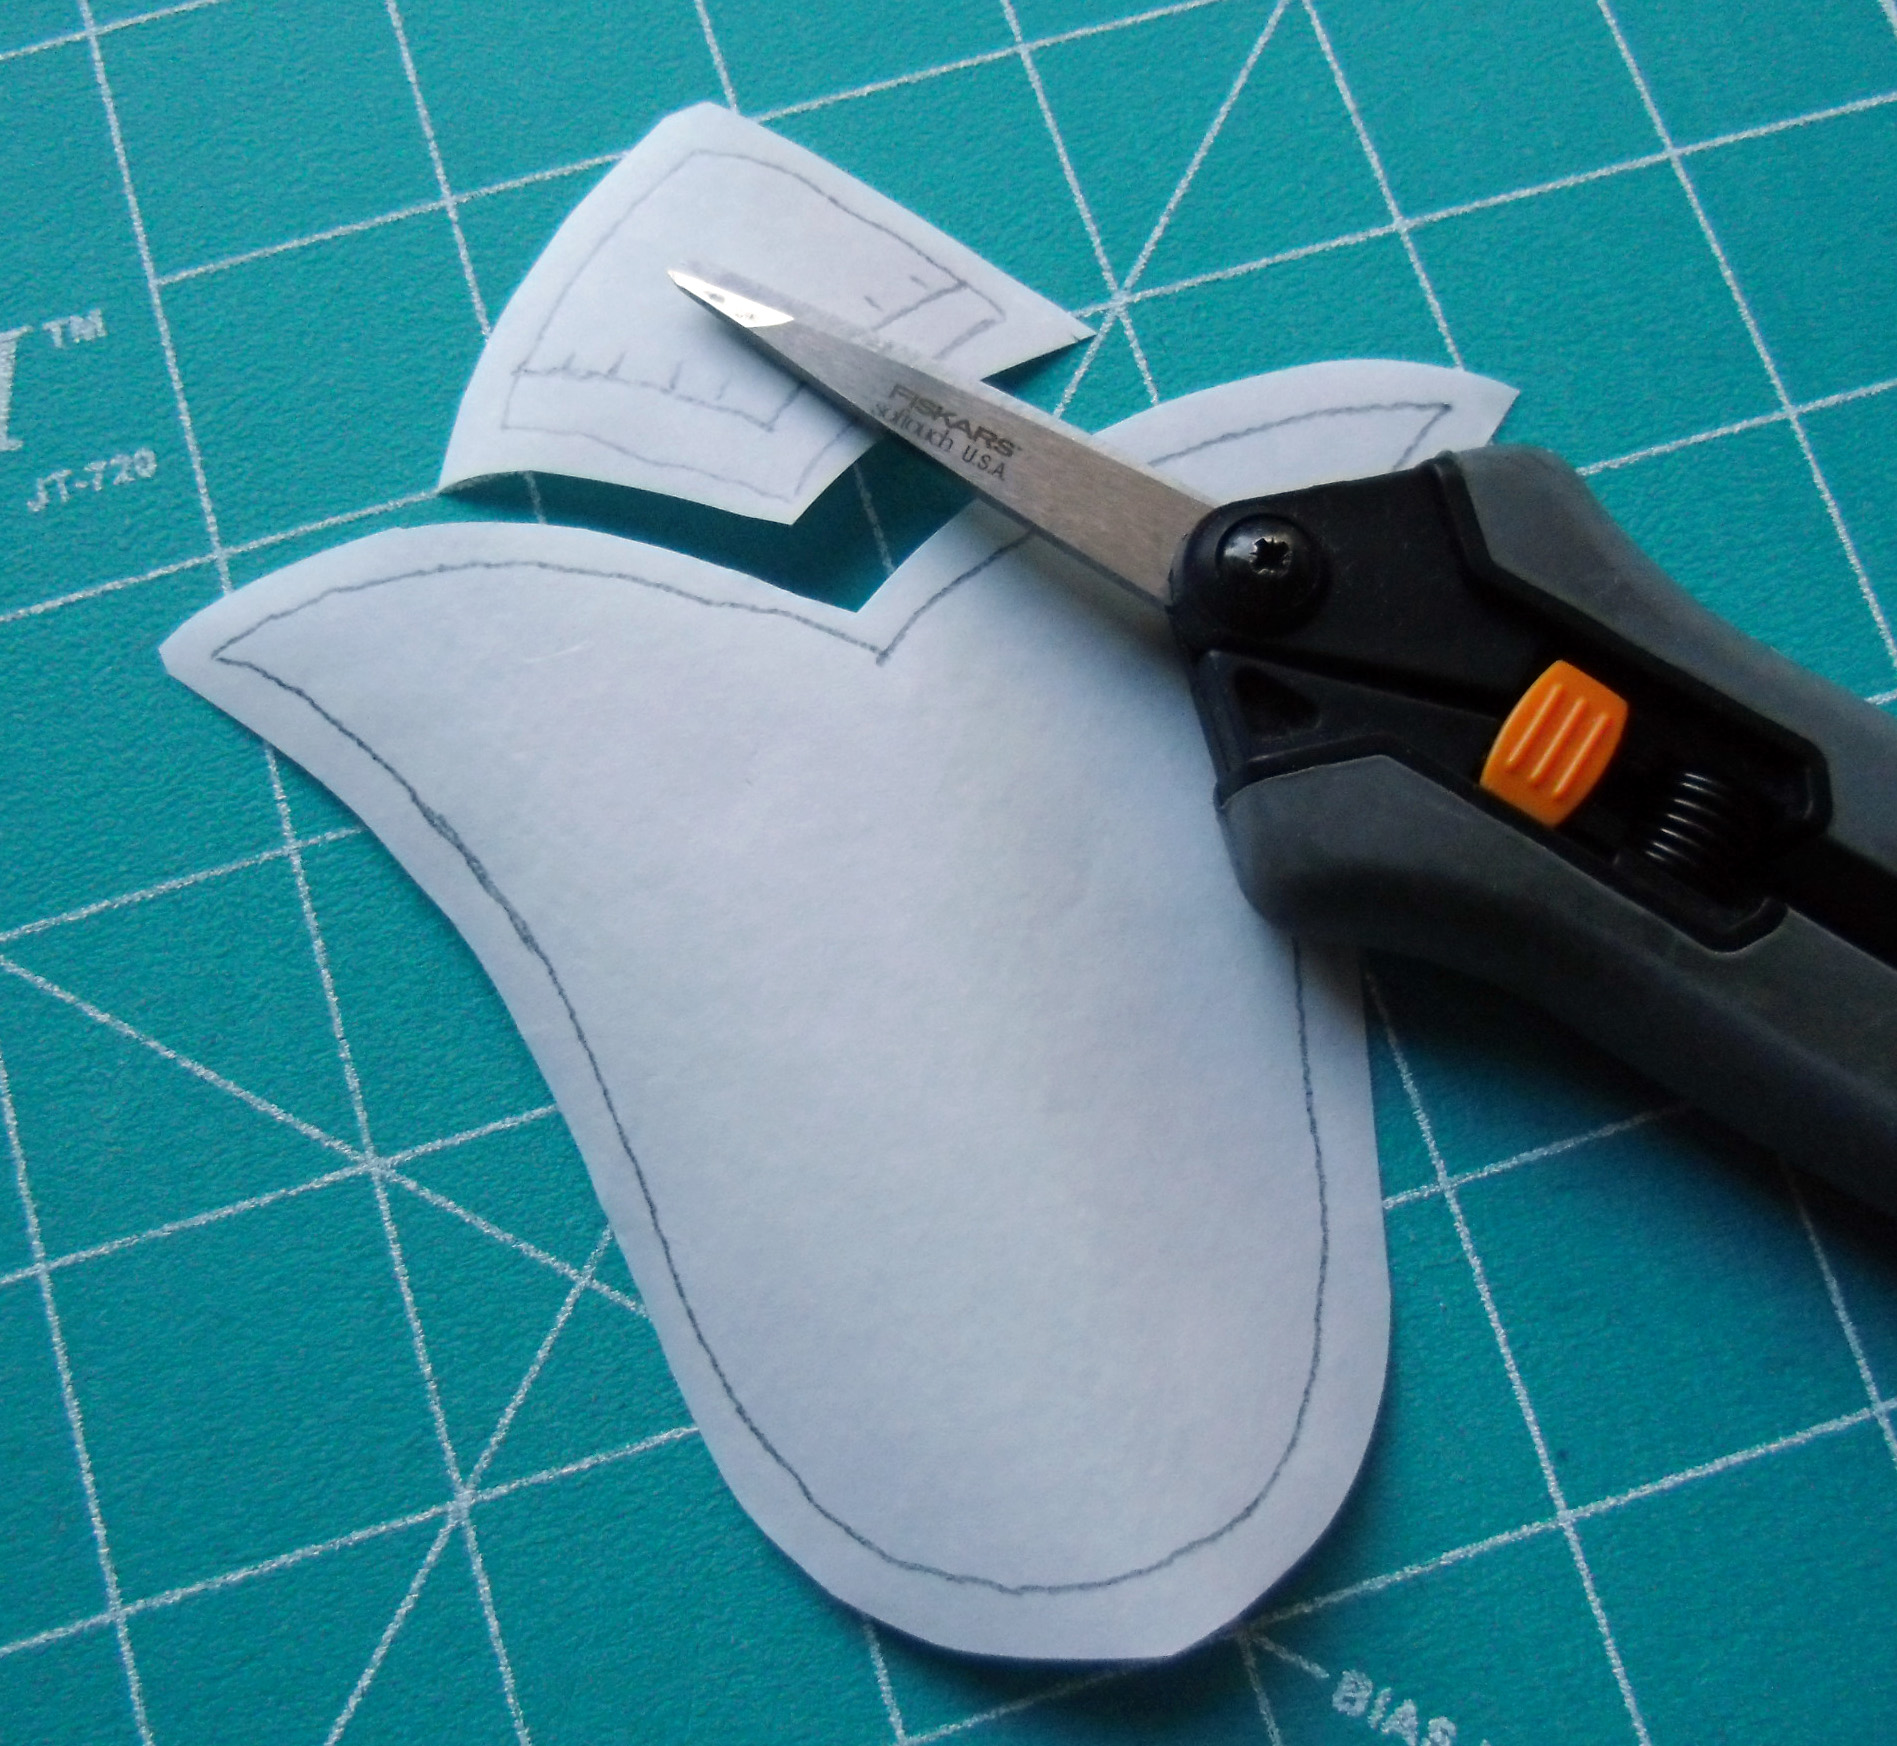
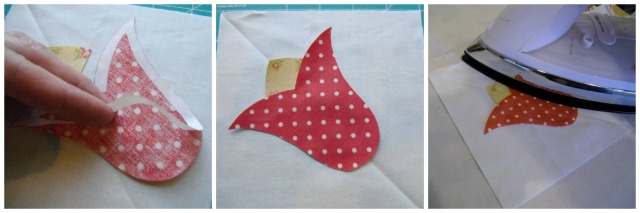
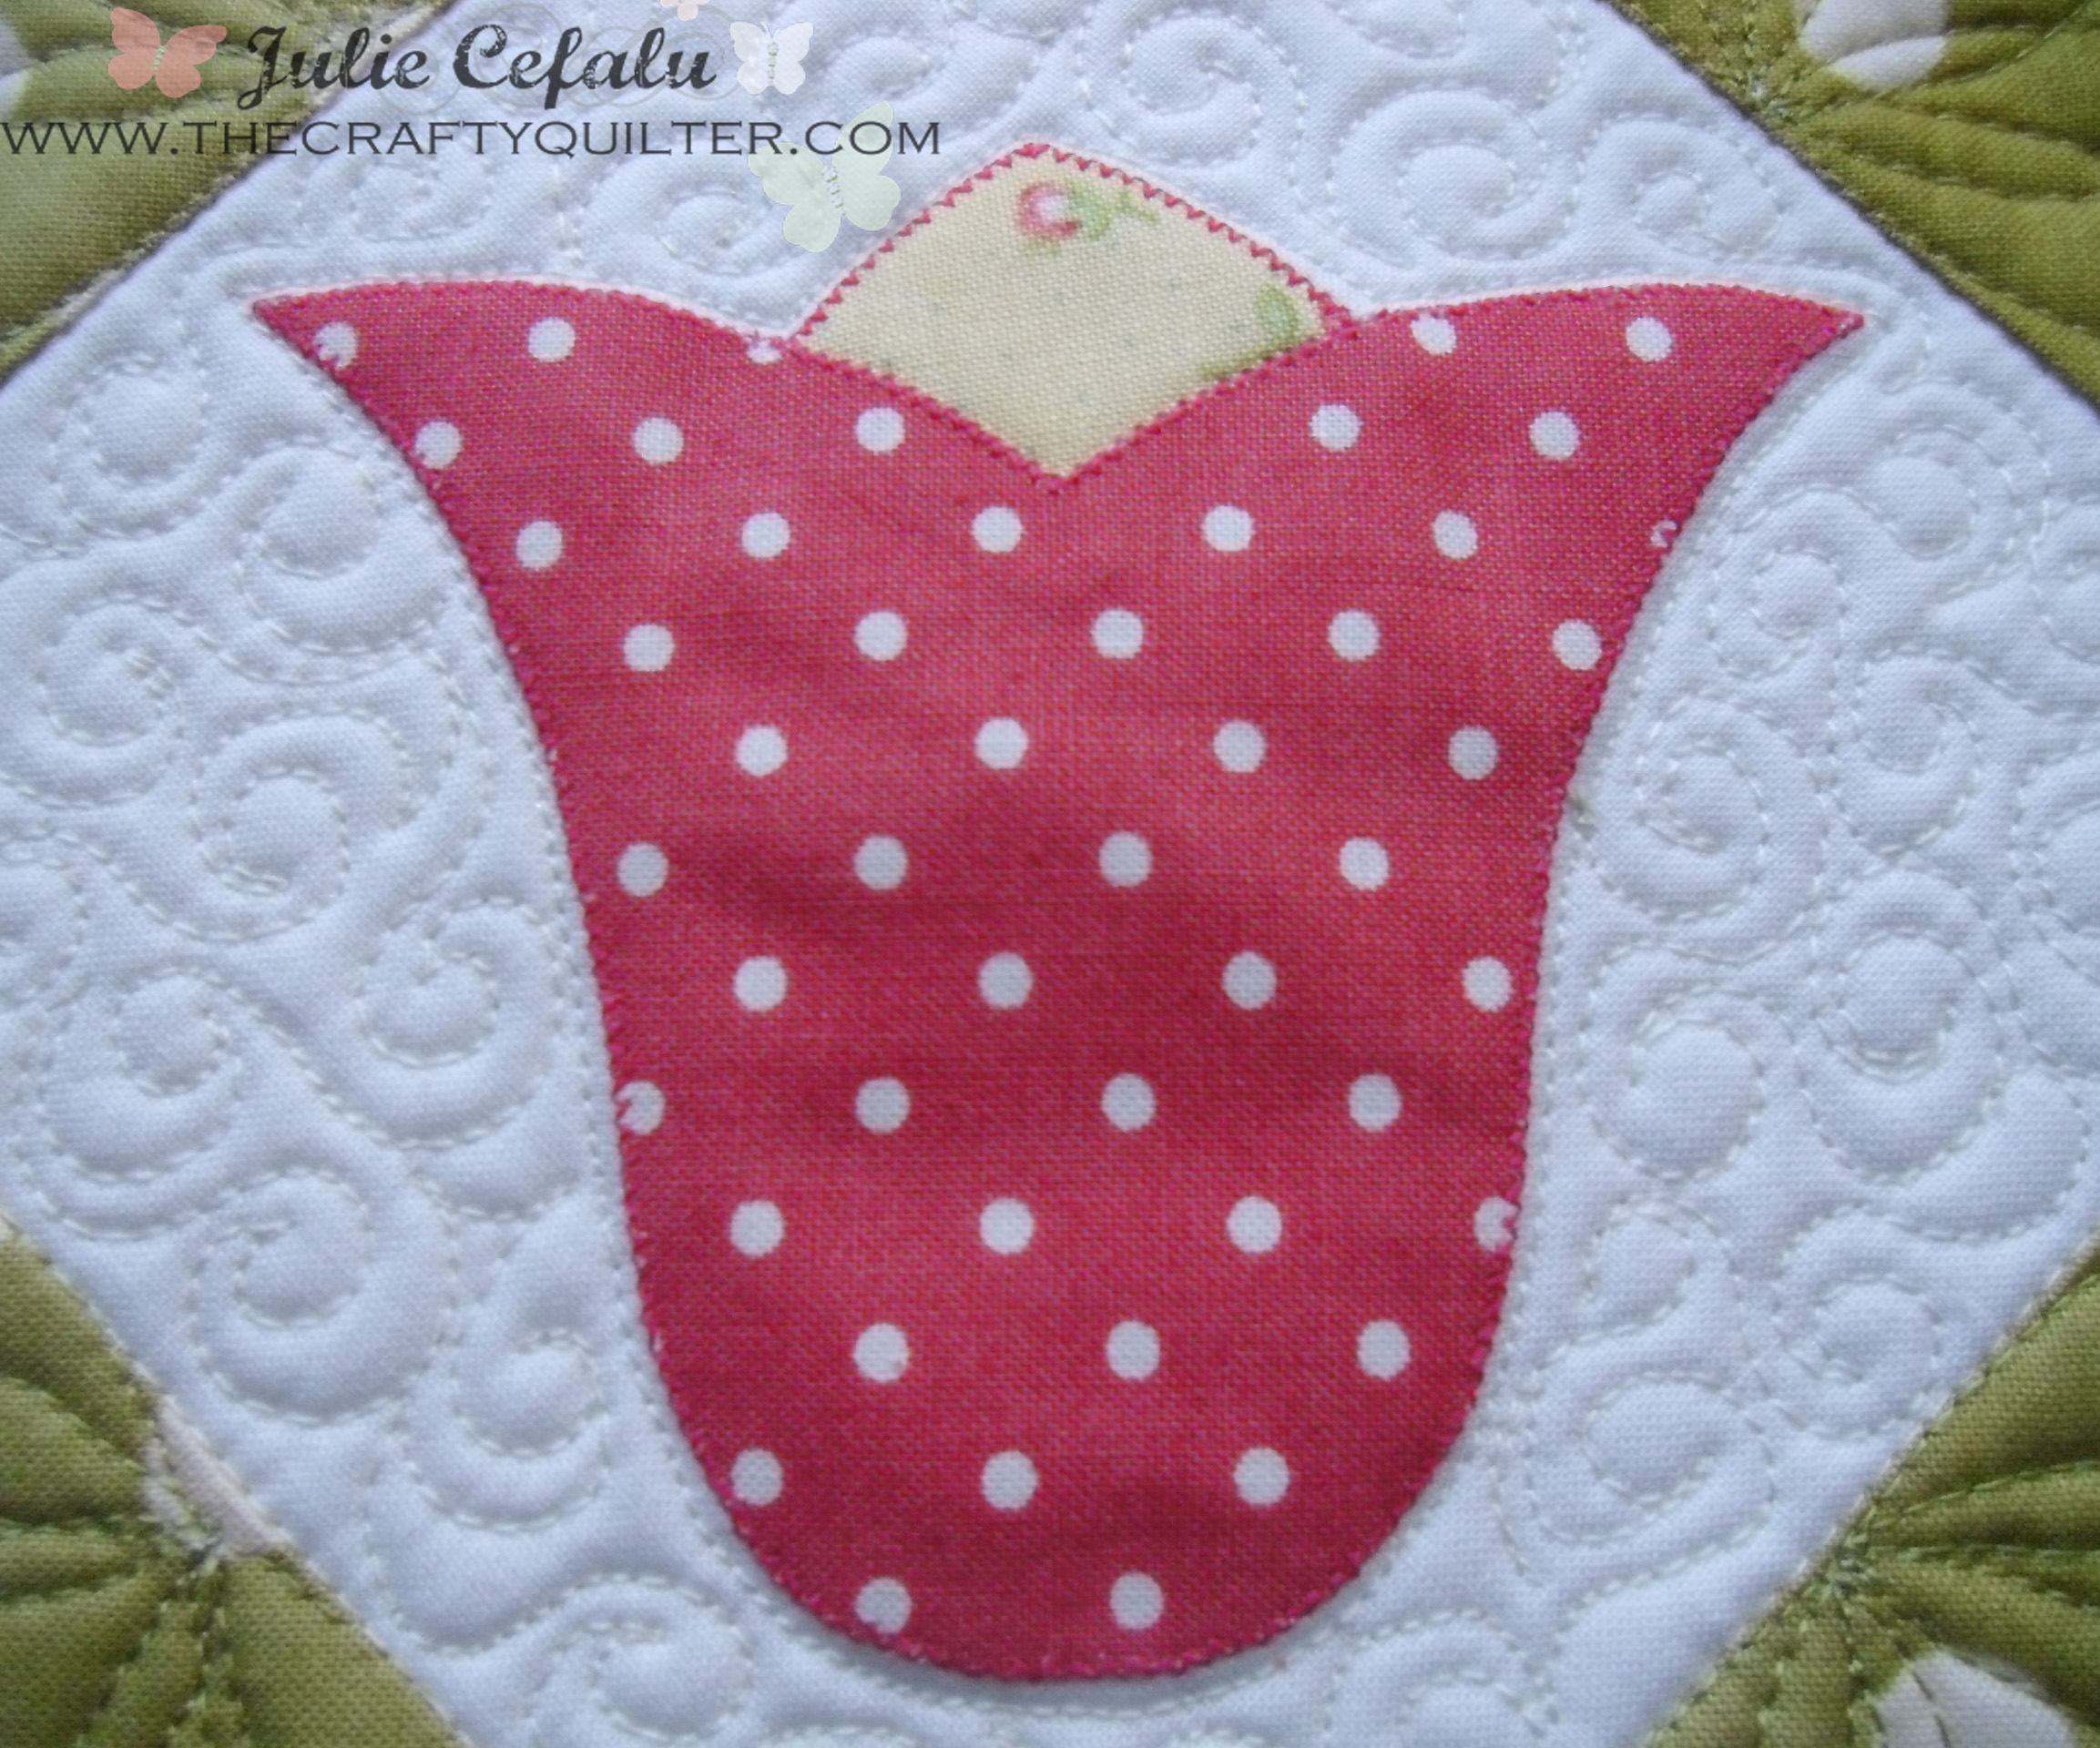
Here is the design that we will be working on for practice. You can find the pdf version here: Tulip Applique pdf. (Make sure to print it out with no scaling or resizing). It’s a simple tulip flower and it has one piece that needs to “slide” under the main flower. I place hash marks along the edge(s) that will be “underlapped”. Here is how it looks on my pattern:
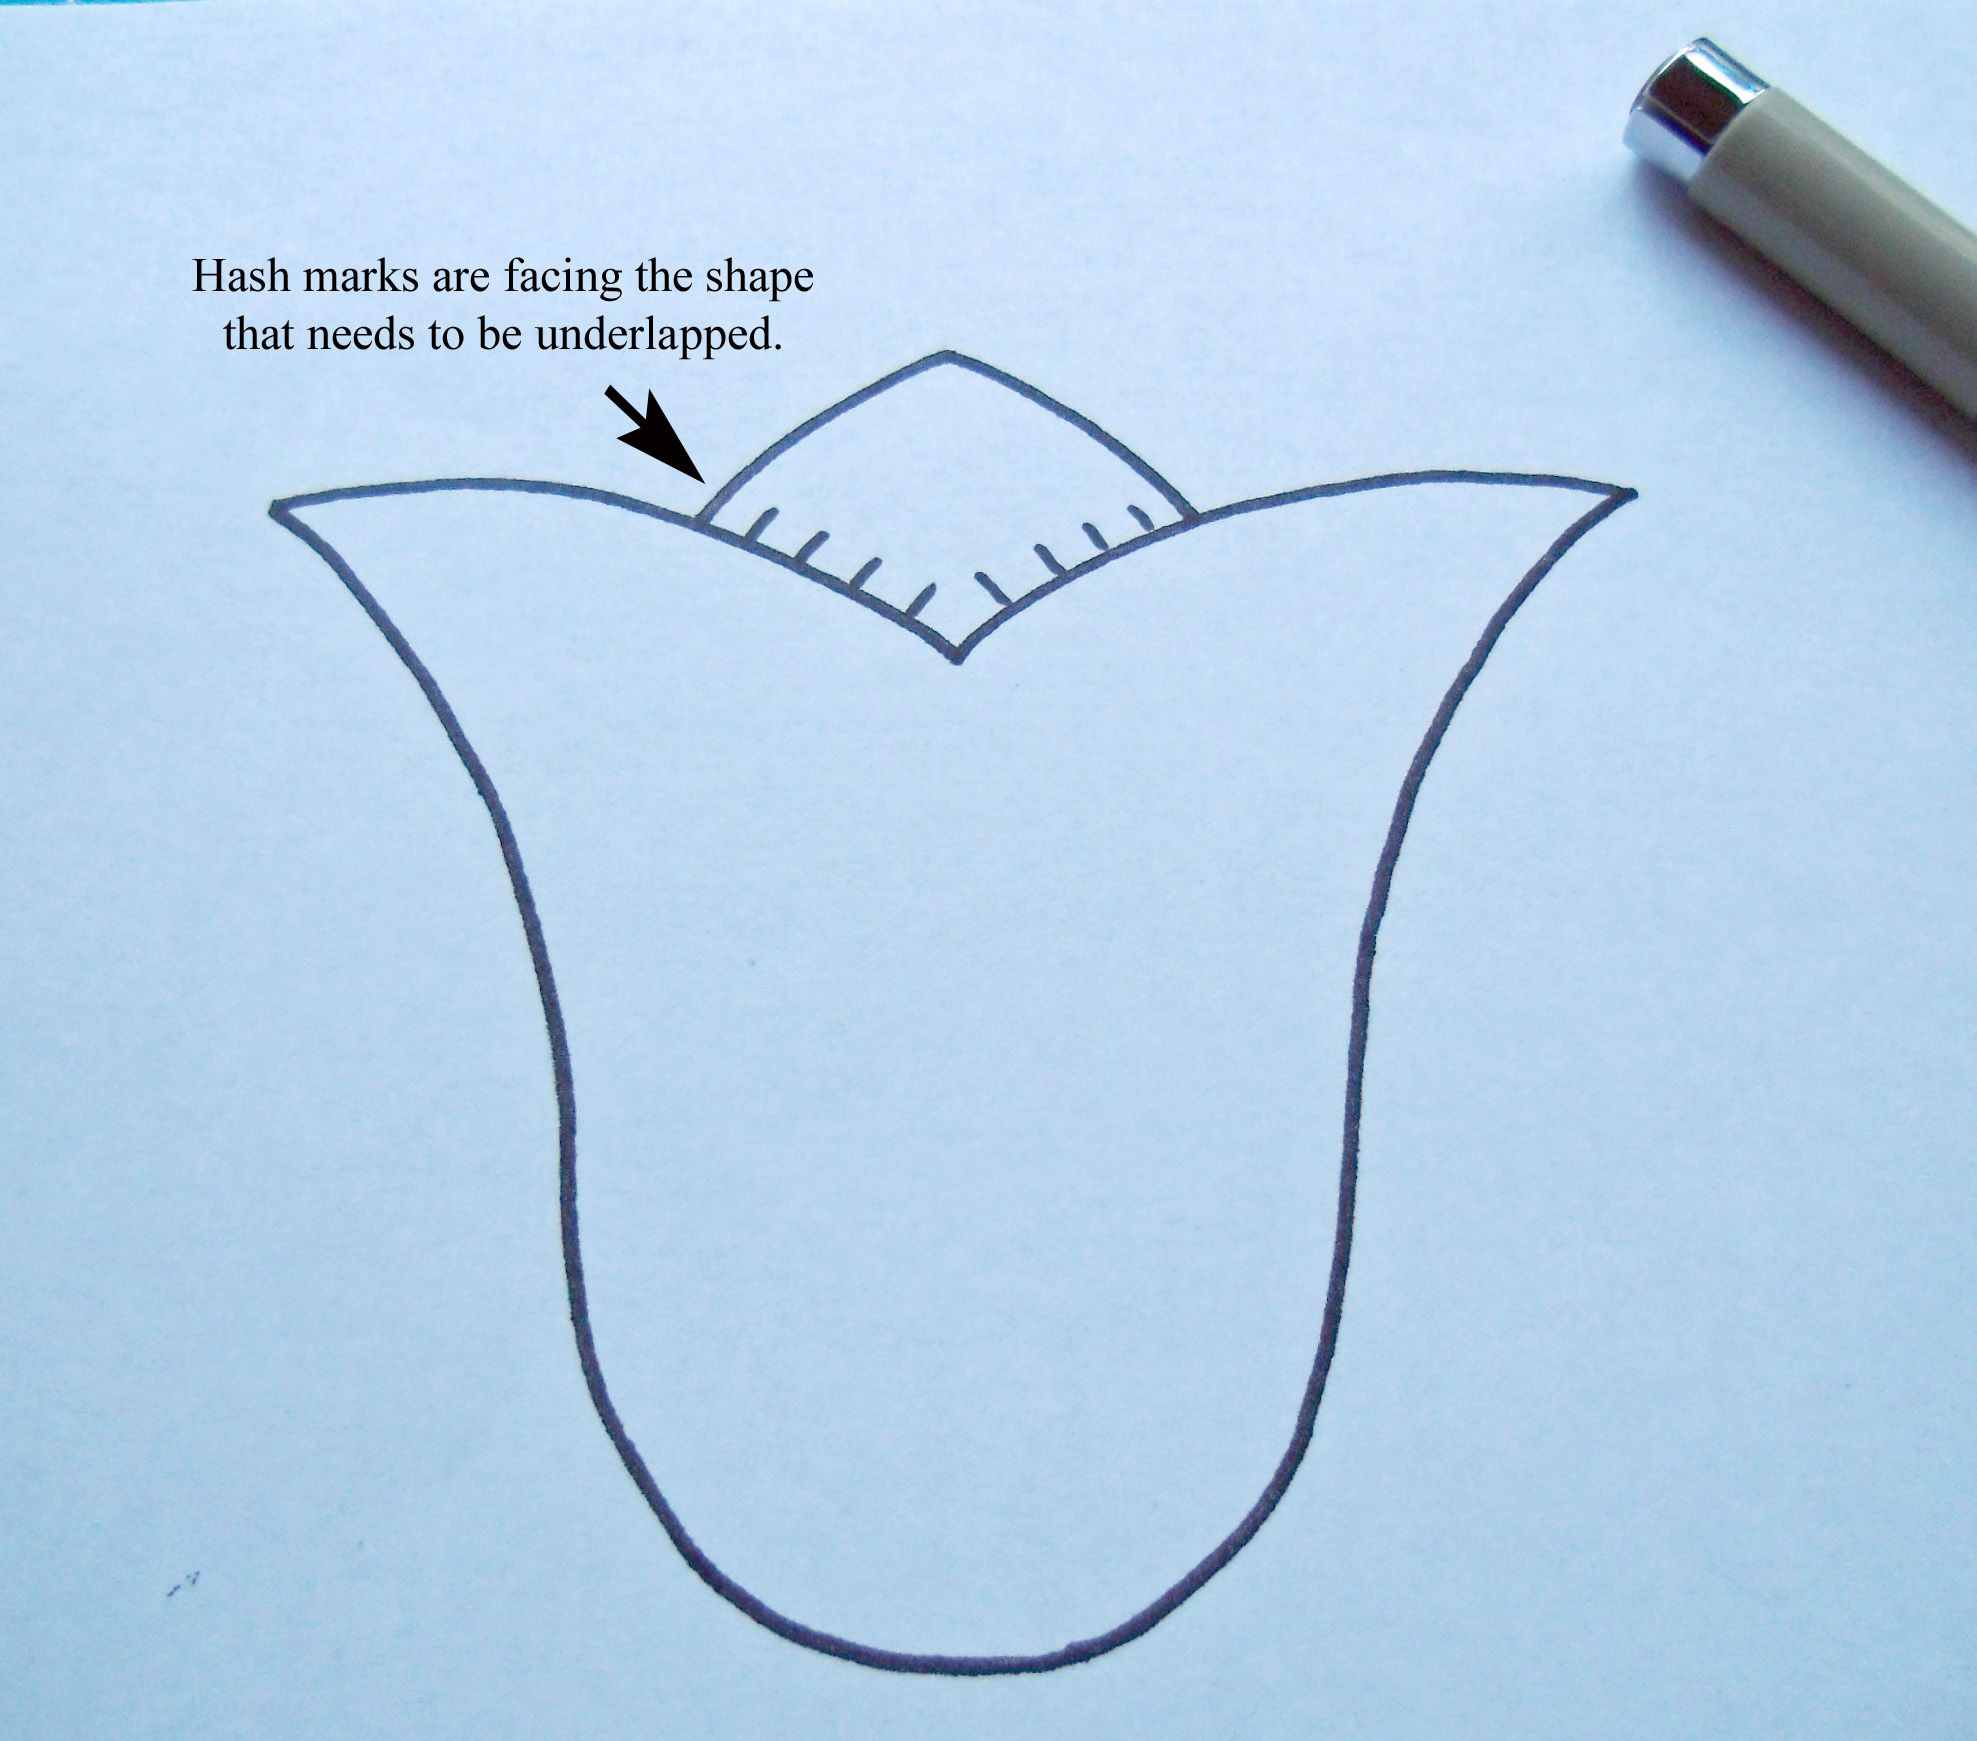
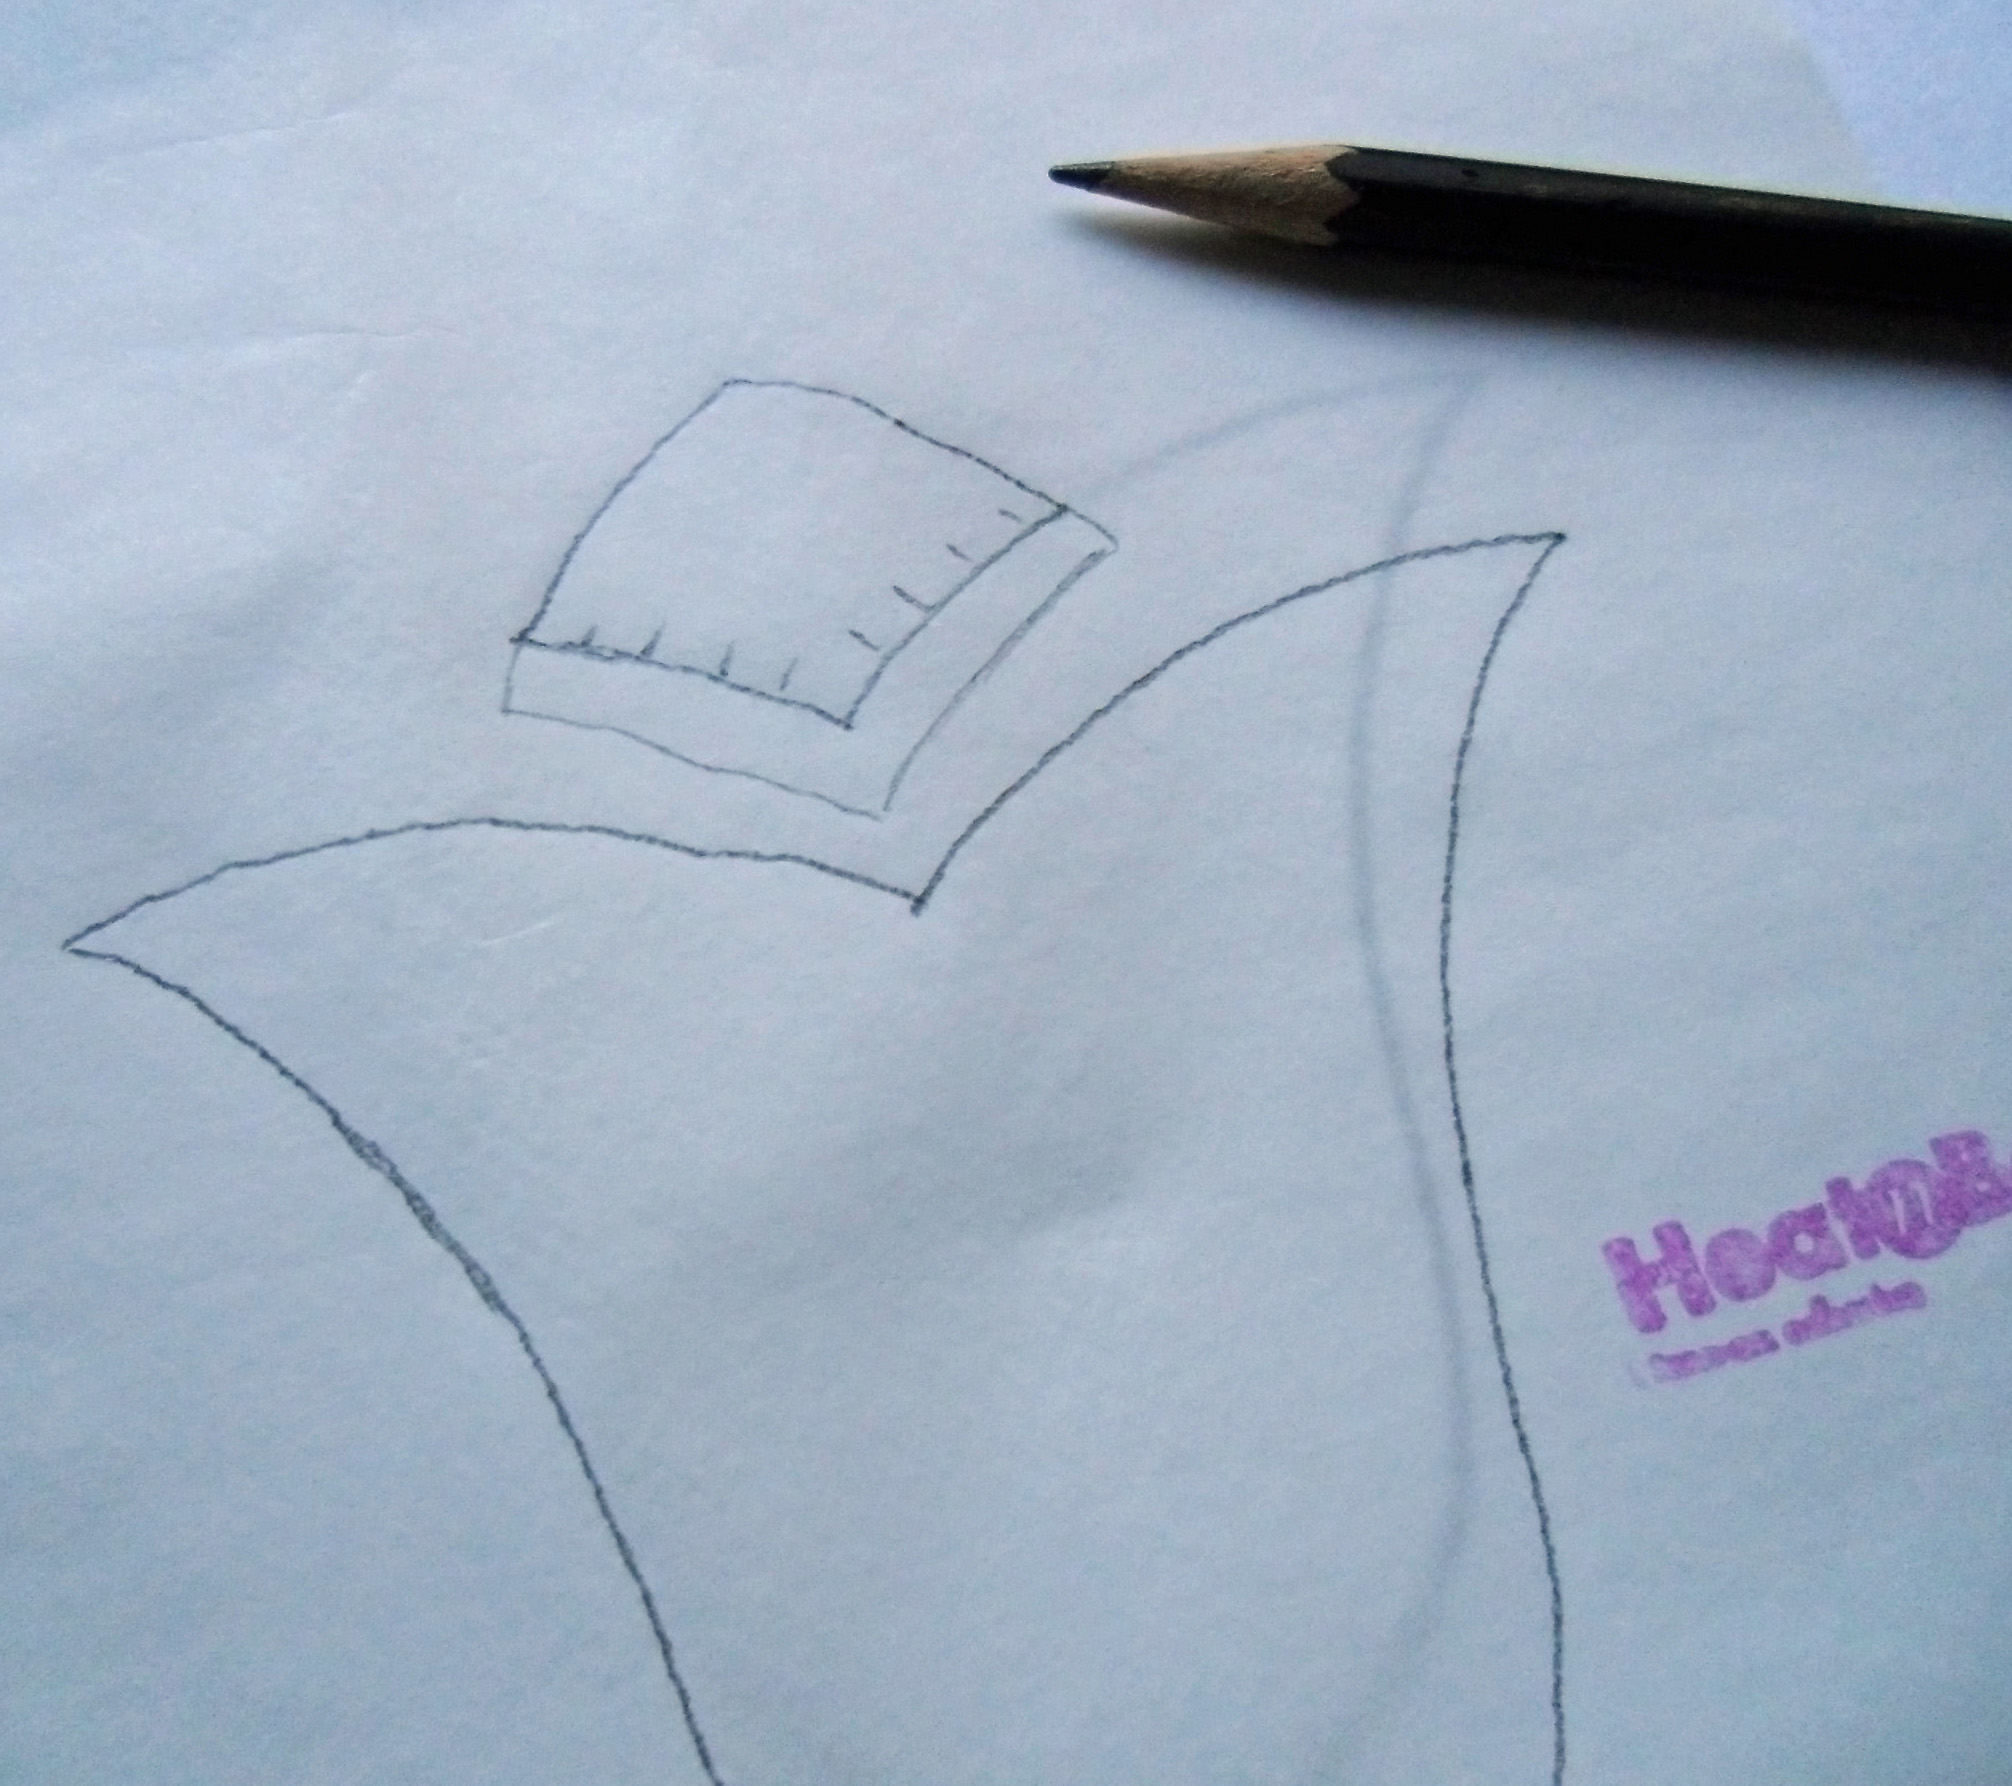
Step 3: Trace the applique shapes onto the paper side of the fusible web. This is fairly easy to do. I usually use a pencil to trace with, and I make sure that there is at least 1/4″ of space in between my shapes. If a shape has been marked as needing to be underlapped, leave 1/2″ around that edge so that you will be able to allow for the extra compensation. I will often draw in the additional seam allowance so I don’t forget.
Step 4: Roughly cut out the traced shapes from the fusible web.
TIP: If I need to make 8 flowers from the same fabric, I can leave the shapes bundled together and cut them out in one large piece. This saves a little bit of time.
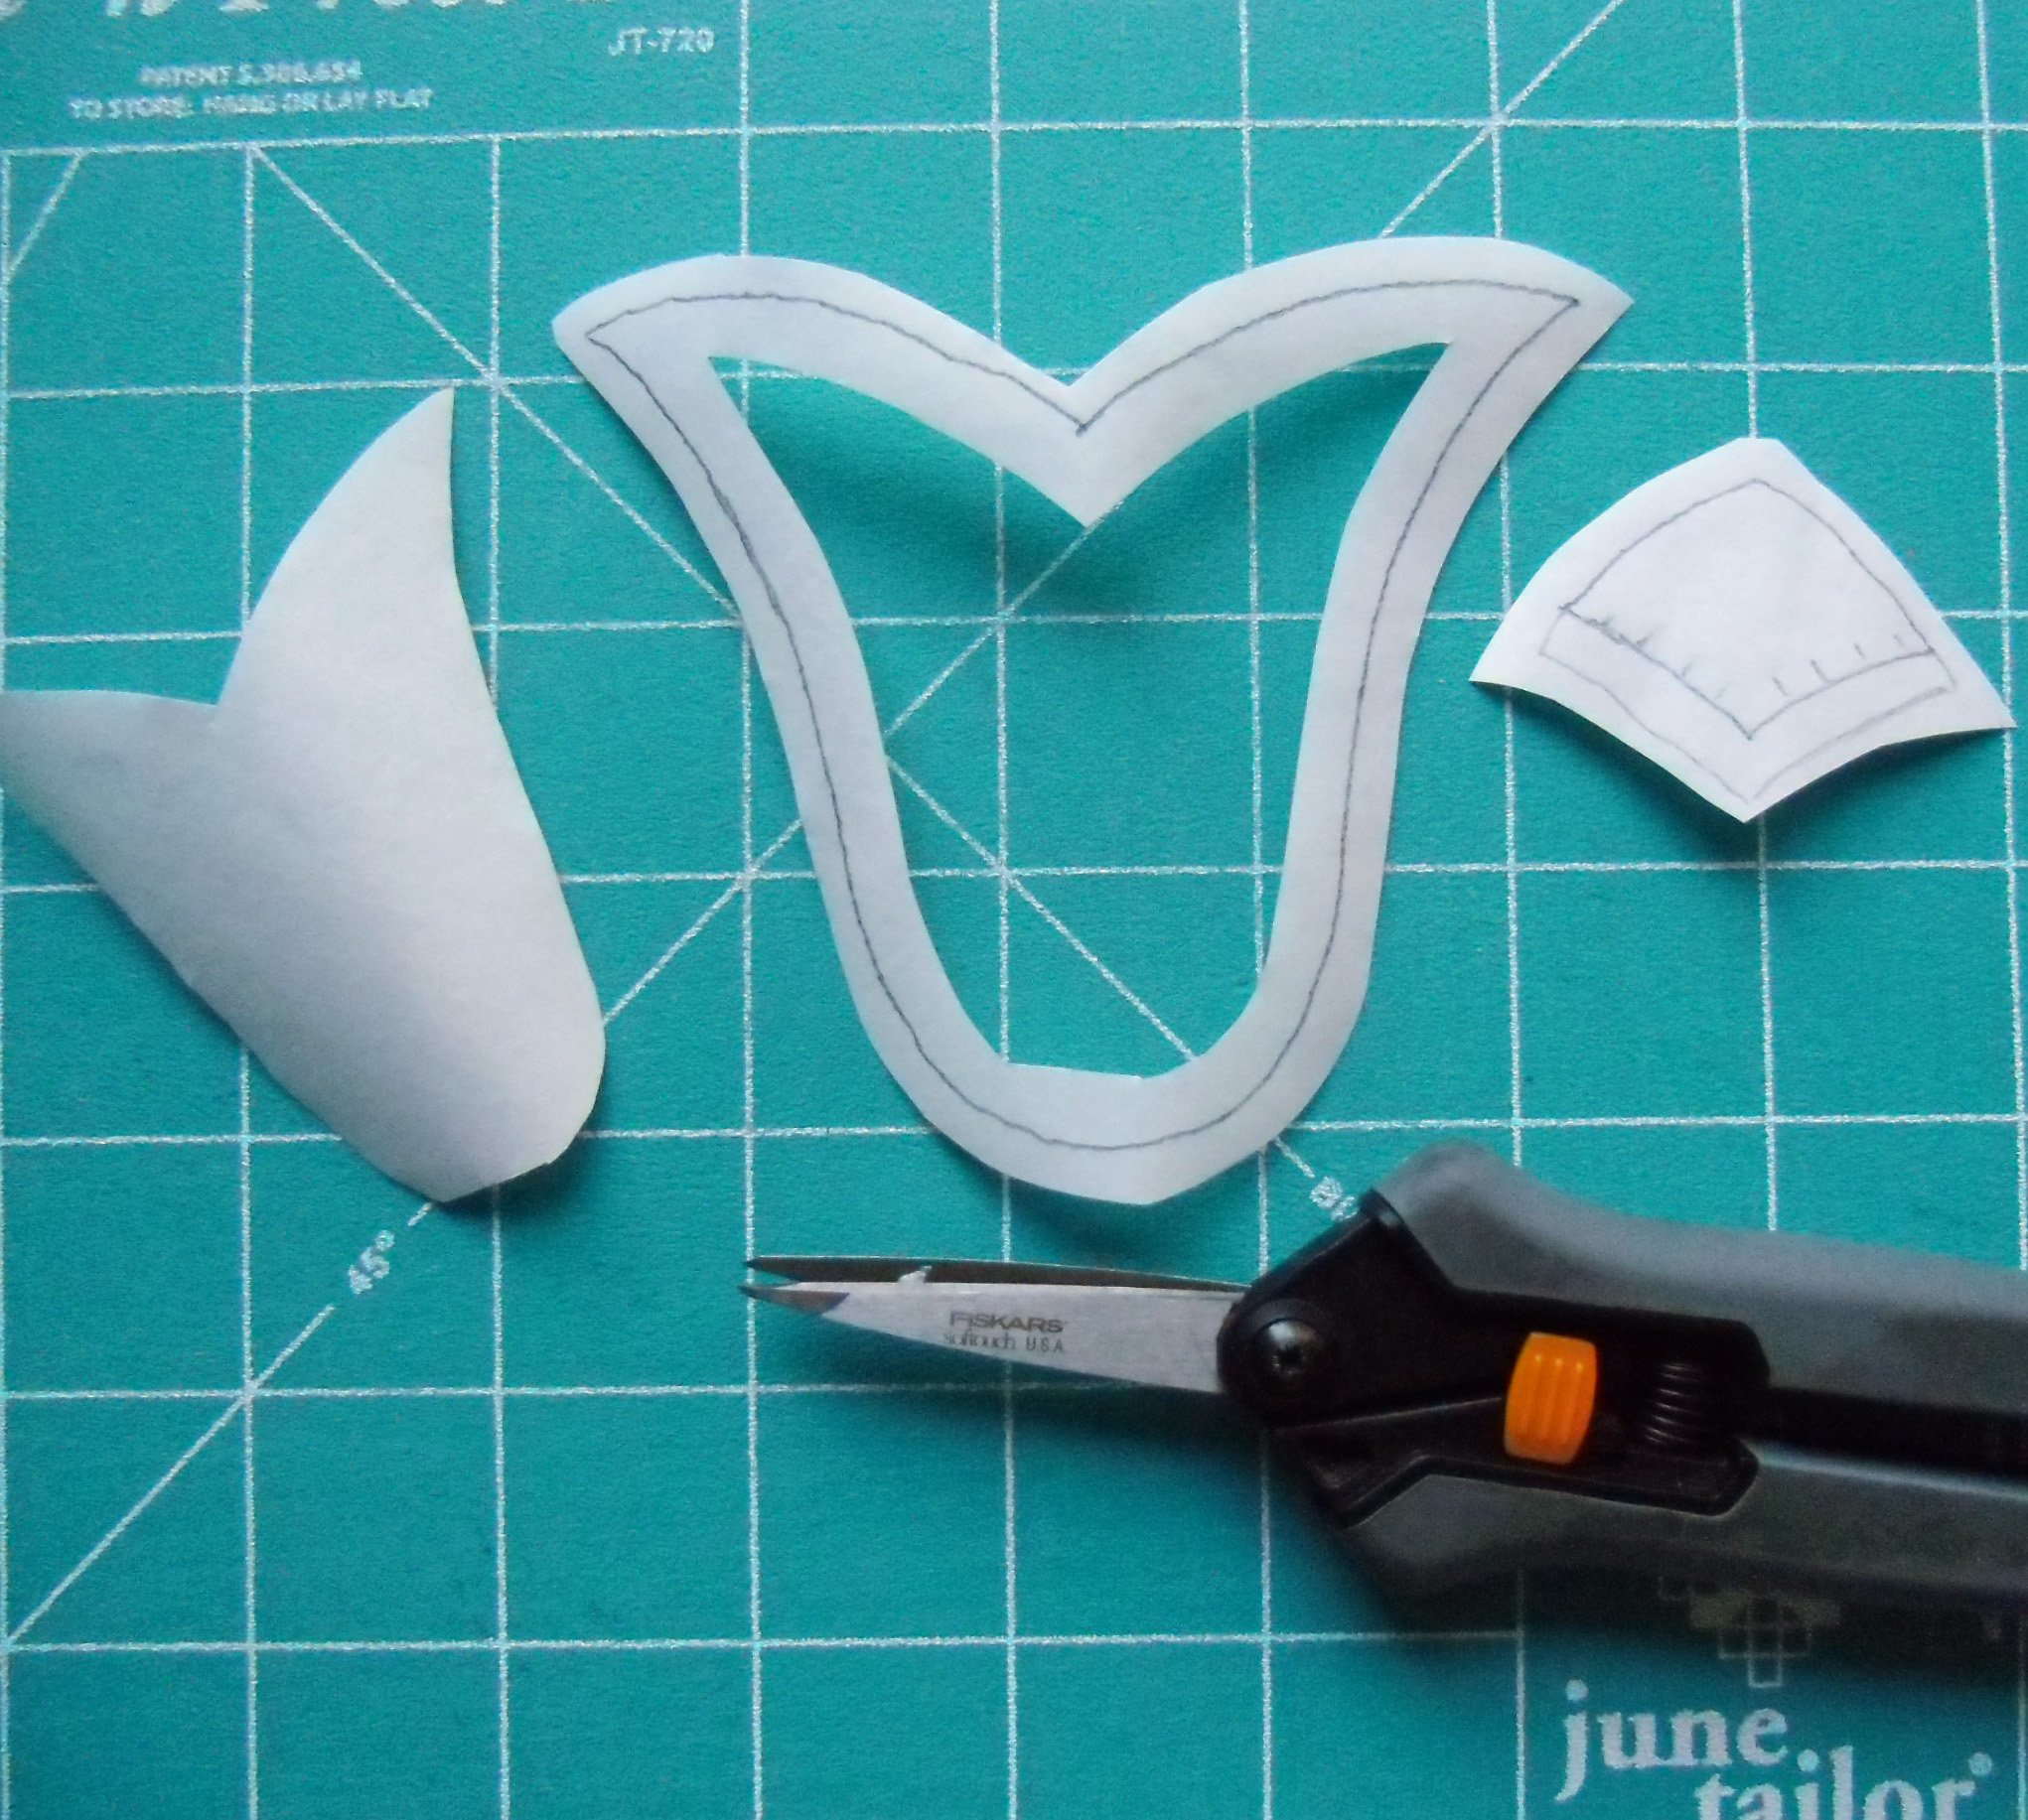
Step 5: Cut out the center of the shape if possible. I like my applique to be as soft and flexible as possible. If my shape is large enough, I will cut out the center of the fusible web, leaving a 1/4″ border around the inside line. This is especially helpful when I have pieces that are stacked on top of each other. All of that fusible will make it really stiff if left in place. In my example, the main tulip shape is large enough to cut away the middle, but the other shape is too small for that step.
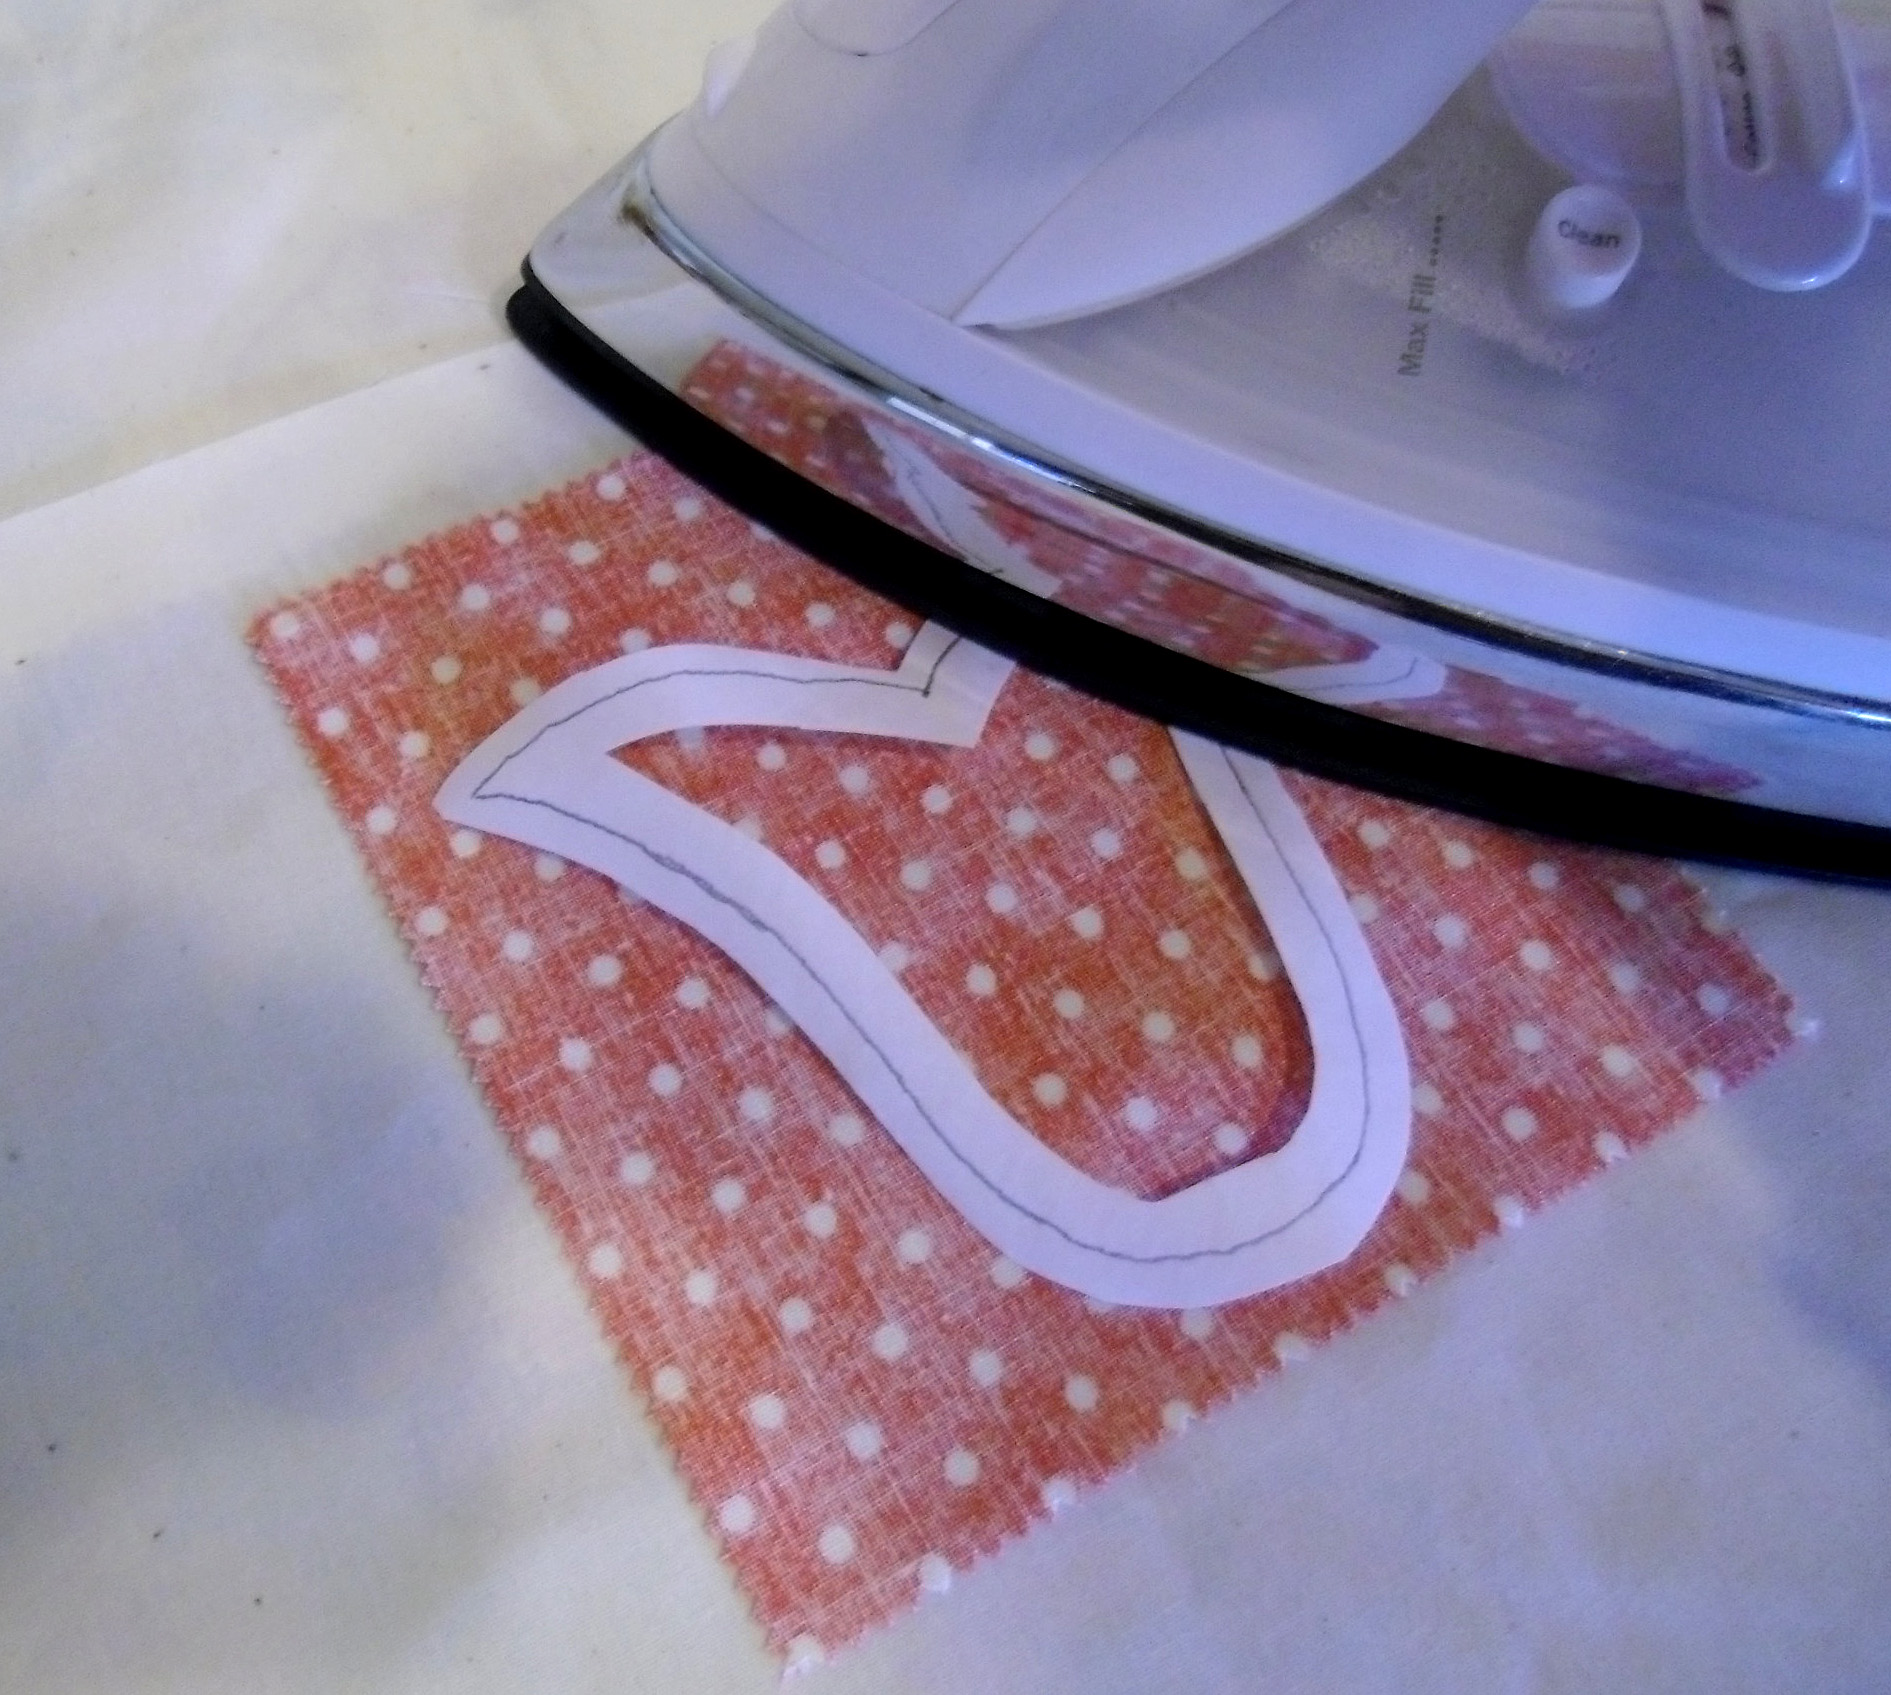
Step 6: Press the fusible web shapes onto the WRONG side of your fabric. Check the instructions on your fusible product to see how long to press. In most cases, this will be a quick press, 2 – 3 seconds long. If you press for too long, it is possible to deactivate the “glue” of the fusible.
Step 7: Cut out the applique shape on the drawn line. Be very careful with this step as this will become the final shape of your applique. If you have an edge that is going to be underlapped, cut 1/4″ beyond that drawn line.
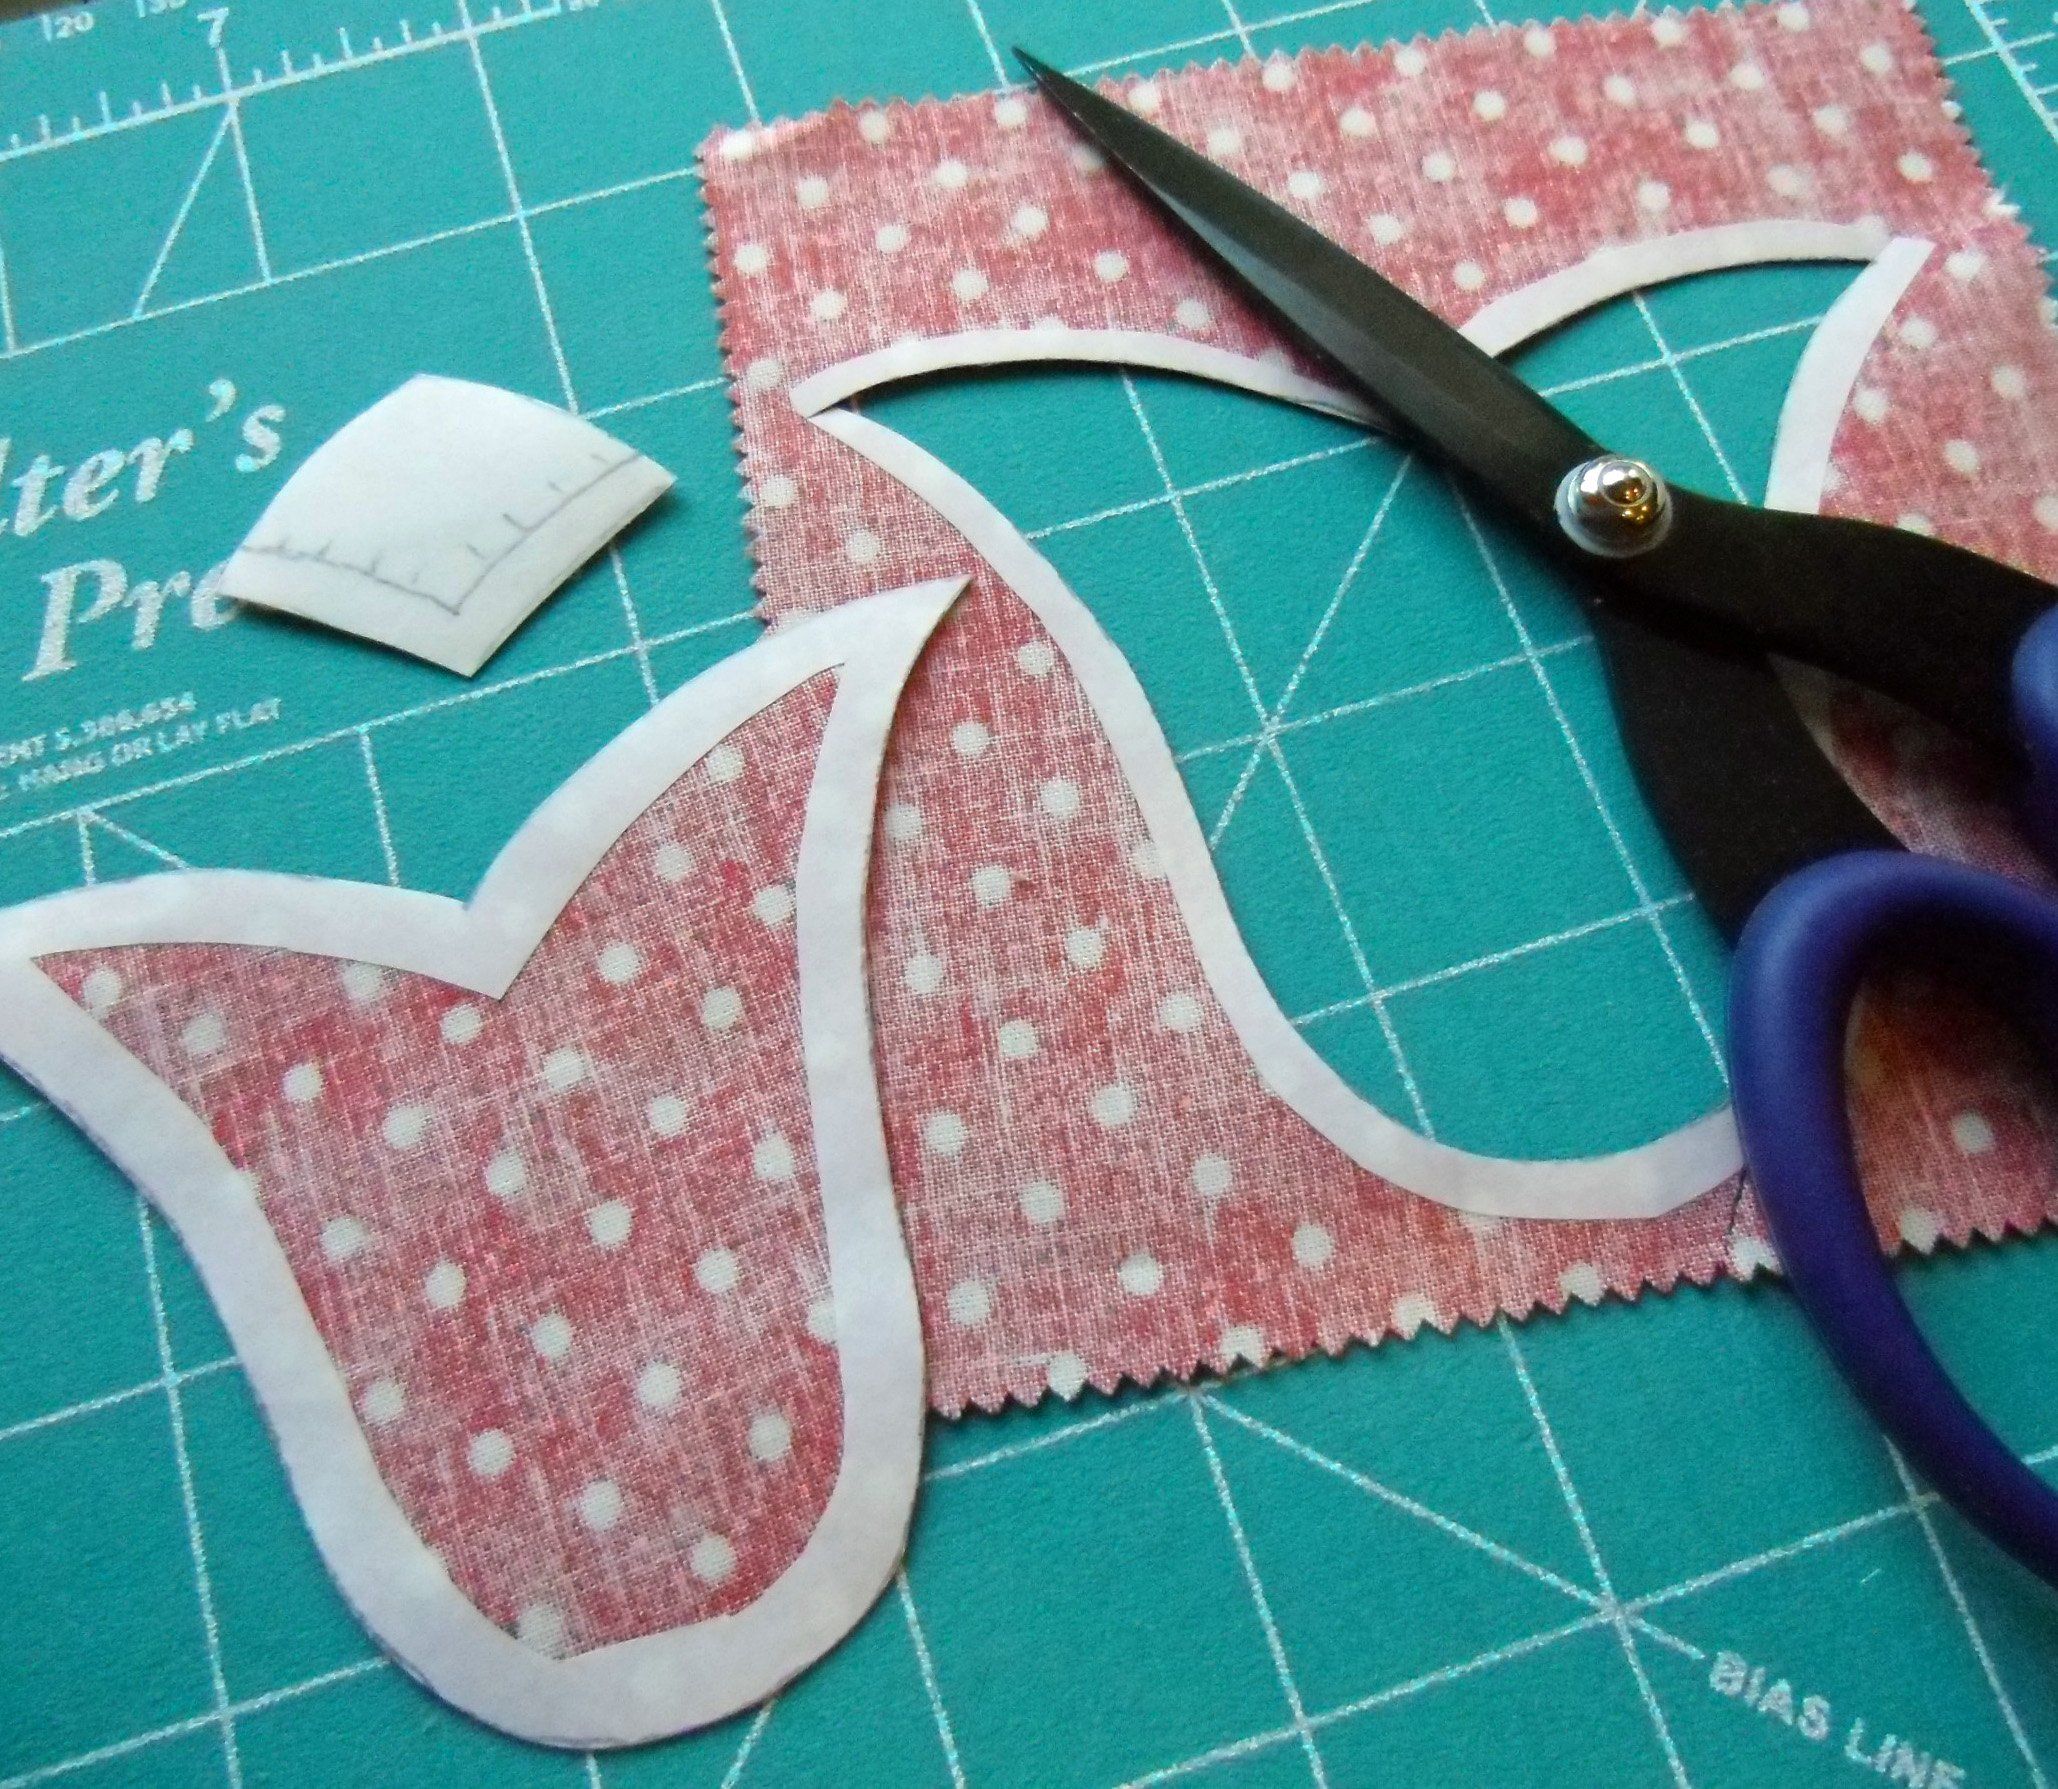
TIP: Having the right tool for the job will make this much more fun. I love scissors that have a micro-serrated edge for cutting out my applique shapes. These scissors really grip the fabric as you cut and because they’re serrated, the cut edges tend to fray less. My favorite brand is Karen Kay Buckley 7-1/2-Inch Perfect Scissors.

Step 8: Fuse the applique shape onto the background fabric. You will need to remove the release paper from your applique shape first. Position the shape onto your background fabric. (It may be helpful to find the center of your background fabric first by folding it in half and making a crease along the center.) Press the applique with a hot iron. Again, check the instructions for your particular fusible product. For HeatnBond Lite, you will press for 8-10 seconds, no steam.
TIP: If your iron is too hot, you could scorch your fabric. Be careful!
TIP: Sometimes an applique pressing sheet can come in handy at this point. These are made out of a non-stick Teflon and they can prevent any stray fusible from sticking to your iron or ironing board. They are also useful if you have a complex applique shape that you could “build” on the applique pressing sheet first and then adhere the entire unit onto the background fabric. The sheet is see-through, so you can place the pattern underneath it and line up the applique pieces on top of the pressing sheet and “glue” them together. This will then peel off of the sheet and be ready to press onto the project.
Step 9: Stitch the applique in place. This is a very important step. Guess how I know? My first applique projects are now starting to fall apart because I skipped this part. 🙁
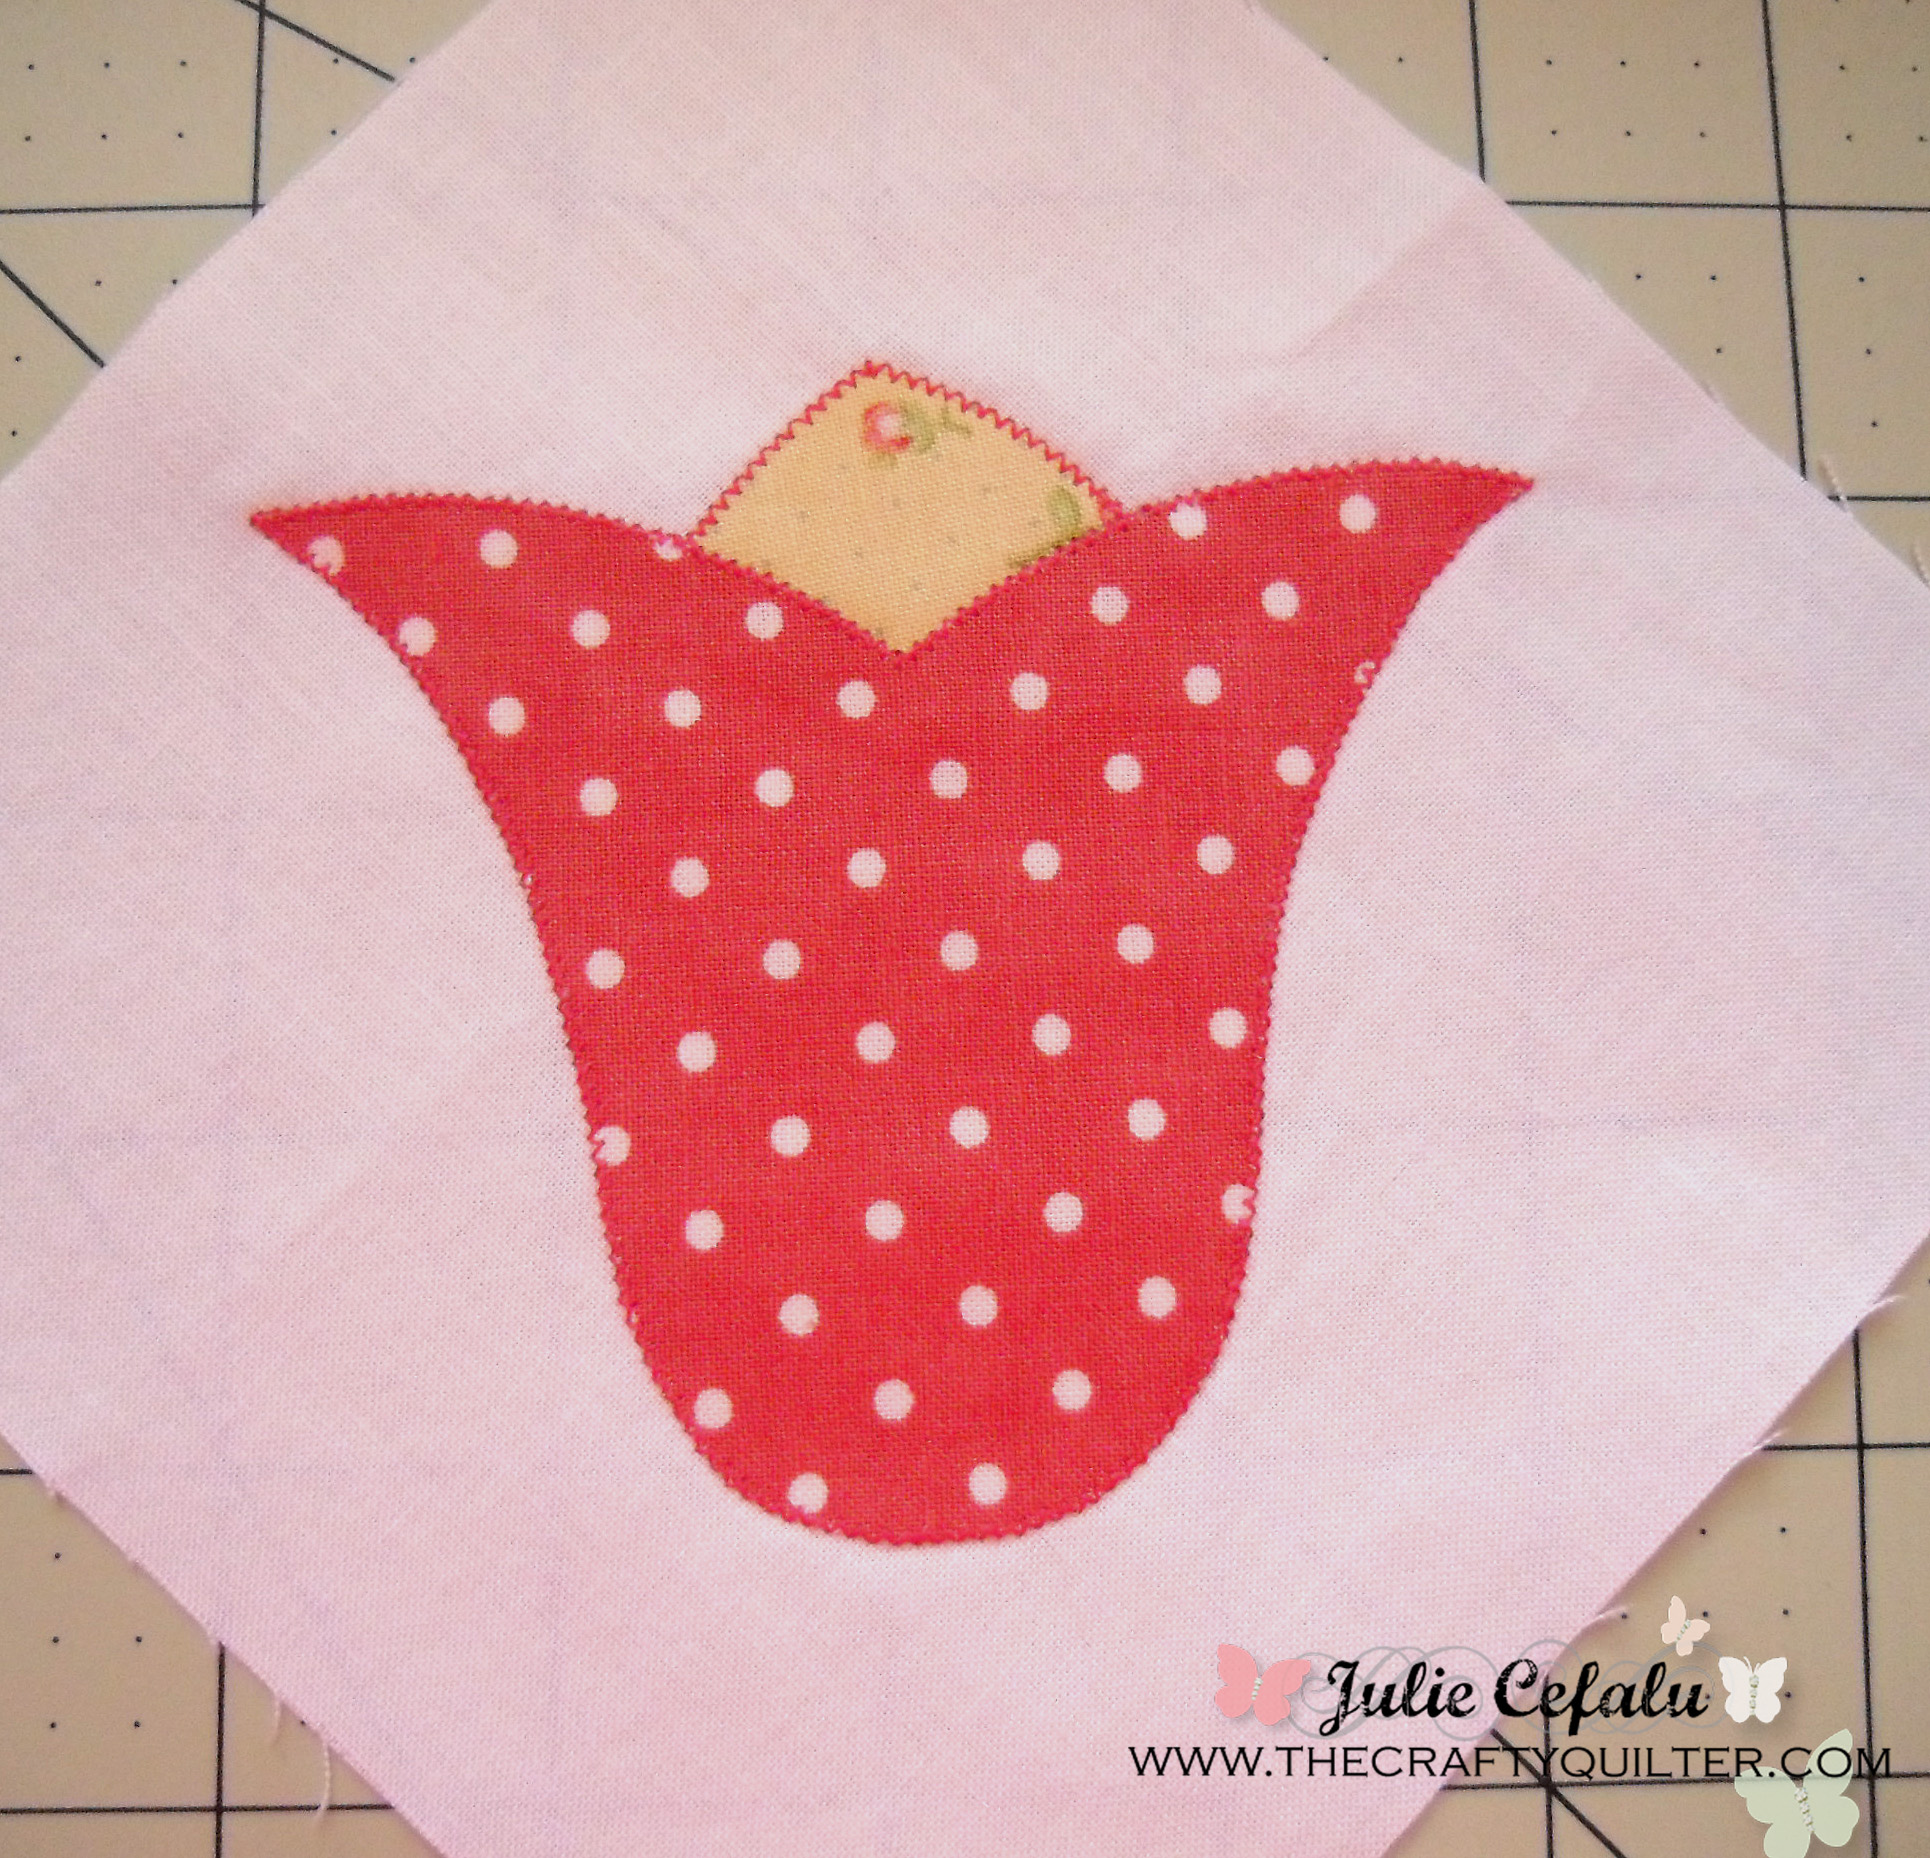
The most common stitches used for this step are the satin stitch and the blanket stitch. You could also use a straight stitch, but there is more likelihood of fraying to occur.
I am going to devote an entire lesson to this last step, the stitching of the applique. So stay tuned for Part 3 – we will be getting to know our machines a little bit better by playing with the stitches and the settings on our sewing machines.
Here is a printable card that you can save or print for future reference:
 [/print_this]
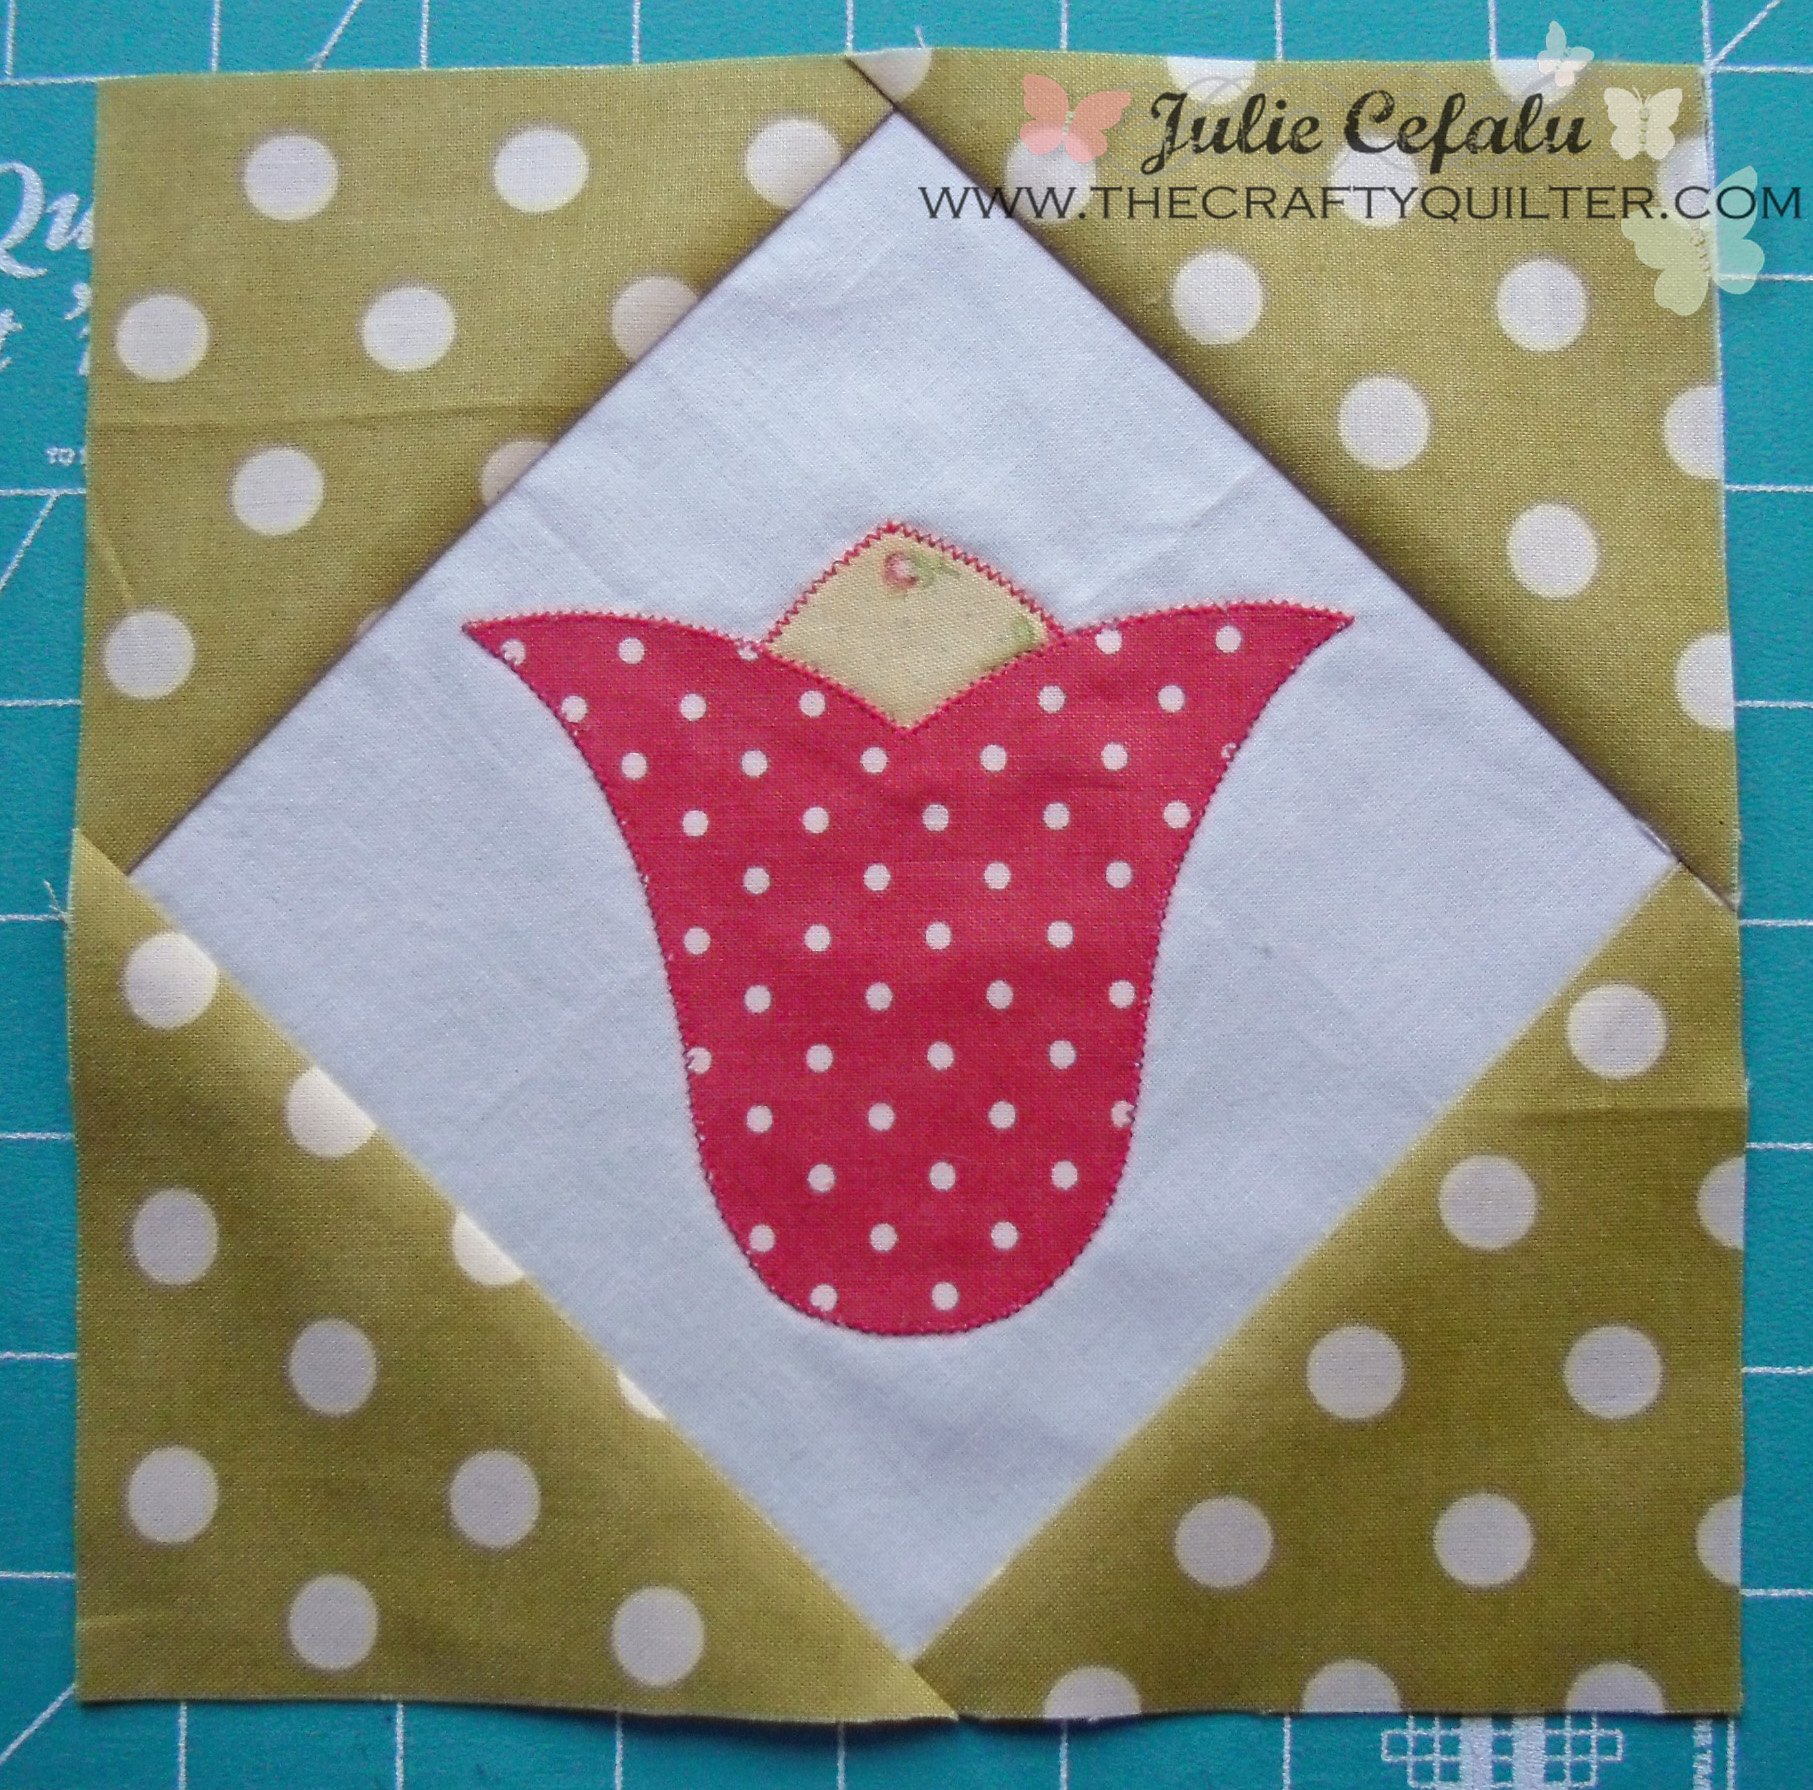
If you would like to make this little tulip block, start with a 6″ piece of background fabric. After you have stitched your tulip applique, trim the square to 5 1/2″. Cut (2) 4 1/2″ squares of fabric for the corner triangles, cutting them in half once on the diagonal. Stitch to each side. You’ll need a scrap of batting, a 9″ piece of backing fabric and a 2 1/2″ strip of binding fabric to finish it.

I think this little tulip block would be sweet in a bigger project, yes? Yes! I’ll be finishing up this series with a table runner filled with tulips perfect for spring! Yippee!

Discover more from The Crafty Quilter
Subscribe to get the latest posts sent to your email.


Working on my first applique quilt. Thanks for all your helpful hints, they helped me tremendously! I never would have thought to cut the middle of the fusible out.
Thank you for a great tutorial
Fantastic tutorials thank-you
This is a fantastic tutorial, thank you so much!
Julie, very detailed tutorial, Thank You! Sewing for over 40 years but new to quilting this past winter and totally addicted! A project I MUST make includes applique so I found your tut! I cant wait to dive in and practice the technique! I have a bazillion stitches on my new Viking 975Q so the opportunities are mind boggling!
Thanks, thanks, thanks. It´s been so useful to me.God bless your hands.
Hi Julie,
Great tutorial, I am looking for information on using Gold Metellic thread to applique in satin stich on my Bernina 440 do you have any suggestions. Regards Robyn
Hi Robyn, I would recommend using a Topstitch needle or a Metallic Needle – they have the biggest eye to reduce friction. Don’t stitch too fast and test out your stitches first on a practice piece. Good luck!
Wonderful tutorial! I loved the outcome!
Great post!! I included it in my post Βόλτα στη Γειτονιά #26 🙂
Have a great week!!
I love this tutorial and I love u.U seem to make it feel sooo easy………..its tempting to try with confidence
Oh, this is a wonderful follow up to your class, Julie! I’m so thankful to have found you as my teacher and that you share your talents with the world through your blog. I’m going to share this with my mom. She just told me this morning that she has always admired appliqué, but was afraid to try it. You will have her up and running in no time! 🙂
Thanks for making me look so good, Polly! It’s been a pleasure working with you and I can’t wait to see what you do next. I hope your mom gives applique a try!
Hi Julie, I’ve featured your Applique tutorial today… Threading Your Way Features
Such a detailed tutorial, that is so easy to follow, Julie!!!
No end to the creativity. Such fabulous fabrics, books, and tools for quilters. I have to plant my bulbs inside and outside. 🙂
I love love love applique and I am always looking to improve. Thank you for such a great post. I pinned!
Excellent tutorial. I am so grateful for the time and effort and knowledge you have shared here. I am in the middle of a self designed piece right now and have come to the point where I must deal with the applique parts! And since i know absolutely nothing about applique, you can’t imagine how happy I am to have your tutorials as a resource.
Thank you!
Beautifully written tutorial , and your tulip block is so pretty! I love your quilting on it, and look forward to seeing the table runner.
susie
Julie…this is GREAT!!! You have inspired me to pull out my applique project that I started about 2 years ago. This is very well written and illustrated. Thank you so much for doing this…
Such a great tutorial! I didn’t know about the new fusible product and will be trying it out soon, hopefully. I pinned this from the first photo!
Thank you Julie, this is so clear and well written. I also like the idea of the Teflon pressing sheet – a must when appliqueing. I always reverse any pieces on the applique sheet for my customers if the design is not symmetrical and note it on the pattern – it just makes life a little easier I find. I love the tulip block and will be making your runner.
This is a brilliant series.
Very well written and illustrated. I am going to give it a try!
Awesome post.
I have that Bloom kit and itching to start but must finish a few wips first.
Leona