Quilt As You Go Mug Rug Tutorial (with applique)
Hello everyone! I have an easy Quilt As You Go Mug Rug Tutorial to share with you today. Mug rugs are so fun and quick to make and they’re a great opportunity to try out a new skill. If you’ve never attempted a “quilt as you go” project, you’re in for a treat!

Are you wondering what quilt as you go means? That’s a legit question, so let me explain. For my technique (there are several ways to do this), you start by layering and basting the backing fabric and batting together. As you sew the strips of a quilt top together, you sew them onto the basted foundation. So, as you’re sewing the top, you’re also quilting through all the layers. When you’re done, all you have to do is trim the quilt sandwich and add the binding!

I’ve added applique to my mug rugs, but that’s optional. If you want to keep it simple, you could use novelty fabrics, gradated colors for an ombre affect, or seasonal colors. It’s a great way to use your leftover scraps!


Supplies
Mug Rug size: 6″ x 9″
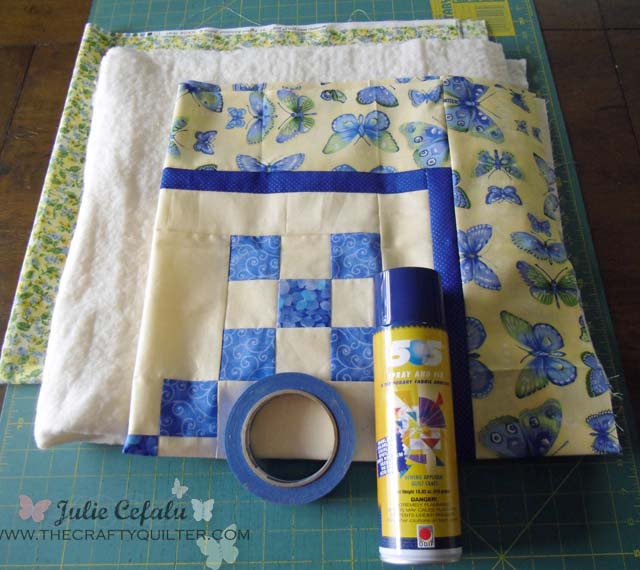
- Scraps of 7 different fabrics (at least 1 3/4″ wide)
- Backing fabric, 6 1/2″ x 9 1/2″
- Binding fabric, (1) strip of desired width
- Batting, 6 1/2″ x 9 1/2″ (I used Pellon Thermolam Plus, but any type of leftover batting is fine)
- Optional: Paper-backed fusible web product for applique (I love Heat ‘n Bond Lite)
- Optional: Print out templates (below) for applique

Cutting Instructions
- Backing and batting are both 6 1/2″ x 9 1/2″ rectangles
- Fabric scraps: (7) 1 3/4″ x 6 1/2″ rectangles
Quilt As You Go Technique
- Baste the backing and batting together. For this small project, you can use pins or a small amount of water-soluble glue or basting spray.
- Make sure your bobbin thread matches the backing fabric. The top thread can be a neutral color.
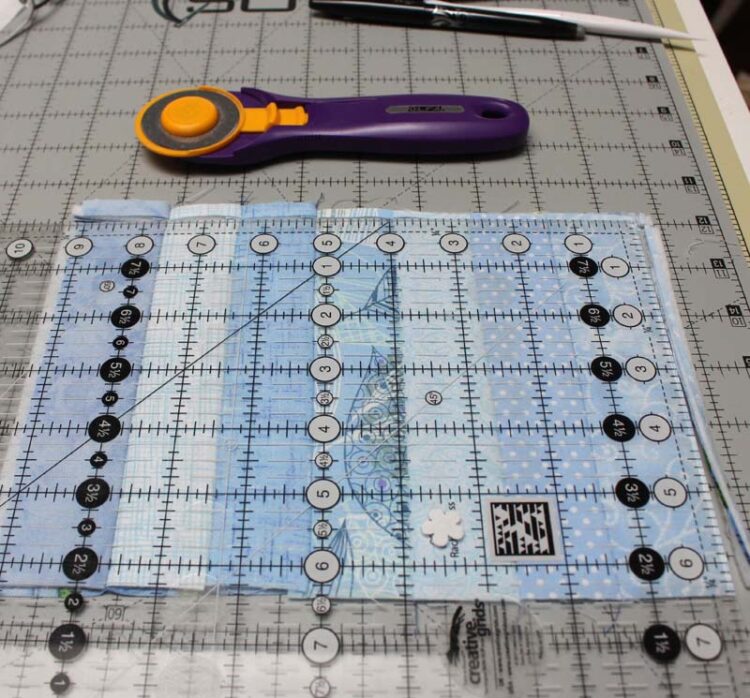
- We are going to work from the center out to the sides. Place the first 1 3/4″ x 6 1/2″ rectangle right side up along the center of the quilt sandwich. Make sure it’s straight and parallel to the sides.
- Place the second 1 3/4″ x 6 1/2″ rectangle right side down, on top of the first rectangle, matching the raw edges.
- Stitch through all layers with a 1/4″ seam. Use a walking foot if needed. I’m using the integrated dual feed on my Bernina 770.
- Finger-press the seam open or use a seam roller.

Take the next strip and repeat the process, working to the right of the quilt sandwich. When you get to the edge, there may be a little batting and backing that remains uncovered. It will get trimmed away later.


- Turn the quilt sandwich and add the remaining fabric strips to the other half in the same manner.
- Trim the quilt sandwich to a 6″ x 9″ rectangle.
- Baste around the edges, within 1/4″ of the raw edge, using a walking foot and long stitch length.

Applique
If desired, add applique to the mug rug. Fusible, raw-edge applique works great for this. If you need specific instructions for that, I have a separate blog post that you can refer to here.
For the applique templates, I included all of the shapes you see on this blog post, plus I added a cute pair of elephants. The link to the applique PDF is in the supplies section above. Print out the applique templates at actual size. Once printed, it will look like the ones below.
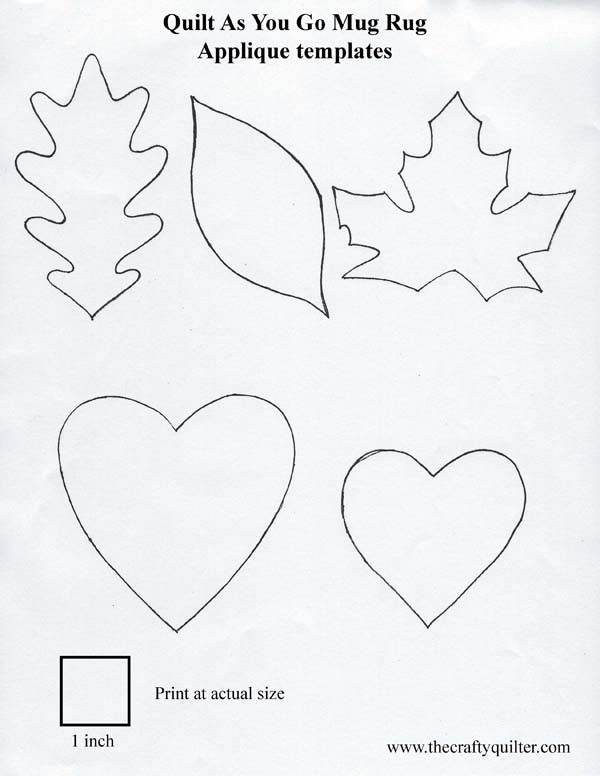

Once the applique shape is fused to the quilt, you will stitch the raw edges down with your favorite stitch. I used a zig zag stitch. This will also add to the quilting since it will go through all layers and show up on the back!


For the leaves, I added a little stem at the end of each applique shape. I switched to a semi-decorative stitch (#1348 on my Bernina 770), but you could also use a reinforced straight stitch or narrow zig zag.

Binding
You can add binding to the mug rug just as you would any quilt. I suggest a 2 1/4″ wide binding strip. If you want, you can try out single-fold binding. It will result in a flatter binding edge which is nice for this project.
I have a tutorial for single-fold binding and more at Mug Rug Binding Tips. For this technique, the binding strip is 1 1/4″ wide. I took photos of the process for this while making the black cat mug rug. You can get the general idea below:

I usually machine stitch the binding down on the second side, but for these mug rugs I did it by hand. I still love doing a little handwork when I can! And don’t forget to add a label if you have one. I ordered mine through Dutch Label Shop.


You may already know this about me, but I LOVE making mug rugs! This heart mug rug started with a request from my granddaughter, Amelia. She was using her Mom’s mug rug and needed one of her own. Of course I dropped everything and went to work on this sweet heart version. I think she likes it!

I hope you enjoy making these as much as I did. I should warn you that they can be addictive! It only takes about 4-6 hours to make one (which is a blink of the eye in the quilting time clock).

This quilt as you go mug rug is just in time for the holidays, and they make great gifts! If you need to clarify what a mug rug is for your recipient, check out this mug rug poem printable. Have fun creating!


Discover more from The Crafty Quilter
Subscribe to get the latest posts sent to your email.


I absolutely love this Quilt As You Go Mug Rug Tutorial! The appliqué adds such a delightful touch. I can’t wait to give this a try—perfect for using up my fabric scraps! Thank you for sharing such a clear and inspiring tutorial!
Beautiful Work!! Thank you so much for teaching and sharing! 🙂
This is great, Julie! Thank you for the tutorial! I especially like the cat silhouette.
Thank you for the templates; I love autumn leaves.
Everything you make is pretty and charming, but of all the delightful pictures on this page, Amelia is, and will always be, the loveliest.
Thank you for the mug rug patterns and tutorial. Love mug rugs.
Thank you for the patterns.
Thanks for the great tutorial Julie. These are so cute and I love the patterns!
Once again you have given us the cutest ideas to use. These will make nice thank you gifts for friends and neighbors during the holidays. A cup to match filled with tea bags and cookies will be a great gift to show how much appreciated they are to you. I think I will make one for myself too.
I can not find the link for the templates.
Hi Patti,
If you’re viewing this blog post on a desk top computer, the pdf link should show up. If you’re on a mobile device, it may show up as the image that you can tap and hold to download or save. Also, if you’re reading this in an email or other type of feed, you may need to click on the blog post title to read it in a browser.
I hope that solves the problem! Julie
cute- OFCOURSE. I’d like to make on or 2 and use my accu quilt dies–I just might do that! thanks!!
These are as cute as can be, the leaf one really speaks to me!
LOVE these mug rugs, especially the quilt-as-you-go method. Now why didn’t I think of that? However, I couldn’t find a link to print the appliqué shapes. Thanks so much for sharing.
Thank You for the pattern and templates. The little poem is too cute! Perfect for people who do not sew and have no idea what a mug rug is.
HI
I have made mug rugs before and I have seen cute poems to go along with them, but have never seen a poem in the shape of a Christmas tree. Thanks for sharing!
Julie, thank you for the patterns. We are a cat crazy household!
Amelia is a little doll.
Adorable! Thank you so much for the tutorial.
Thank you. These are cute. I’ve made many mug rugs, but not qayg.
Thank you so much for the mug rug patterns….going to start them today.
Thank you so much I love them
Hello Julie!
This is such a cute mug rug! I’m going to make them for my granddaughters tomorrow! Thank you!
-Jean ❤
What a great post Julie; I love the mug rugs, poem and patterns. I know just who I am going to make this for. Thanks so much.