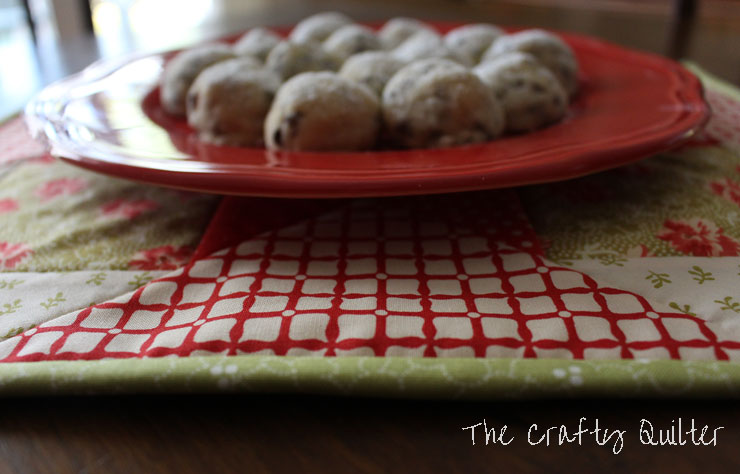
Christmas Once a Month, Cookie Plate Crumb Catcher
It’s October and we have a little over two months left before the big day! Seriously folks, Christmas will be here before you know it! This month’s Christmas Once a Month project is a Cookie Plate Crumb Catcher.
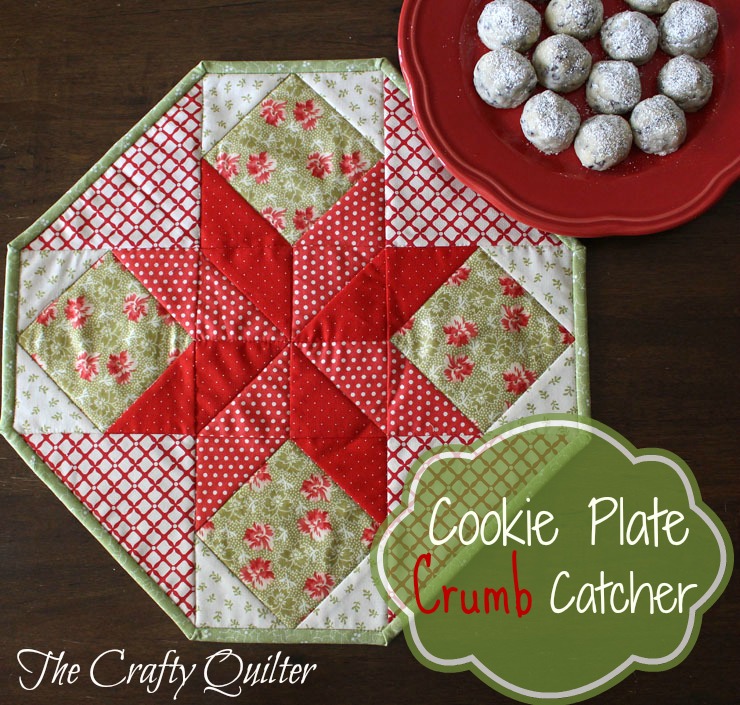 Yes, that would be a special quilt to keep your cookie plate company and catch any stray crumbs that may fall its way!
 I think every plate of cookies deserves a good crumb catcher!
These little quilts would be perfect for a hostess gift or make a bunch for co-workers and family members. And they are just the right size for placemats if you wanted.
 The following is a tutorial for you that shows every step needed to make your own crumb catcher. If you want to download a shortened pdf file to print out, then you can find it here: Cookie Plate Crumb Catcher
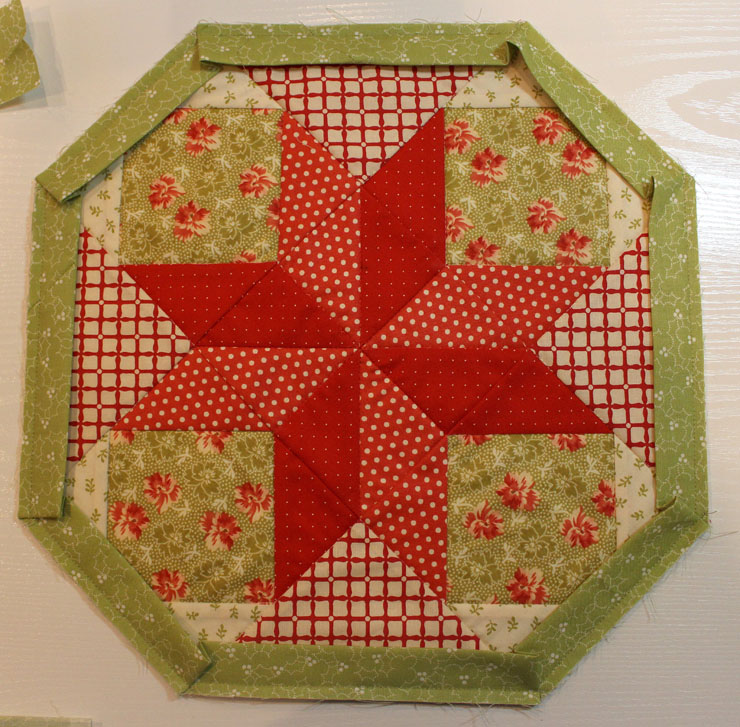
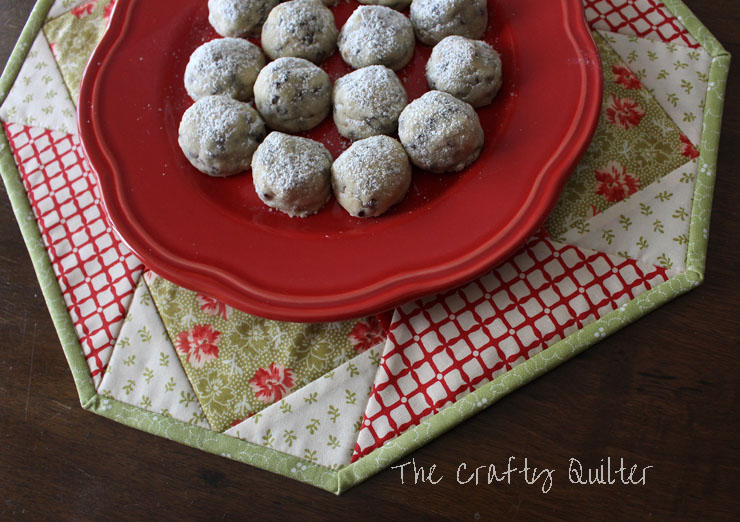
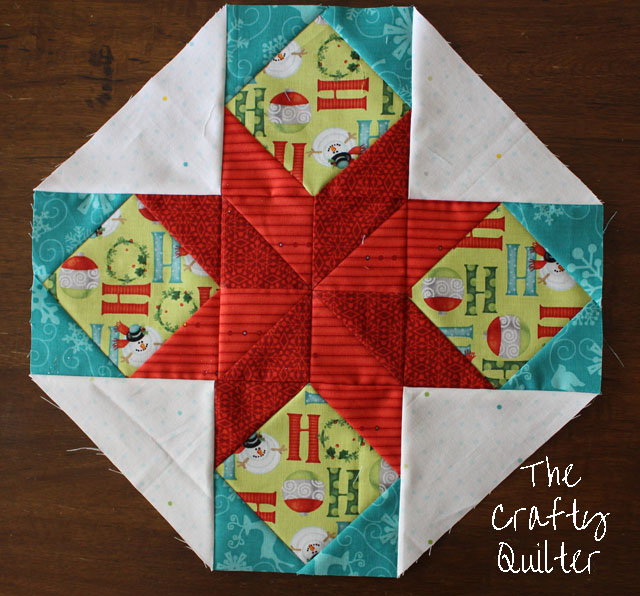
Cookie Plate Crumb Catcher, finished size: 15″ diameter
Supplies:
- Fabric A (red): 1/8 yard
- Fabric B (red polka dot): 1/8 yard
- Fabric C (green floral): 1/4 yard
- Fabric D (white print): 1/8 yard
- Fabric E (red/white check): 1 fat quarter
- Backing: 1 fat quarter
- Binding: 1/4 yard
- Batting: Scrap, 18″ square
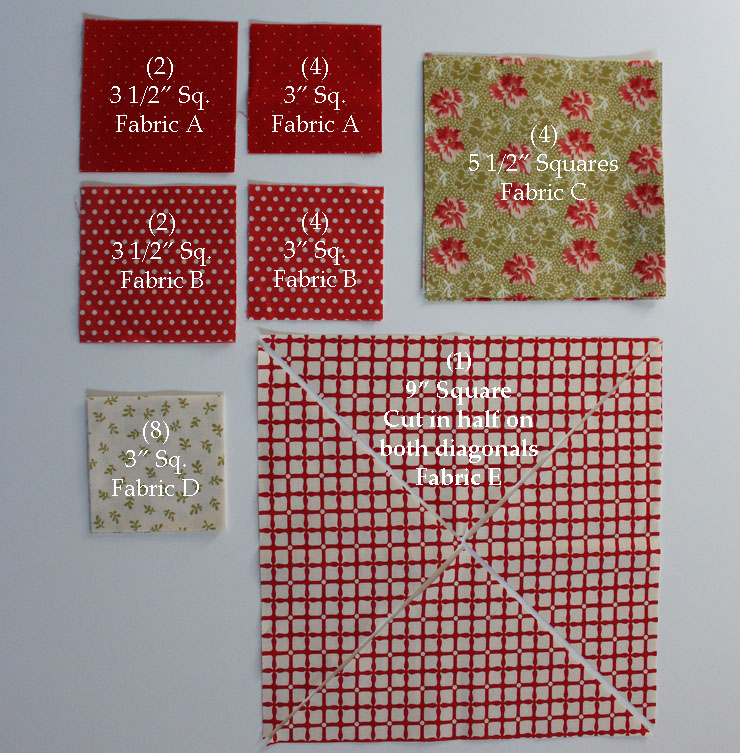
Cutting Instructions:
- Fabric A: Cut (2) 3 ½” squares; cut (4) 3” squares
- Fabric B: Cut (2) 3 ½” squares; cut (4) 3” squares
- Fabric C: Cut (4) 5 ½” squares
- Fabric D: Cut (8) 3” squares
- Fabric E: Cut (1) 9” square, subcut on both diagonals to make 4 setting triangles
 Piecing Instructions:
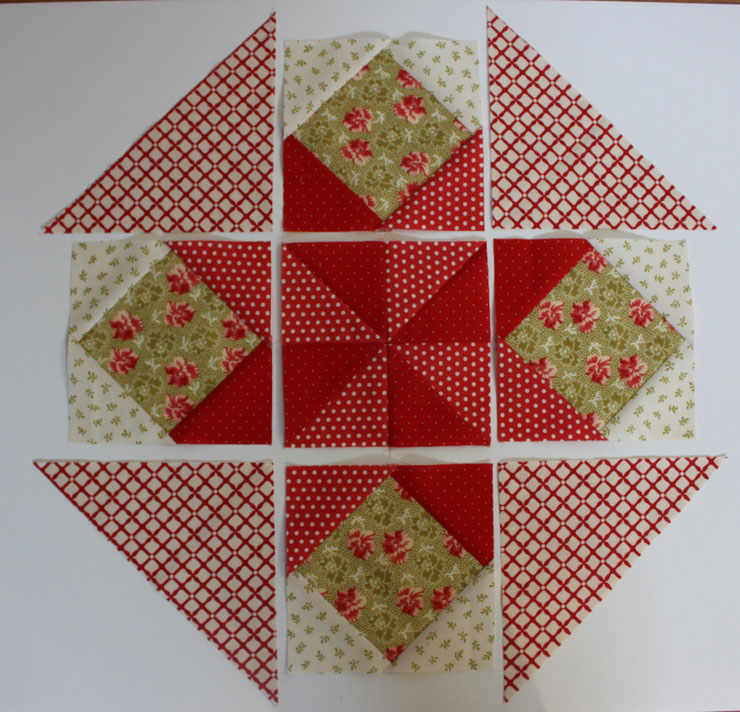
Note: You will be making 1 pinwheel unit and 4 square-in-a-square units. They will all measure 5 1/2″ (unfinished). You can use your preferred method to make these units, but adjust the cutting instructions as needed. I will be using mostly traditional methods for this tutorial such as “stitch and flip” for the square-in-a-square units.
All seam allowances are 1/4″.
Make pinwheel block:
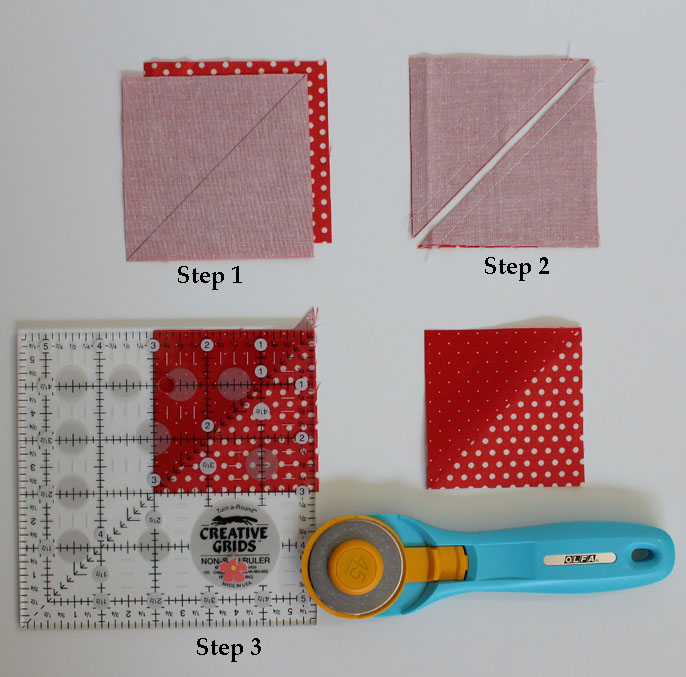
1. Draw a diagonal line on wrong side of Fabric B 3 ½” squares.
2. Layer Fabric A and B 3 ½” squares, right sides together and sew ¼” from each side of diagonal line. Cut on drawn line and press towards dark fabric.
3. Trim to 3” squares. (They should be slightly over-sized before trimming).
 4. Arrange half-square triangles to form a pinwheel. Stitch squares together into pairs and then stitch pairs together to form (1) 5 ½” unfinished pinwheel block.
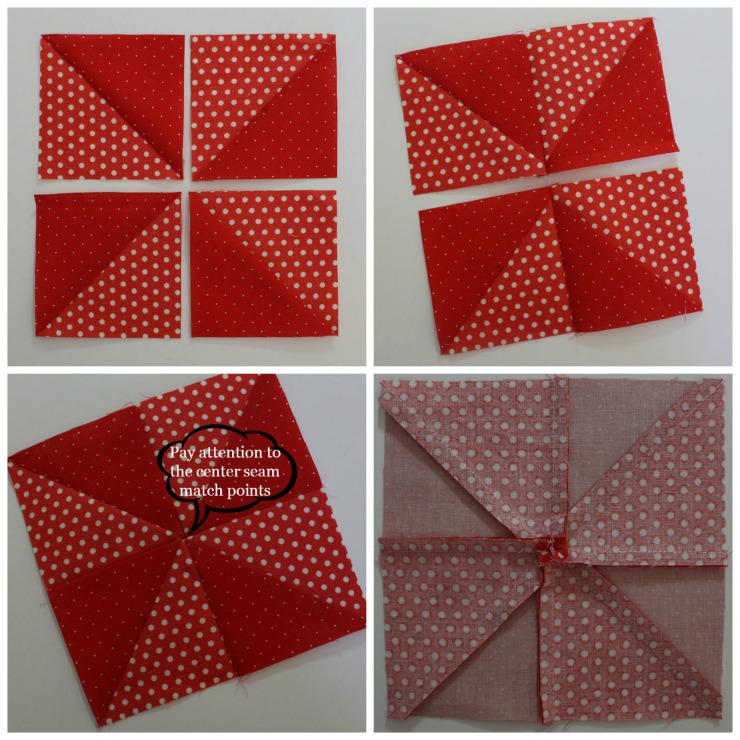 5. Notice how I pressed the seams in the last photo above. The final seam can be pressed so that half of it is up and the other half is down. You need to twist the center a bit to “pop” the stitches open to allow it to spiral. This gives you a flatter center intersection when pressed.
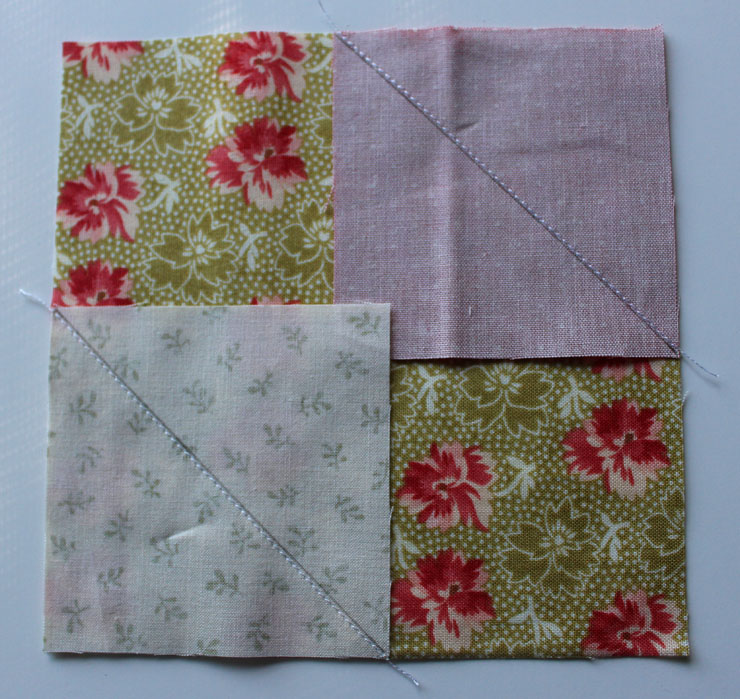
Make square-in-a-square units:
1. Draw a diagonal line on wrong side of each 3” square from Fabrics A, B, and D. Place Fabric A square on upper right corner of Fabric C (5 ½”) square. Sew just next to the drawn diagonal line. (This allows space for the thread and fold-over fabric).
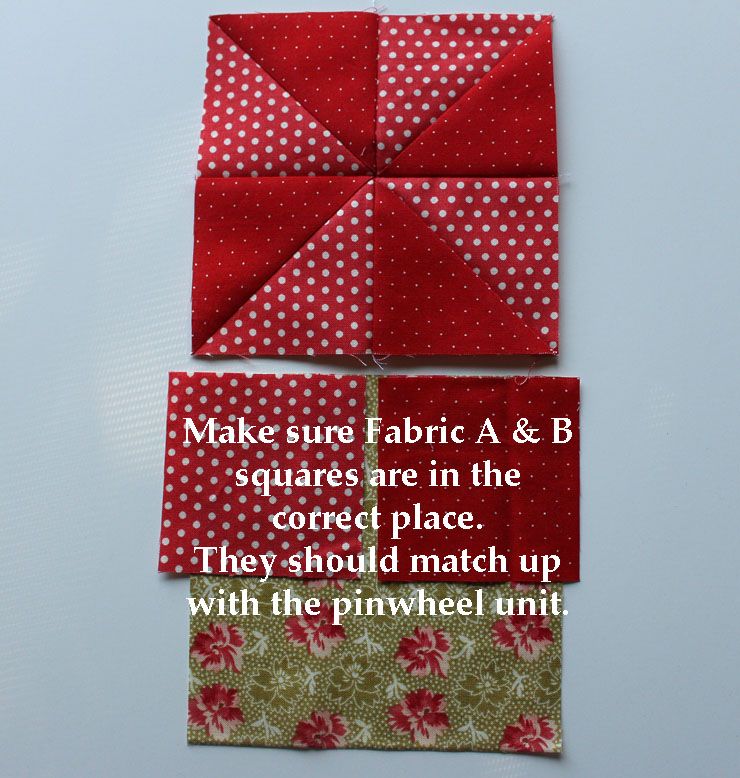
 2. Make sure that you have the correct color placement of squares in the upper corners. You want to match the colors with the pinwheel block so that you get a star when it’s all put together.
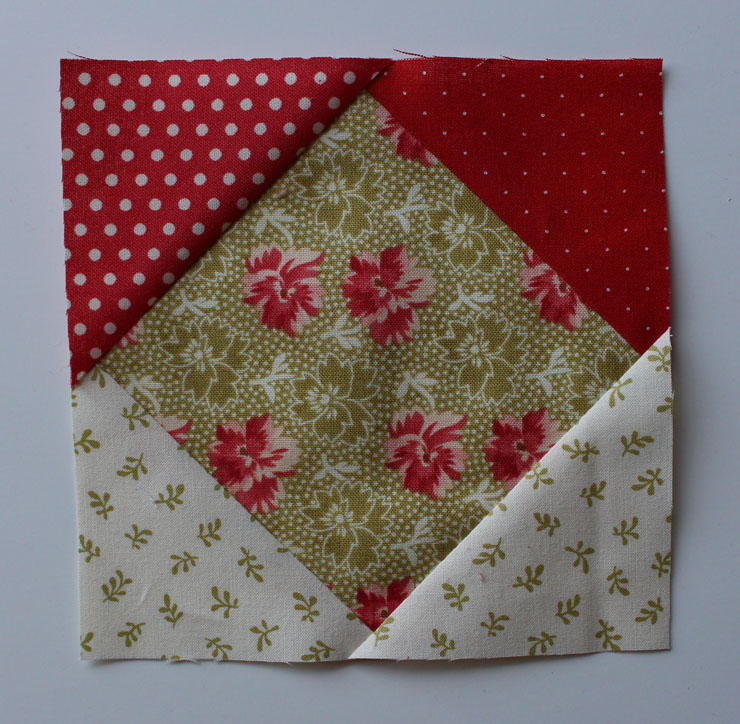
 3. Press towards corner and trim excess fabric.
4. Repeat for remaining corner squares. Make 4 square-in-a-square blocks.
 As an alternate method, you can use my Perfect square-in-a-square technique to make these units.
Assemble quilt top:
Place the pinwheel unit, the 4 square-in-a-square units and the setting triangles into rows as shown below:
 Stitch the rows together.
Press the top and bottom row seams toward the setting triangles and press the center row seams toward the middle.
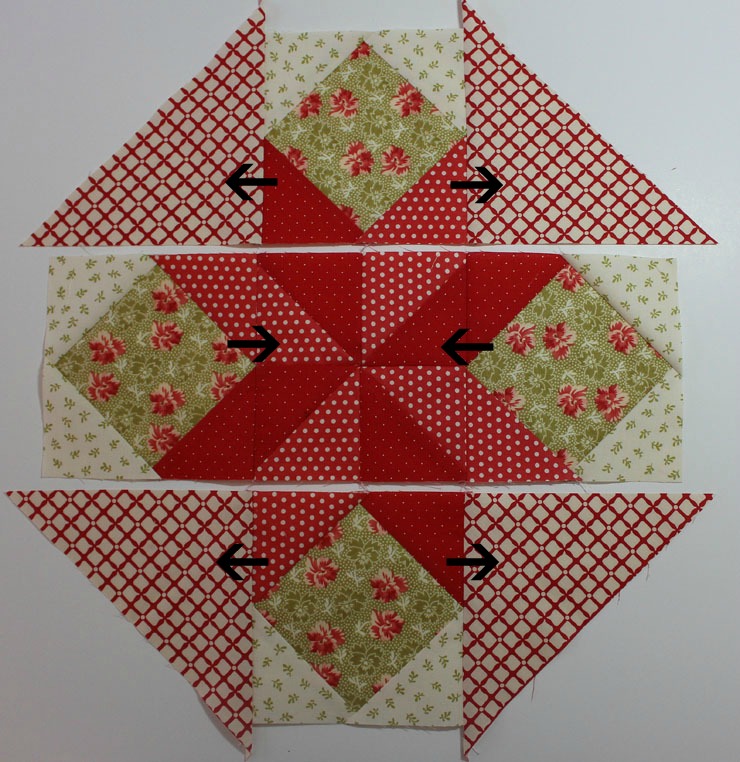 Join rows together, matching seam intersections. Press seams to the outside.
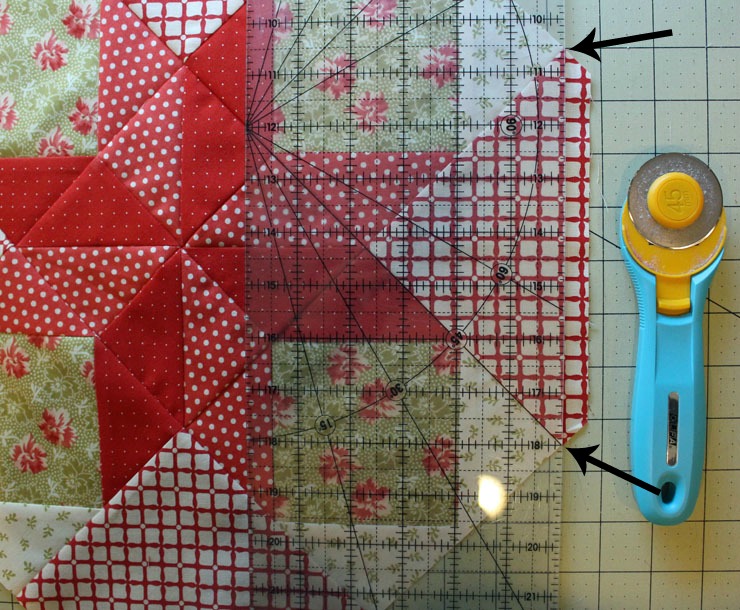
The setting triangles are over-sized so you need to trim them. First, trim the points that hang over the short sides:
 Then trim the long edge of the setting triangles so that they are even with the seams:
 Now you’re ready to baste and quilt!
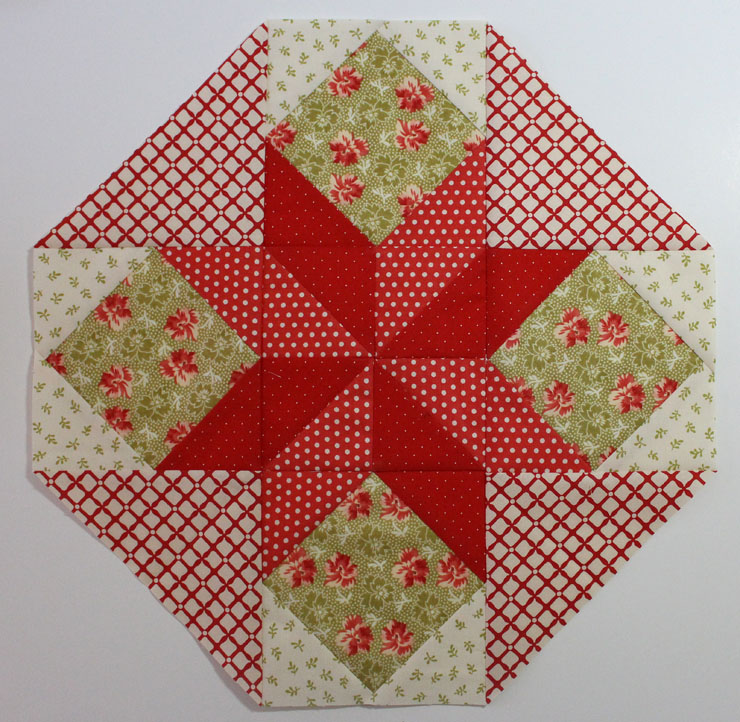 I simply stitched in the ditch for my quilting. Nothing too fancy, but feel free to get creative!
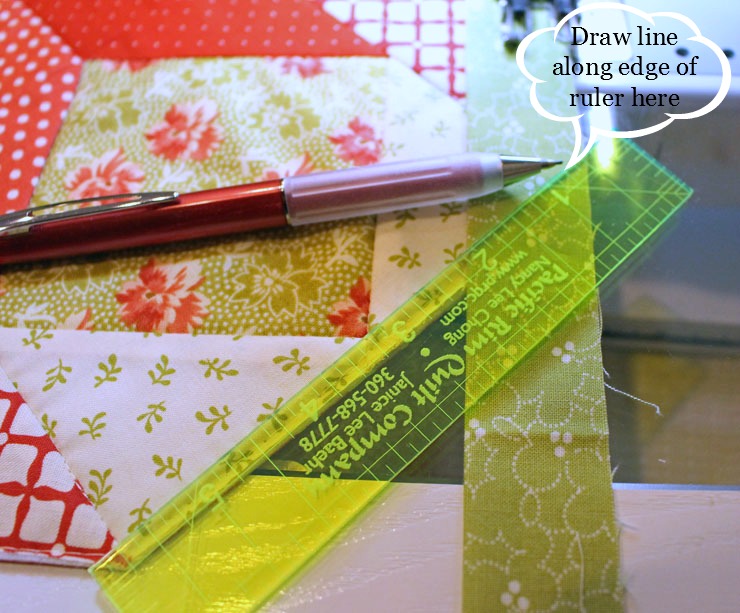
The last thing you need to do is add the binding. You have some odd corners here. They’re at a 45 degree angle (rather than 90) and you’ll need to approach them a little differently. Here’s how I do it:
As I approach the corner, I draw a 1/4″ line on the binding that follows the next side of the quilt that I’ll be turning on to. This will give you a pivot point.
 When you reach the pencil line, stop and pivot. Then stitch out to the edge.
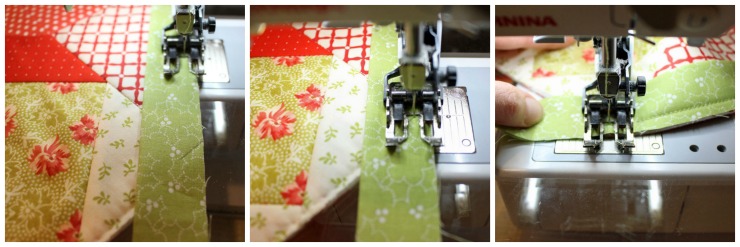 Remove the quilt and clip the threads. Now rotate the quilt/binding so that you’re working on the next side. Flip the binding up and away from the quilt (the raw edges should form a straight line) and then fold the binding back down on itself so that the folded top edge is even with the corner. Continue sewing to the next corner.
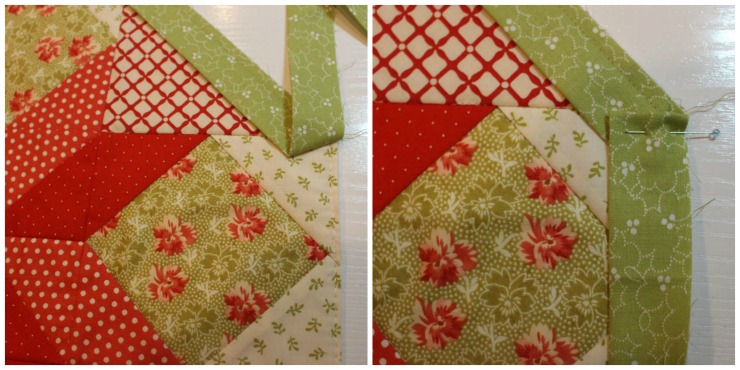 When you’re done sewing, the corners will look like this from the front:
 When you fold the binding to the back of the quilt, there will be a very small miter that you make on the back side. Sorry, I don’t have a picture, but this is what it will look like from the front:
 I love this project because it’s small and quick to make. You don’t need a big investment in time or material. Plus it’s so versatile!

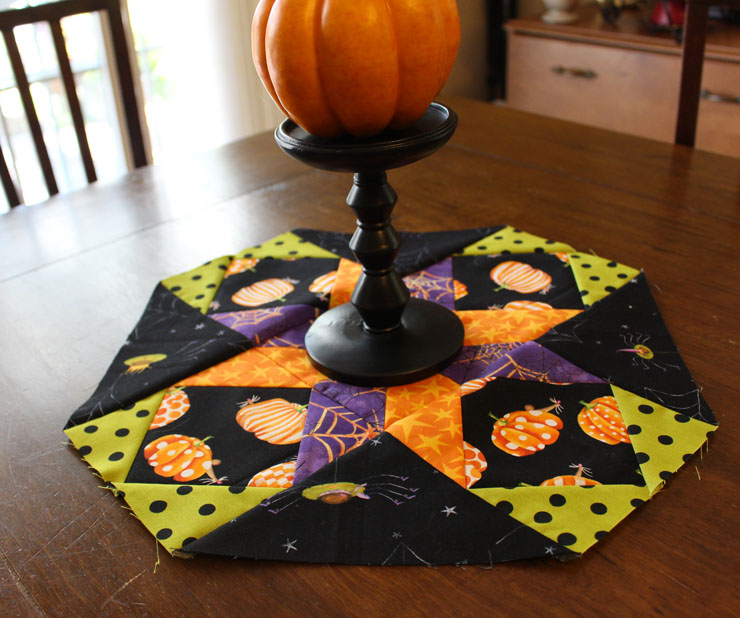
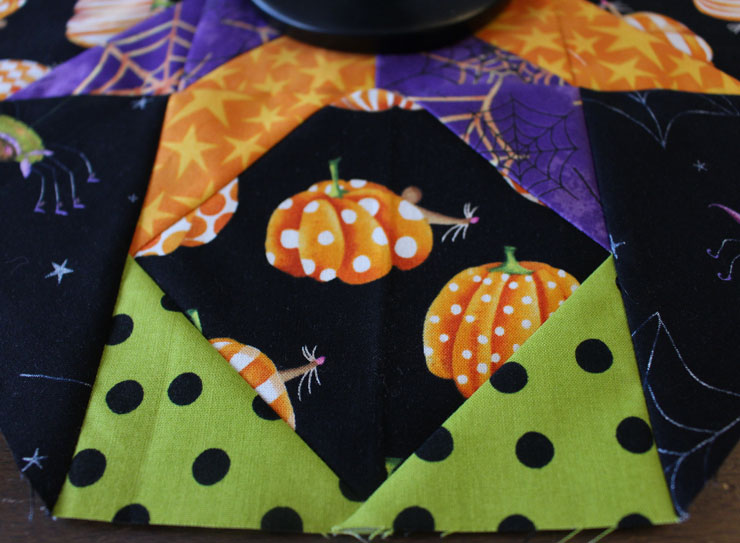
And you don’t need to wait for Christmas to put this little quilt to good use. Halloween, here I come!
 I LOVE the mouse’s nose peeking out behind the pumpkin:
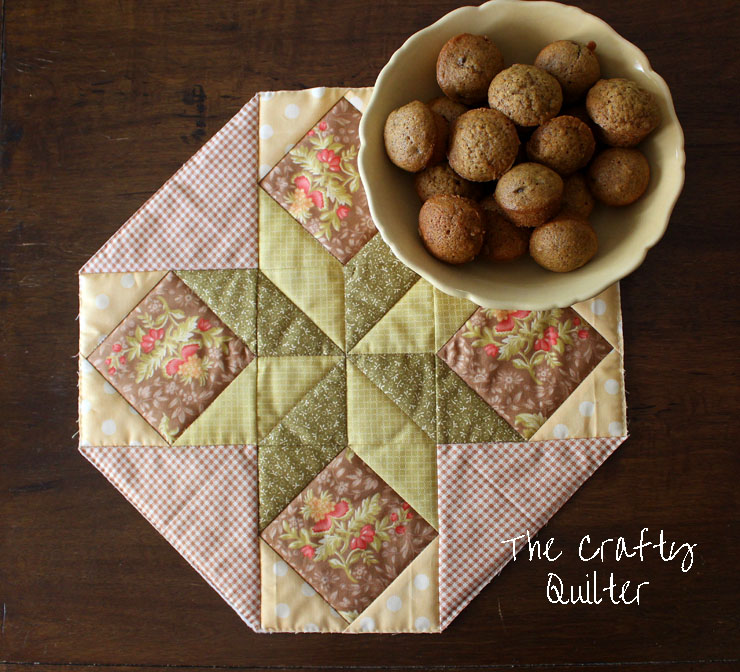
 And then there’s this soft Fall version. And I had to make some pumpkin mini muffins just for this photo shoot! I’m a real trooper that way!
And still more Christmas versions. Notice how the fabric choices emphasize a “plus” shape:
 Oh, but don’t forget the candy:
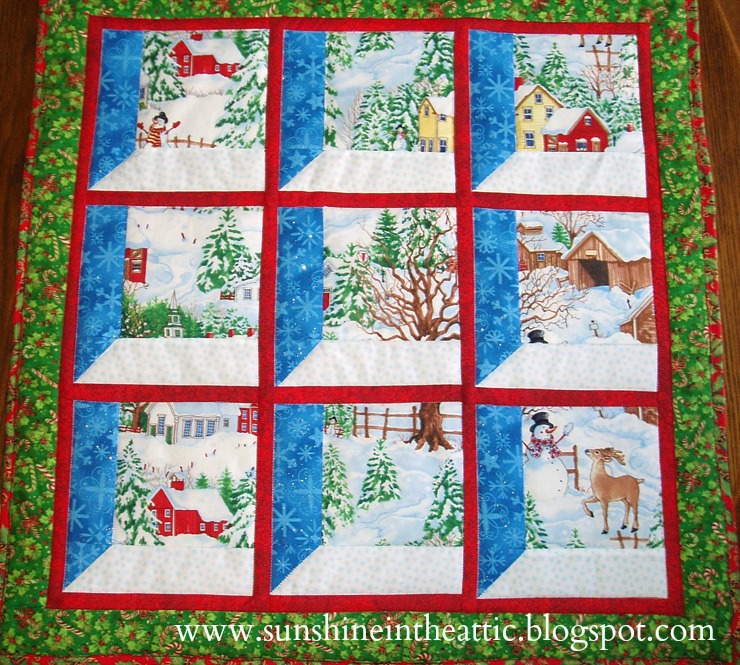
 And here’s a classic Christmas version:
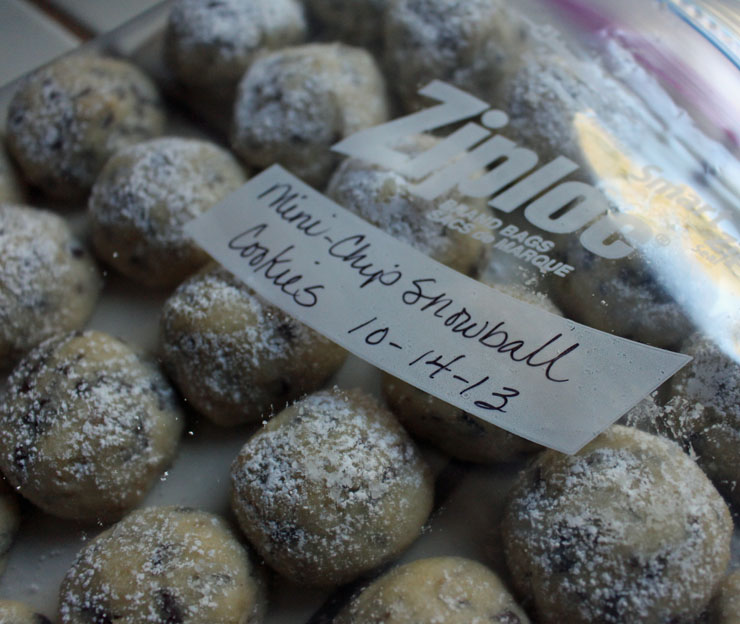
 And since you’ve stayed with me to the end of this vast tutorial, I want to reward you with a few cookie recipes! The snowball cookies that are pictured in the original version came from my best friends at Nestle Toll House: Mini-chip Snowball Cookies.
Another favorite Christmas cookie is the Candy Cane Kiss Cookie from Our Best Bites. Simply delicious!

I make my Christmas cookies in November and freeze them. They will last three months in the freezer. I place them in Ziploc freezer bags and squirrel them away until it’s time to eat them give them away.
 What do you think of having a cookie exchange on my blog? Maybe a linky party with our favorite Christmas cookies! Or, I could just do a round-up of cookie recipes that I find out there in blogland.
In the meantime, get your cookie plate crumb catchers ready!


Discover more from The Crafty Quilter
Subscribe to get the latest posts sent to your email.
I love this idea. And such pretty examples. Thanks so much.
Thank you for inspiring the perfect little gift for friends. Your suggestions for quilted projects are always one step ahead of my thought processes and such a gift when I find your clearly written directions with pictures….and the added bonus recipe made this extra special.
Thank you for taking the time to be there with great quilting projects for all of us.
I am a longtime fan of your blog! As I was getting ready to make this pattern, I noticed a possible error. Shouldn’t the larger fabric A blocks begin at 3-7/8 inches, rather than 3-1/2?
I am so glad I found you – everything looks stunning. I want to make it all. Great tutorials always!
Your work is beautiful! Thank you for sharing your talents with us! God bless you.
Love your site (passed on to me by my Sister in New Zealand) – I am new at quilting and made this quite quickly – great photos and explanations all the way through – many thanks!
Thank you for a cute design and great tutorial.
Patricia C
Awesome, detailed instructions. Left nothing to imagine or make wrong. Thank you for your patience and details.
I love your Cookie Plate Crumb Catcher!! I am in the process of making three of them for Christmas presents. You have done an excellent job of making the directions clear and I appreciate your tip on the binding! Thanks a lot for the pattern and have a wonderful Christmas!
I just made two of these cookie plate crumb catchers and they are adorable. Your totorial is so well done and very easy to follow. Thank you so much for sharing and wish you and your family a Very Merry Christmas and looking forward to some new patterns in the new year.
Great project! Thanks for sharing it.
Thanks for sharing, I love this!
Was always afraid to try these but after seeing your great directions and pictures I am going to make one.
Thank you soo much.
I found your blog and these gorgeous patterns on Kris’s Freebies blog. Thank you so much for sharing them, and for putting all that effort into taking so many photos for the tutorial. It makes such a difference to have explicit instructions for any projects like this!
I love these, but I am so new to quilting, I wonder if you have a pic of back of one these anywhere?
Thanks!
Thanks soooo very much for the pic! I can see where I got all worried when trimming and accidently cut off a corner, now I see I was supposed to.
Got you message, but this is the only way I know to answer. Anyway, I’ll probably be linking to you again next week as I have just made your cookie crumb catcher. What a great idea. I love it and want to make more.
Thank you so much for sharing your pattern!
Thank you. This is adorable and look forward to making it. Hope it looks almost as nice as yours.
So very nice. I will really enjoy making this for gifts!! Thanks so much.
What a fun project, thanks for sharing. Great for gifts.
These are so cute! Thank you for the tutorial!
What a great project and tutorial. I’ll be digging in my stash tomorrow. Neat idea and pattern. Thanks!
Julie, congrats on this tutorial being included in The Quilt Show newsletter today. WOW! I always read your blog when I get my notification and don’t post as often as I should to let you know that I appreciate all the effort you put into creating a great blog for us – it’s always fun, informative, and infectious. Each time you talk about your children, I miss my daughter more and more. My son lives near and she lives far away. She’s a math teacher with two young sons and a long-hour working hubby who is also working on his doctorate. So, we don’t get a chance to communicate as much as this grandma would like. Again, thank for your great blog and congrats – well deserved.
Love it! I can see this in different color ways for gifts.
Thank you for the tut!
Thank You! I agree what a wonderful gift idea, esp. for co-workers. Excited for your upcoming ideas. Thanks, again.
Trudy
Glad i found you. Better late than never
Happy and grateful i found you. Better late than never.
Oh! And thank you for the tutorial in pdf format, with a link back to your blog page. . . so nice of you to go through that trouble so I don’t have to put everything in a Word document like I usually do for stuff I want to save. You’ve made it so easy!
I love this! And I love your blog! I’m putting you on my feed list next 🙂
Thank you for sharing.
Thank you for your pattern! i need to make a ‘table runner’ for a friend with a square table. I think I can enlarge this and it will be perfect! I like that you took the time to show different versions, too. So inspiring.
Beautiful!! Thanks for sharing 🙂
I love your crumb catcher, what a great gift idea! Thank you for the tutorial.
Beautiful work Julie and a fantastic tutorial! Your photos are awesome as usual! Thanks for sharing.
Freemotion by the River Linky Party Tuesday
What a cute idea! Making a catcher will give me a reason to have a plate of cookies around!
And thanks for the tutorial on the 45 degree binding. I am assuming you can use the same process for 60 degree, etc. I always have to fake it but now I have clear instructions!
Great tute, adding it to my Xmas ‘to do’ list 😀
So pretty and thank you for the very clear tutorial …these are the kind that I need 🙂
Muchas gracias !! Es fantaástico
Saludos
Elena (España)
LOVELY. LOVELY. LOVELY. So creative. Thank you.
WOW! So versatile. Thank you.
I love this! Thank you for the tutorial! I would love the idea of tried and true recipes too. Happy weekend!
I made one! There will definitely be more of these in my future. Thanks for the easy to follow tutorial.
http://sewystuff.blogspot.com/2013/10/lot-of-firsts.html
These are absolutely adorable! They will fit the perfect bill for Holiday Gifts.
Thanks for sharing,
Julie, this is just awesome! I love the size and the pattern is really spectacular. It’s so interesting for such a relatively small space.
I’m so glad you linked this up with Needle and Thread Thursday!
🙂 Kelly @ My Quilt Infatuation
It’s so sweet your post! Thanks for the tuto, I like so much this idea, but I need your talent to match the right fabrics!
Very darling and love that you coined a new name for a little mat! I was looking for mugs the other day (gifts to go with mug rugs) and saw some cute little plates. Now those cute plates will have there perfect place too!
Thanks , a great post. Very motivating, I’m so going to be organised this Christmas. Off to check out some Christmas fabric before all the good ones go.
This is so cute! Thanks for the design.
I love it in all the versions that you show. Thank you!
I love every version! Honestly, the featured one would look great all year round. Thanks for another winner, Julie!
I love these! I just bought a whole bunch of random Christmas fat quarters. Now I know what I am going to do with (at least some of) them! Great tutorial, easy to follow. THANKS!
WOW – you have been busy. What a lovely, versatile make. Thank you for sharing.
xxx
I love the crumb catcher mat. Your tutorials are totally
AWESOME! Besides great instructions, the photos are done
so beautifully. Thanks a bunch. It is a lot of work to
put it all together. You are so talented!!!!!!!!!!!!!!!
Thank you. This is spectacular. Each version you made is beautiful.
Thanks so much for the tutorial. This came at just the right time. I was looking for a little something to make for a friend, and this will be perfect!
Thank you for taking the time to make such a great tutorial of your crumb catcher! Your ideas are so inspiring. I can’t wait to get started on making some up as gifts for my friends and family!
Julie: you have the best quilting site and I can leave a comment. The above is a great idea and I will have to make some for Xmas. I have saved many of your projects just need more time to play. Thanks Sandi
Wow, you have been busy, what a beautiful pattern, thanks so much for sharing.
The cookies look delish! Great Christmas gifts.
Oh, my goodness! You have REALLY outdone yourself! Those toppers are all sew sweet – and so are the goodies on display. Thank you so much for sharing all your fabulous ideas with us. Hope you don’t mind if I share this, with a link back, on my facebook page at http://facebook.com/sewfreshquilts
This is such a pretty pattern…. and so versatile for any season! Your fabrics are so pretty. I love the block, and the size! And of course, your excellent tutorial!!
Thanks for this gift idea, too.
Susie
What a great tutorial and an adorable project! Thanks!
Very, very nice Julie. These look like they are really fun to make and what a great gift idea. Thank you so much for sharing.